# Fortigate 防火牆
# VPN相關
# MPLS + Internet IPSEC SDWAN 設定
### **設計概念 :**
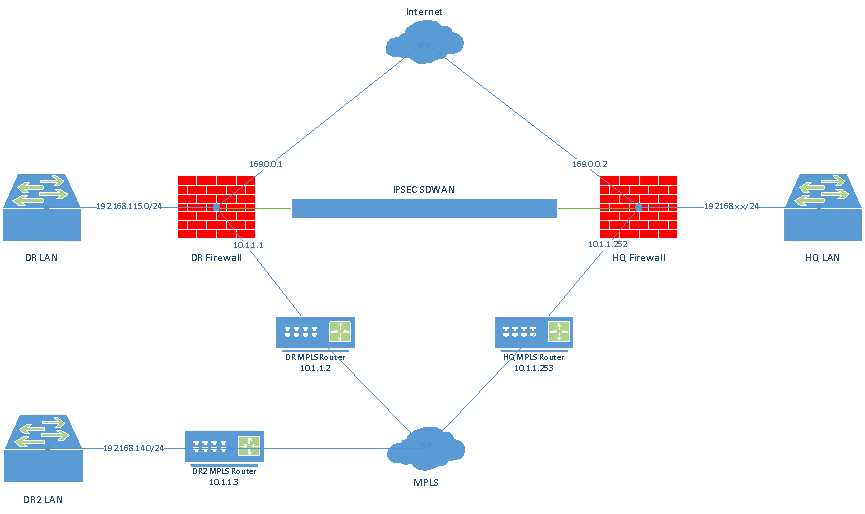
HQ透過MPLS連線到各分點,同時針對某些較重要的分點透過MPLS+Internet 建立雙線備援,以防網路連線中斷。
#### **一、概念架構圖。**
[](https://mdfk.goddamn.idv.tw/uploads/images/gallery/2024-06/image.png)
#### **二、先設定好 MPLS、Internet Interface與路由。**
HQ Interface設定:
[](https://mdfk.goddamn.idv.tw/uploads/images/gallery/2024-06/eXximage.png)
[](https://mdfk.goddamn.idv.tw/uploads/images/gallery/2024-06/m2Zimage.png)
HQ 路由:
[](https://mdfk.goddamn.idv.tw/uploads/images/gallery/2024-06/Oj8image.png)
[](https://mdfk.goddamn.idv.tw/uploads/images/gallery/2024-06/BTlimage.png)
Internet Interface與路由請比照MPLS設定,DR端亦然
至於到其他分點的路由就照常設定MPLS的Static Route即可
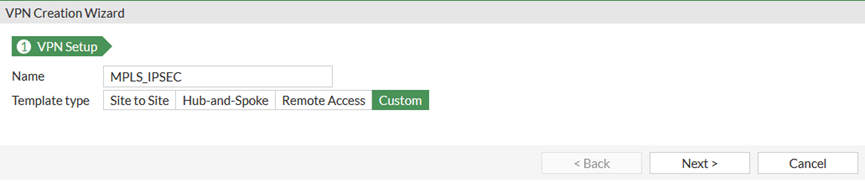
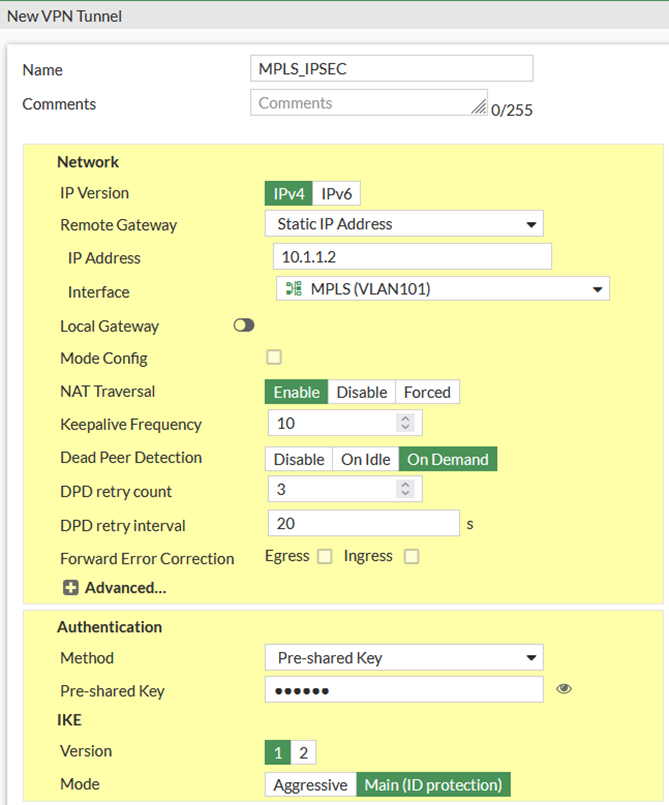
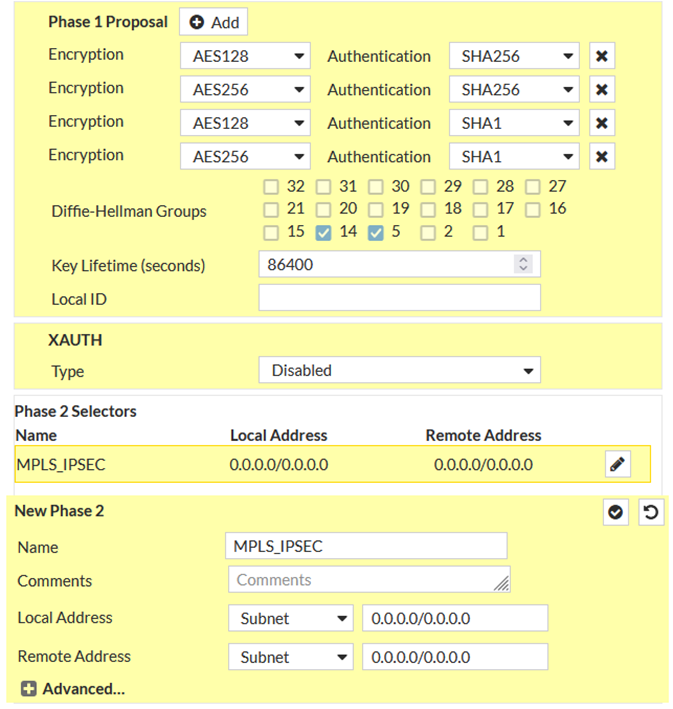
#### **三、設定MPLS、Internet到DR的IPSEC VPN,使用自定義模式。**
以下僅用MPLS IPSEC示範,Internet IPSEC請自行比照設定
[](https://mdfk.goddamn.idv.tw/uploads/images/gallery/2024-06/mpfimage.png)
[](https://mdfk.goddamn.idv.tw/uploads/images/gallery/2024-06/d5jimage.png)
[](https://mdfk.goddamn.idv.tw/uploads/images/gallery/2024-06/BgEimage.png)
兩條IPSEC建立好之後如下圖
[](https://mdfk.goddamn.idv.tw/uploads/images/gallery/2024-06/8OUimage.png)
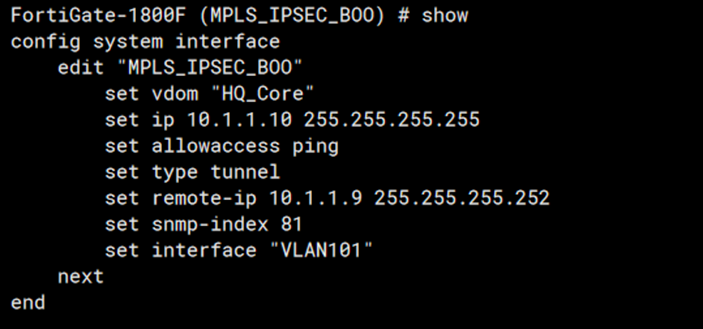
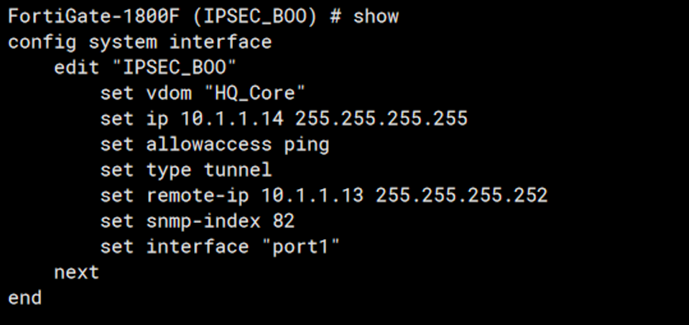
#### **五、至Interface將VPN介面設定IP,兩邊的設備互相設定**
[](https://mdfk.goddamn.idv.tw/uploads/images/gallery/2024-06/GKyimage.png)
[](https://mdfk.goddamn.idv.tw/uploads/images/gallery/2024-06/0Puimage.png)
FortiOS 7.0版會出現錯誤,使用CLI設定
[](https://mdfk.goddamn.idv.tw/uploads/images/gallery/2024-06/bJqimage.png)
[](https://mdfk.goddamn.idv.tw/uploads/images/gallery/2024-06/6HJimage.png)
**注意 !! **此處設定IPSEC VPN Interface的 IP是用來作路由使用,上圖為HQ端設定,DR端請自行比照設定
以此範例為例
HQ Internet IPSEC VPN Interface 為 10.1.1.14、DR Internet IPSEC VPN Interface 為 10.1.1.13
HQ MPLS IPSEC VPN Interface 為 10.1.1.10、DR MPLS IPSEC VPN Interface 為 10.1.1.9
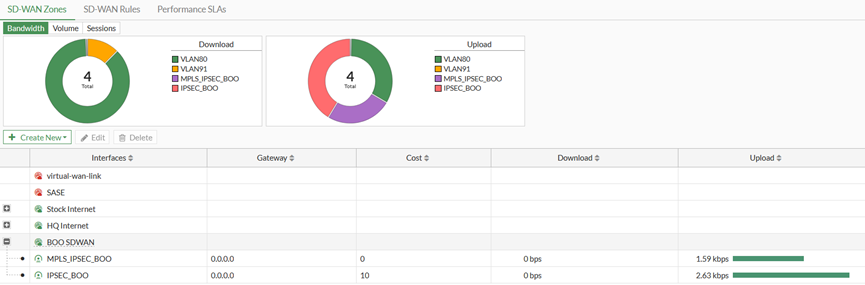
#### **六、建立SDWAN Zone,將兩個IPSEC VPN Interface加進去Member**
完成HQ與DR的上述設定後並加完之後應該就可以正常將IPSECVPN Turnnel帶起來,此時互Ping對方的IPSEC VPN Interface IP應該就要會通了。
[](https://mdfk.goddamn.idv.tw/uploads/images/gallery/2024-06/EvUimage.png)
[](https://mdfk.goddamn.idv.tw/uploads/images/gallery/2024-06/xIdimage.png)
[](https://mdfk.goddamn.idv.tw/uploads/images/gallery/2024-06/SN5image.png)
#### **七、設定SDWAN Rule**
下圖為HQ端SDWAN Rule,DR端請自行比照設定
[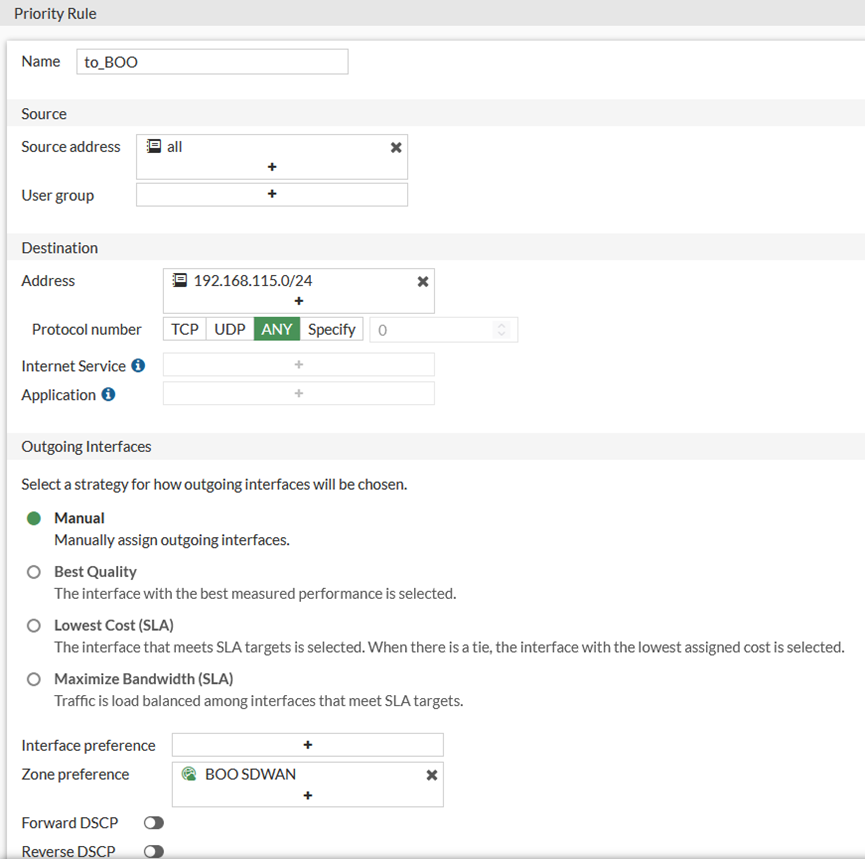](https://mdfk.goddamn.idv.tw/uploads/images/gallery/2024-06/3CRimage.png)
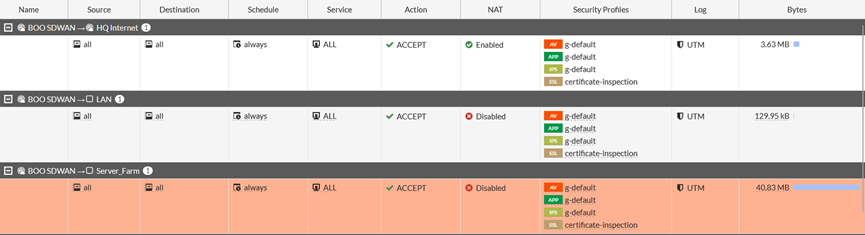
#### **八、設定Firewall Policy、Static Route**
[](https://mdfk.goddamn.idv.tw/uploads/images/gallery/2024-06/W7mimage.png)
[](https://mdfk.goddamn.idv.tw/uploads/images/gallery/2024-06/OL9image.png)
[](https://mdfk.goddamn.idv.tw/uploads/images/gallery/2024-06/oE1image.png)
[](https://mdfk.goddamn.idv.tw/uploads/images/gallery/2024-06/fv0image.png)
[](https://mdfk.goddamn.idv.tw/uploads/images/gallery/2024-06/07qimage.png)
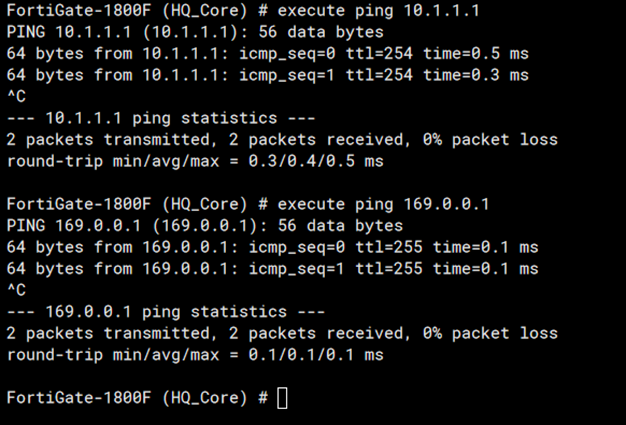
設定完成後Ping DR LAN Interface應該就要會通了。
[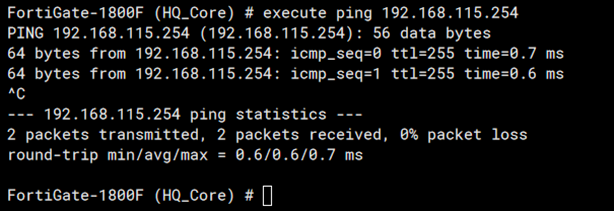](https://mdfk.goddamn.idv.tw/uploads/images/gallery/2024-06/I8Limage.png)
**注意 !! **一樣HQ、DR都要設定,否則也不會通
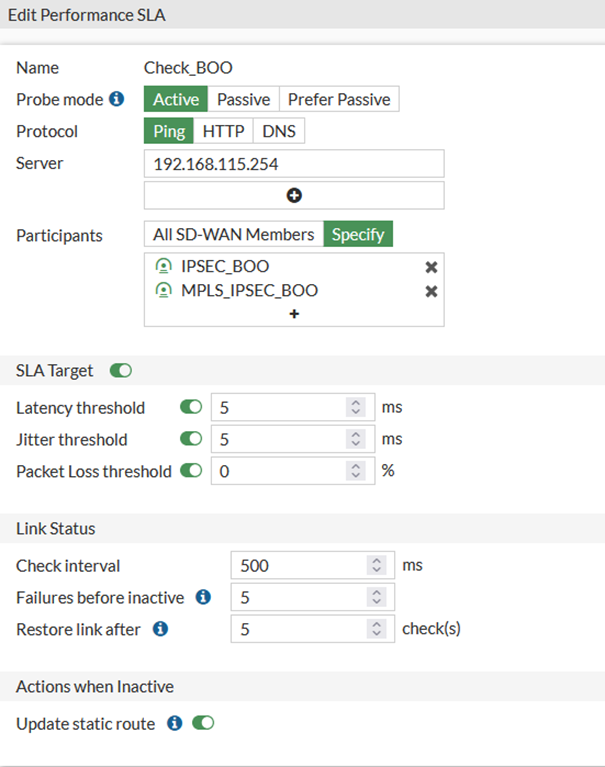
#### **九、設定SDWAN線路偵測機制,互相指對方的LAN Interface即可。**
透過兩條線路去跟對方的LAN Interface作Health Check,如果Check異常則將線路直接下線,用以確保資料傳輸的正確性。
[](https://mdfk.goddamn.idv.tw/uploads/images/gallery/2024-06/vfIimage.png)
# Fortigate PPPOE IPSEC ADVPN 實作
### 參考資料
[https://docs.fortinet.com/document/fortigate/7.4.4/administration-guide/853412/ipsec-vpn-wizard-hub-and-spoke-advpn-support](https://docs.fortinet.com/document/fortigate/7.4.4/administration-guide/853412/ipsec-vpn-wizard-hub-and-spoke-advpn-support)
### 前言
利用Fortigate來建立 Site to Site IPSEC VPN不是難事,IPSEC的前提必需兩個Site都有固定IP,但是如果某間企業門市眾多,為了經費考量想利用便宜的家用型PPPOE VDSL來佈建分點,又想要透過統一的企業上網出口來作資安控管,在Fortigate上也有支援這種Solution稱為**ADVPN (Auto-Discover VPN)**。
同時上次帶大家實做了[Fortigate IPSEC+iBGP](https://mdfk.goddamn.idv.tw/books/fortigate/page/fortigate-ipsec-ibgp),我有提到過到過其實企業內部使用iBGP的機率很低,大多是都是走OSPF居多,但是在**ADVPN**下預設就是走BGP,此篇實做帶大家看看ADVPN怎麼搞。
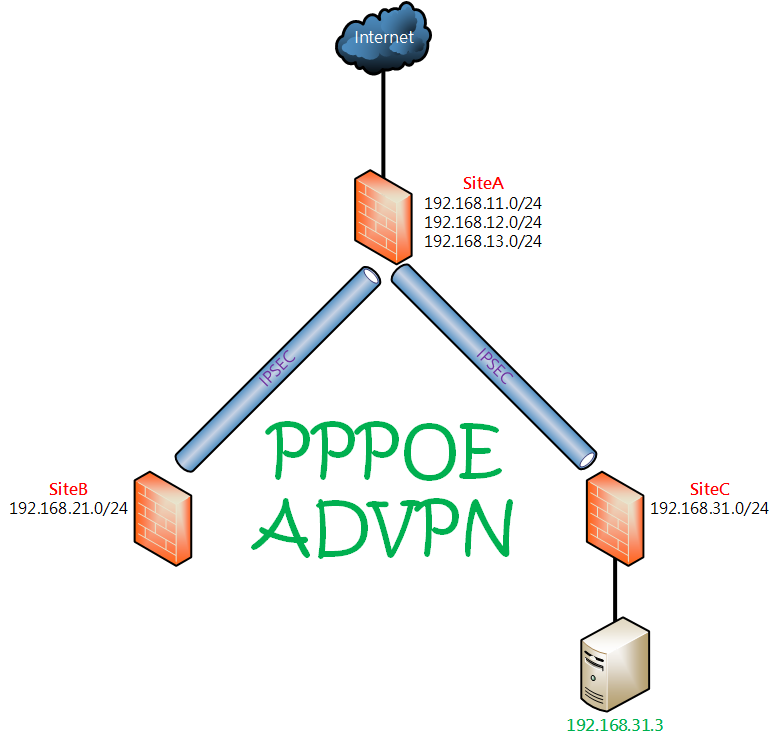
### 環境說明
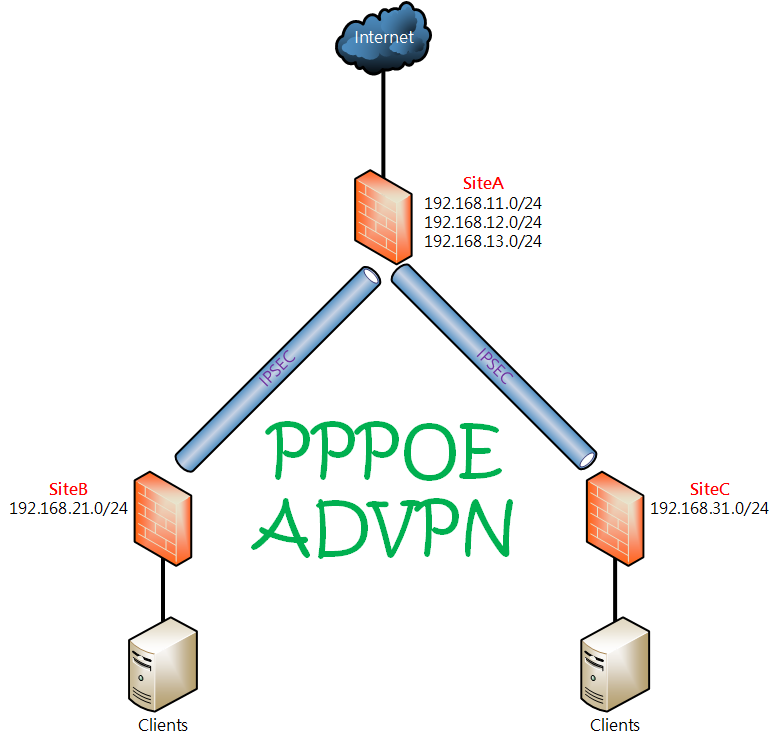
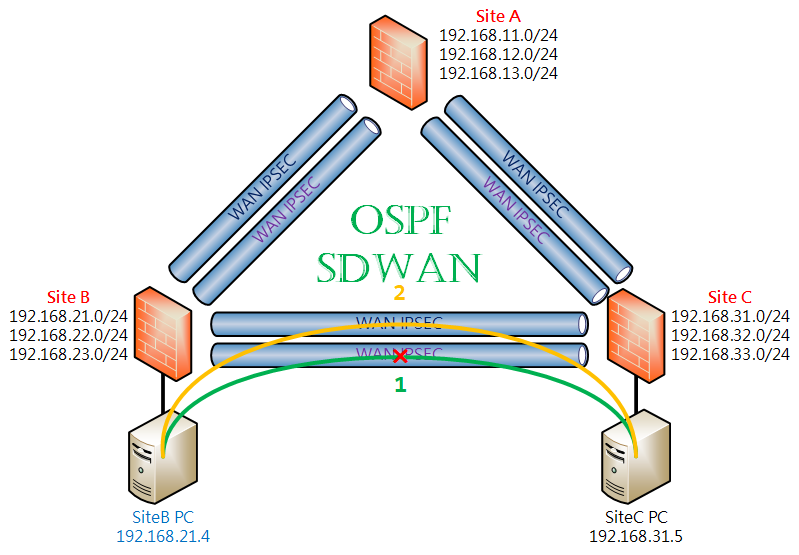
**設計概念:** **SiteA** **(HQ)**有固定IP,其餘分點 **SiteB**、**SiteC** 皆使用**PPPOE**,同時由於資訊安全控管的原則希望能Internet流量統一由同一個Gateway進出。
**Firmware Ver. :** Fortigate-VM 7.0.15
|
| **WAN IP**
| **LAN Subnets**
| **WAN IPSEC IP**
|
| **SiteA**
| WAN1 10.1.1.1
Gateway 10.1.1.254
| 192.168.11.254/24
192.168.12.254/24
192.168.13.254/24
| 172.17.1.1
|
| **SiteB**
| WAN1 PPPOE
(以DHCP模擬)
| 192.168.21.254/24
| 172.17.1.2
|
| **SiteC**
| WAN1 PPPOE
(以DHCP模擬)
| 192.168.31.254/24
| 172.17.1.3
|
### Hub設定過程
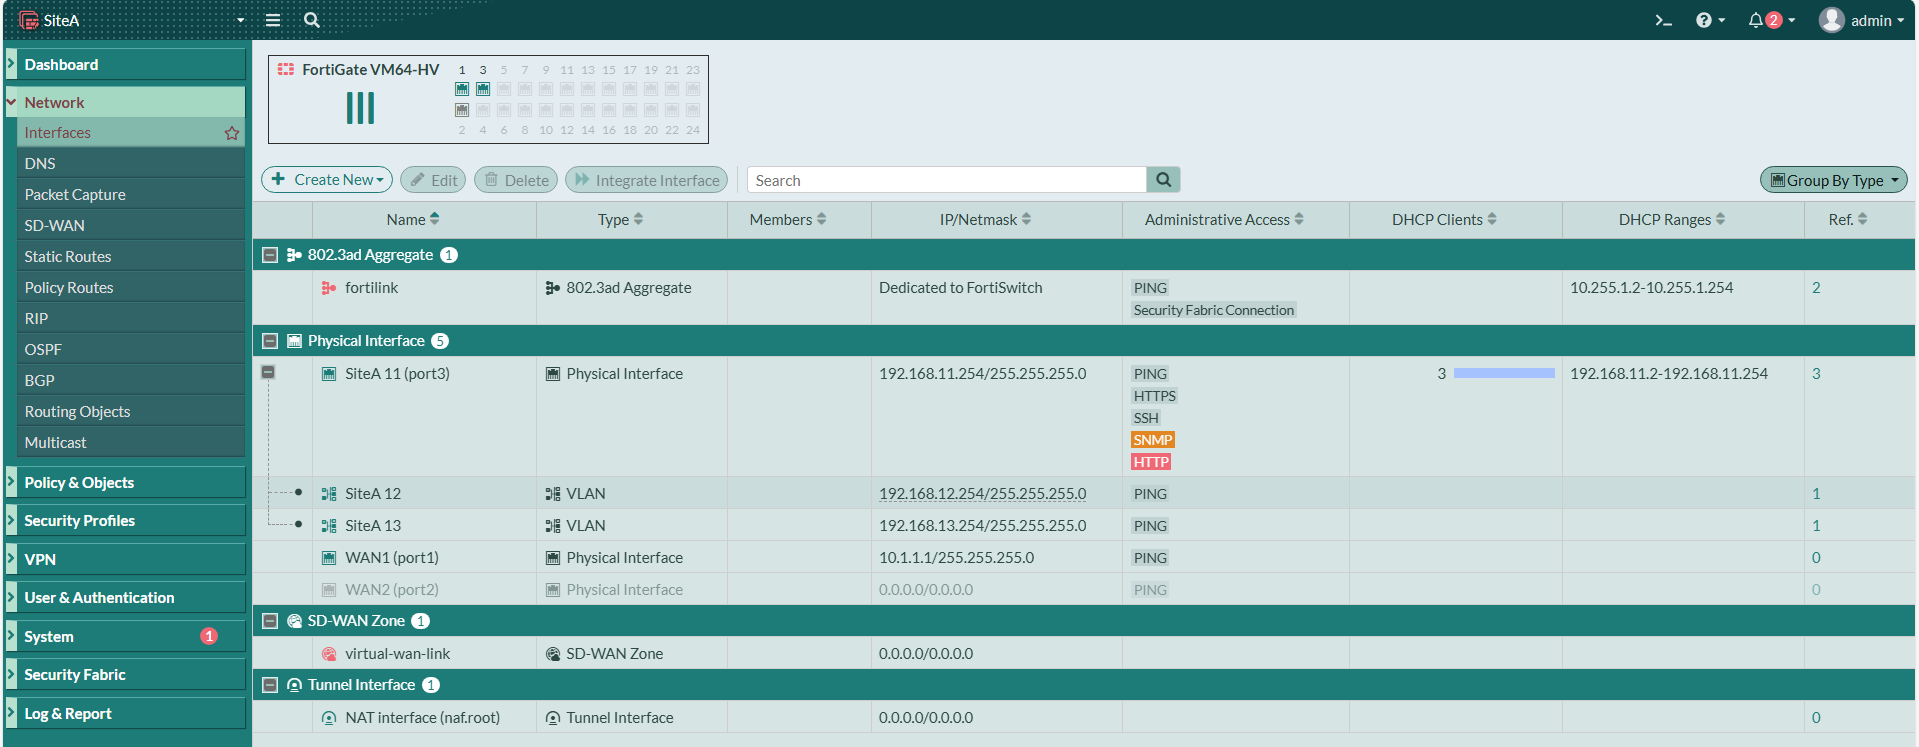
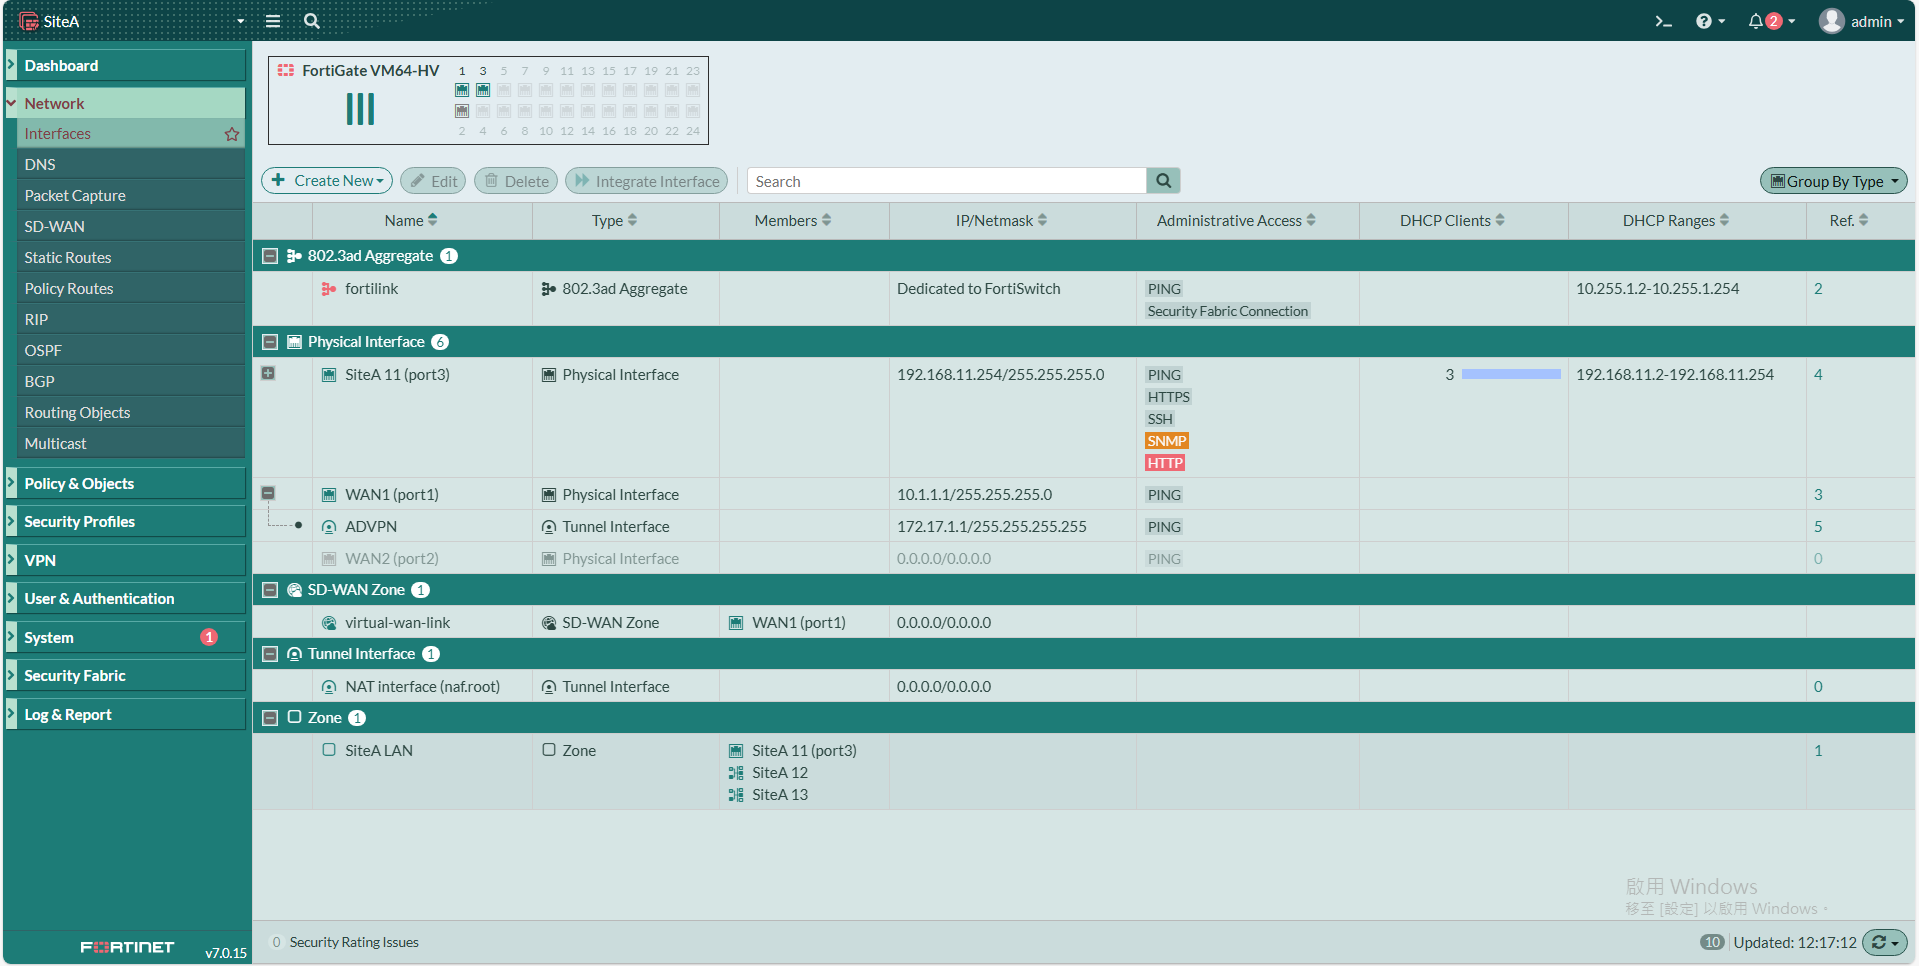
#### **SiteA**設定Interface
首先我們先將SiteA的WAN1、Local Subnets 192.168.11.254/24、192.168.12.254/24、192.168.13.254/24設定好。
[](https://mdfk.goddamn.idv.tw/uploads/images/gallery/2024-08/okrrvbsasx.png)
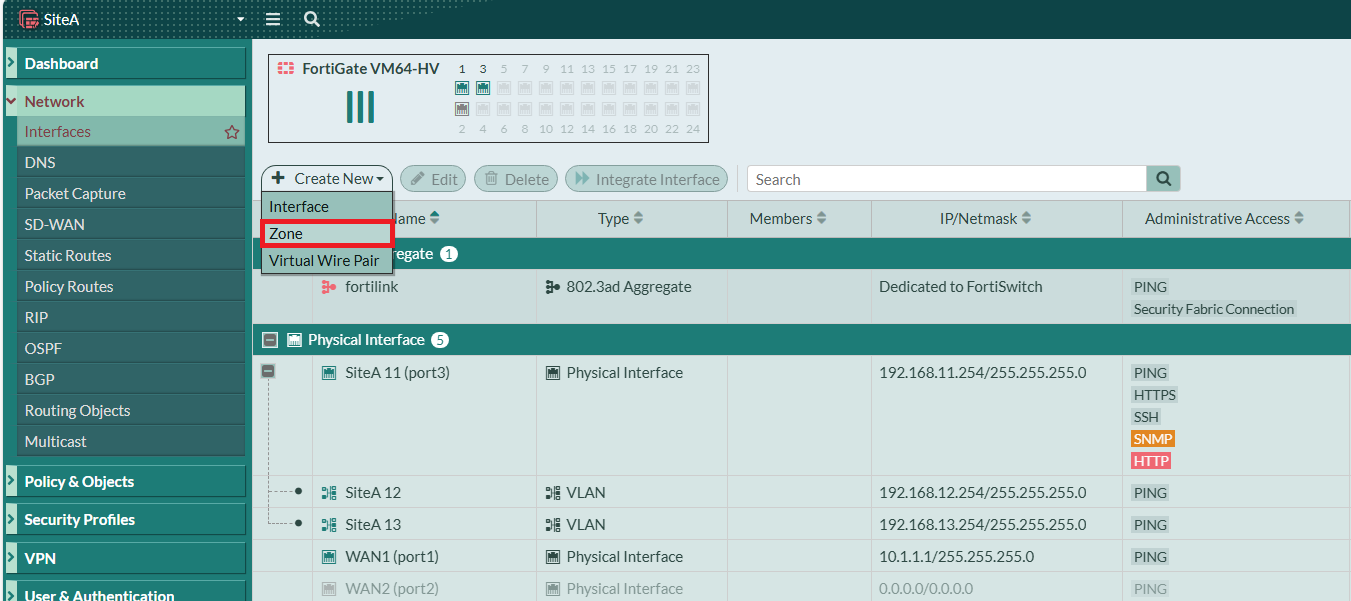
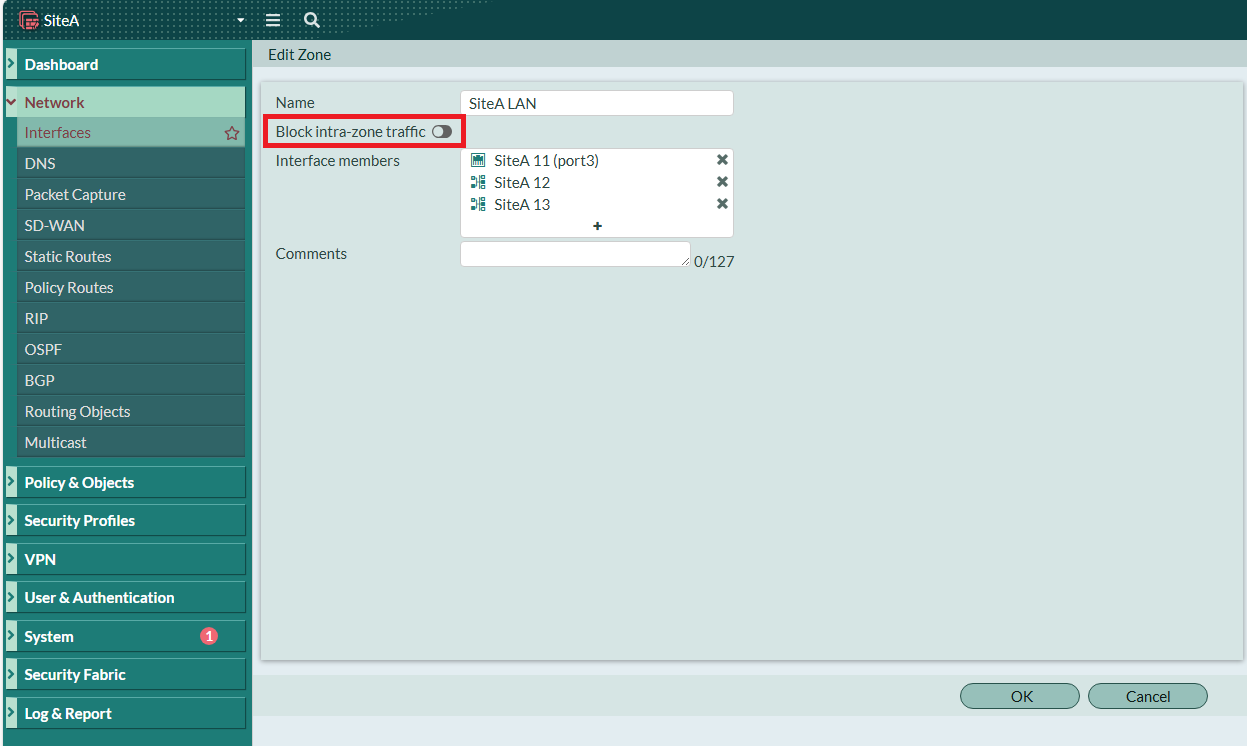
為了後續設定方便,我將三個Subnets綁成一個Zone,並且允許Interface之間互相溝通。
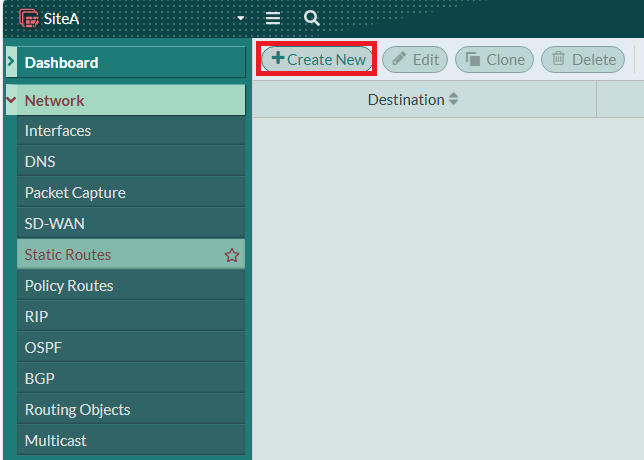
#### 設定**SiteA**上網
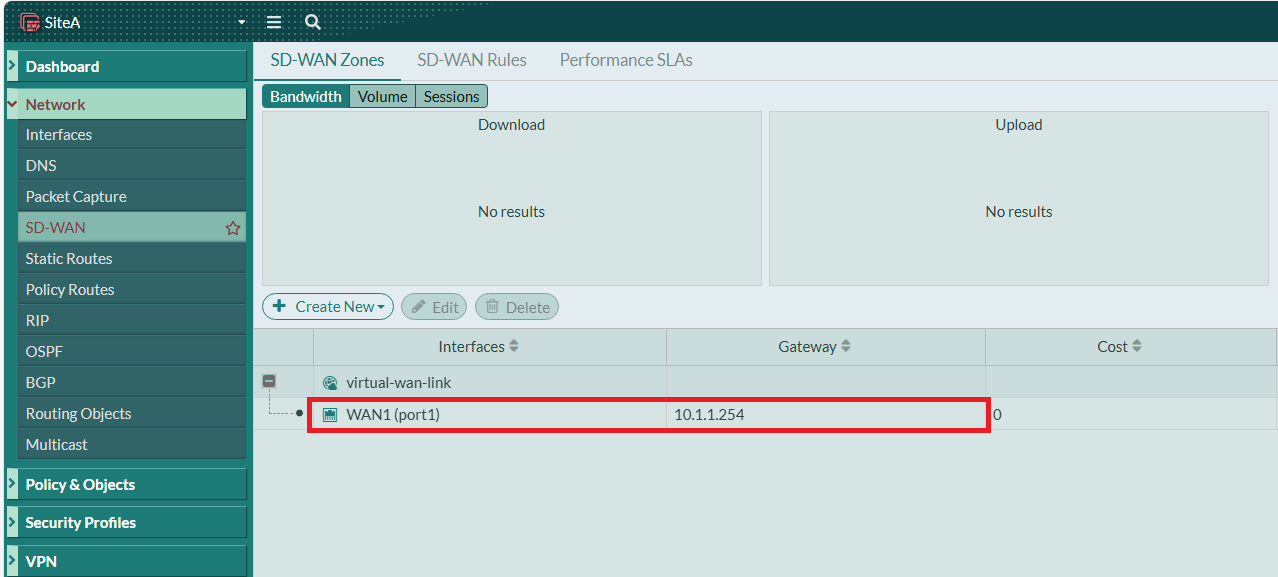
新增一筆 Static Route 0.0.0.0/0 進到 Default SD-WAN Zone
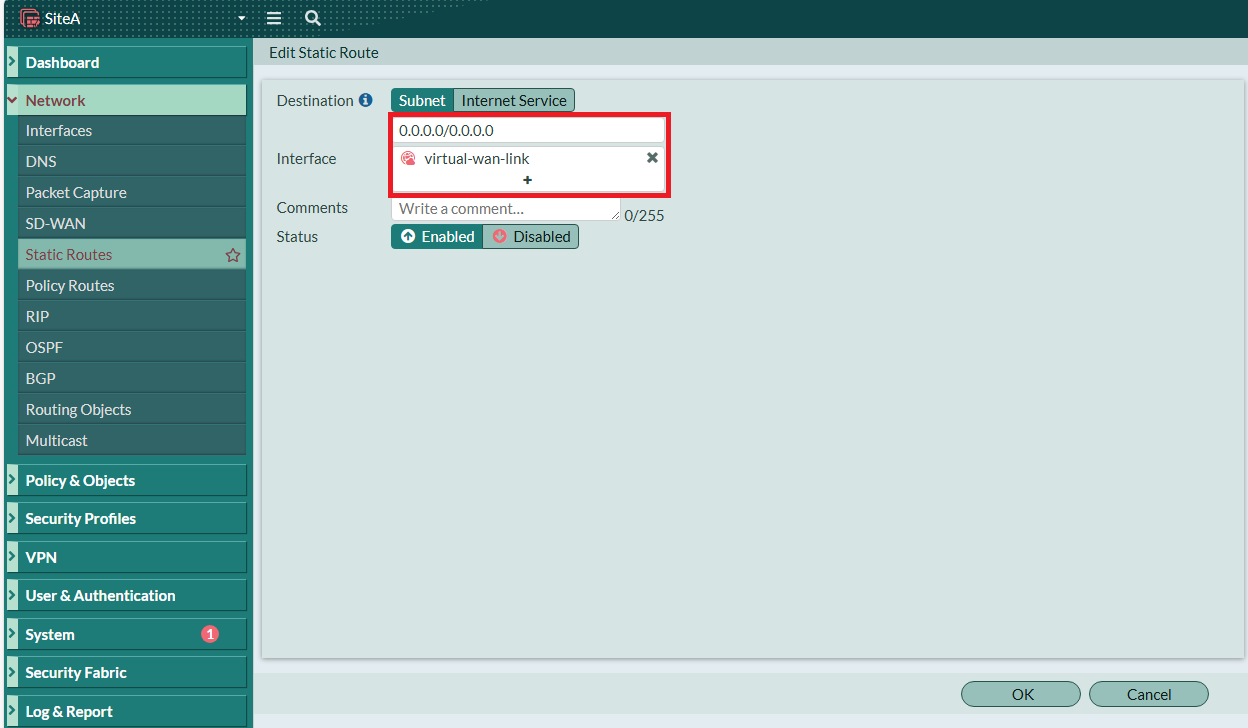
[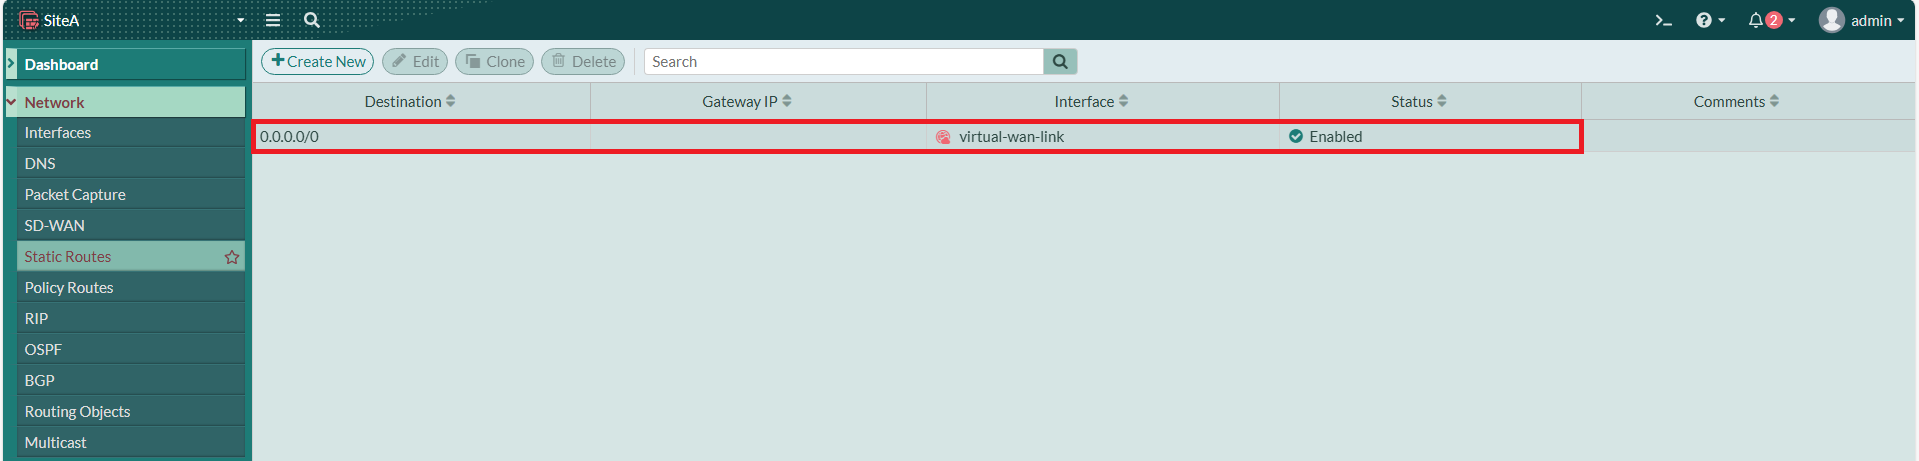](https://mdfk.goddamn.idv.tw/uploads/images/gallery/2024-08/5Jfs3iOPoF.png)
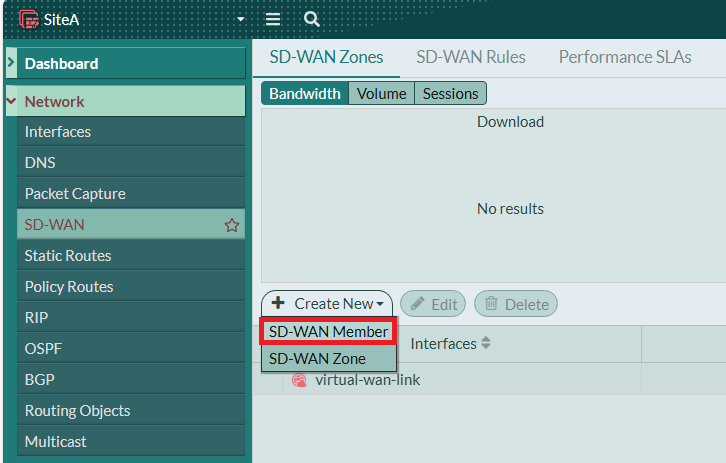
將 WAN1 加入 Default SD-WAN Zone 的 Member,並設定Gateway

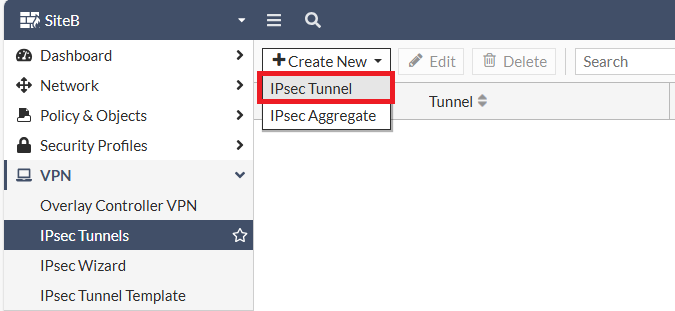
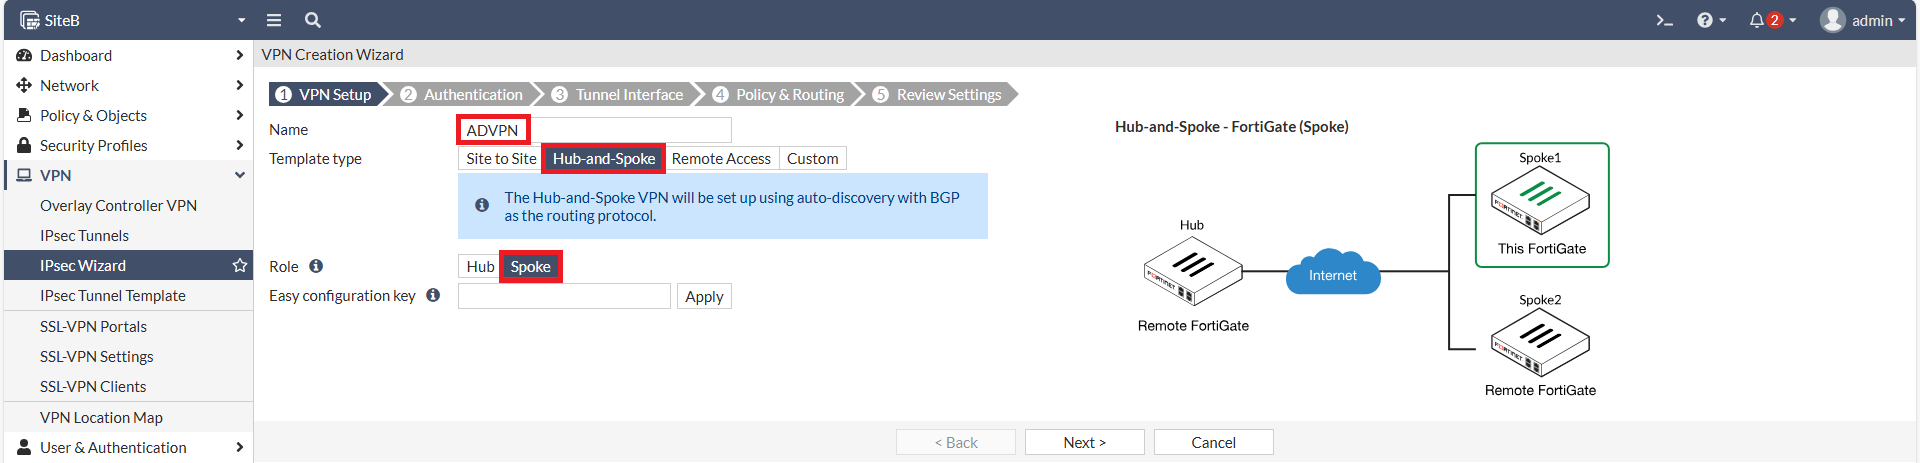
#### 建立 **SiteA** IPSEC ADVPN HUB
至 VPN 建立 IPSEC Tunnel
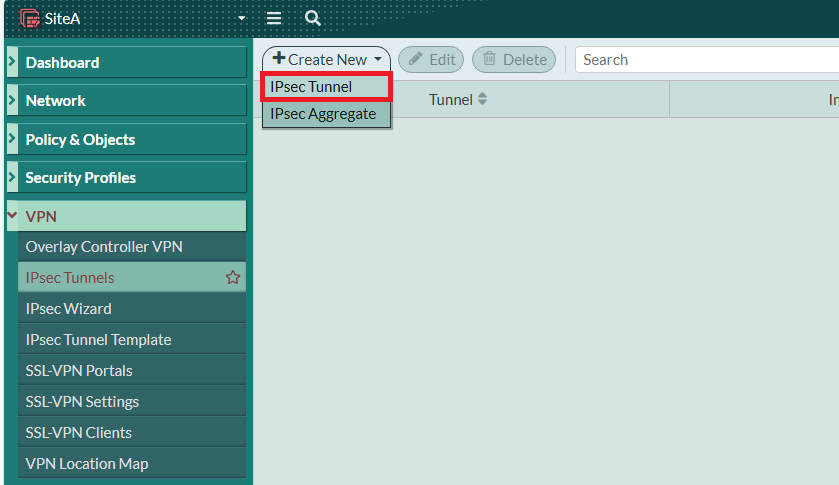
選擇 Hub-and-Spoke,角色選擇 Hub
[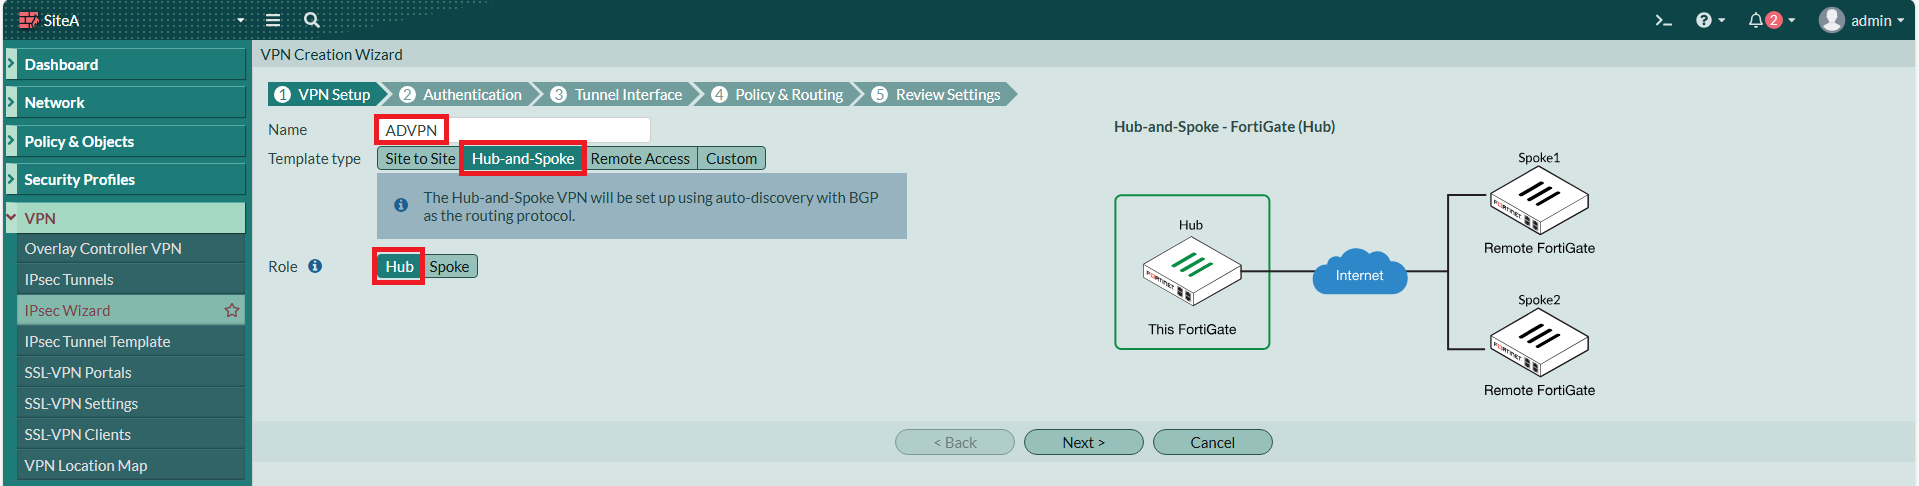](https://mdfk.goddamn.idv.tw/uploads/images/gallery/2024-08/XODFh8iIR5.png)
Interface選擇剛剛設定好的WAN1,指定一個Pre-shared Key
[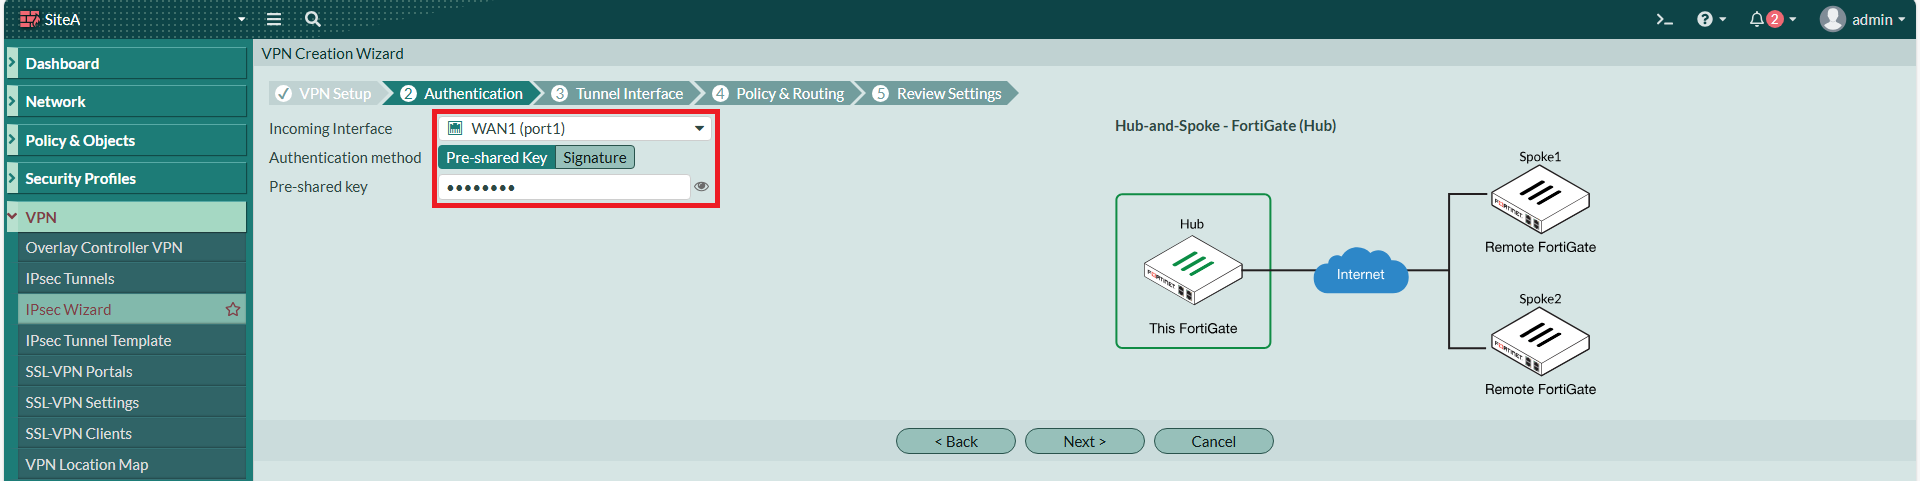](https://mdfk.goddamn.idv.tw/uploads/images/gallery/2024-08/8zF1N6iHBF.png)
本地IP設為 172.17.1.1,Remote IP 隨便打,我選擇設為 172.17.1.254/24
[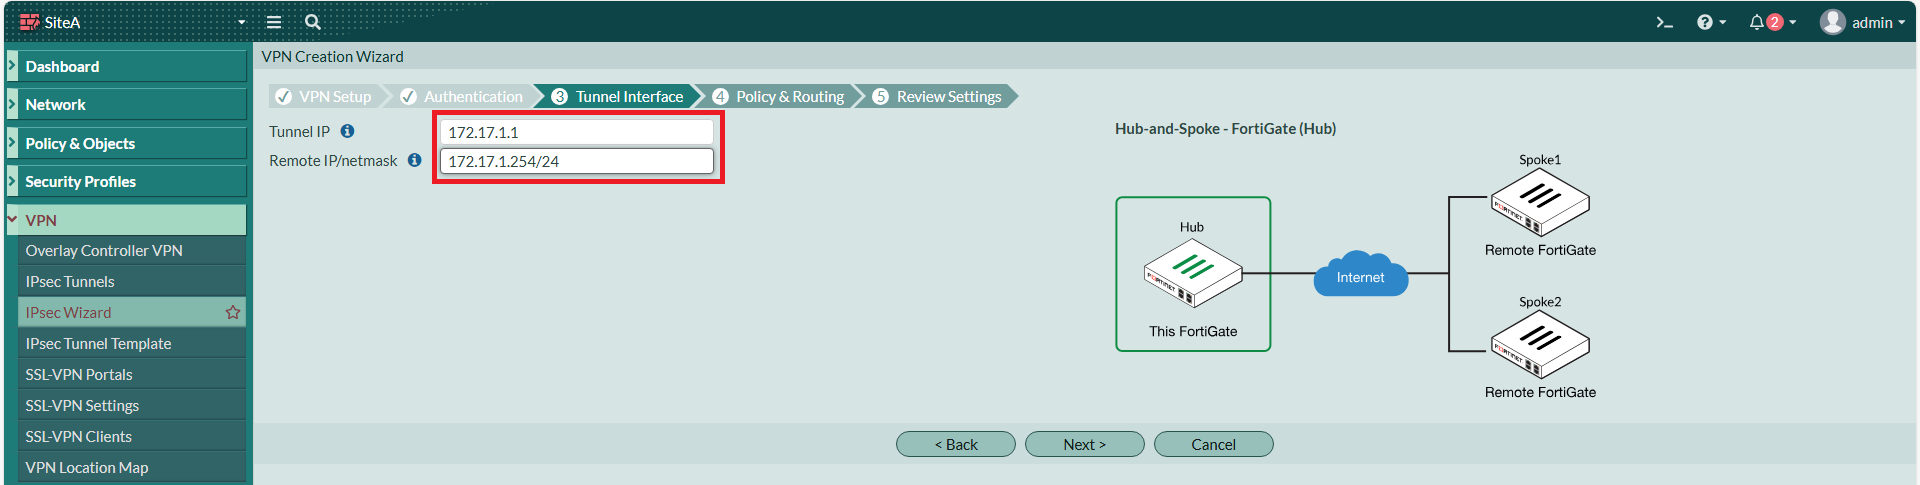](https://mdfk.goddamn.idv.tw/uploads/images/gallery/2024-08/0TfqPFnyav.png)
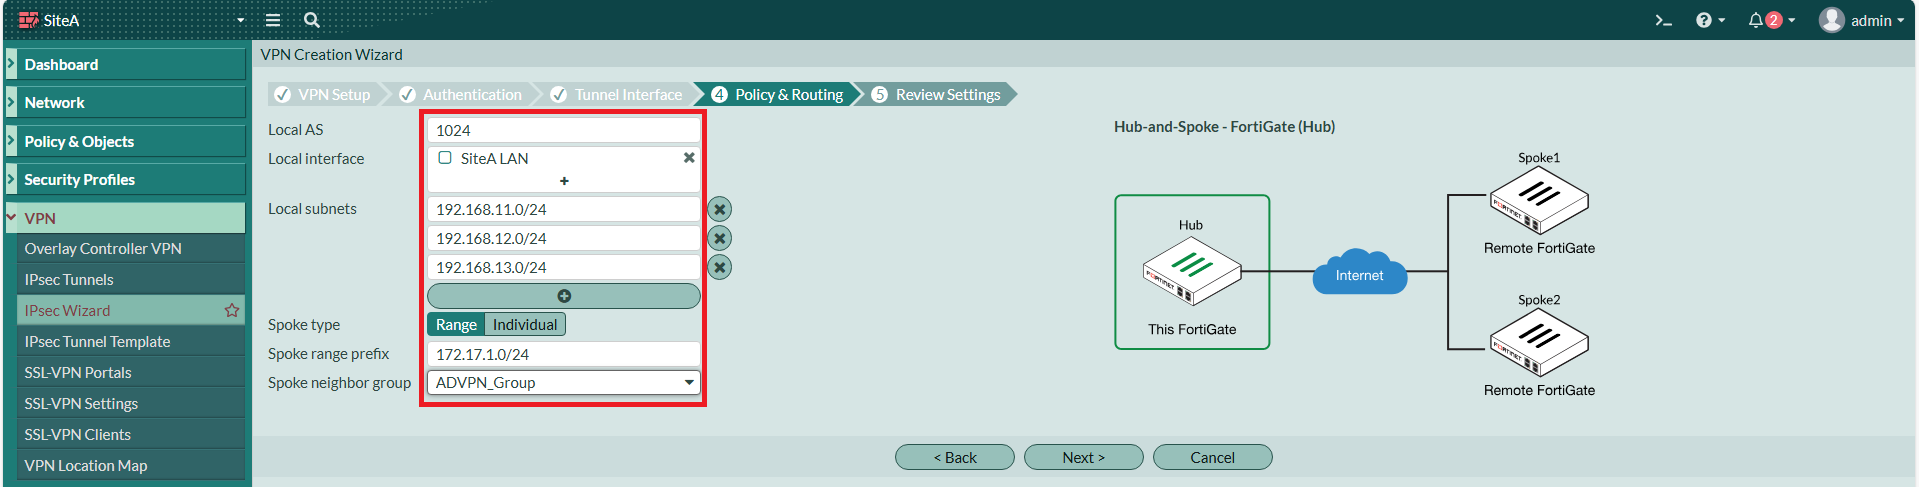
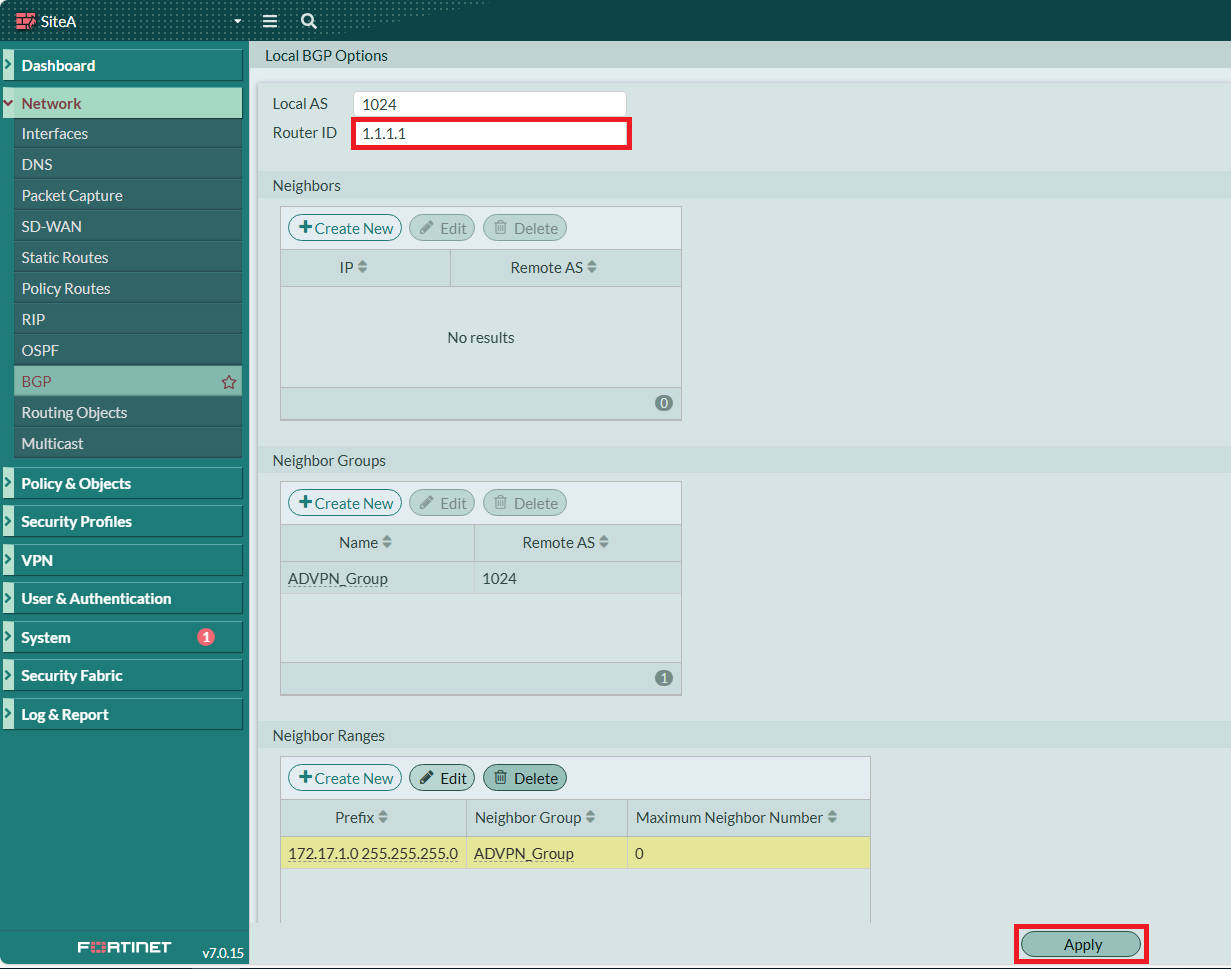
本地端AS我設為1024、本地端介面選擇上面建好的Zone、鍵入Local Subnets、Spoke Type 選擇 Range,指定Spoke 的 IP Range,並建立一個Spoke Neighbor Group。
[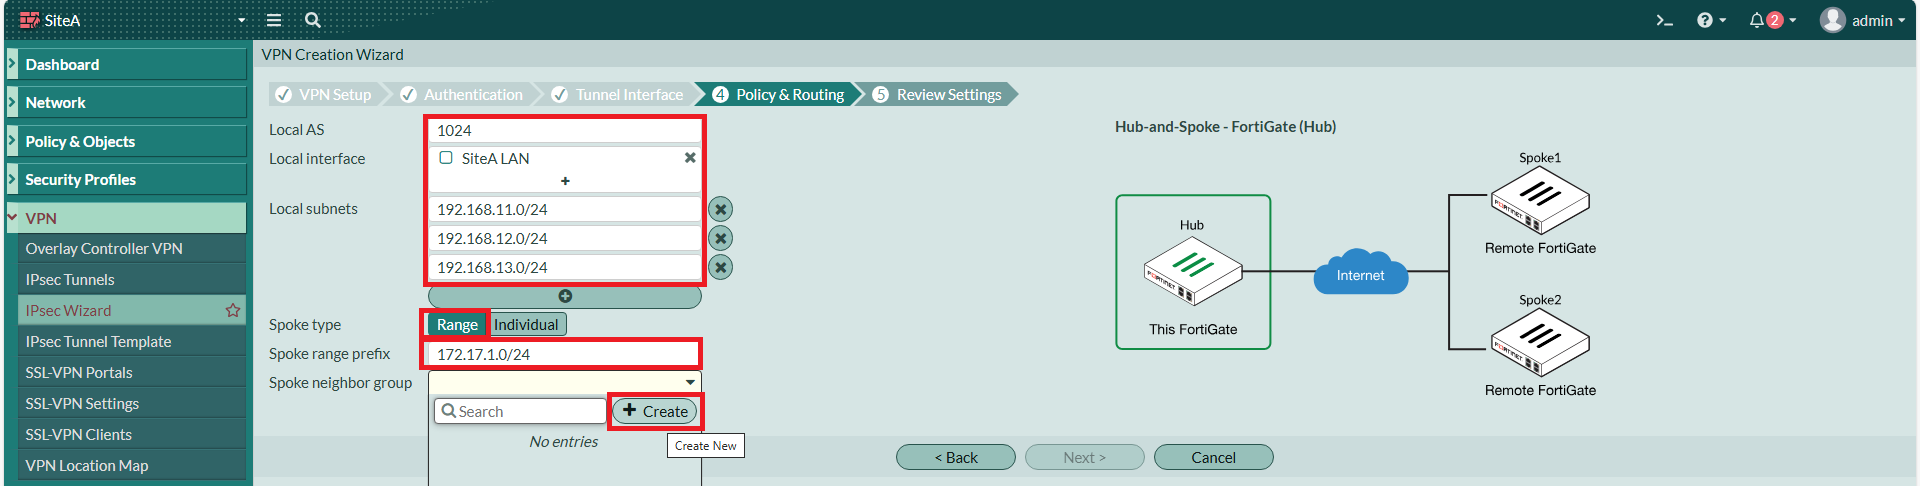](https://mdfk.goddamn.idv.tw/uploads/images/gallery/2024-08/wPtMzTetq3.png)
Neighbor Group Remote AS也設為1024、Activate IPv4,勾選 Route Reflector Client。
[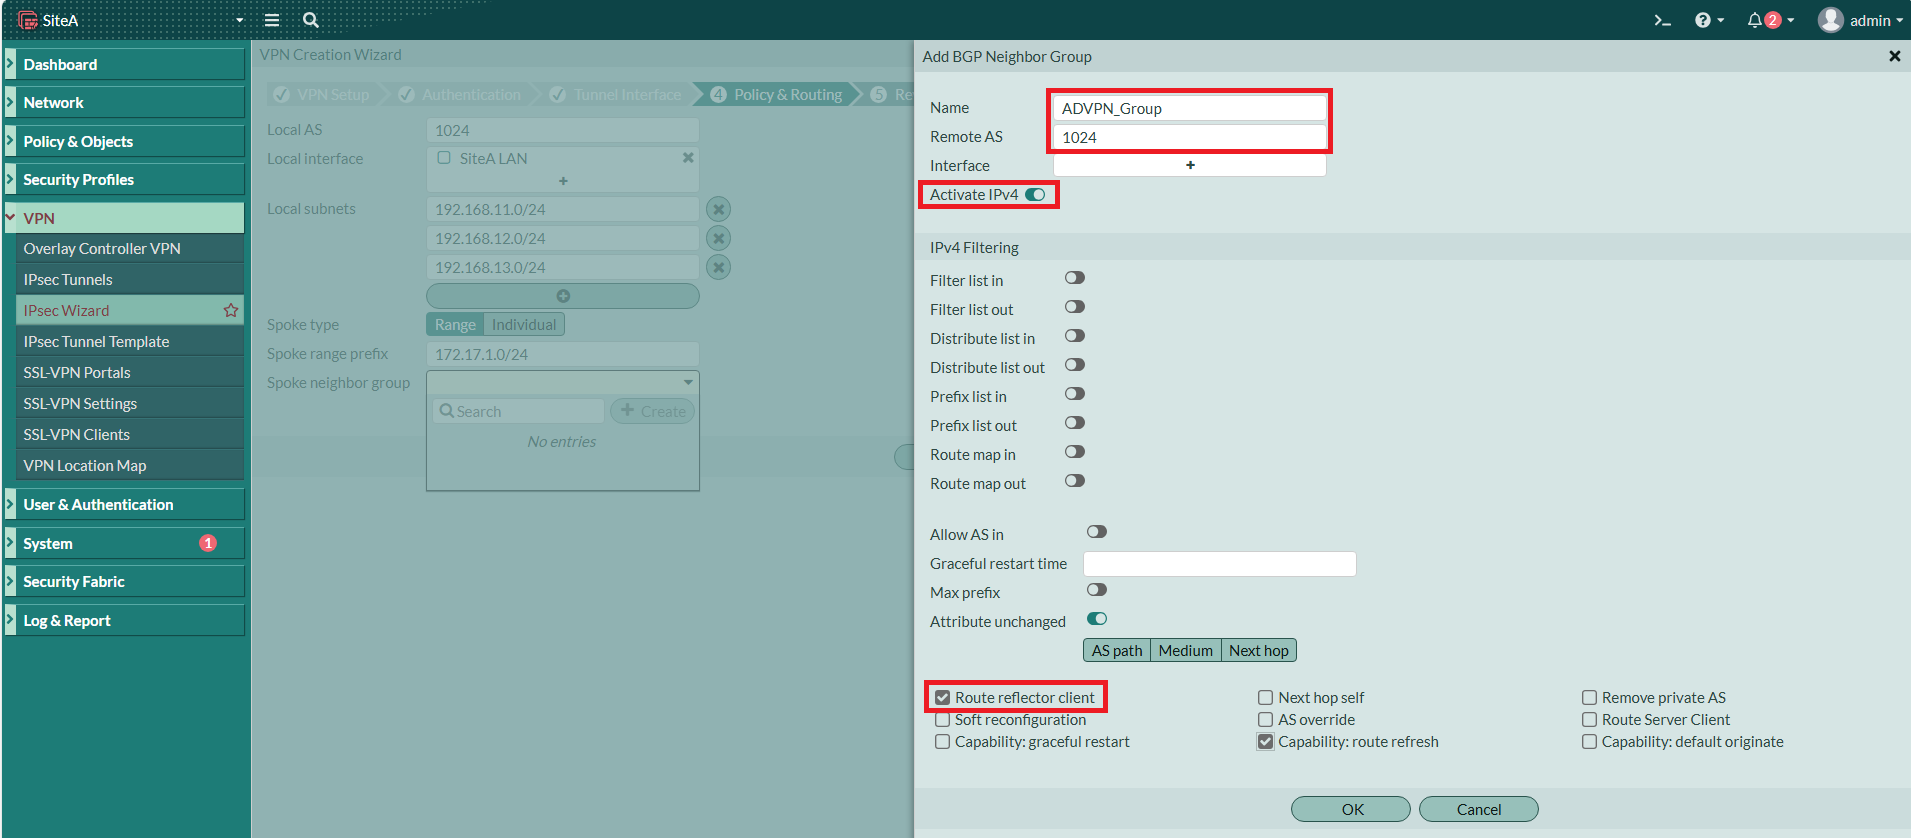](https://mdfk.goddamn.idv.tw/uploads/images/gallery/2024-08/7kPq98ygb1.png)
[](https://mdfk.goddamn.idv.tw/uploads/images/gallery/2024-08/AEv0gqPw0X.png)
Wizzard建立完成
[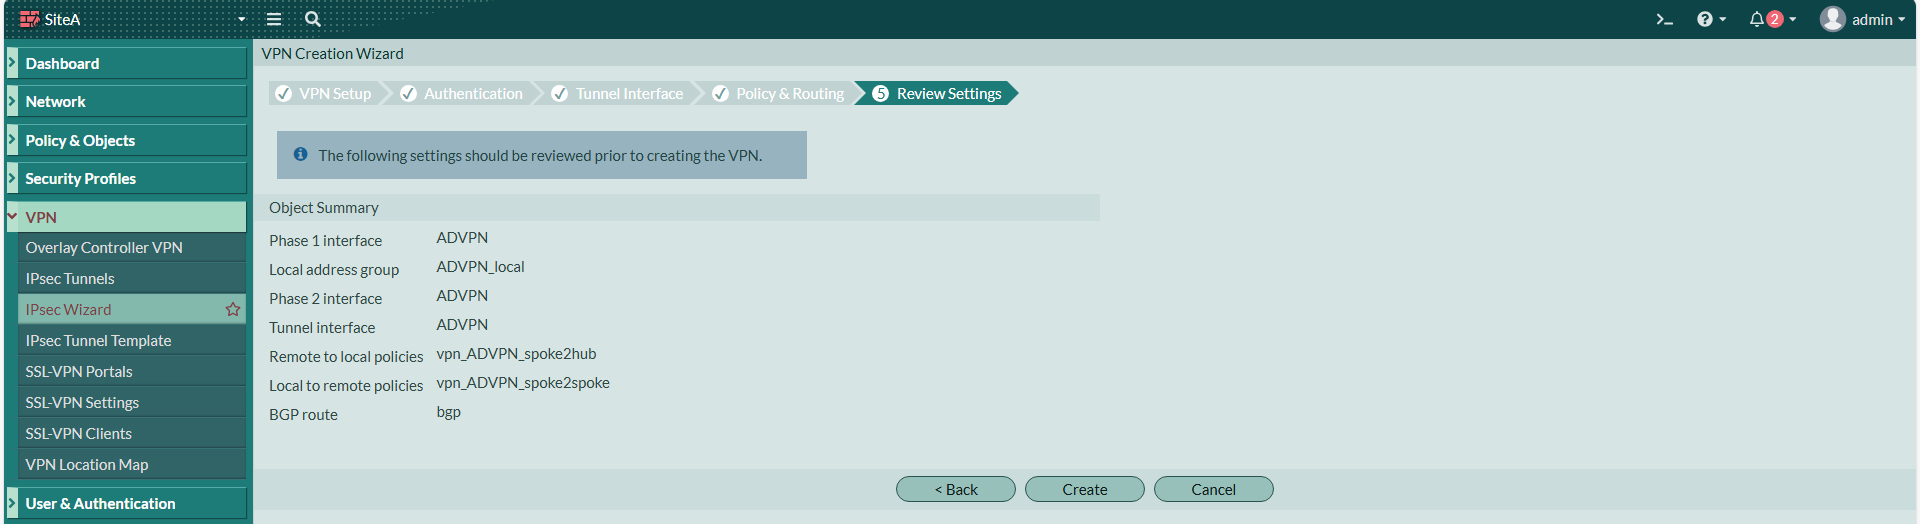](https://mdfk.goddamn.idv.tw/uploads/images/gallery/2024-08/pE7u2eH8IV.png)
[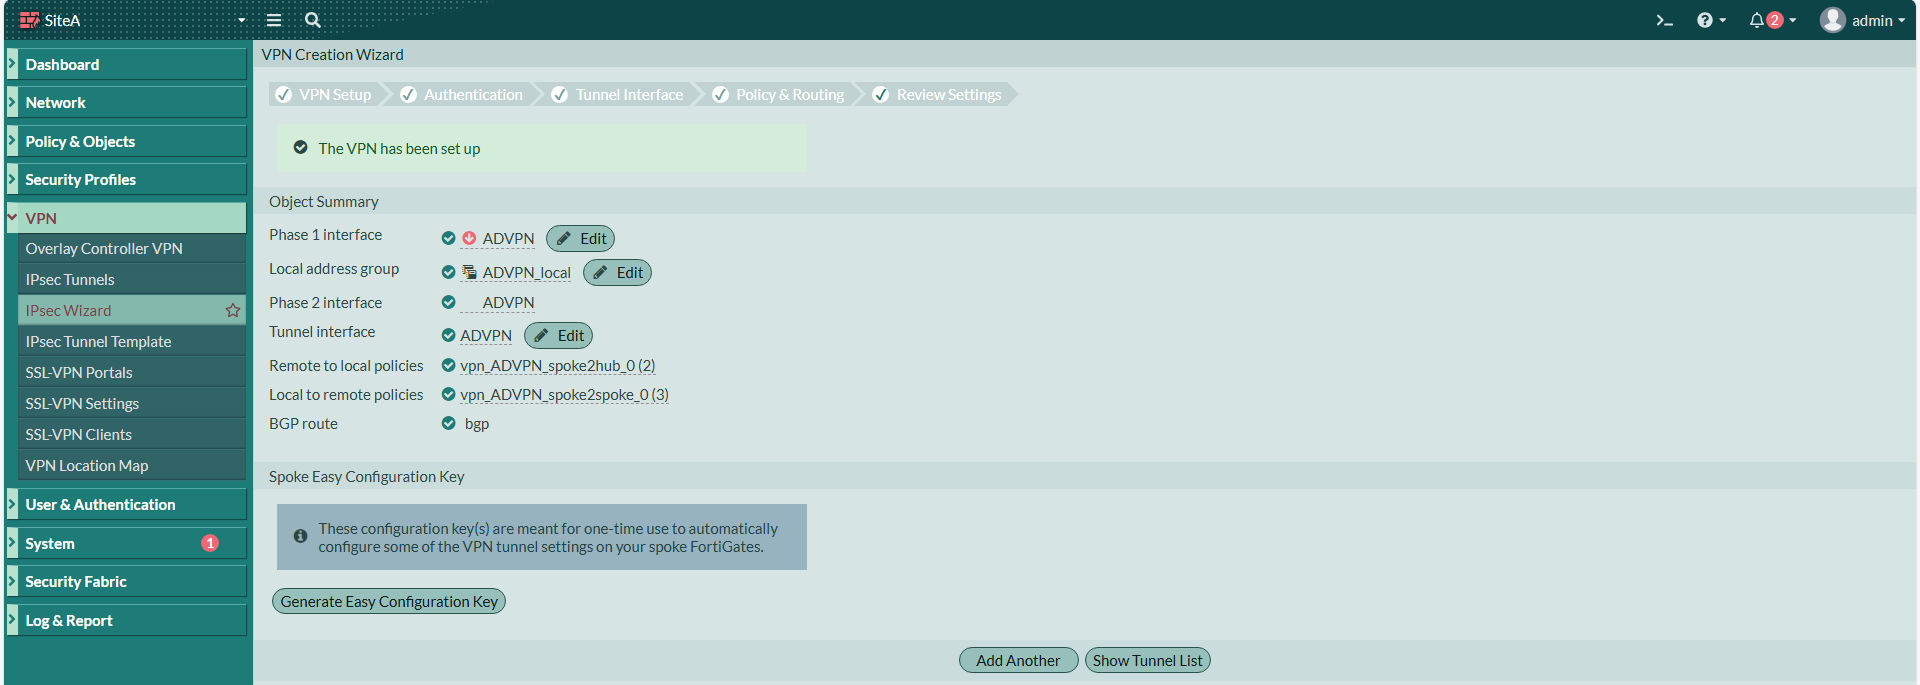](https://mdfk.goddamn.idv.tw/uploads/images/gallery/2024-08/Xt0TZl3DBQ.png)
回到Interface,將**ADVPN** Interface 的 Ping 打開
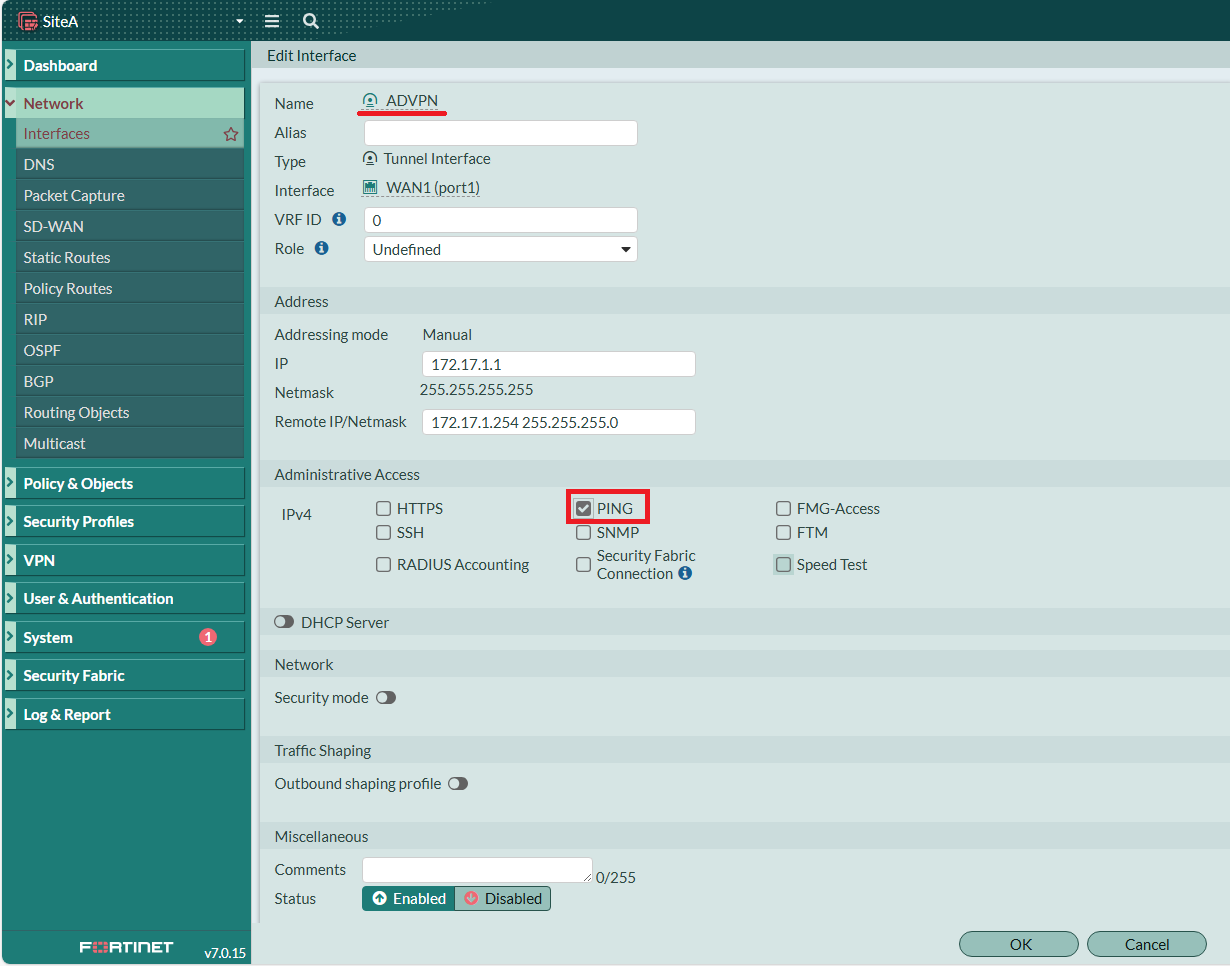
[](https://mdfk.goddamn.idv.tw/uploads/images/gallery/2024-08/WiqhEEGoFB.png)
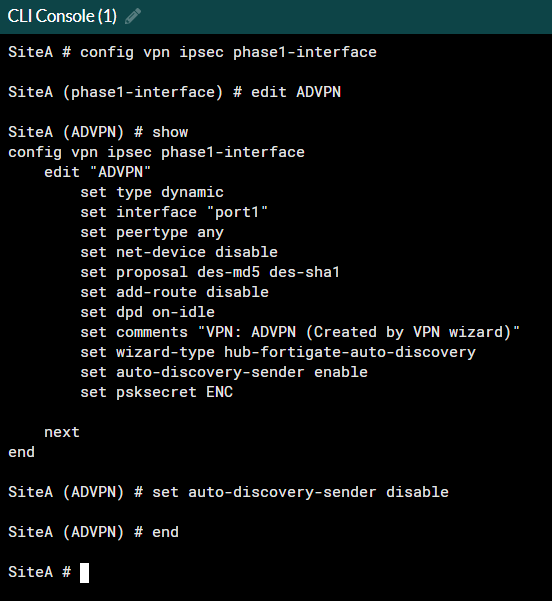
由於在這個情境下,ADVPN Full Mesh 是無法使用的,所以我們輸入下面指令來關閉自動建立 Spoke 之間IPSEC的功能。
```
config vpn ipsec phase1-interface
edit ADVPN
set auto-discovery-sender disable
end
```
#### 設定BGP
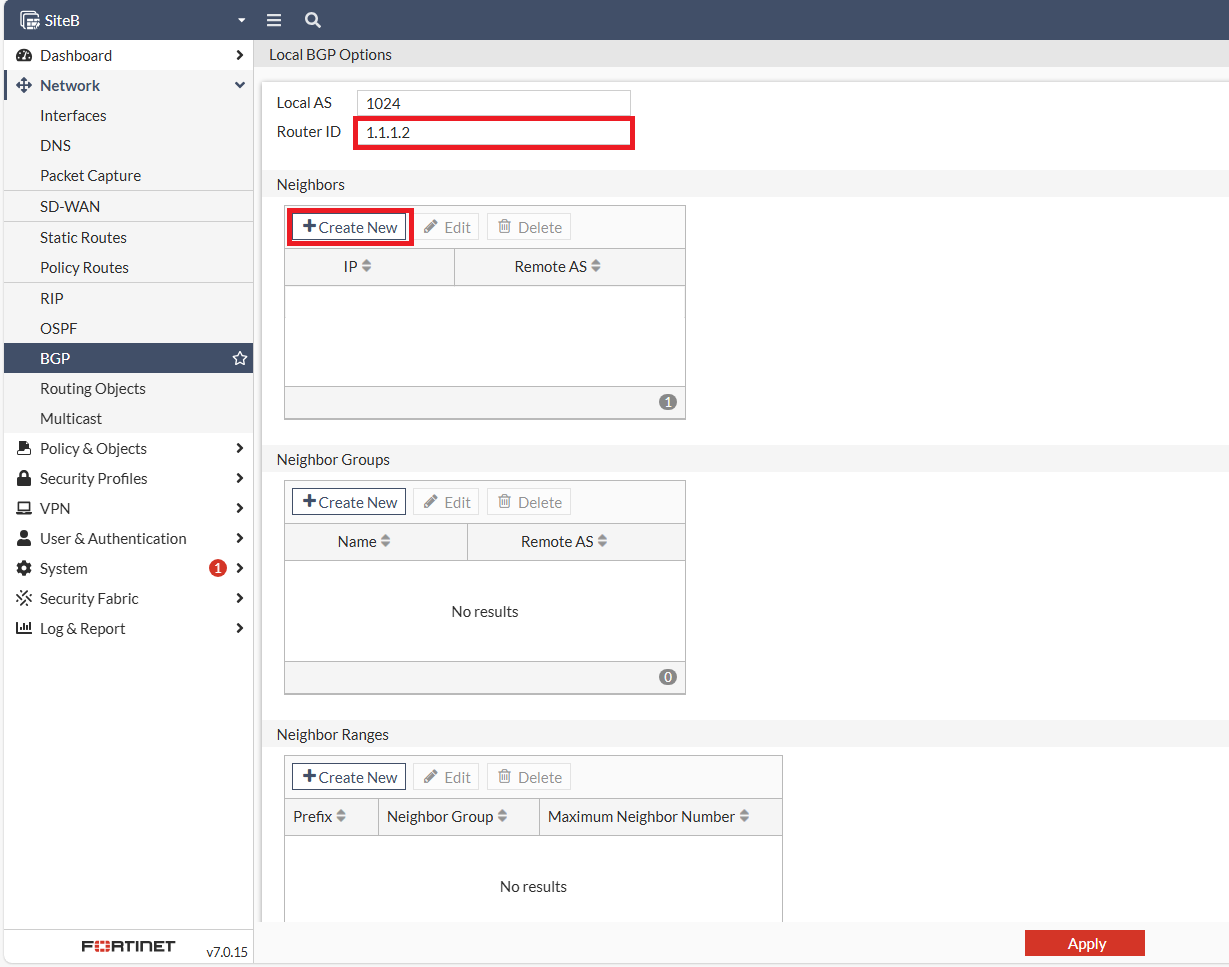
設定SiteA的Router ID,記得**要Apply !!** (鍵人我不知道忘了多少次 ...... Again ...... )
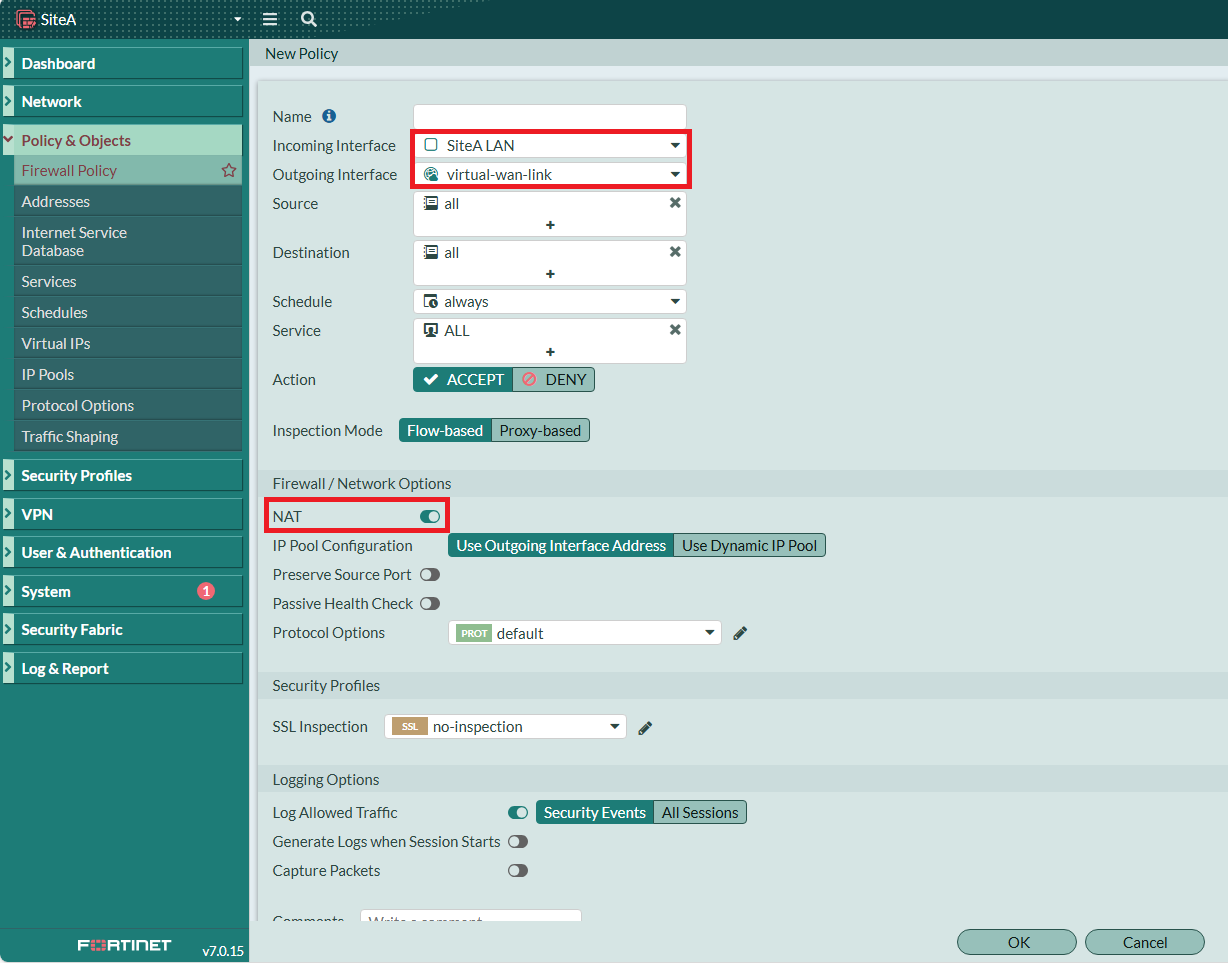
#### 設定Firewall Policy
Wizzard會幫我們建立兩條Policy,但我們還需要更多
[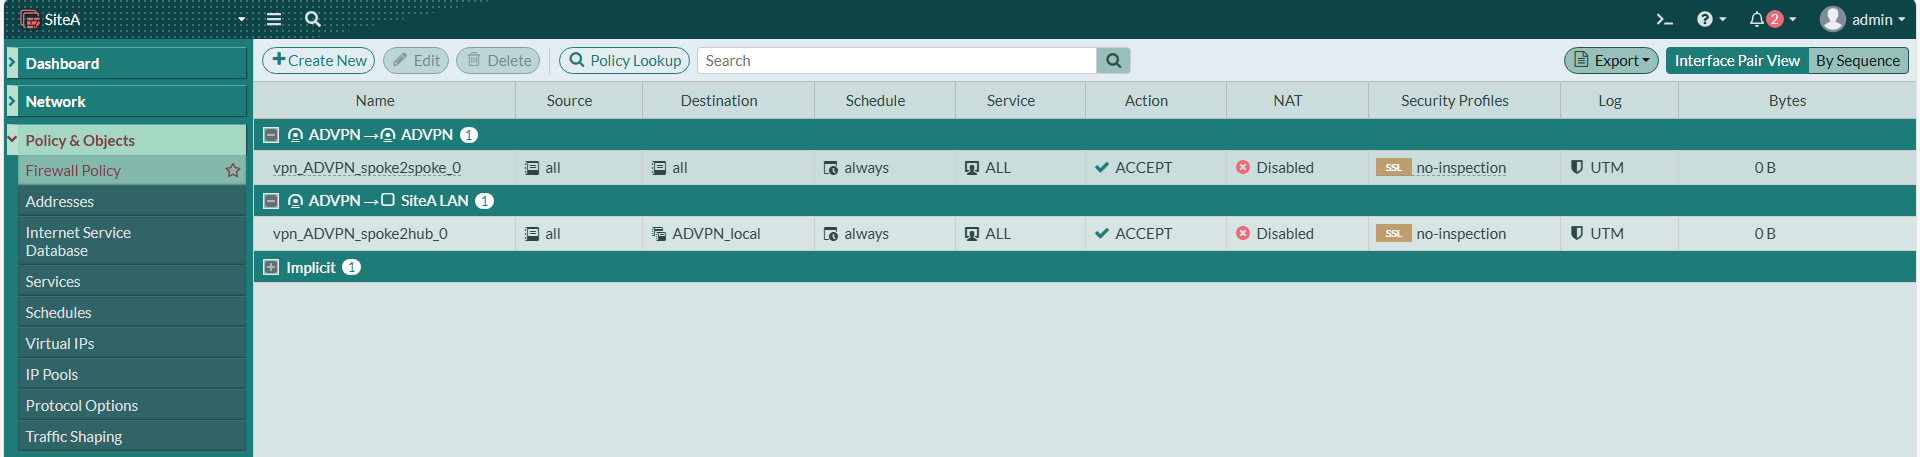](https://mdfk.goddamn.idv.tw/uploads/images/gallery/2024-08/He6GzbrAw2.png)
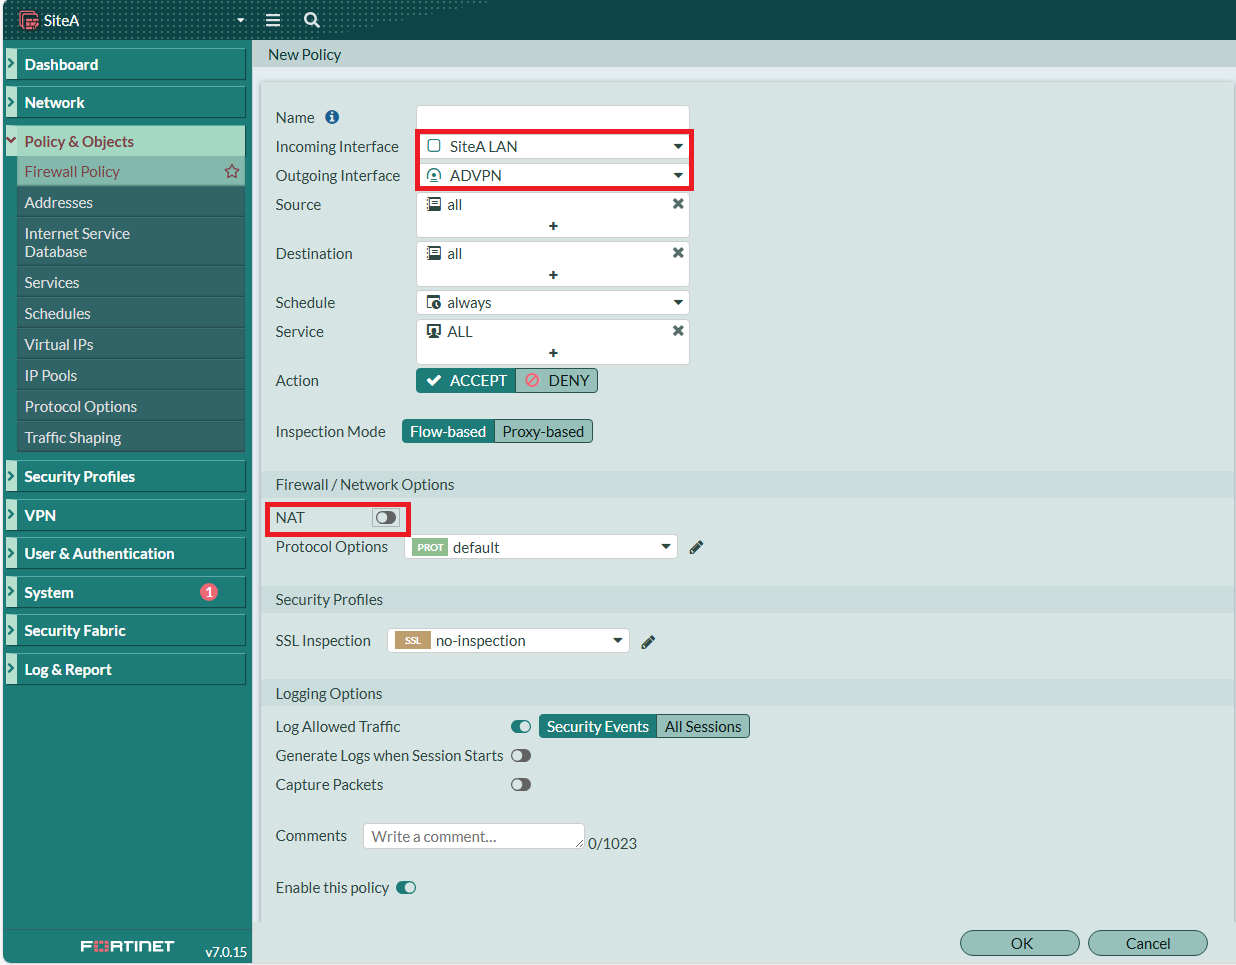
建立 SiteA LAN => ADVPN,不做NAT
建立 ADVPN => SD-WAN 上網用,要做NAT
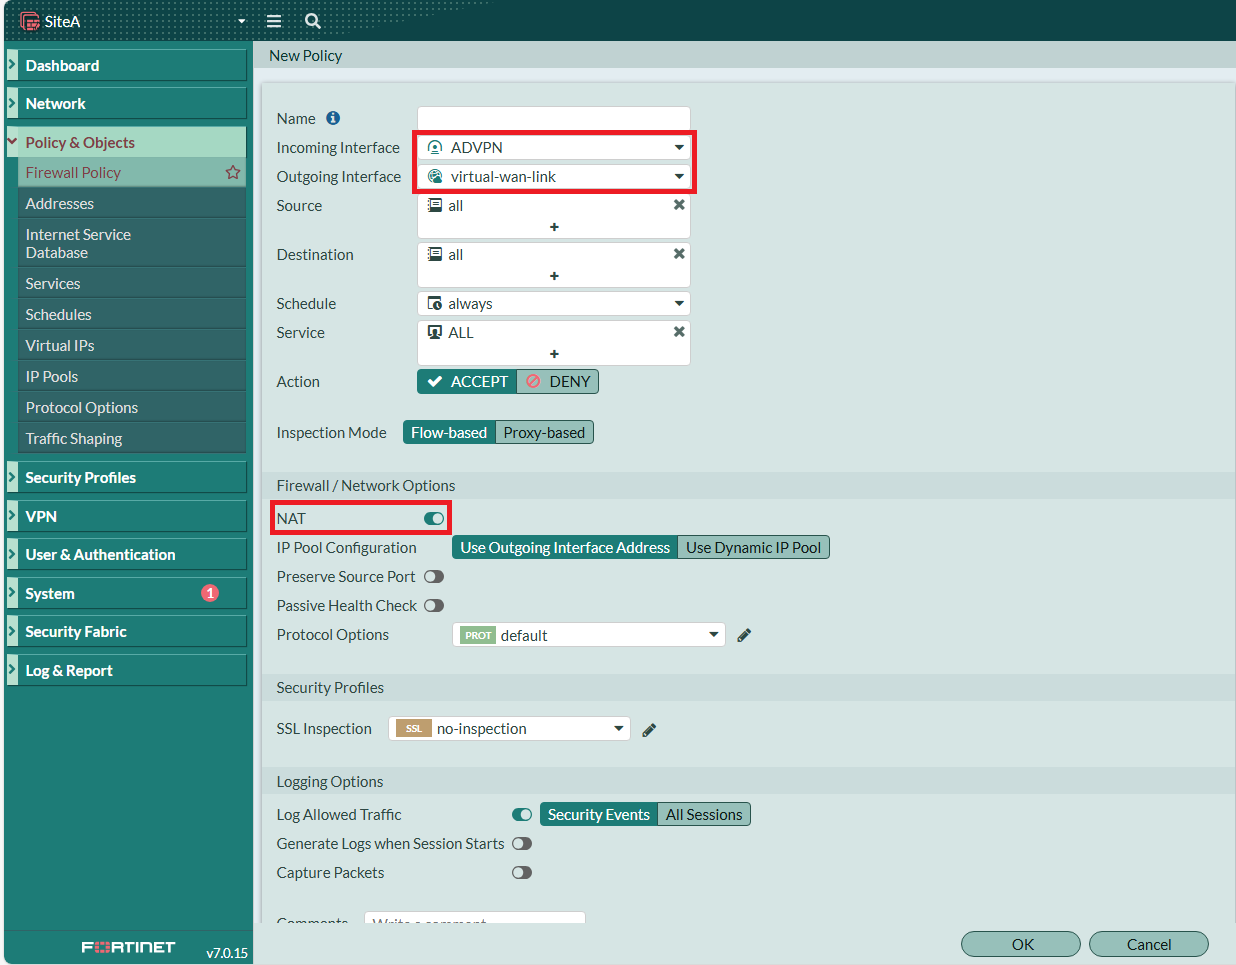
建立 SiteA LAN => SD-WAN 上網用,要做NAT
**SiteA** 設定至此大功告成
[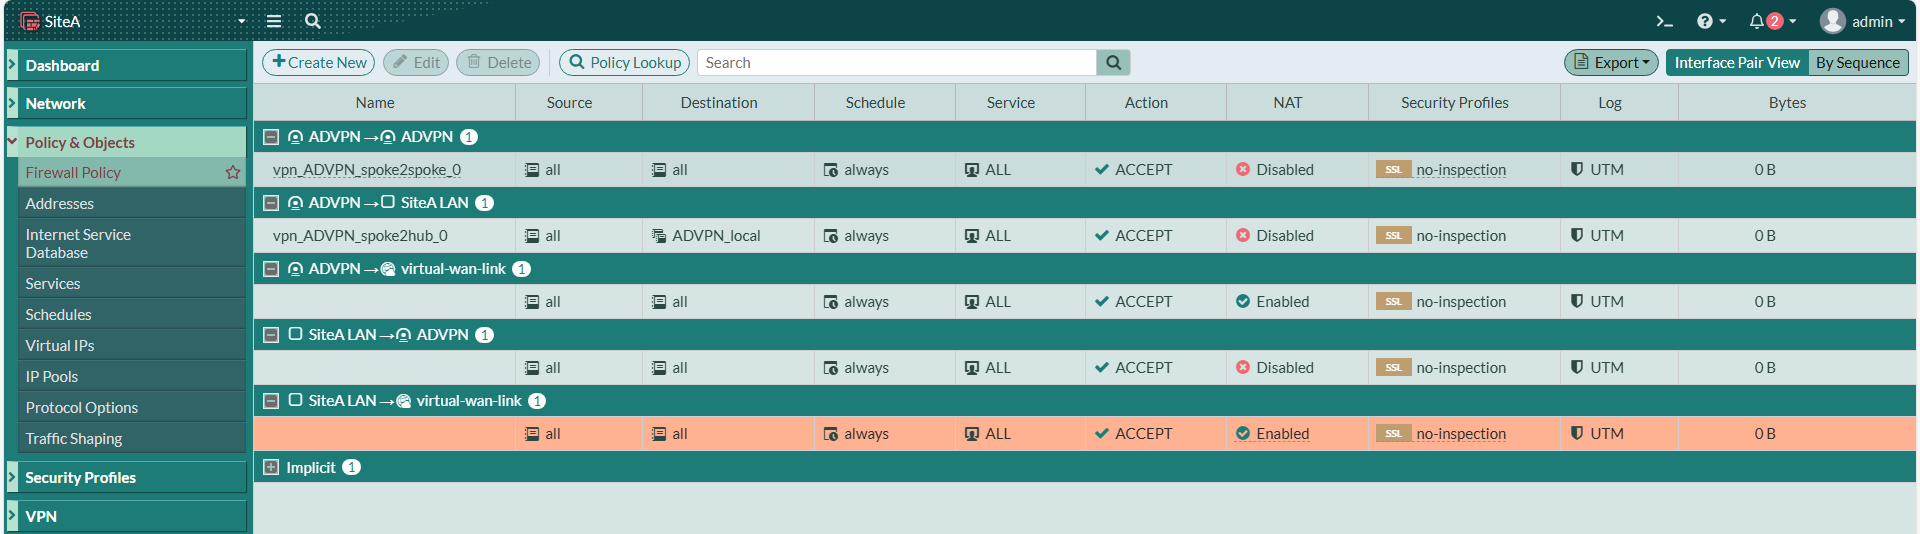](https://mdfk.goddamn.idv.tw/uploads/images/gallery/2024-08/z0wH5QQVZY.png)
### Spoke設定過程
#### **SiteB**設定Interface
一樣,先設定好**SiteB**的Interface
[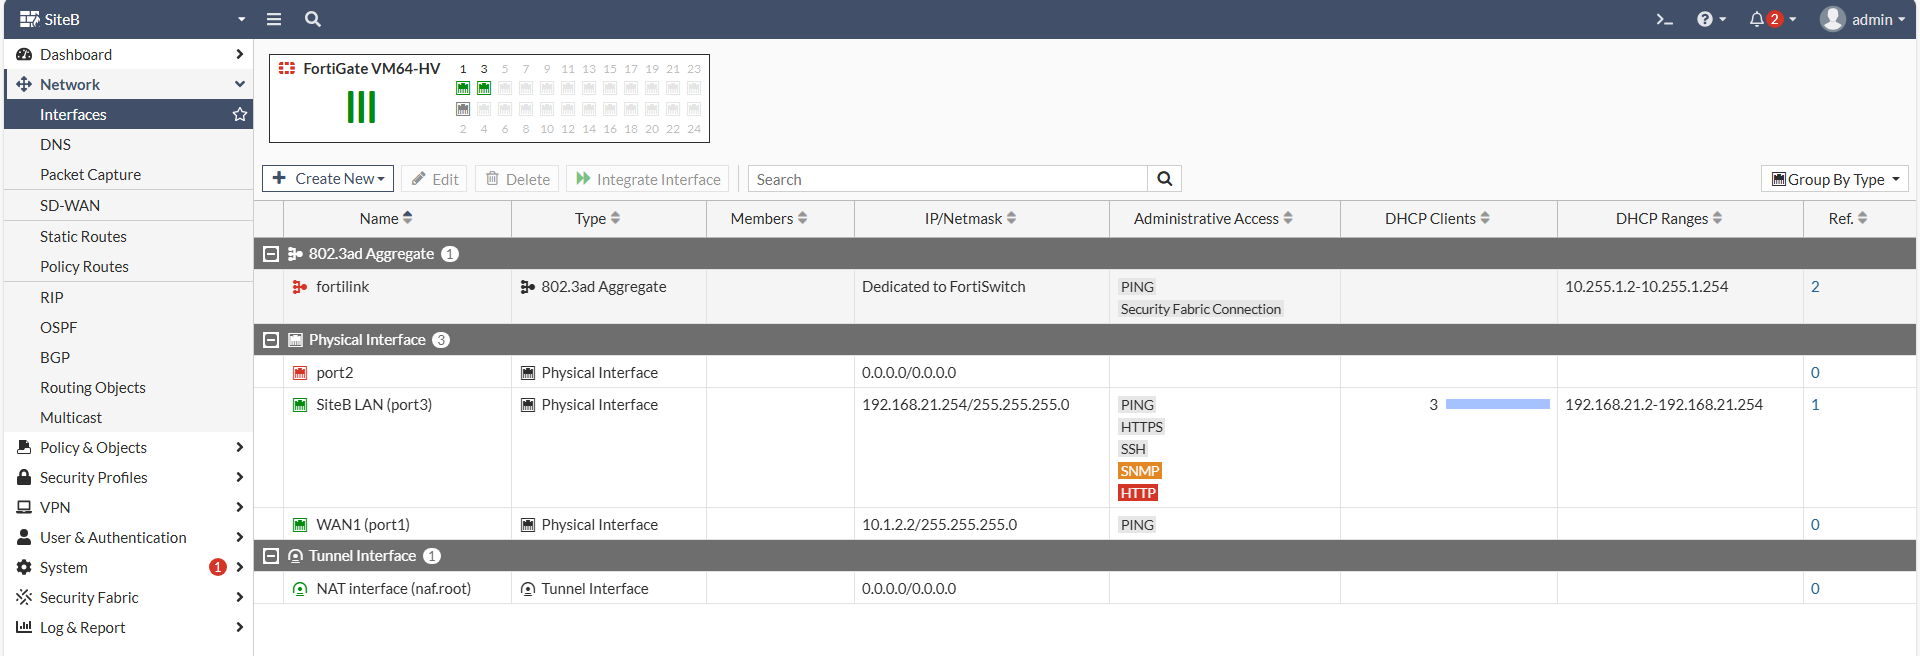](https://mdfk.goddamn.idv.tw/uploads/images/gallery/2024-08/qFIJcQzcN7.png)
WAN的部分,我用DHCP來模擬PPPOE,可以看到自動取得了IP & Gateway
[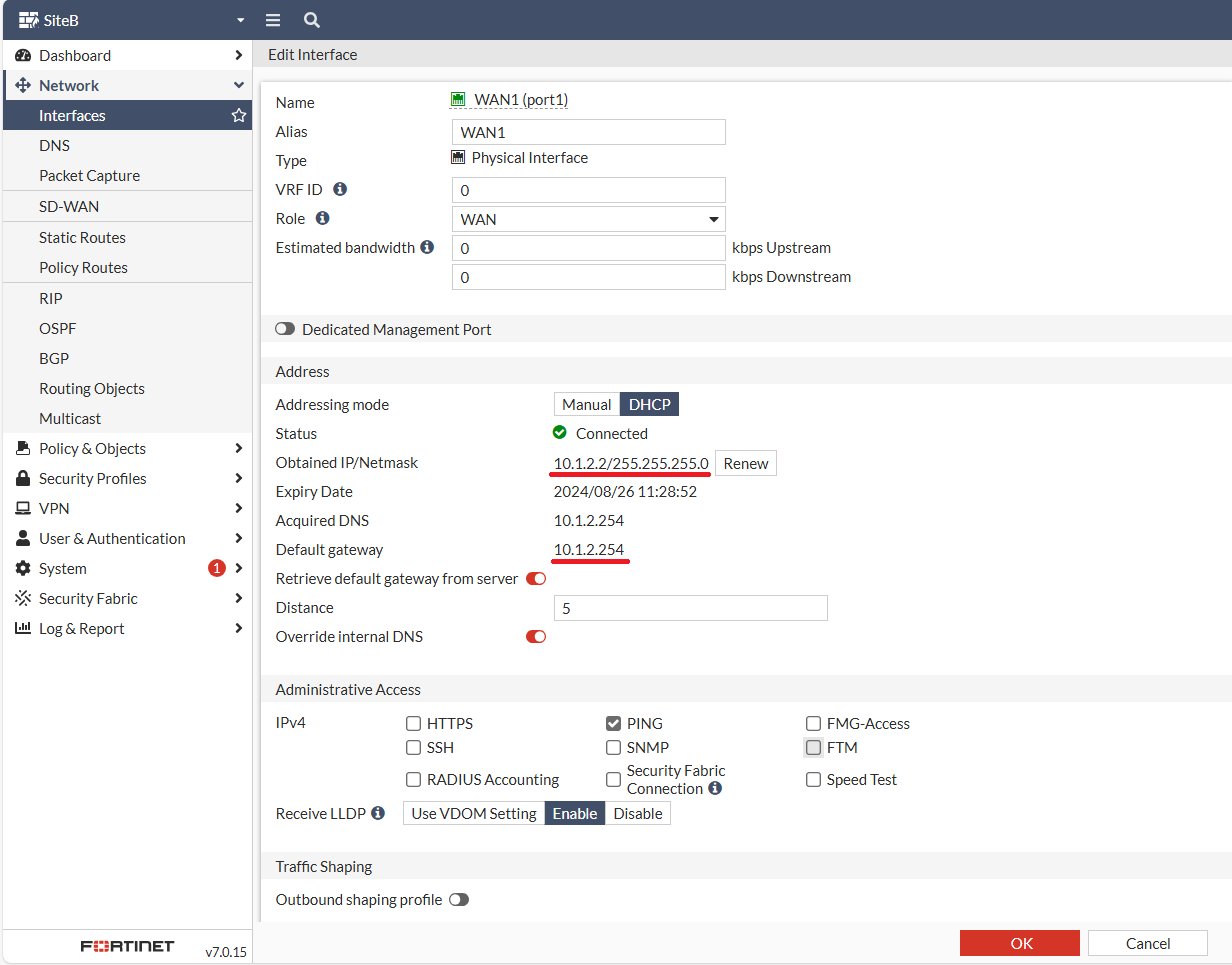](https://mdfk.goddamn.idv.tw/uploads/images/gallery/2024-08/fnMRgPJyHt.png)
#### 建立 **SiteB** IPSEC ADVPN Spoke
至 VPN 建立 IPSEC Tunnel
這一次我們選擇建立Spoke
[](https://mdfk.goddamn.idv.tw/uploads/images/gallery/2024-08/53aDM05u1C.png)
鍵入SiteA的WAN IP、Pre-shared Key
[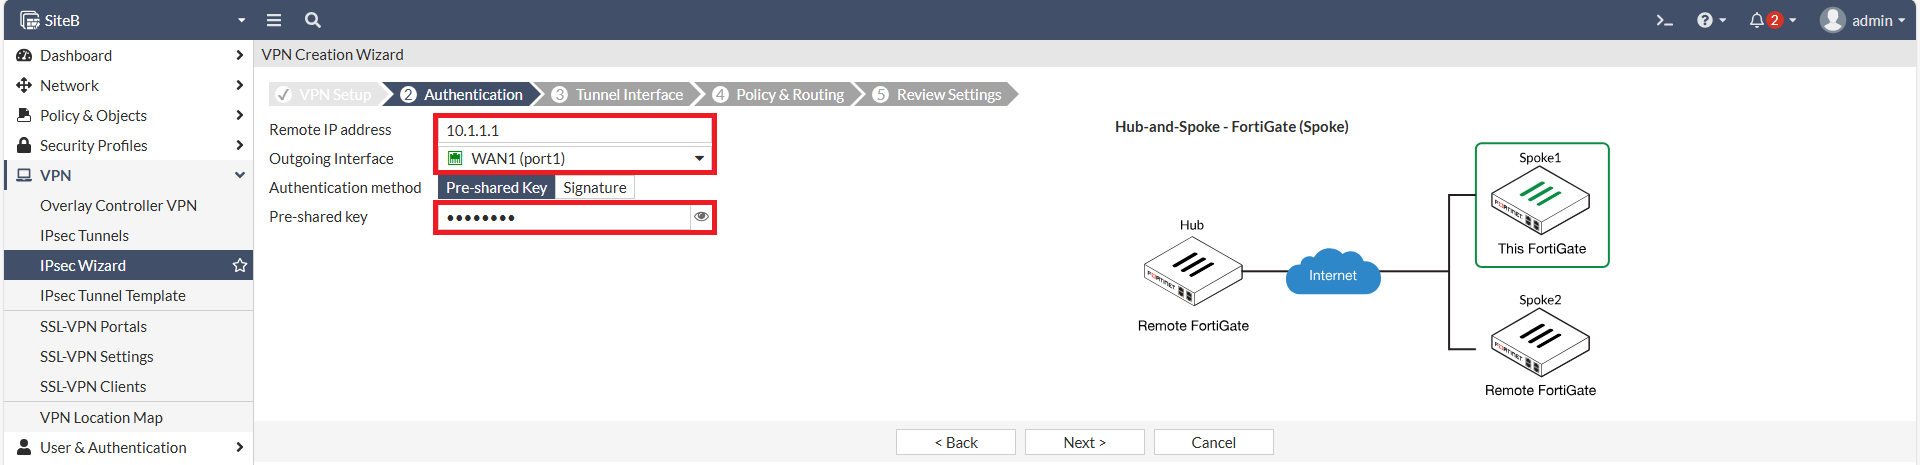](https://mdfk.goddamn.idv.tw/uploads/images/gallery/2024-08/Biuf8l2QRr.png)
設定Local IPSEC IP、Remote IP設為**SiteA**的 IPSEC IP 172.17.1.1/24
[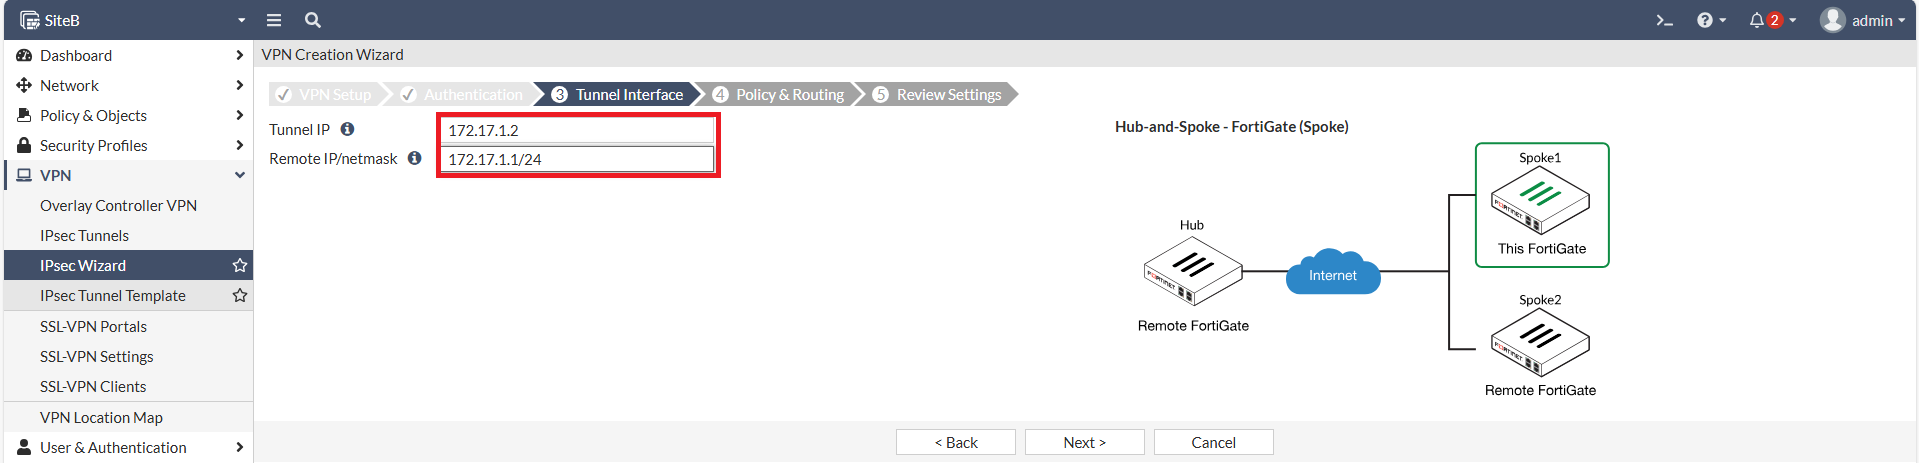](https://mdfk.goddamn.idv.tw/uploads/images/gallery/2024-08/H3mKEBol2B.png)
設定Local AS、Local Interface、Local Subnets。
[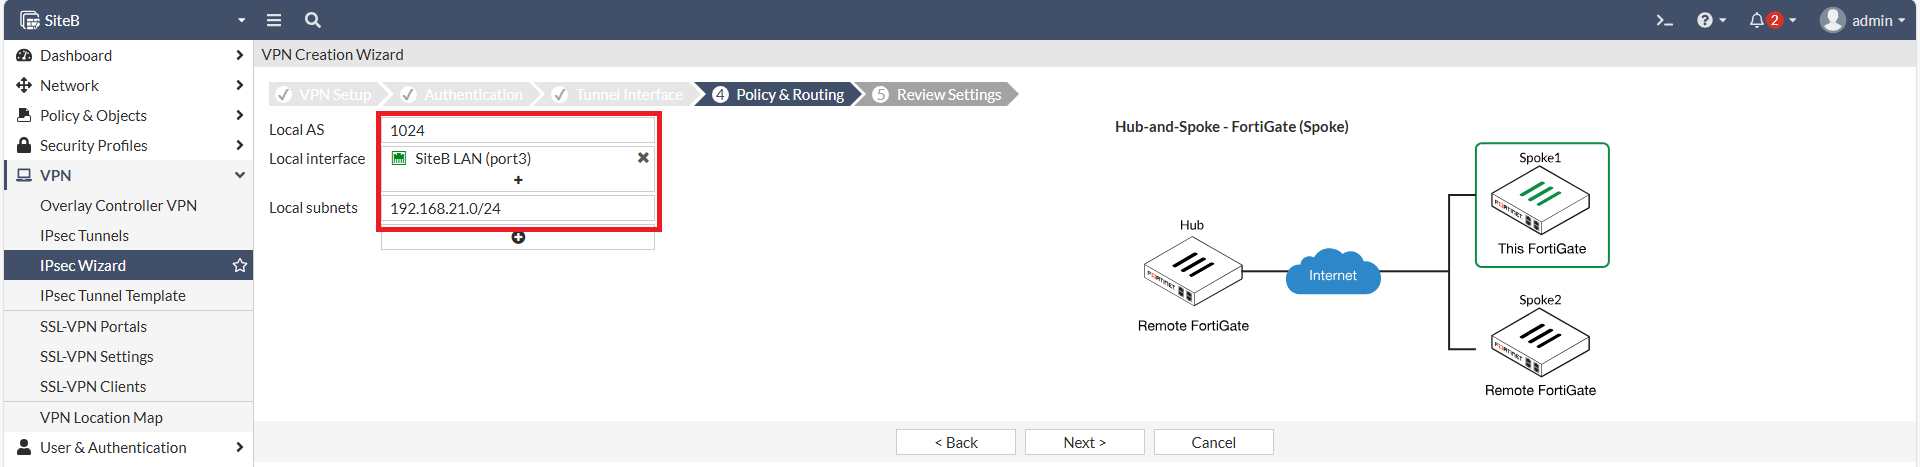](https://mdfk.goddamn.idv.tw/uploads/images/gallery/2024-08/2DIDRXGYxx.png)
Wizzard建立完成
[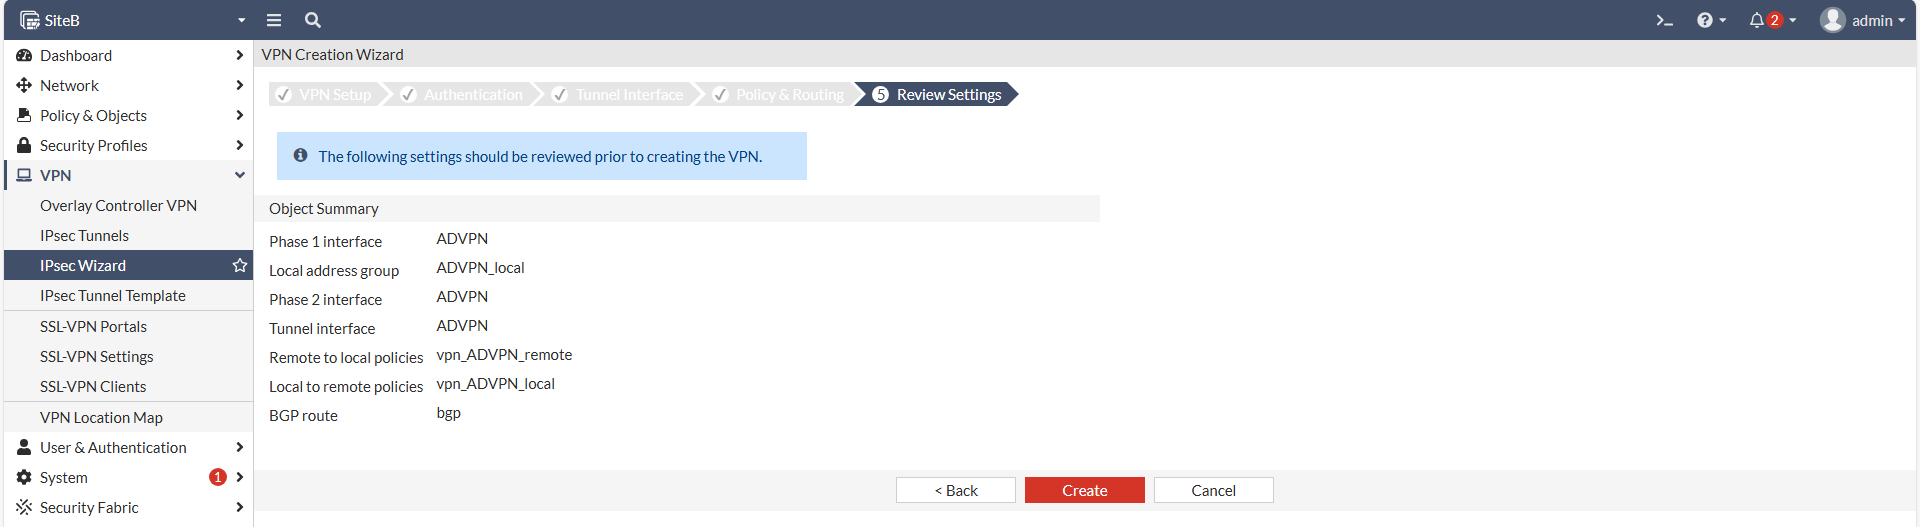](https://mdfk.goddamn.idv.tw/uploads/images/gallery/2024-08/FZlnT6PMcI.png)
[](https://mdfk.goddamn.idv.tw/uploads/images/gallery/2024-08/EZnpaJSjaq.png)
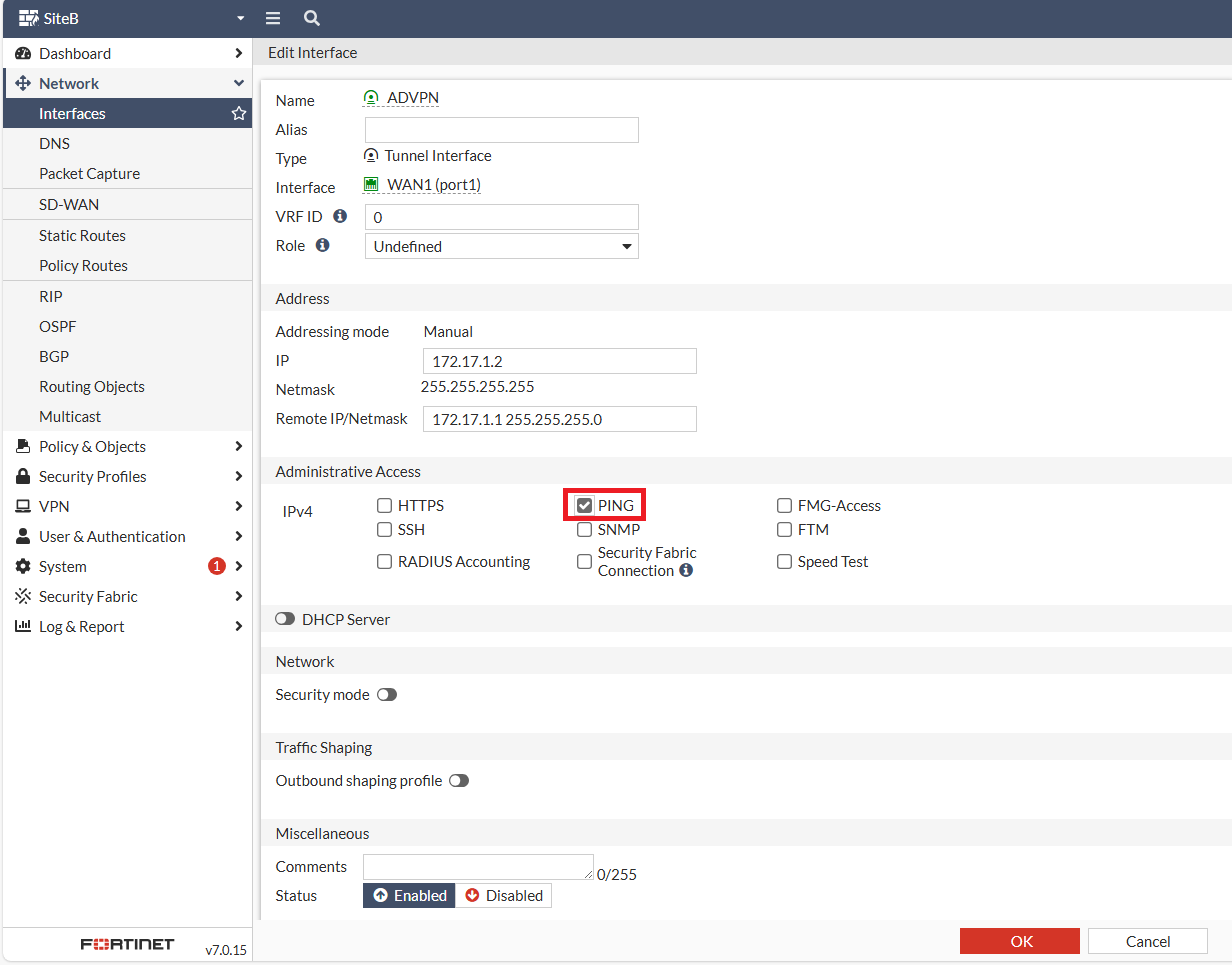
回到Interface,一樣將**ADVPN** Interface 的 Ping 打開,我就不贅述了。
#### 設定BGP
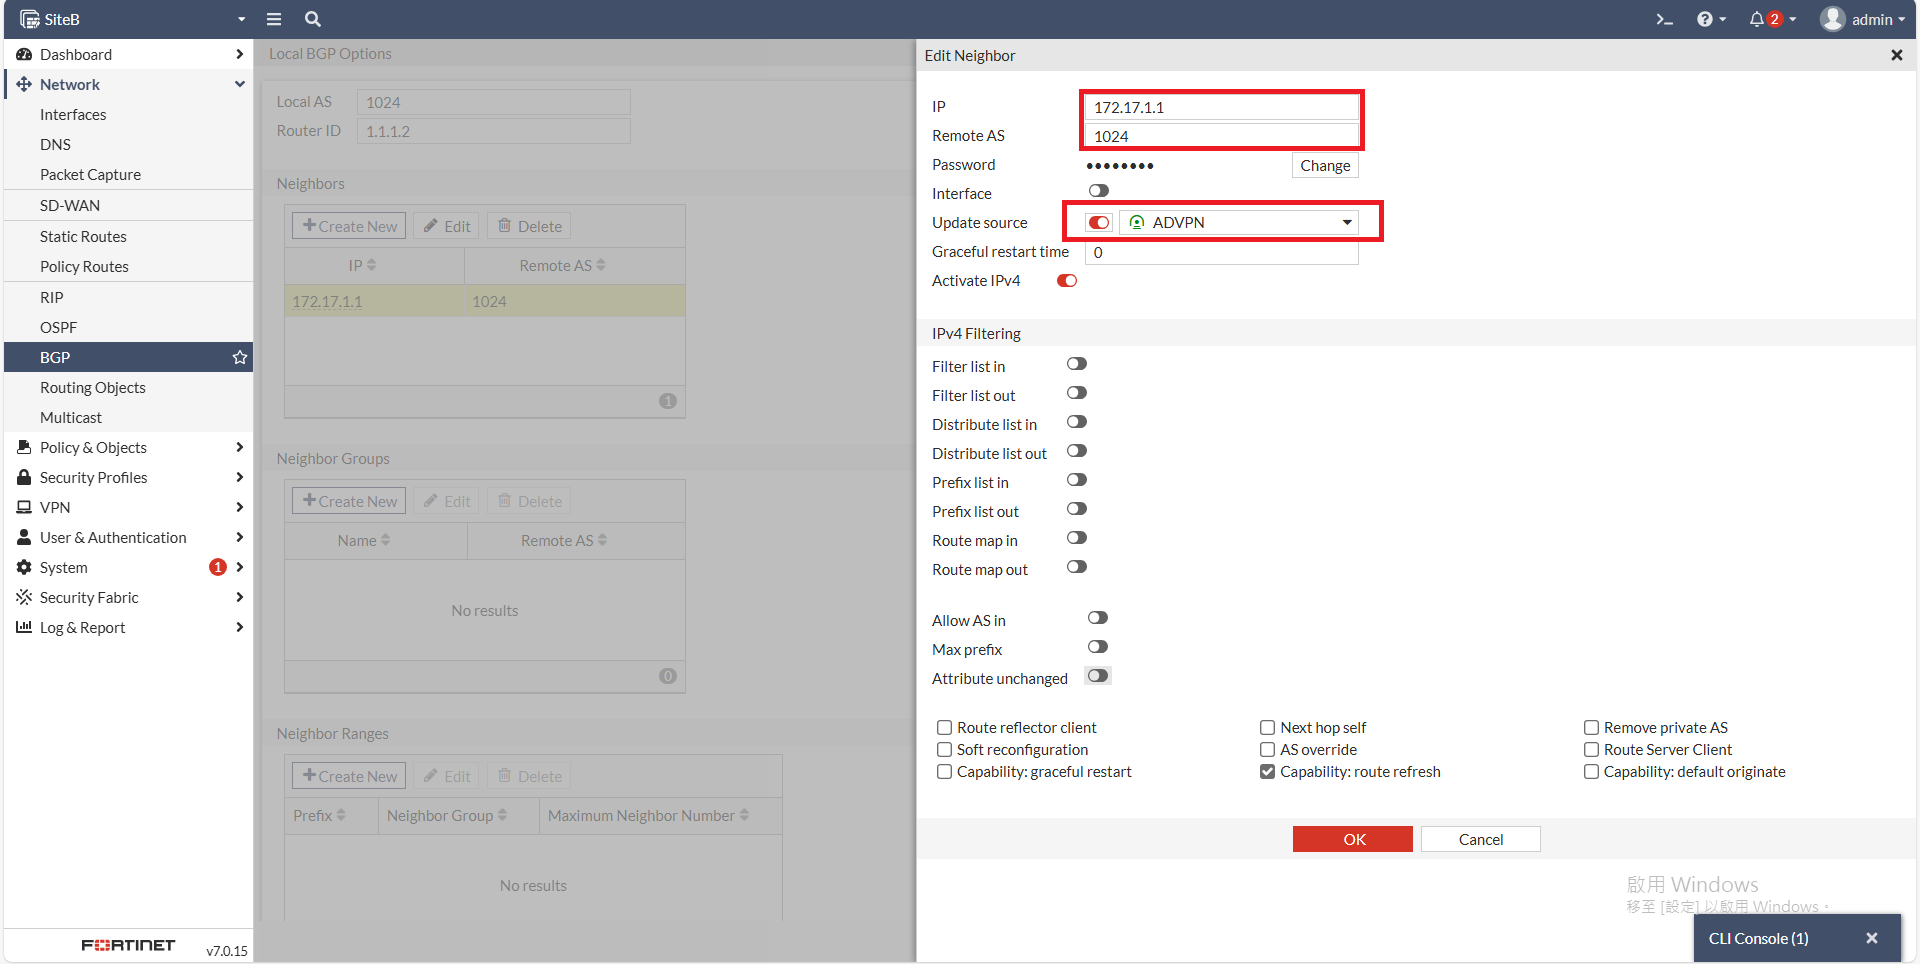
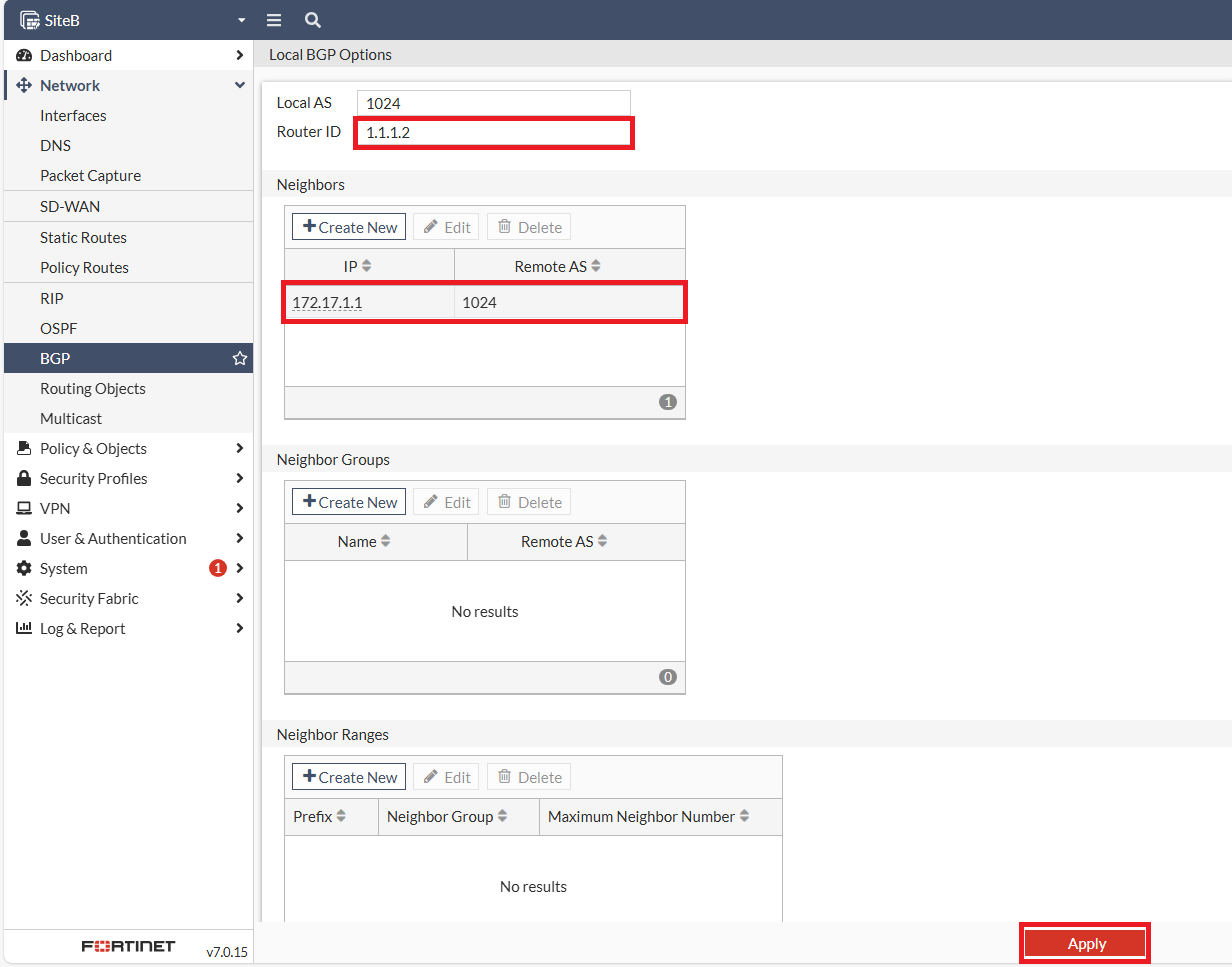
設定**SiteB**的Router ID、Neighbors設定 **SiteA** 的IPSEC IP
Update Source 選擇 ADVPN
[](https://mdfk.goddamn.idv.tw/uploads/images/gallery/2024-08/o9mSHVIlKO.png)
記得**要Apply !!**
其實這個時候IPSEC應該已經起來了
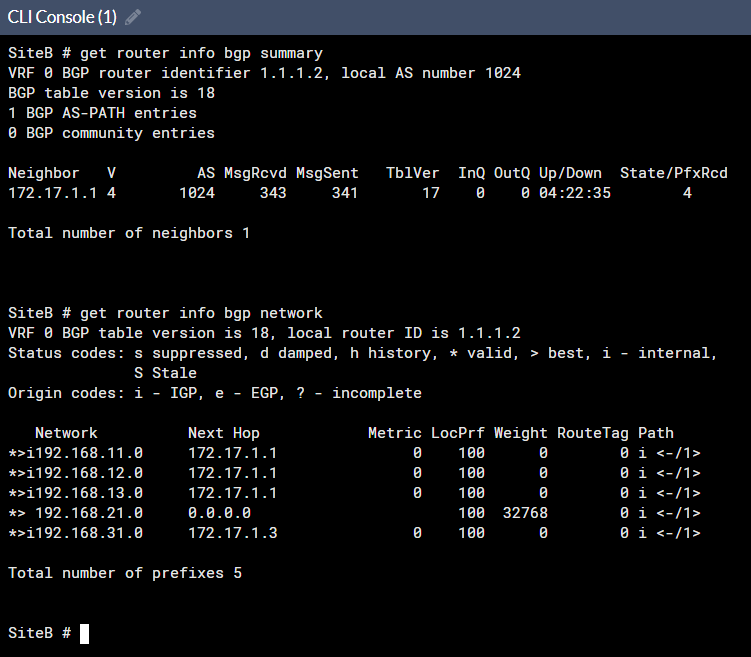
[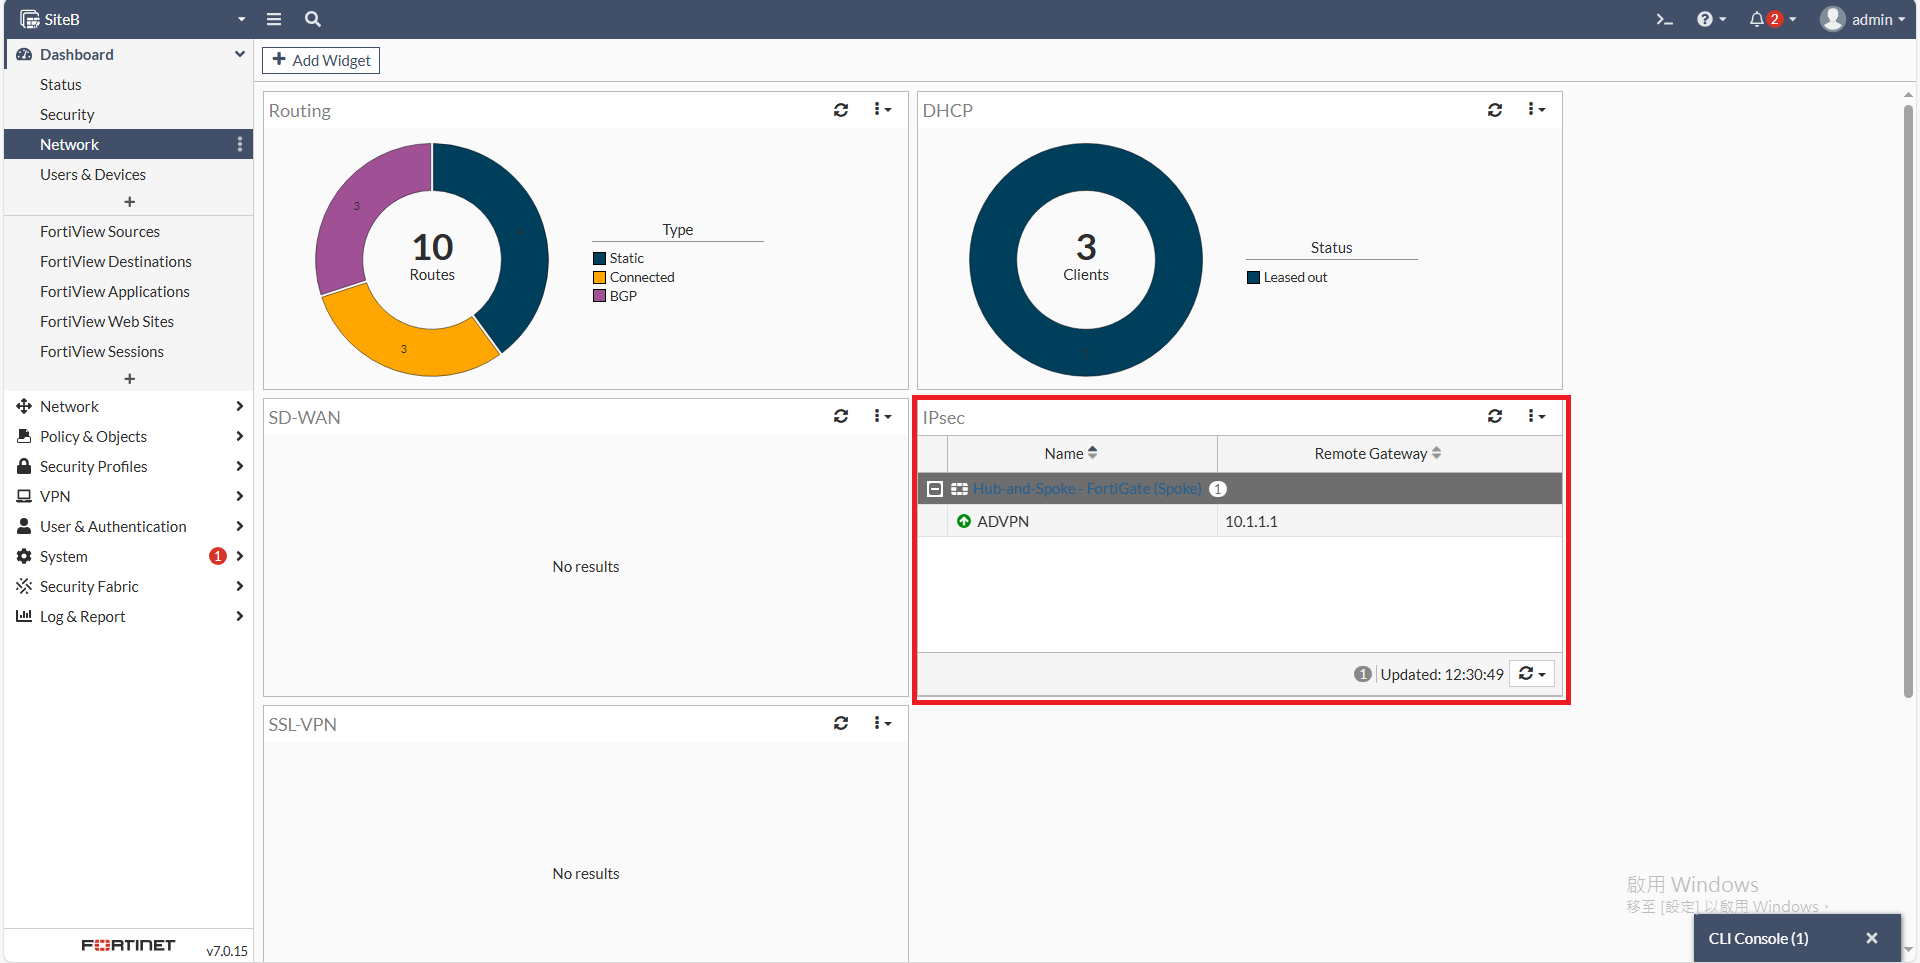](https://mdfk.goddamn.idv.tw/uploads/images/gallery/2024-08/b0Crfs8FGW.png)
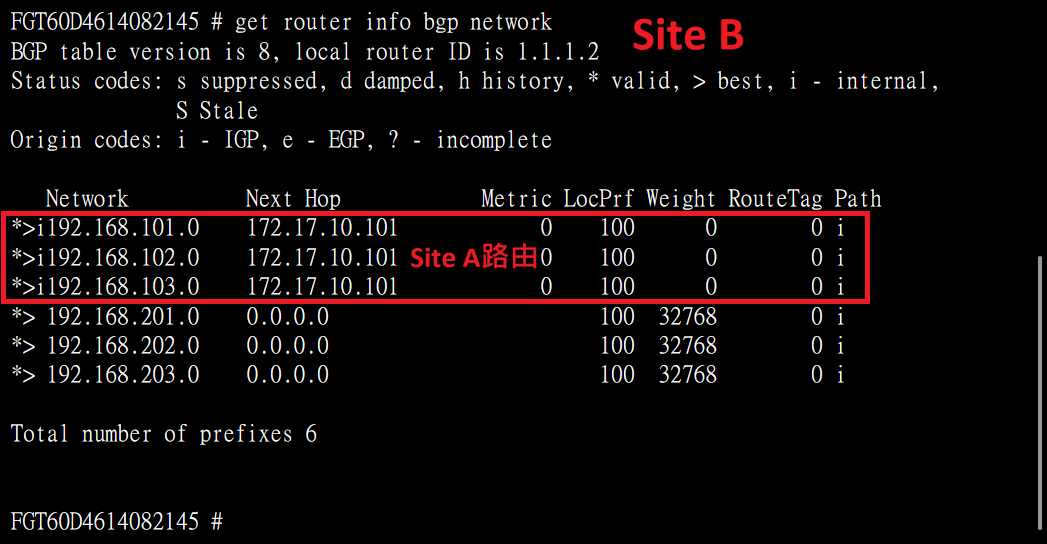
確認BGP狀態良好,**SiteA**的路由有同步過來
```
get router info bgp summary
get router info bgp network
```

#### 確認Firewall Policy
Wizzard都幫我們建好了,這樣足矣
[](https://mdfk.goddamn.idv.tw/uploads/images/gallery/2024-08/ZFGngrZBv1.png)
#### 設定Static Route
所以大功告成了 **(?)**
不不不,**路由在這裡才是整篇的關鍵**,我們看一下下圖
Default Route 0.0.0.0/0 是往WAN1 Gateway設,但其實我們並沒有設定任何的路由,這個路由是由 PPPOE / DHCP自動派發的
```
get router info routing-table all
```
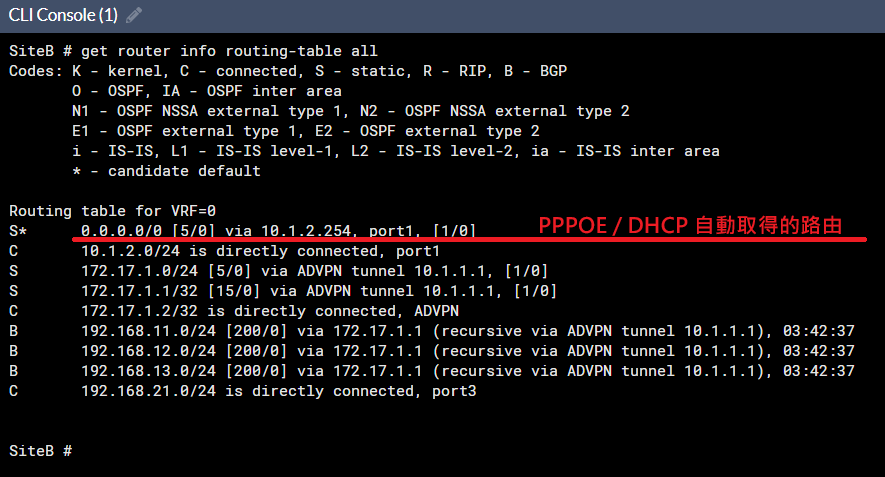
如果依照這種設定,Internet流量會走WAN1出去而不是回到**SiteA**走SD-WAN,所以在這邊我們要變更一下路由設定
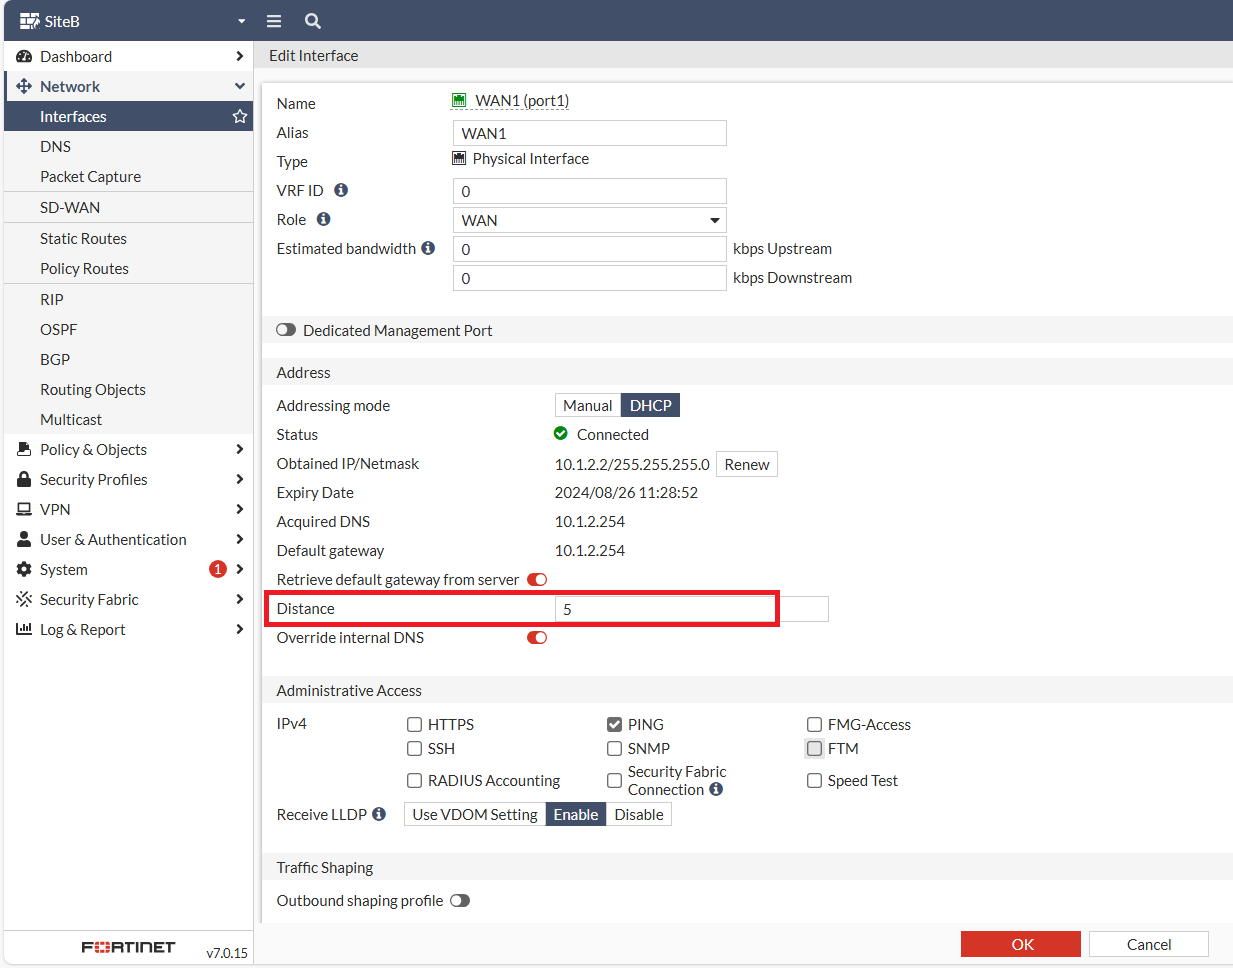
從 WAN Interface 可知,PPPOE / DHCP 預設的 Distance 是 5
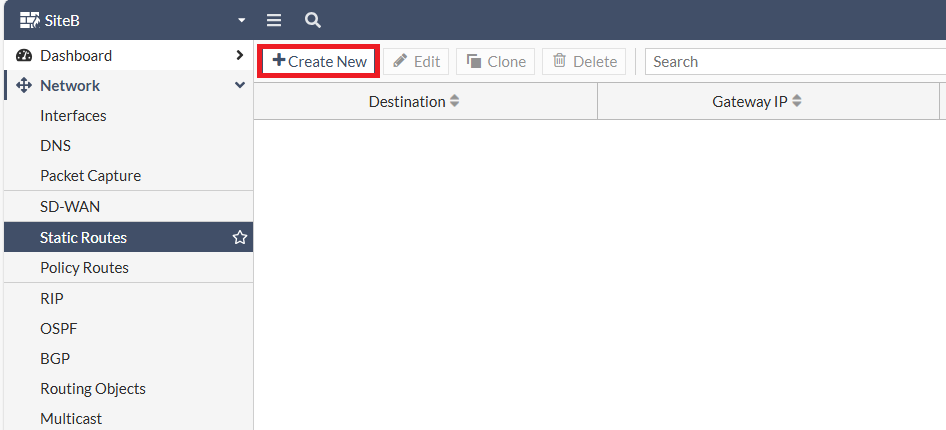
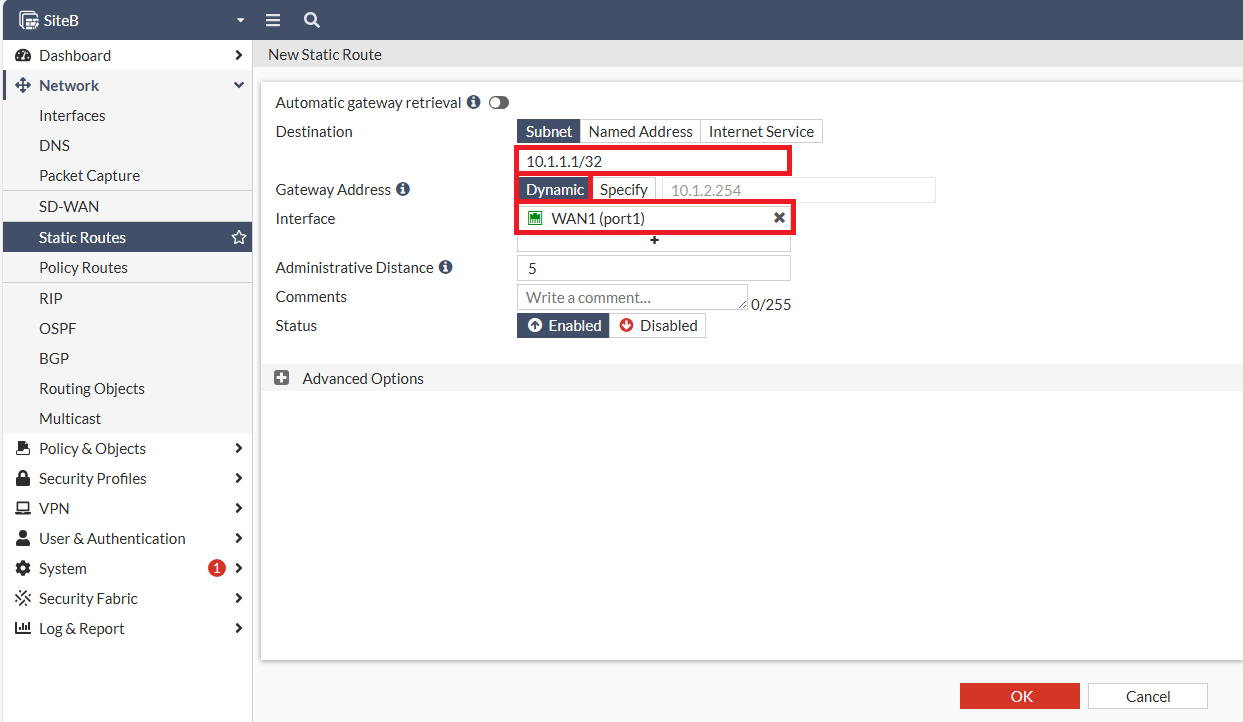
所以在這邊我們要新增兩筆路由
1\. 往 **SiteA** WAN IP 走 WAN1 的 Dynamic Gateway,Distance 一樣設為 5
[](https://mdfk.goddamn.idv.tw/uploads/images/gallery/2024-08/RDn9G6A40D.png)
2\. Default Route 0.0.0.0/0改走 ADVPN,Distance 必須設定比 PPPOE / DHCP 小才會優先走,在此我們設為 1。
[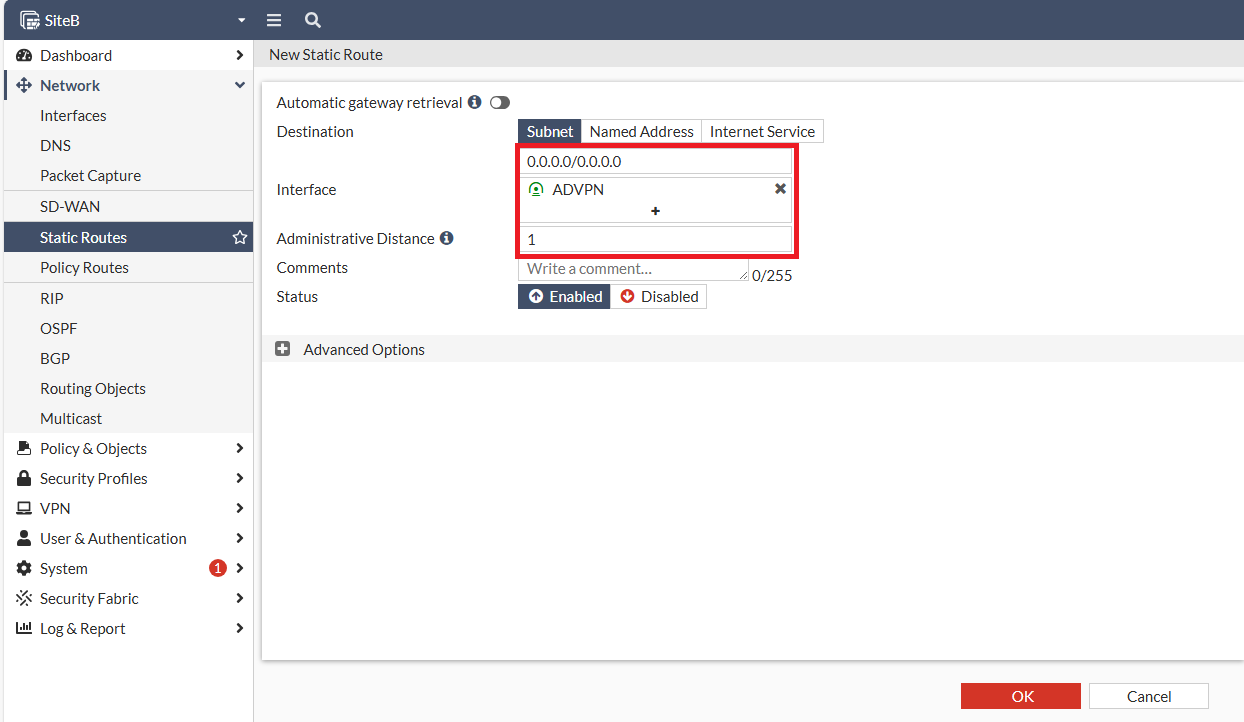](https://mdfk.goddamn.idv.tw/uploads/images/gallery/2024-08/QA4HZZK8Du.png)
[](https://mdfk.goddamn.idv.tw/uploads/images/gallery/2024-08/VzmHfyBu9R.png)
設定完再看一次路由
[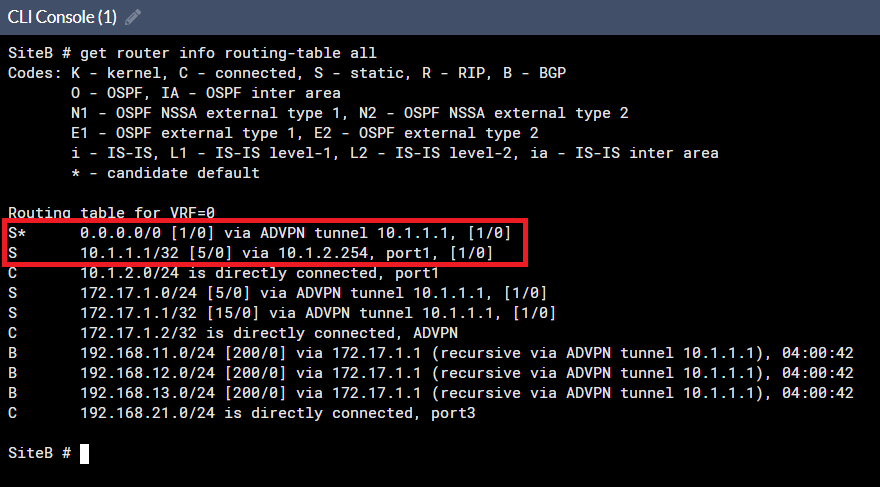](https://mdfk.goddamn.idv.tw/uploads/images/gallery/2024-08/JNLcbJejN5.png)
**SiteB**到此設定就大功告成了
#### 建立 **SiteC** IPSEC ADVPN Spoke
比照**SiteB**步驟建立,不贅述
### 狀態確認
#### IPSEC狀態
回到**SiteA**,確認ADVPN都有自動連上來了
[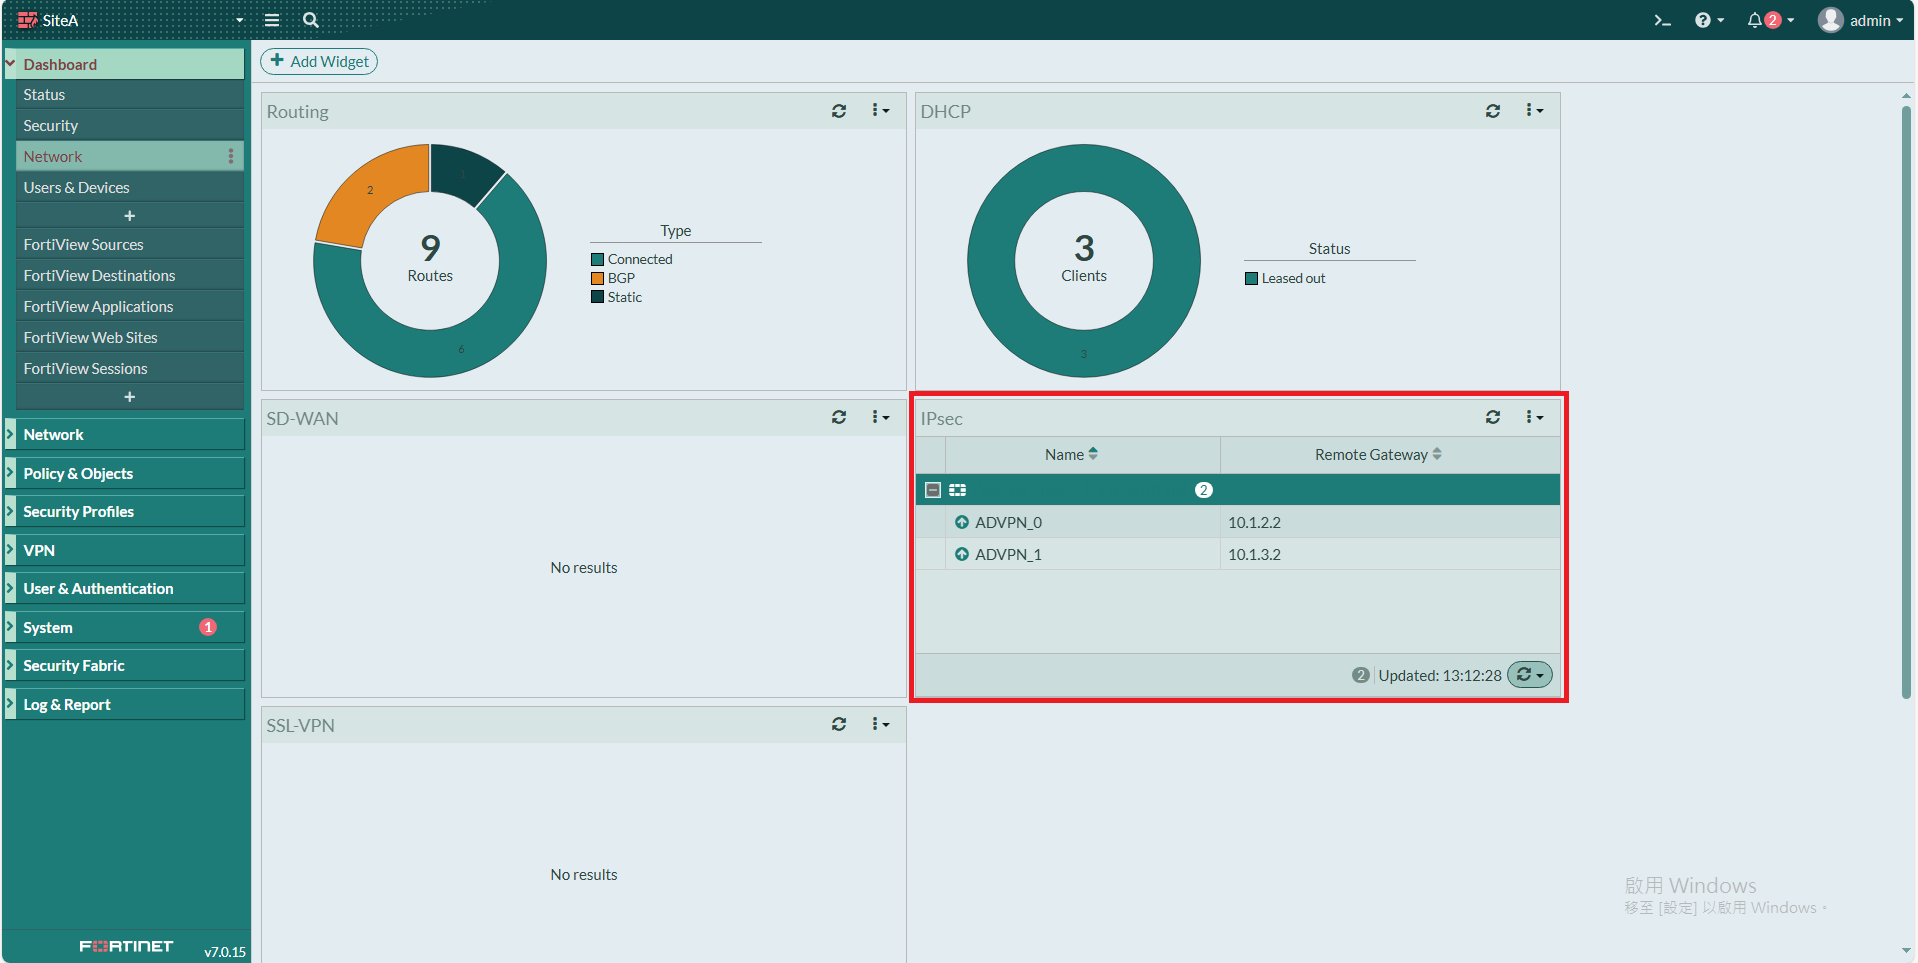](https://mdfk.goddamn.idv.tw/uploads/images/gallery/2024-08/8HEBXkmZhm.png)
[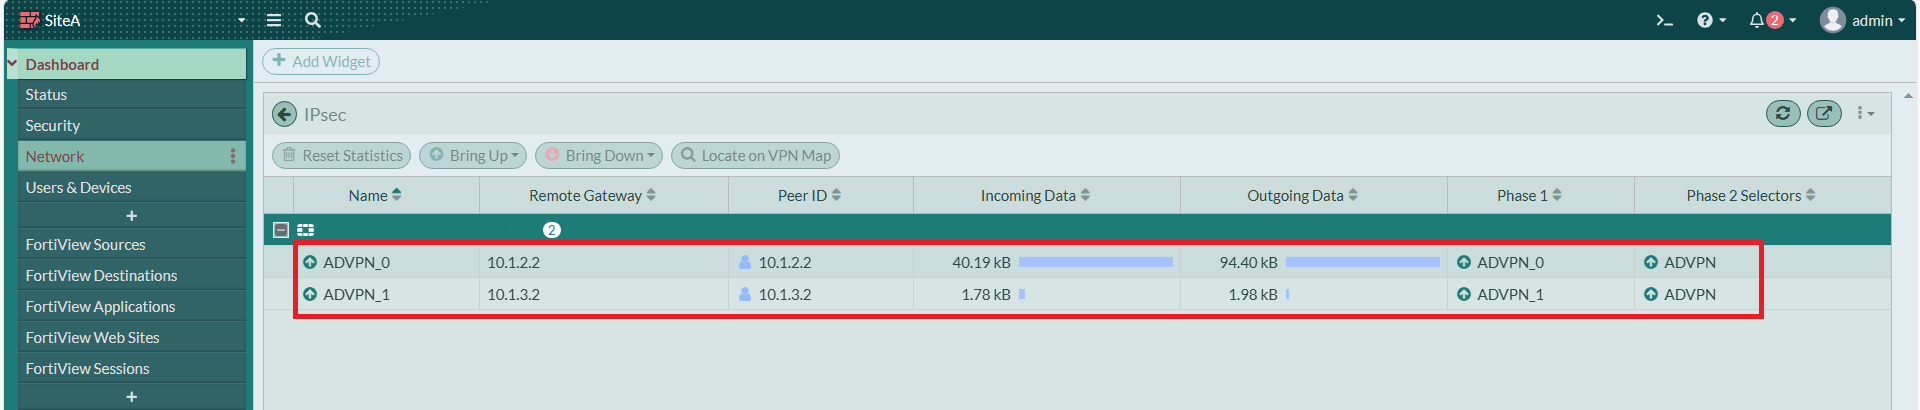](https://mdfk.goddamn.idv.tw/uploads/images/gallery/2024-08/QD3Pz4oZEO.png)
#### BGP 狀態
```
get router info bgp summary
get router info bgp network
```
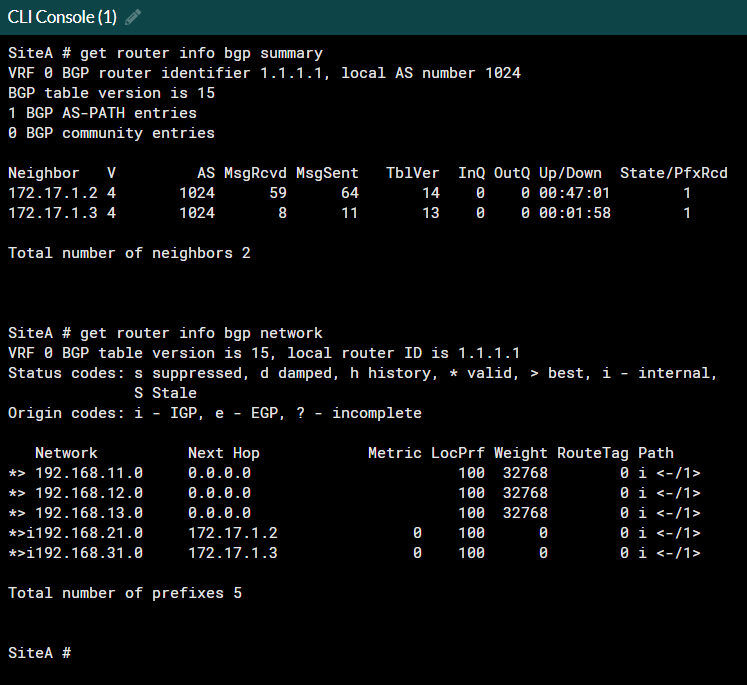
**SiteA**
**SiteB**
[](https://mdfk.goddamn.idv.tw/uploads/images/gallery/2024-08/EAYJO2Dy57.png)
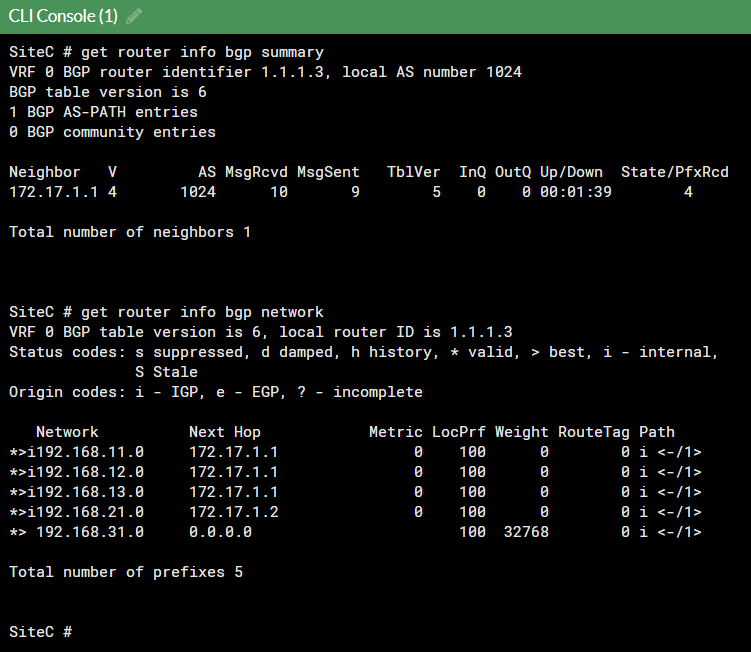
**SiteC**
#### 路由狀態
**SiteA**
[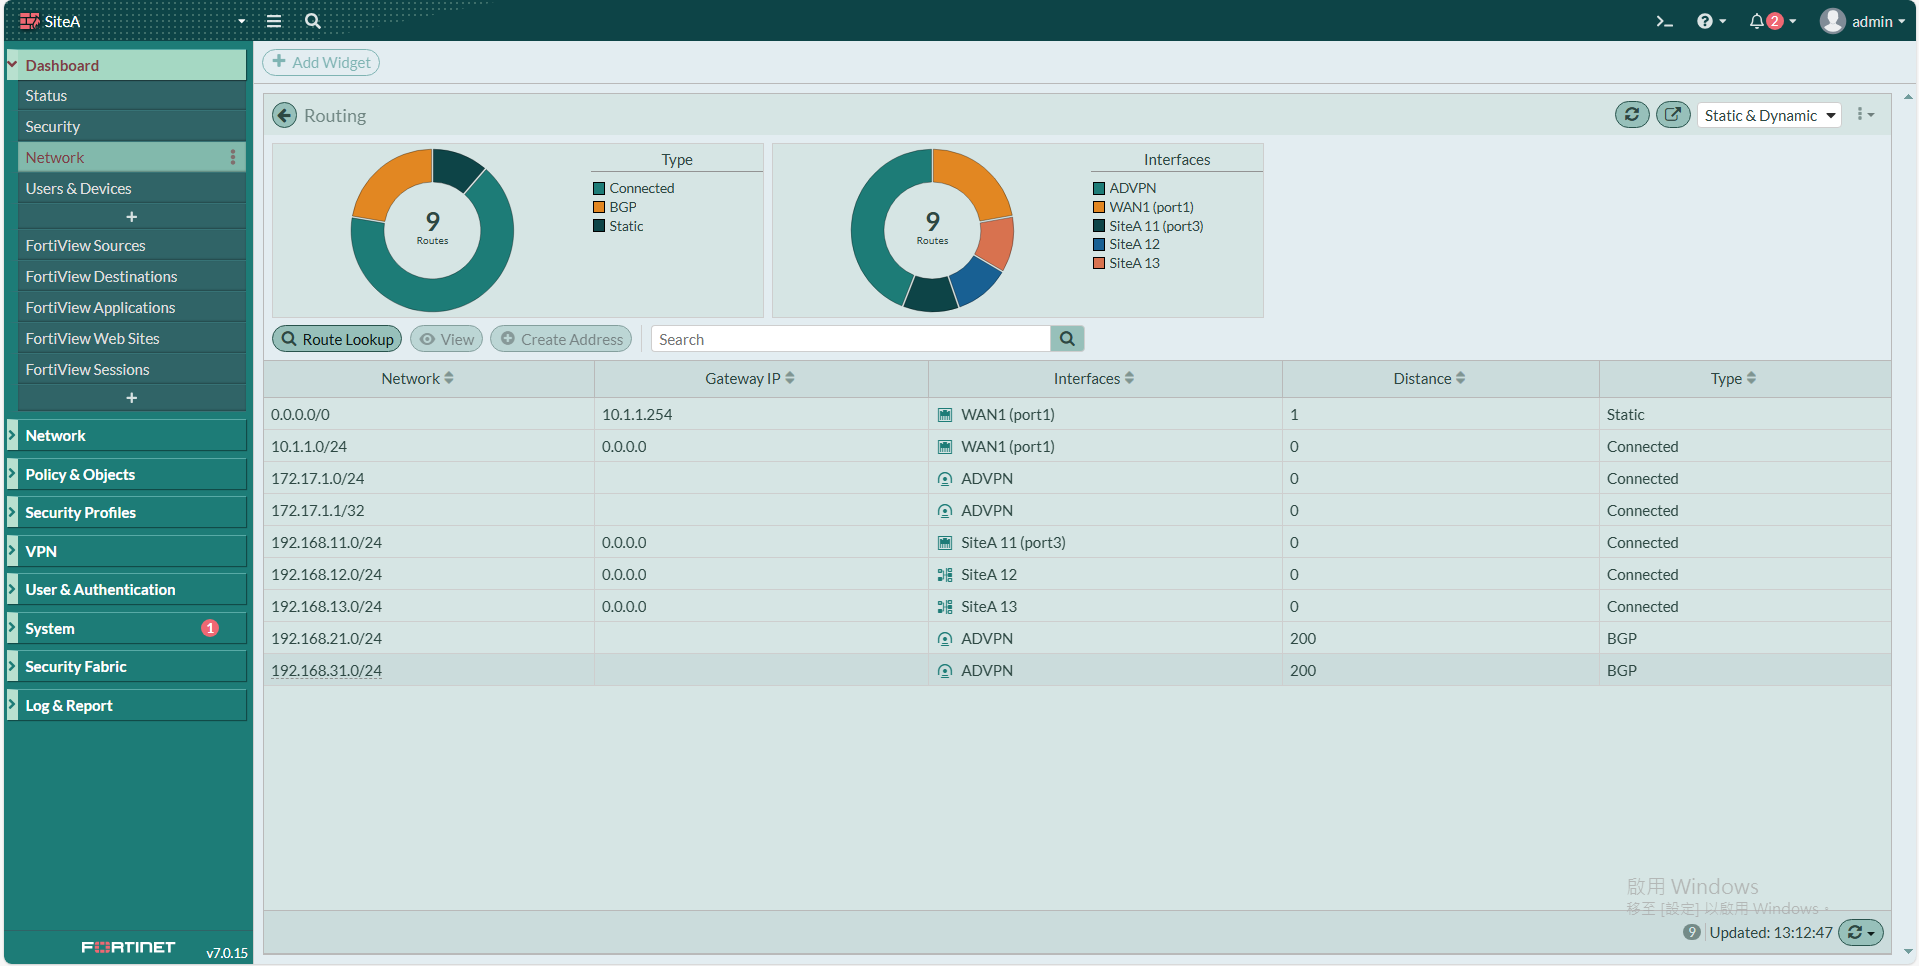](https://mdfk.goddamn.idv.tw/uploads/images/gallery/2024-08/GCYM5HRcI9.png)
**SiteB**
[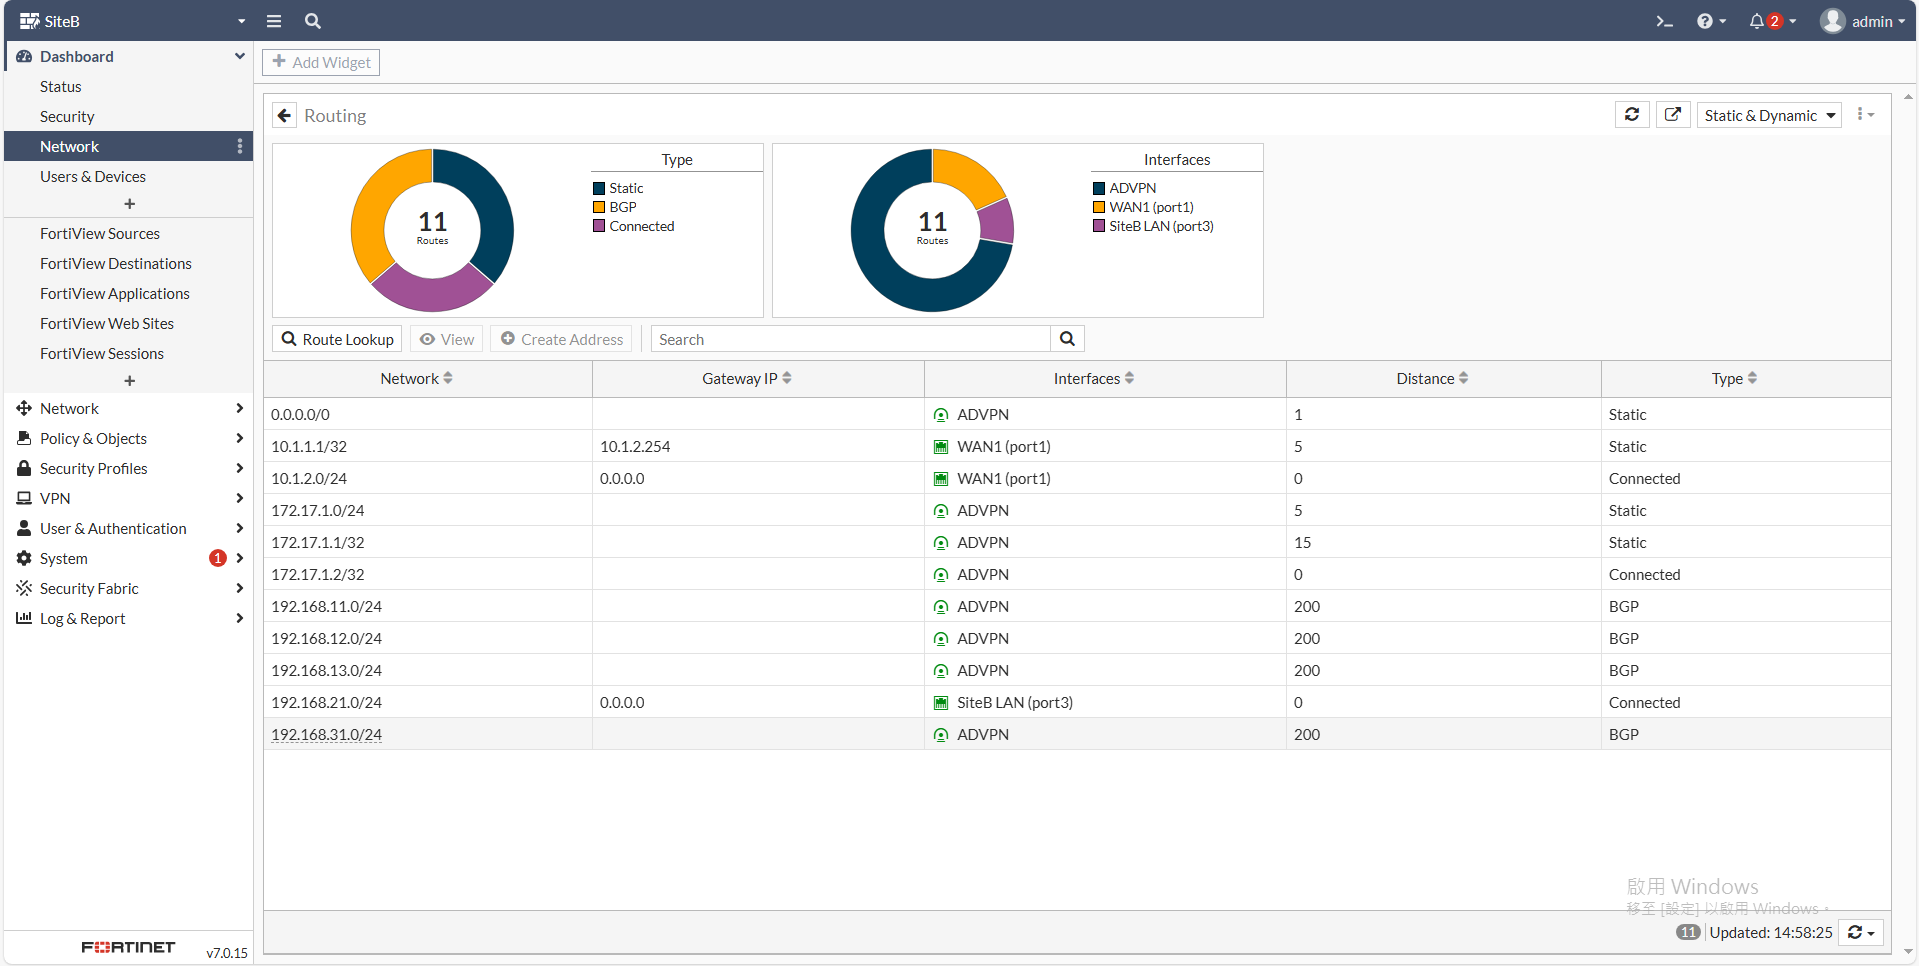](https://mdfk.goddamn.idv.tw/uploads/images/gallery/2024-08/9ejXgtTZHN.png)
**SiteC**
[](https://mdfk.goddamn.idv.tw/uploads/images/gallery/2024-08/ELixXre2lW.png)
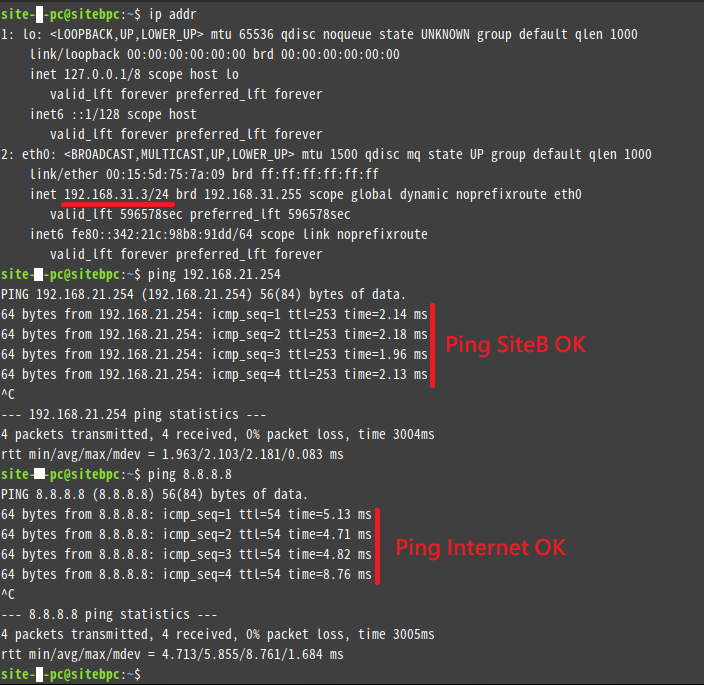
### 連線測試
我在 **SiteC** 放了一台PC,Ping **SiteB** LAN Interface OK、Ping Internet OK
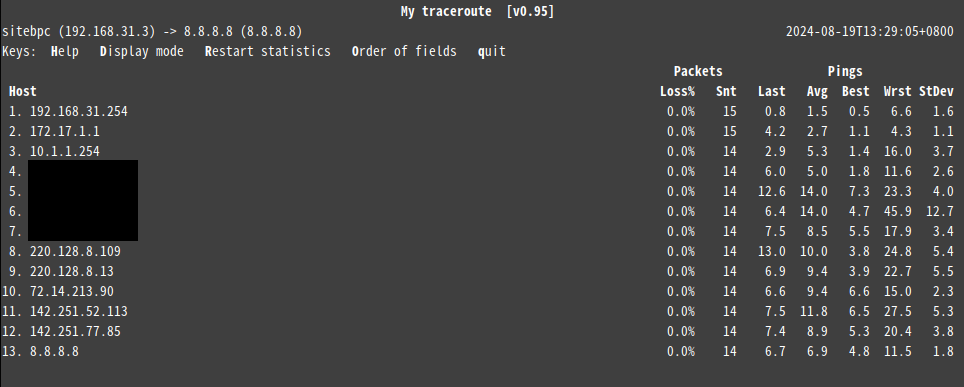
Traceroute **SiteB** Interface,透過**SiteA**過去 OK

Traceroute Internet,透過**SiteA**過去 OK
### 結語
由於中華電信的PPPOE在未申請固定IP的狀況下每72小時更換一次IP,在IP可能不斷變動的狀況下,各分點透過 PPPOE 網路與 HQ IPSEC ADVPN 介接,透過iBGP自動交換路由,並統一由HQ出Internet以利於政策與資安控管,透過這種架構大幅降低了設定的複雜度,同時減少了企業建置VPN的線路成本,是很實用的一種應用提供給大家參考。
# 動態路由
# Fortigate IPSEC + iBGP實作
### **參考資料**
[https://docs.fortinet.com/document/fortigate/7.4.4/administration-guide/763341/basic-bgp-example](https://docs.fortinet.com/document/fortigate/7.4.4/administration-guide/763341/basic-bgp-example)
### **環境說明**
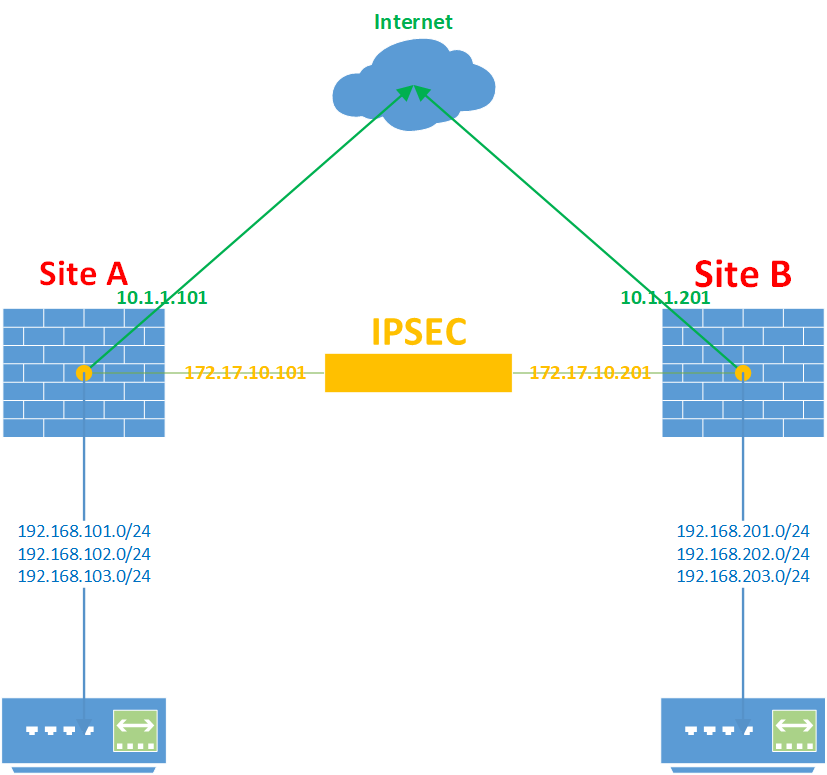
**Site A :** Fortigate 60D Firmware v6.0.17
WAN IP : 10.1.1.101
LAN IP : 192.168.101.0/24、192.168.102.0/24、192.168.103.0/24
IPSEC IP : 172.17.10.101
**Site B :** Fortigate 60D Firmware v6.0.17
WAN IP : 10.1.1.201
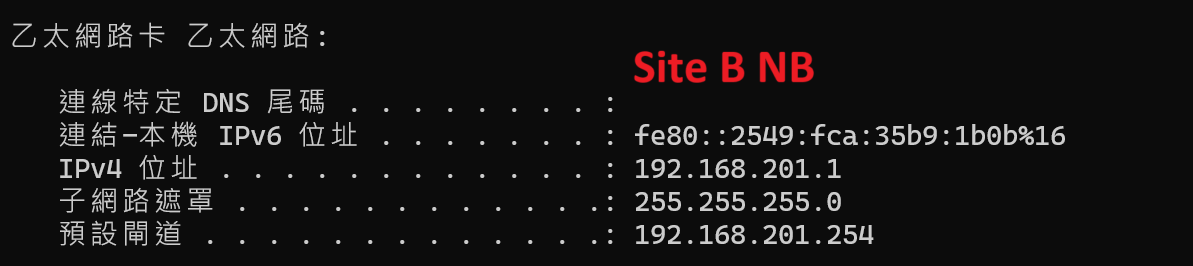
LAN IP : 192.168.201.0/24、192.168.202.0/24、192.168.203.0/24
IPSEC IP : 172.17.10.101
### **設定步驟**
#### 預先設定
首先先將Site A、Site B的WAN、LAN Interface IP設定好,為了後面Policy設定方便我將LAN綁成一個Zone


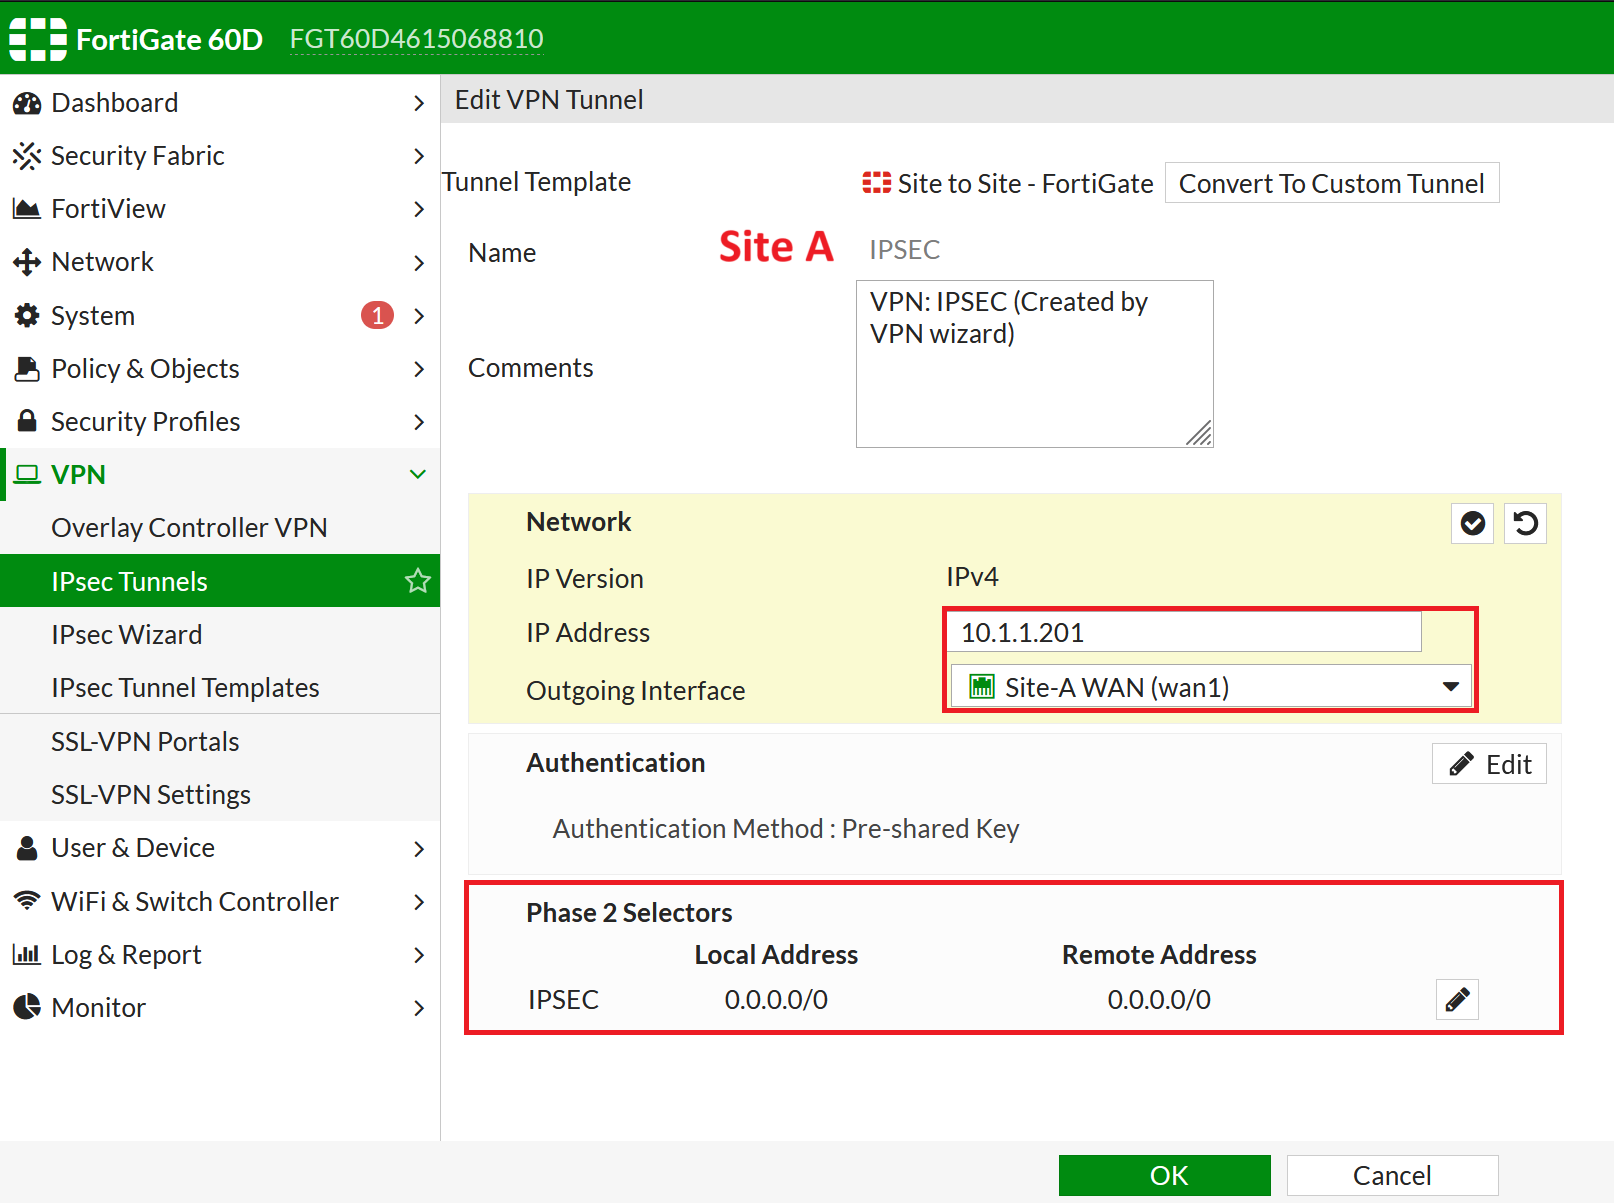
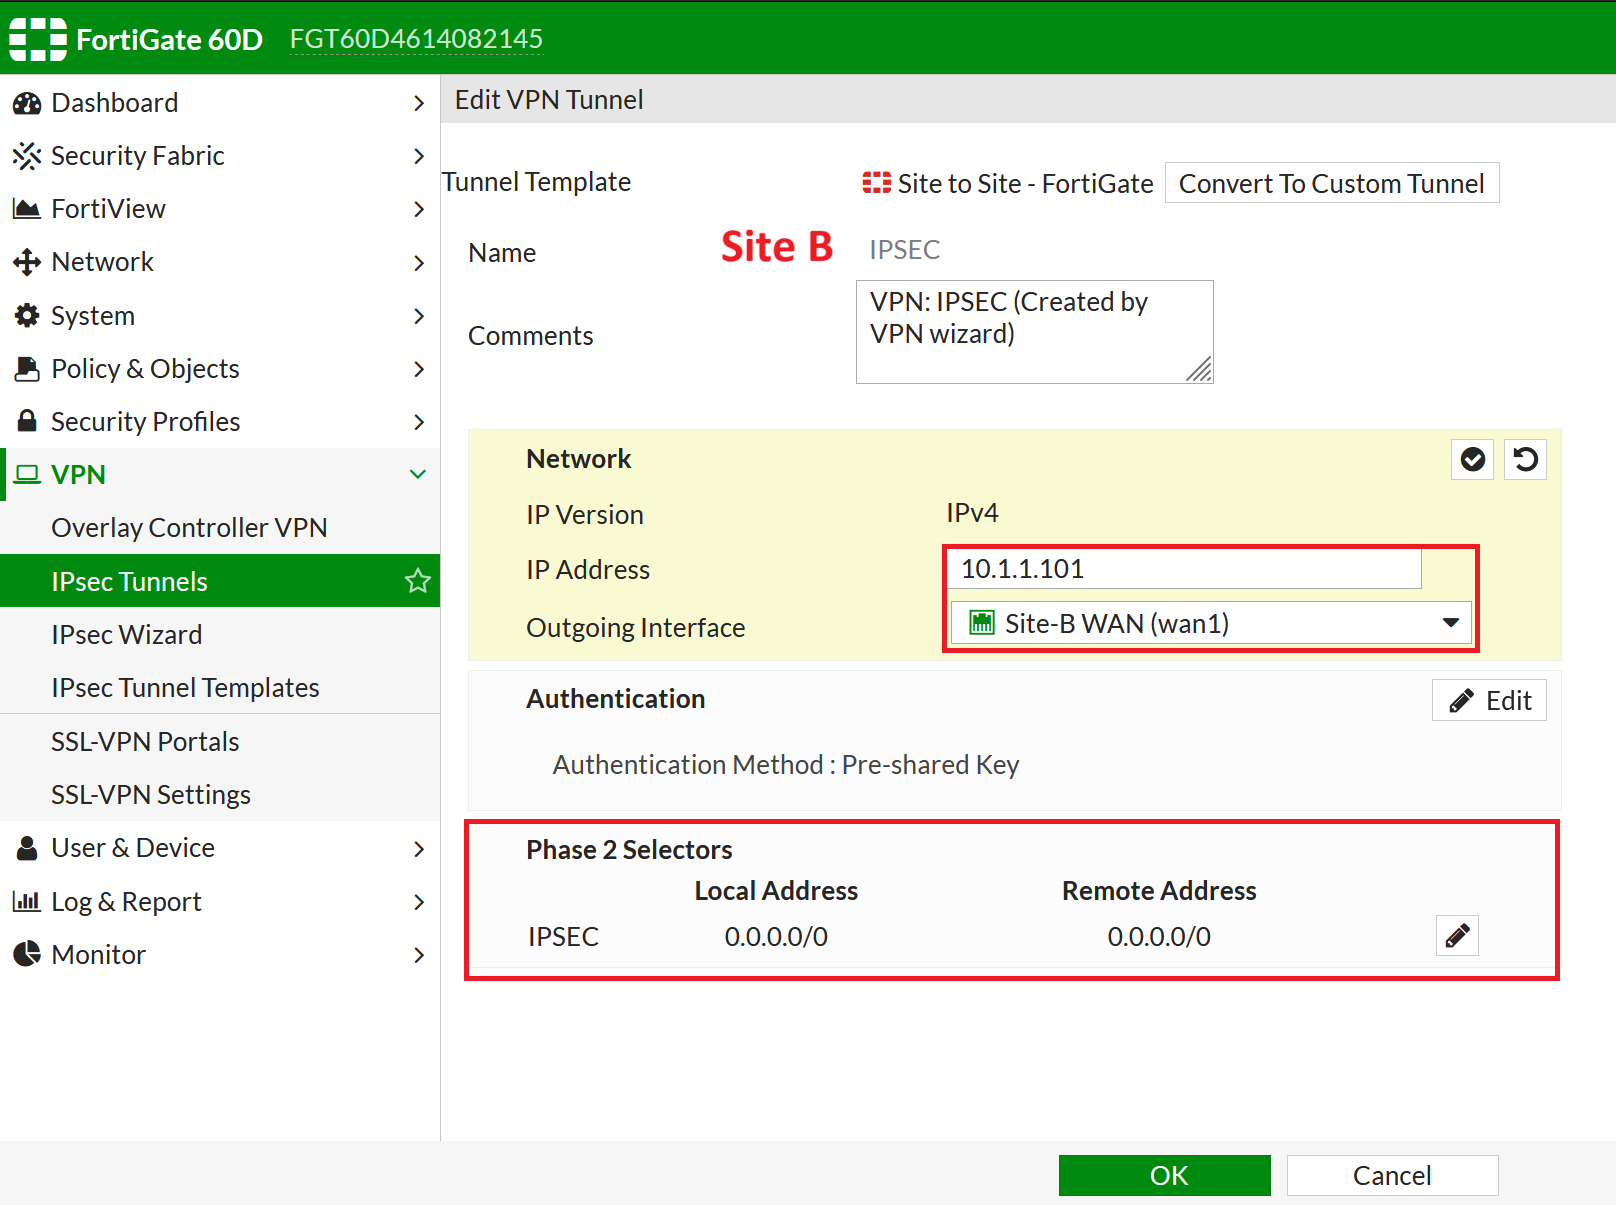
#### 建立IPSEC VPN
IP指向對方的WAN IP、Local & Remote Address 設定為 0.0.0.0/0
#### 設定IPSEC介面IP
對應Site A、Site B的設定,設定其Interface IP Address、Remote IP,並允許Ping (方便偵錯)
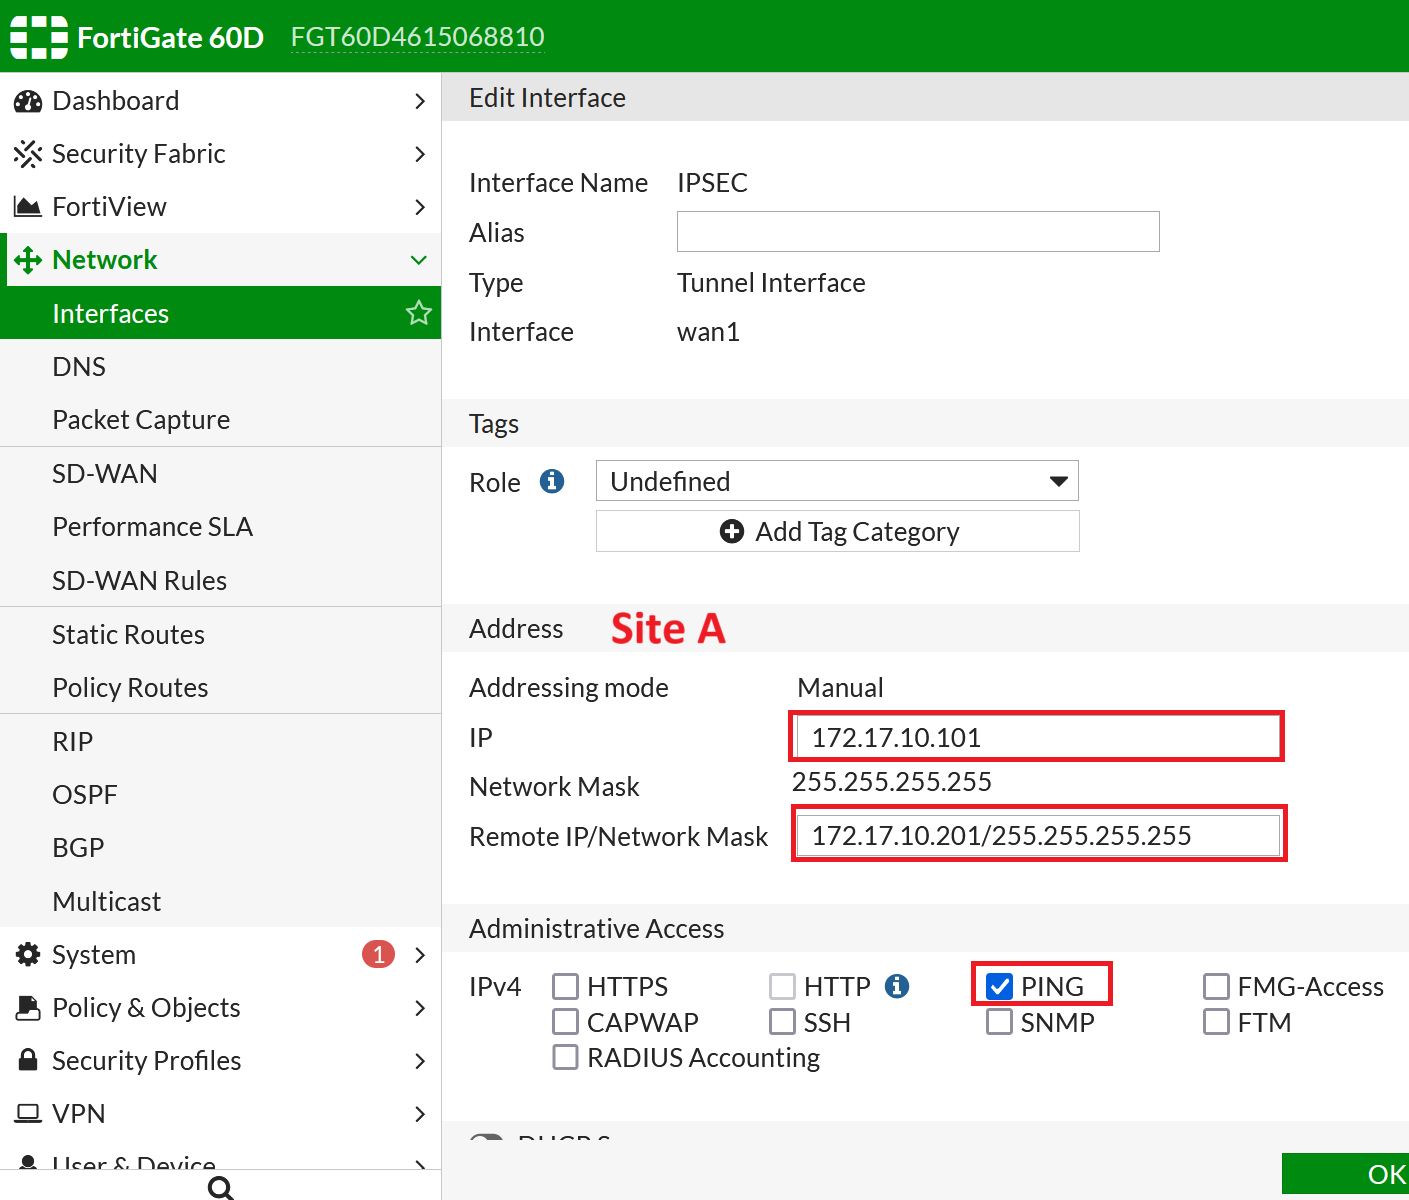

順便檢查一下上一動建立IPSEC的Static Route與 Policy

[](https://mdfk.goddamn.idv.tw/uploads/images/gallery/2024-07/I7Vimage.png)
[](https://mdfk.goddamn.idv.tw/uploads/images/gallery/2024-07/yLLimage.png)
[](https://mdfk.goddamn.idv.tw/uploads/images/gallery/2024-07/GRkimage.png)
檢查都ok的話,IPSEC應該就已經起來了
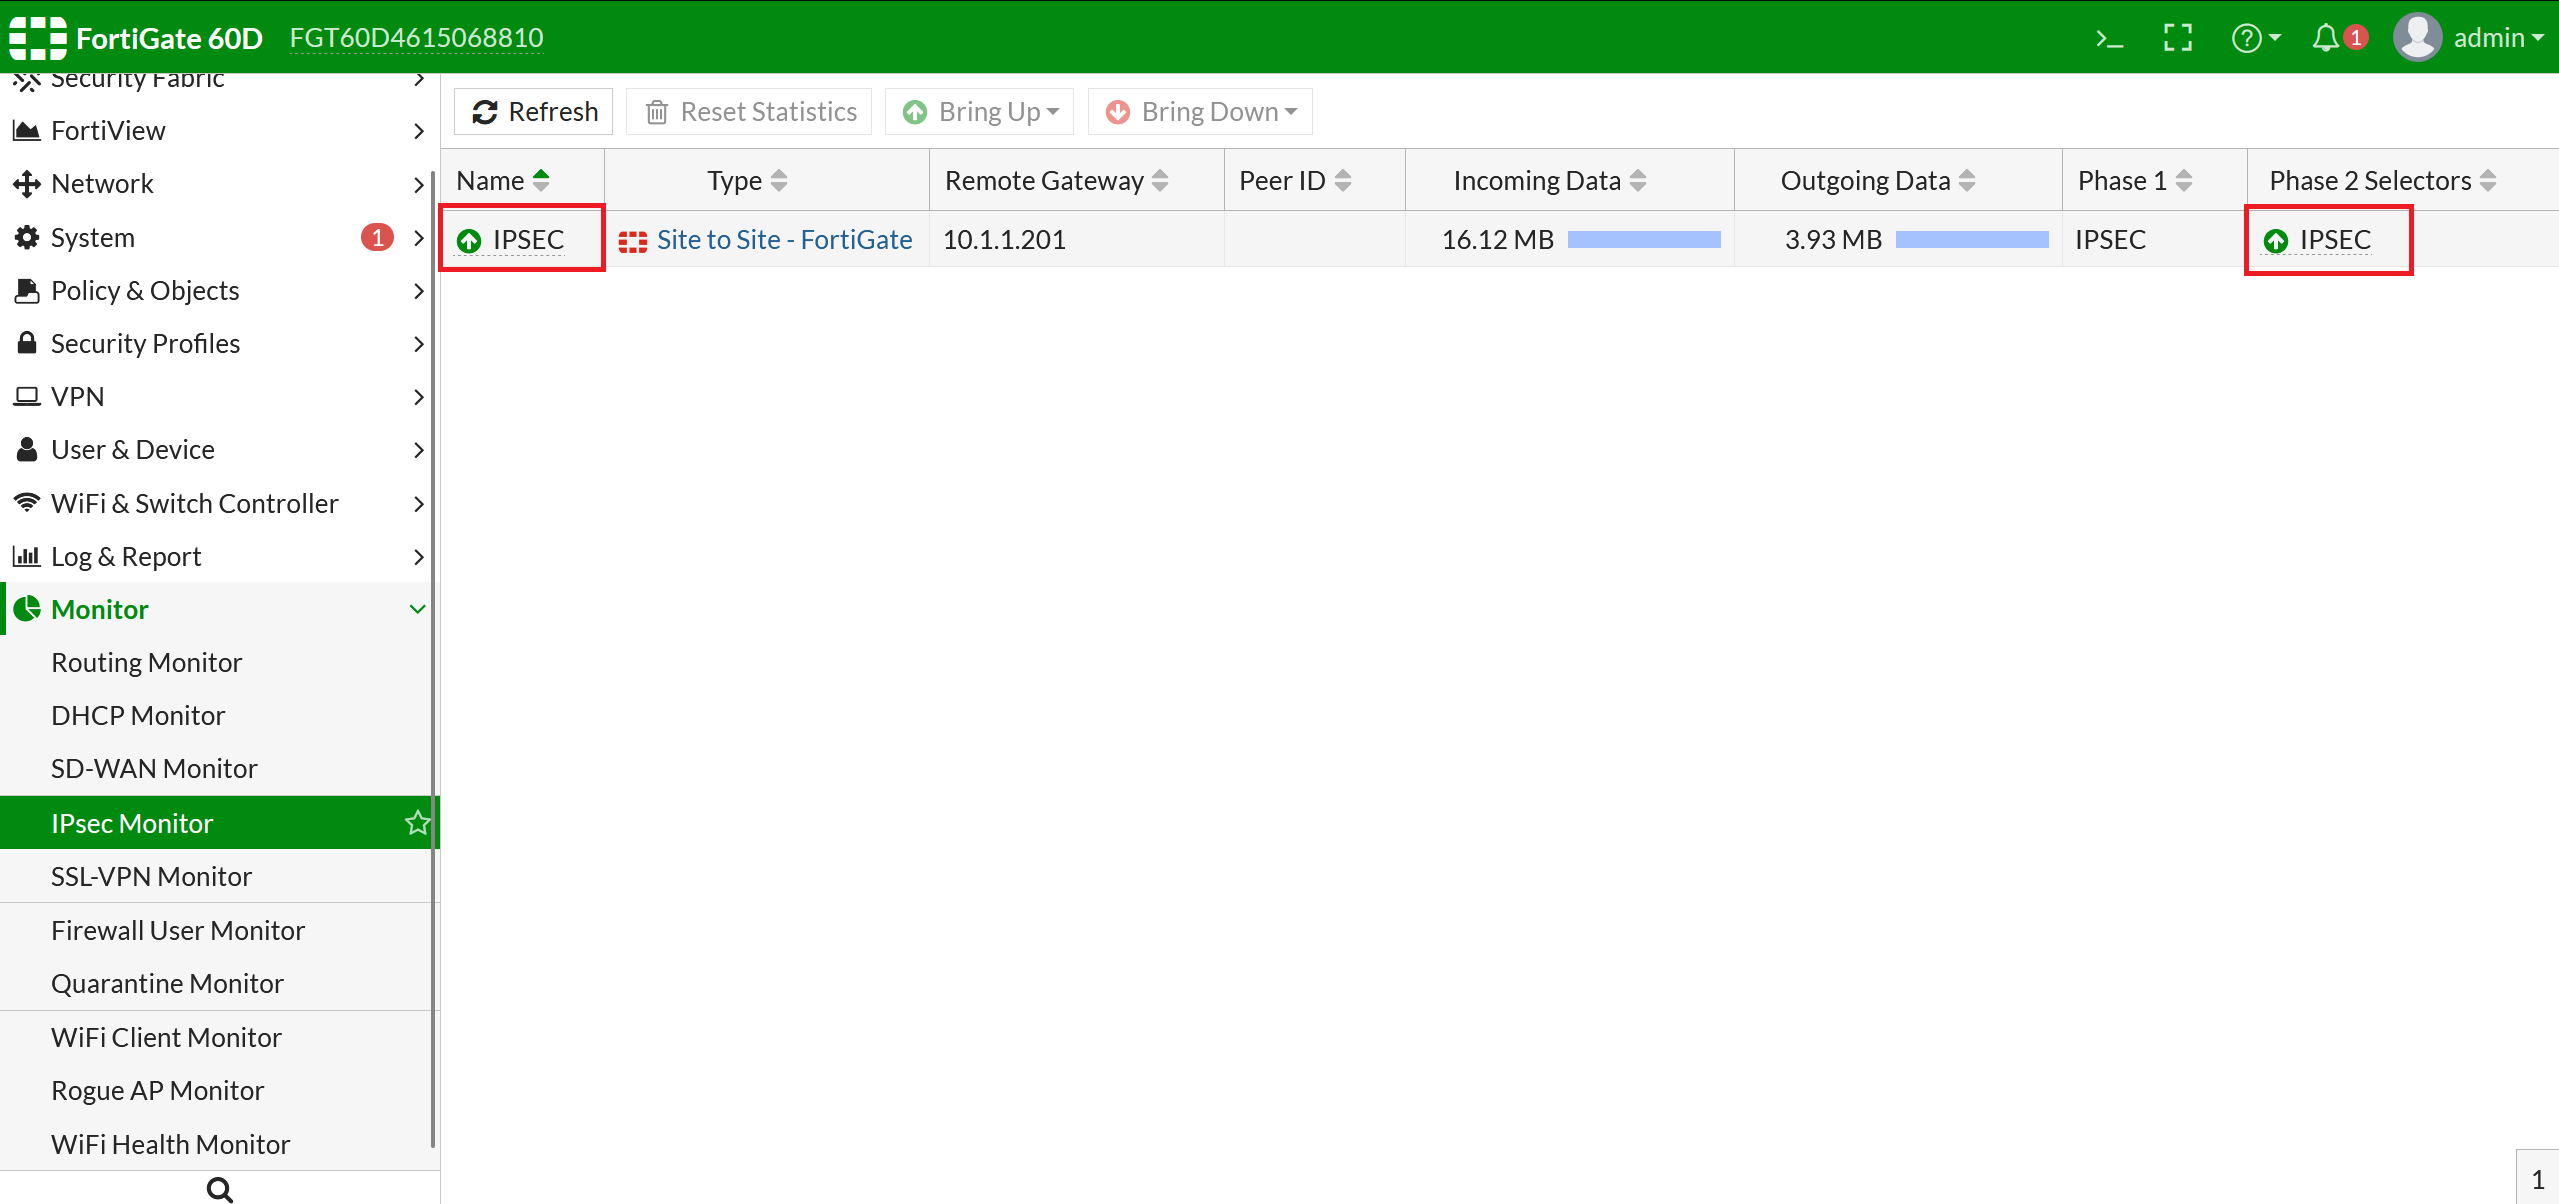
此時互相Ping對方的IPSEC Interface IP應該就會通了
#### 設定iBGP
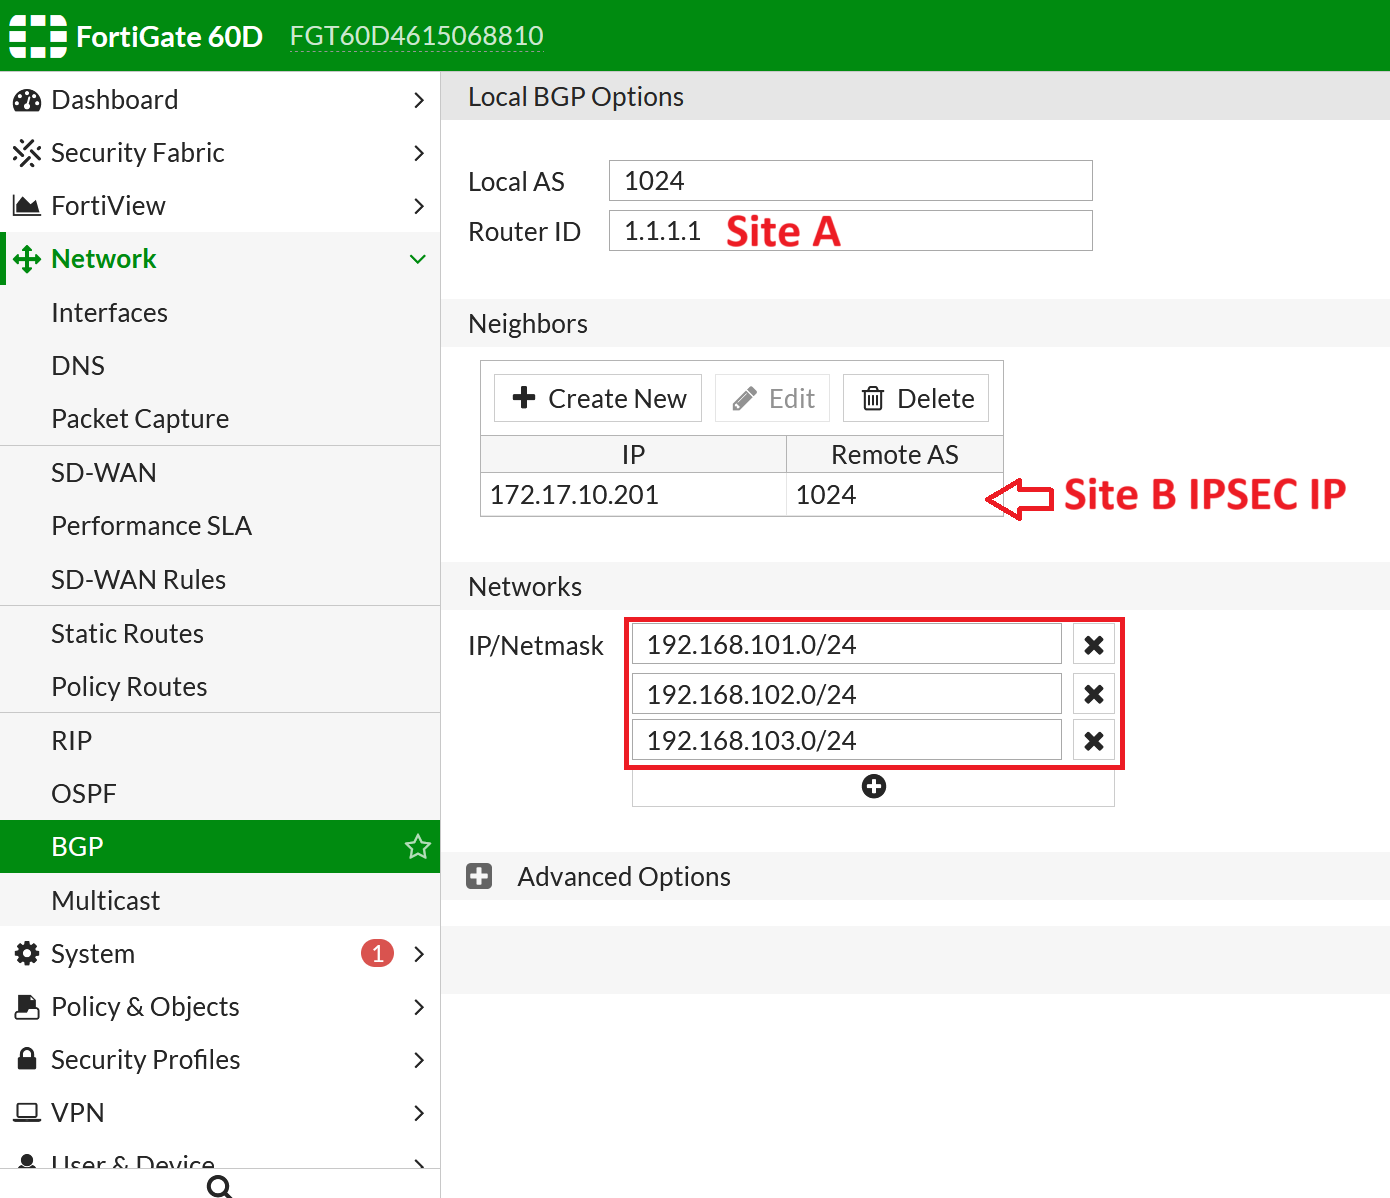
Site A、Site B 設定相同的AS,Router ID設定不同的ID,Neighbors設定對方的IPSEC IP,最後鍵入自己的LAN Subnets
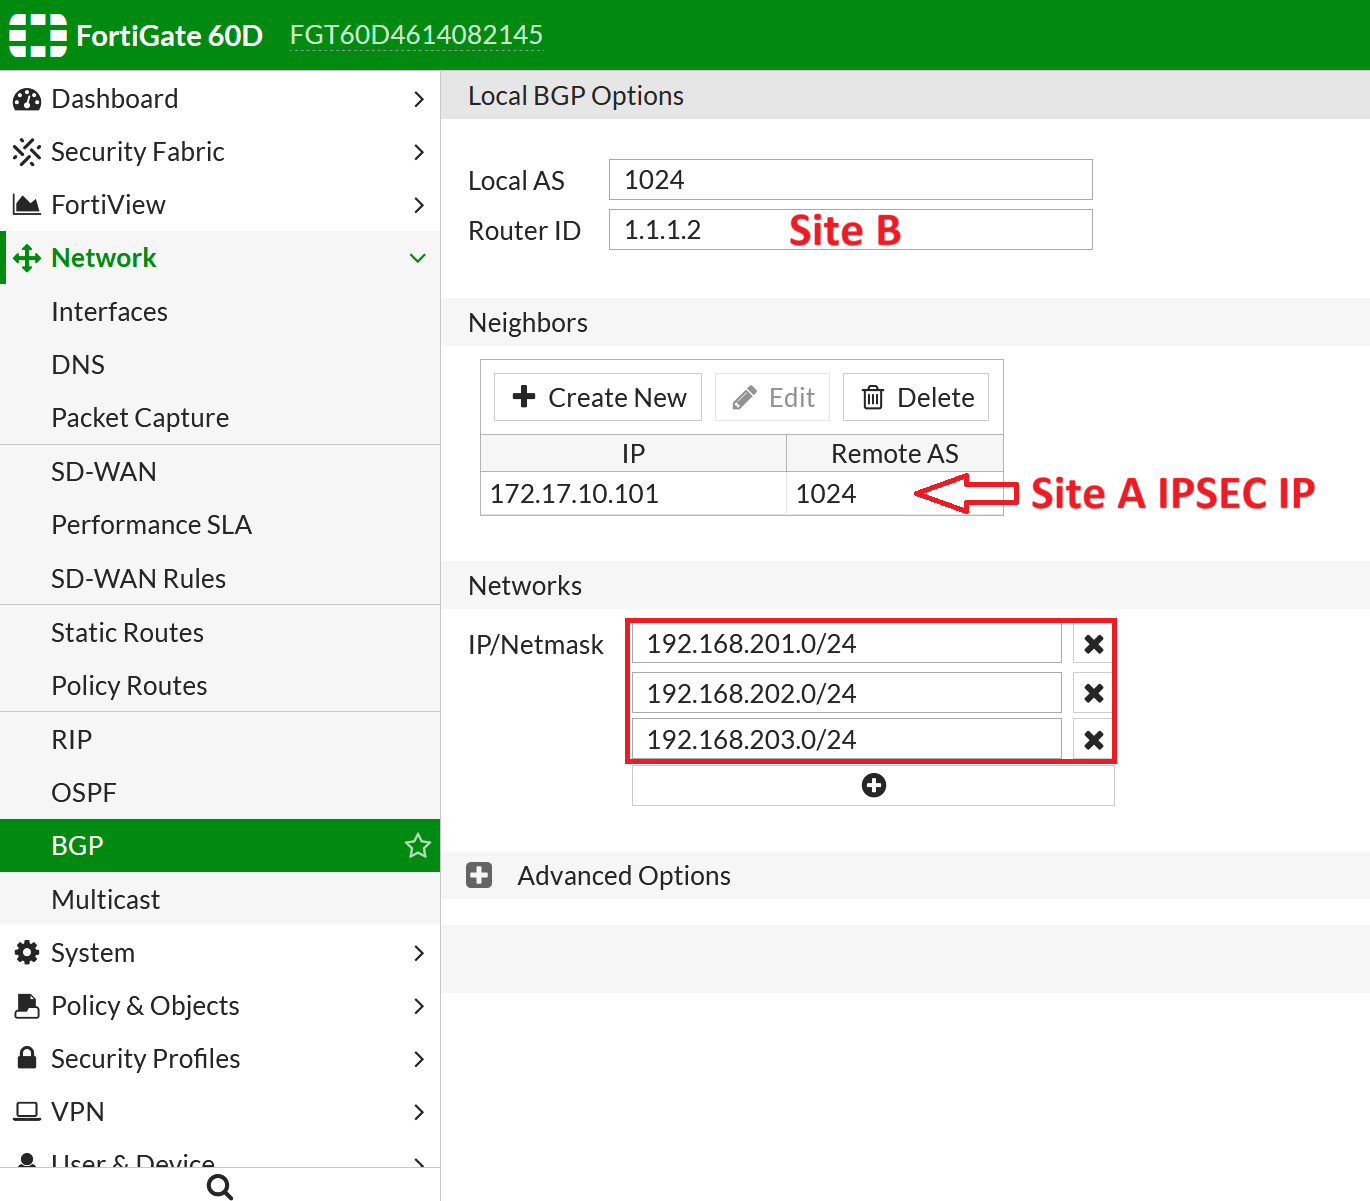
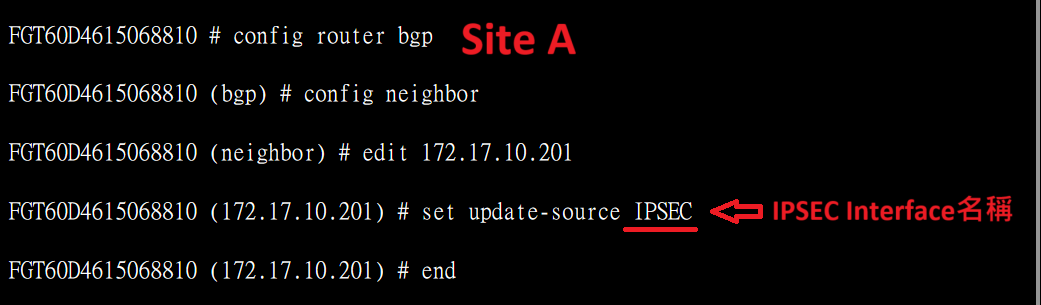
至CLI設定BGP介面來源
```
<< Site A >>
config router bgp
config neighbor
edit 172.17.10.201
set update-source IPSEC
end
```
```
<< Site B >>
config router bgp
config neighbor
edit 172.17.10.101
set update-source IPSEC
end
```

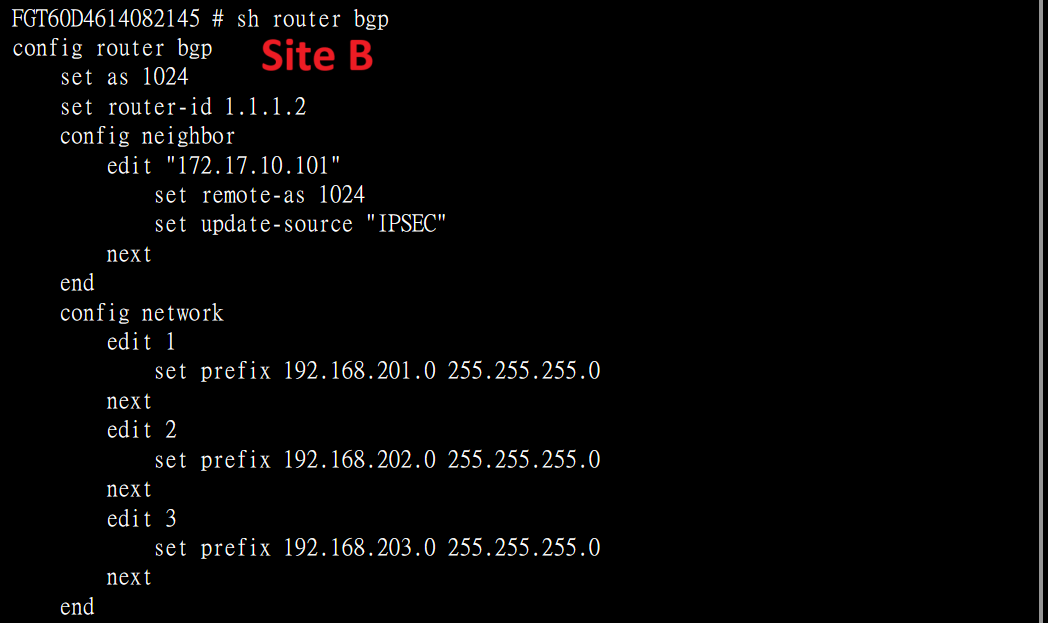
確認一下BGP設定
```
show router bgp
```

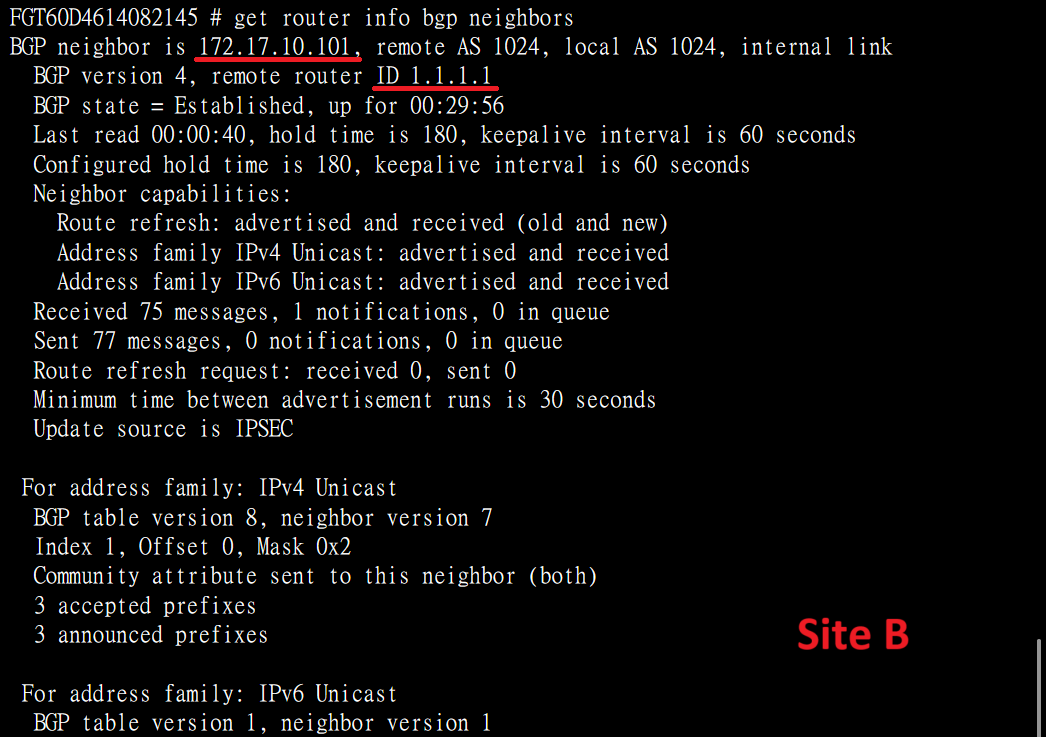
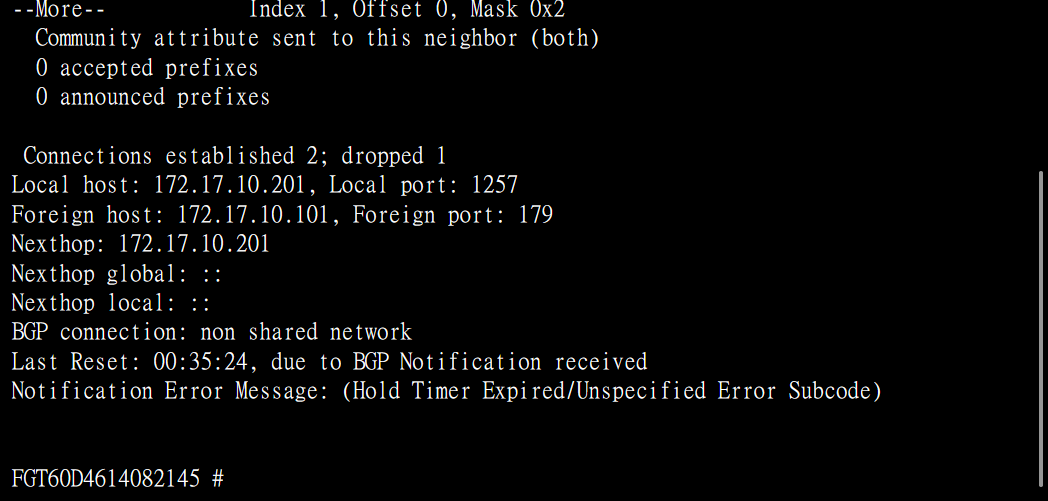
確認Neighbors
```
get router info bgp neighbors
```
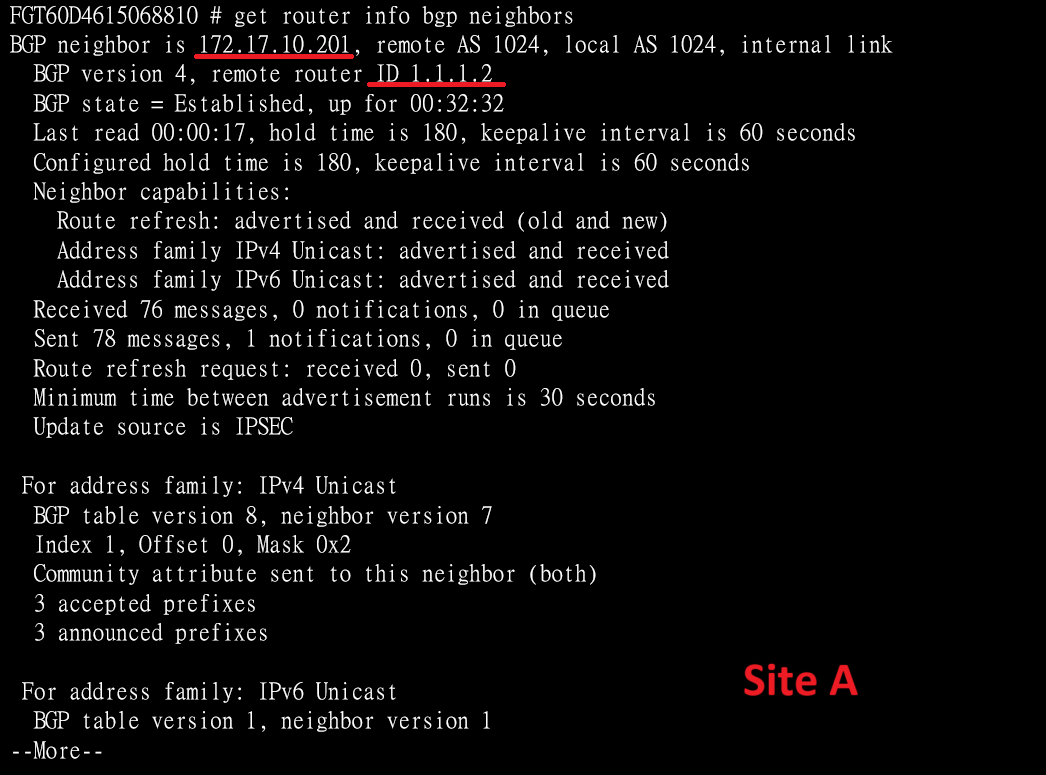
[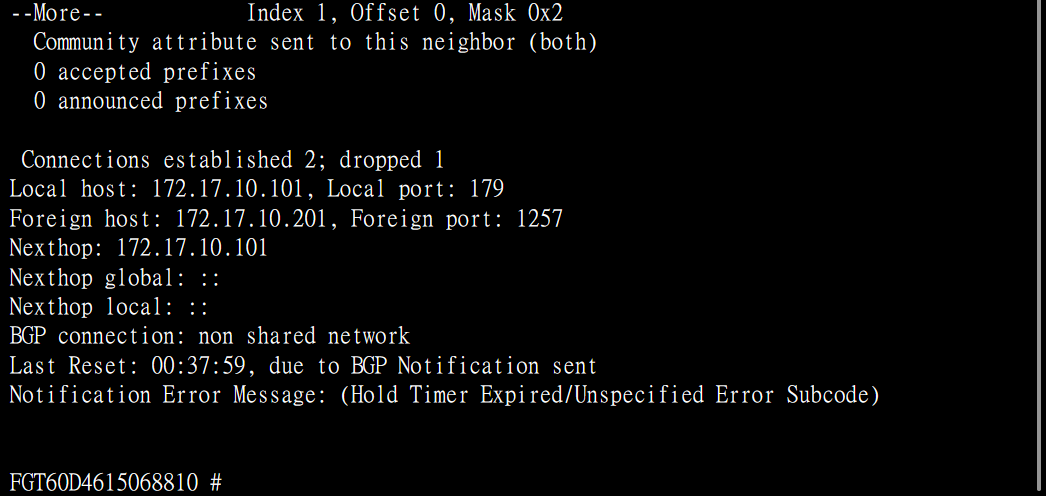](https://mdfk.goddamn.idv.tw/uploads/images/gallery/2024-07/DgLimage.png)
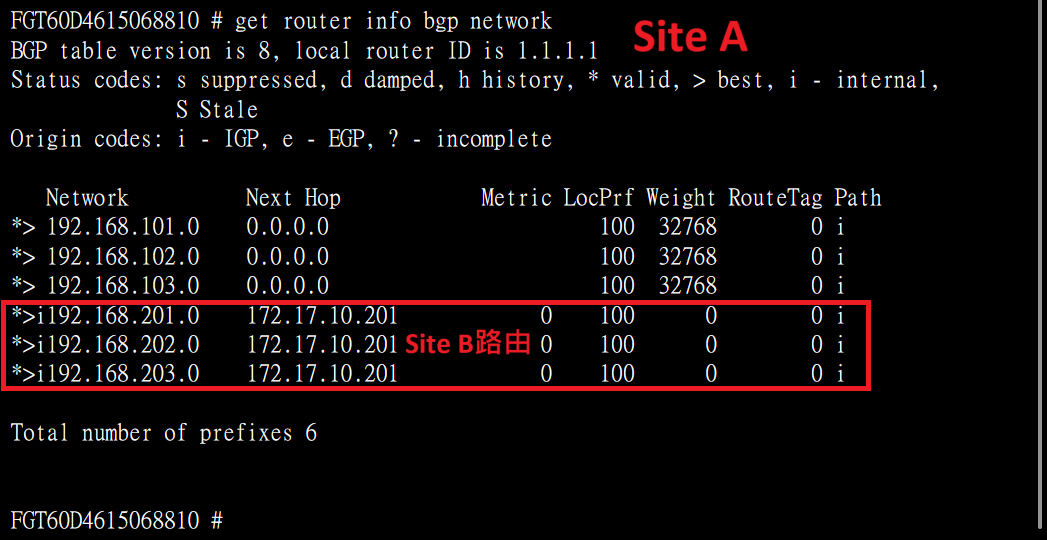
確認BGP路由
```
get router info bgp network
```
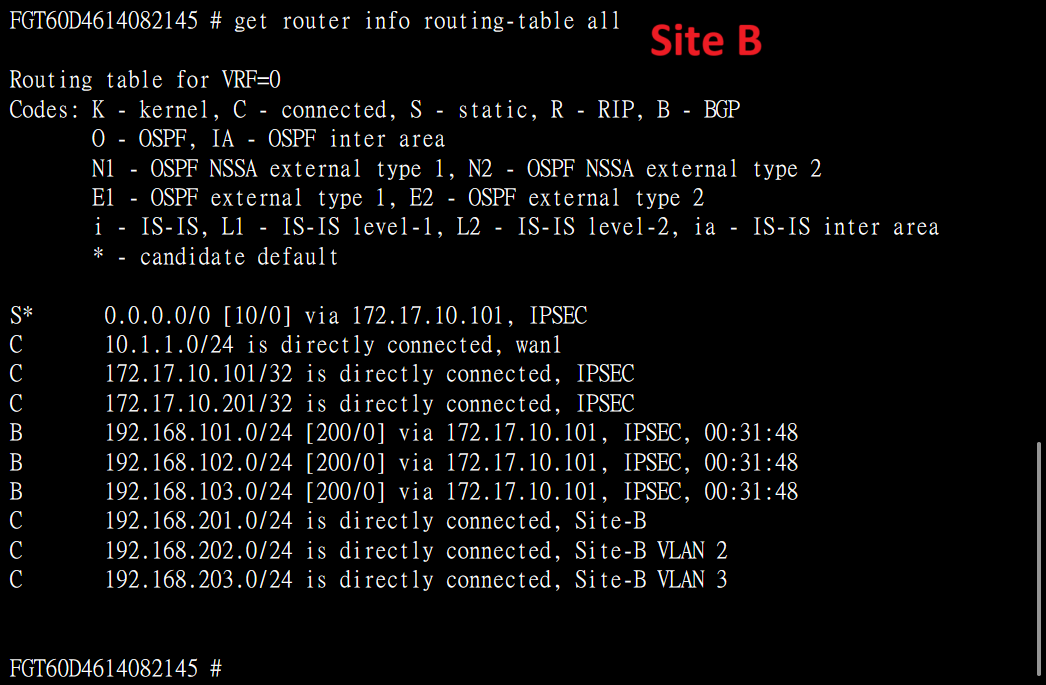
確認整體路由
```
get router info routing-table all
```

## 連線測試
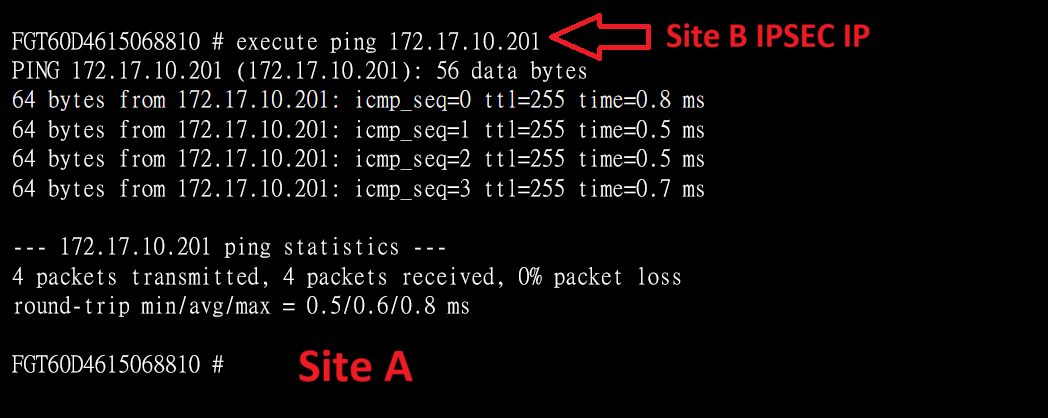
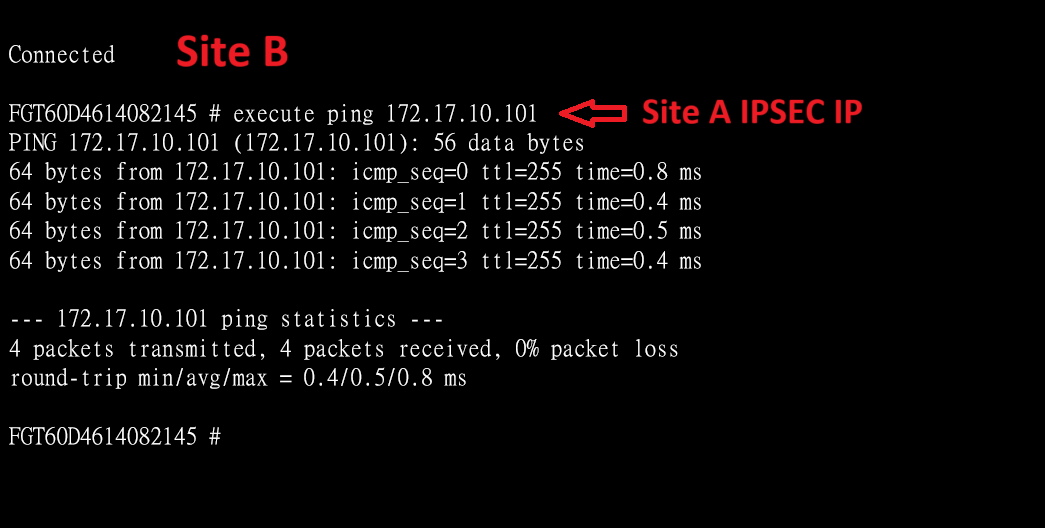
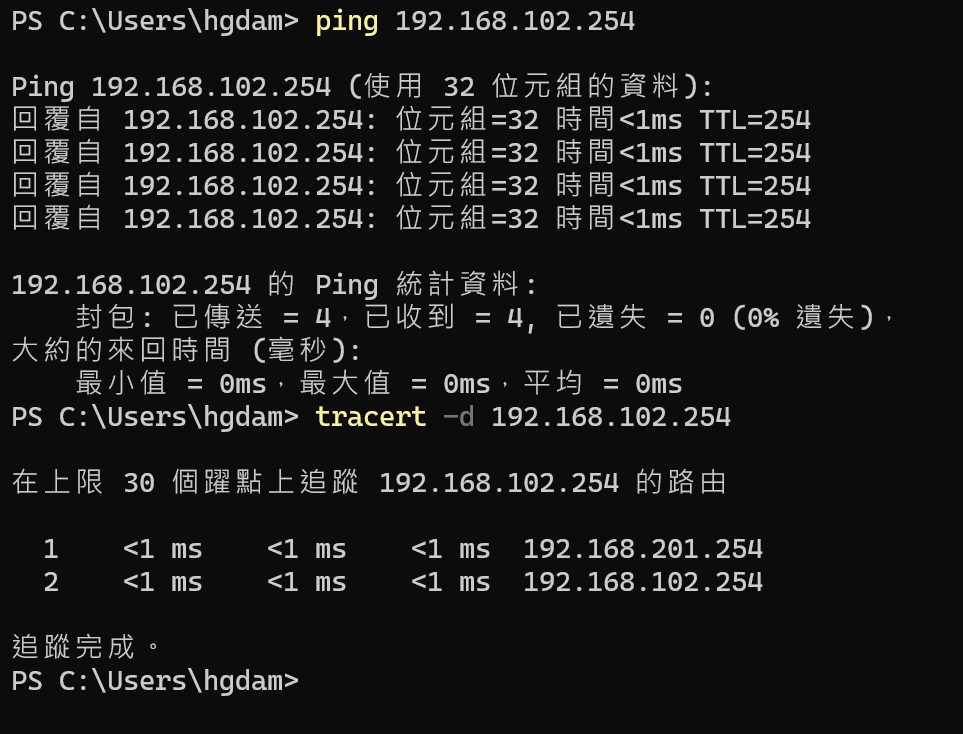
從Site A Firewall測試ping Site B VLAN 3 Interface IP

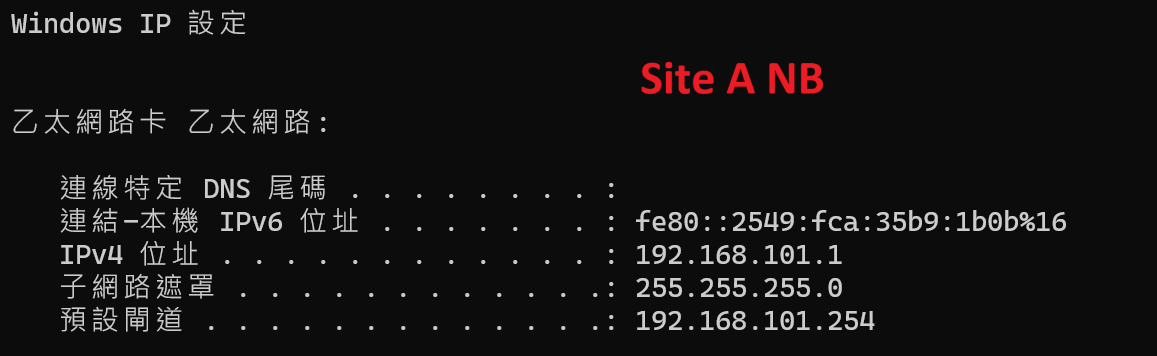
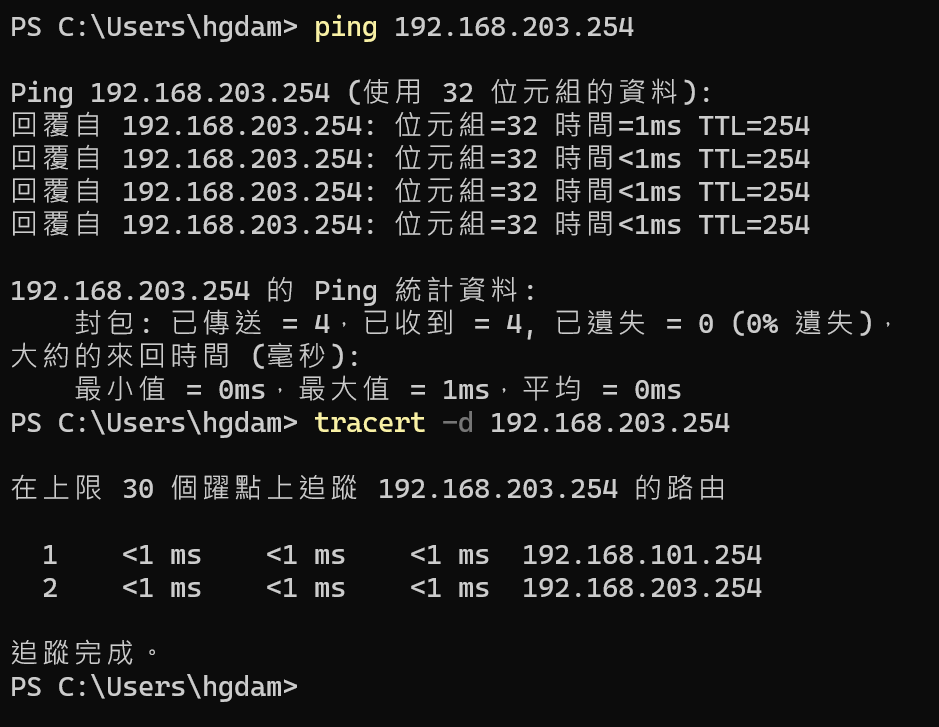
將NB接到Site A LAN,Ping Site B VLAN 3 Interface IP
將NB接到Site B LAN,Ping Site B VLAN 2 Interface IP
## 結語
以上實作透過Fortigate IPSEC VPN來進行iBGP動態路由,不過通常一般企業內部其實鮮少會使用BGP來進行路由交換,僅在此紀錄一下設定與測試的過程,並提供有需要的朋友參考。
# Fortigate IPSEC + OSPF + SDWAN 實作
### 參考資料
[https://docs.fortinet.com/document/fortigate/6.2.16/cookbook/632796/ospf-with-ipsec-vpn-for-network-redundancy](https://docs.fortinet.com/document/fortigate/6.2.16/cookbook/632796/ospf-with-ipsec-vpn-for-network-redundancy)
### 前言
上一篇分享了 [Fortigate IPSEC + iBGP](https://mdfk.goddamn.idv.tw/books/fortigate/page/fortigate-ipsec-ibgp) 的動態路由,但畢竟一般企業中鮮少使用BGP,大多反而是使用OSPF,OSPF不但能自動交換路由,同時也能 Fail Over 與 Load Balance,此篇實作帶大家一起來看看 Fortigate IPSEC + OSPF + SDWAN 有沒有搞頭。
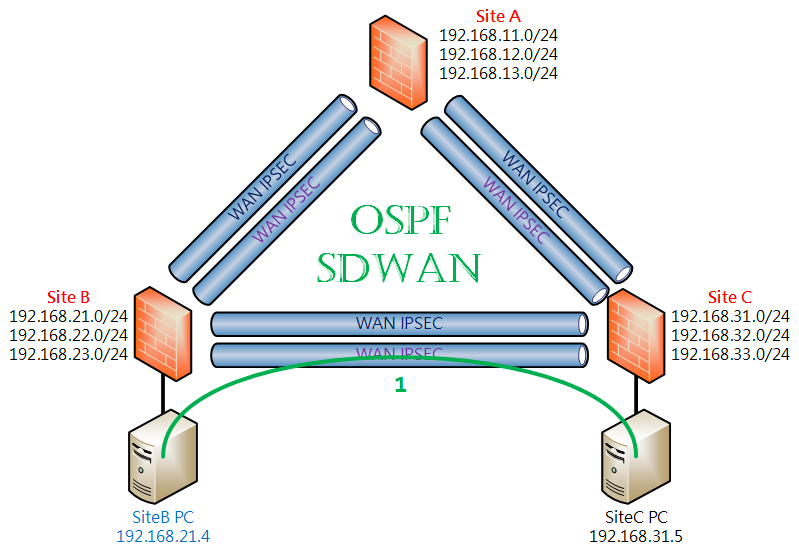
### 環境說明
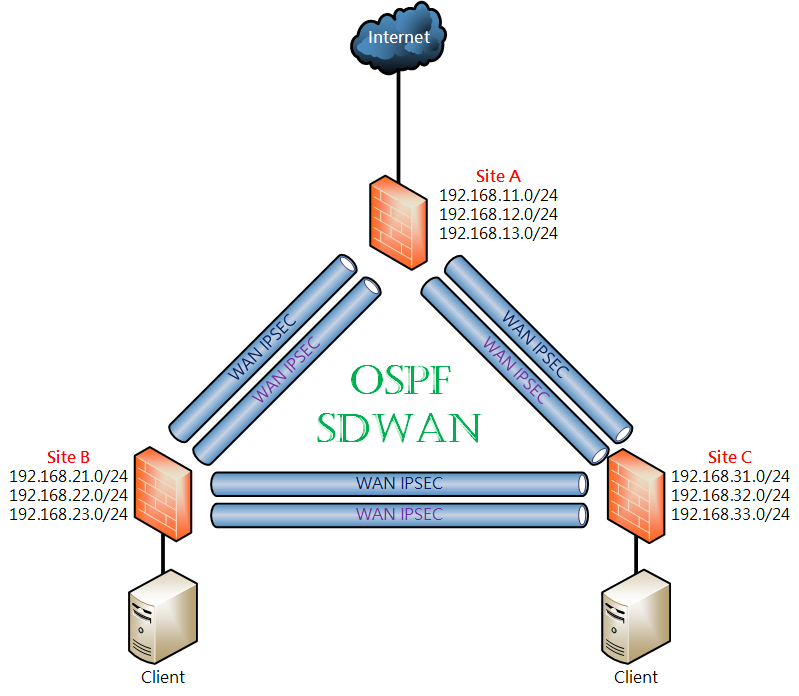
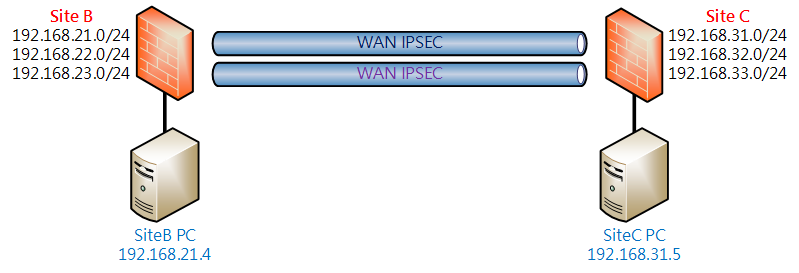
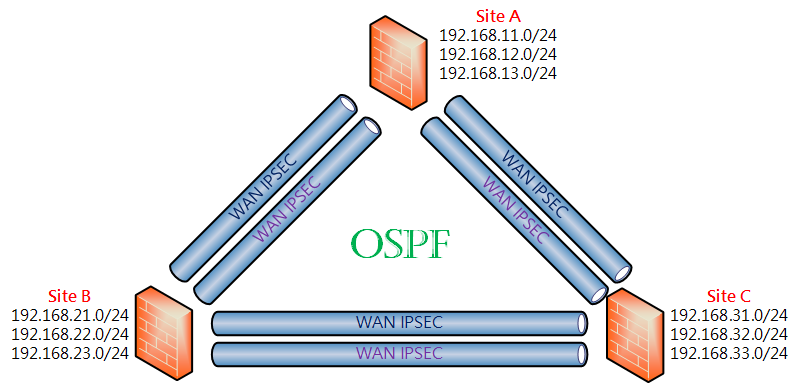
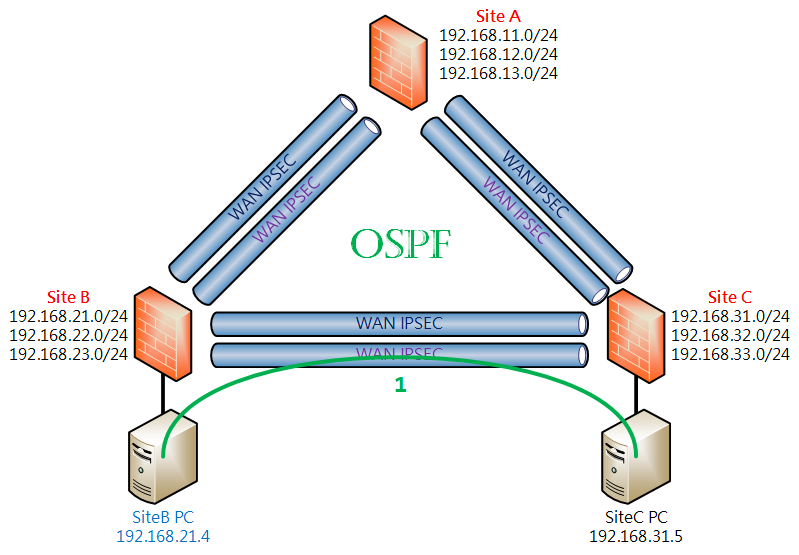
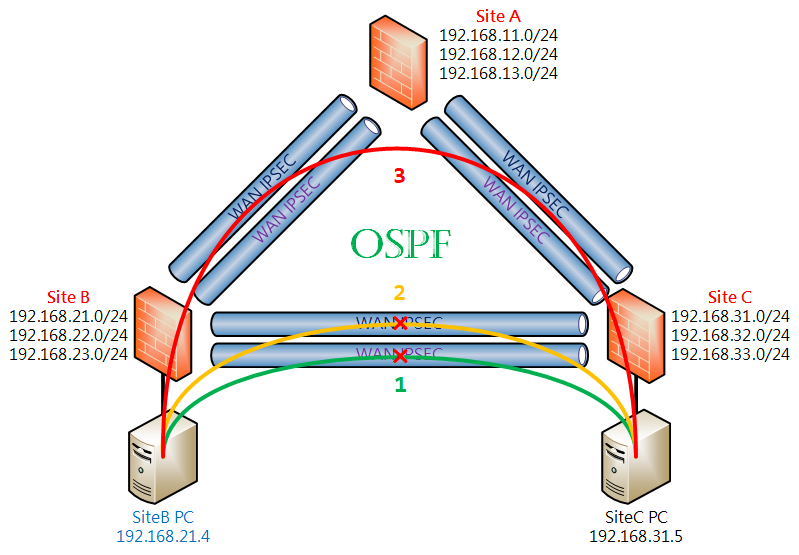
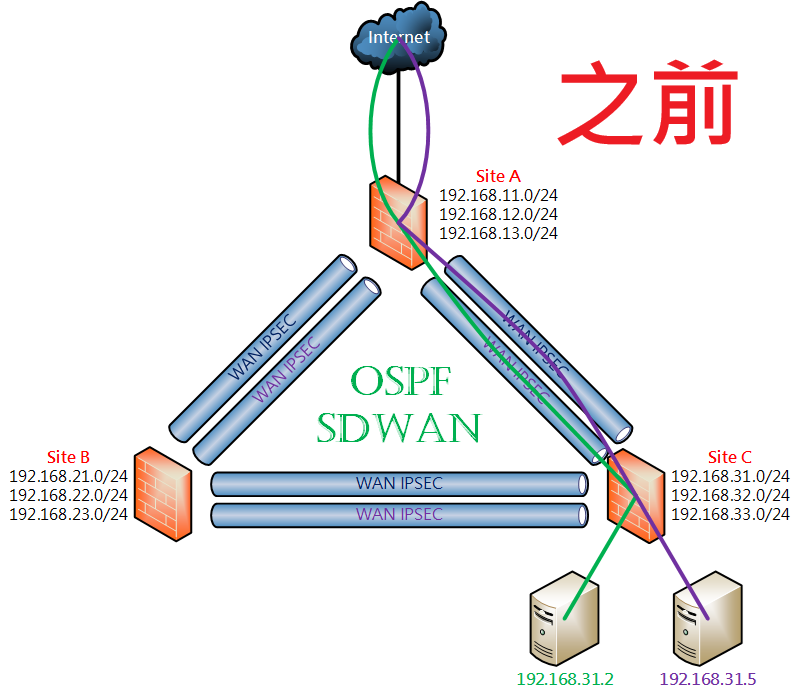
**設計概念:** 三個Site透過 IPSEC+OSPF+SDWAN 來達成多線路OSPF動態路由,任一條線路故障時可透過其他線路接續連線,並透過SDWAN來監測線路品質狀況,同時由於資訊安全控管的原則希望能統一由同一個Gateway進出。
**Firmware Ver. :** Fortigate-VM 7.0.15
|
| **WAN IP**
| **LAN Subnets**
| **WAN1 IPSEC IP**
| **WAN2 IPSEC IP**
|
| **SiteA**
| WAN1 10.1.1.1
WAN2 10.1.2.1
Port4 (to Internet)
| 192.168.11.254/24
192.168.12.254/24
192.168.13.254/24
| **A1toB1** 172.17.1.1
**A1toC1** 172.17.1.6
| **A2toB2** 172.17.2.1
**A2toC2** 172.17.2.6
|
| **SiteB**
| WAN1 10.1.1.2
WAN2 10.1.2.2
| 192.168.21.254/24
192.168.22.254/24
192.168.23.254/24
| **B1toA1** 172.17.1.2
**B1toC1** 172.17.1.3
| **B2toA2** 172.17.2.2
**B2toC2** 172.17.2.3
|
| **SiteC**
| WAN1 10.1.1.3
WAN2 10.1.2.3
| 192.168.31.254/24
192.168.32.254/24
192.168.33.254/24
| **C1toB1** 172.17.1.4
**C1toA1** 172.17.1.5
| **C2toB2** 172.17.2.4
**C2toA2** 172.17.2.5
|
### 設定過程(1)
#### 設定Interface
以下設定皆以一台**SiteC**為範例,請對照該台設定相關對應設定至**SiteB**,第一階段我們先忽略SDWAN,先把IPSEC+OSPF設起來。
[](https://mdfk.goddamn.idv.tw/uploads/images/gallery/2024-08/BjZhlTC5LX.png)
先把 WAN1、WAN2、LAN Interface設定好如下圖
[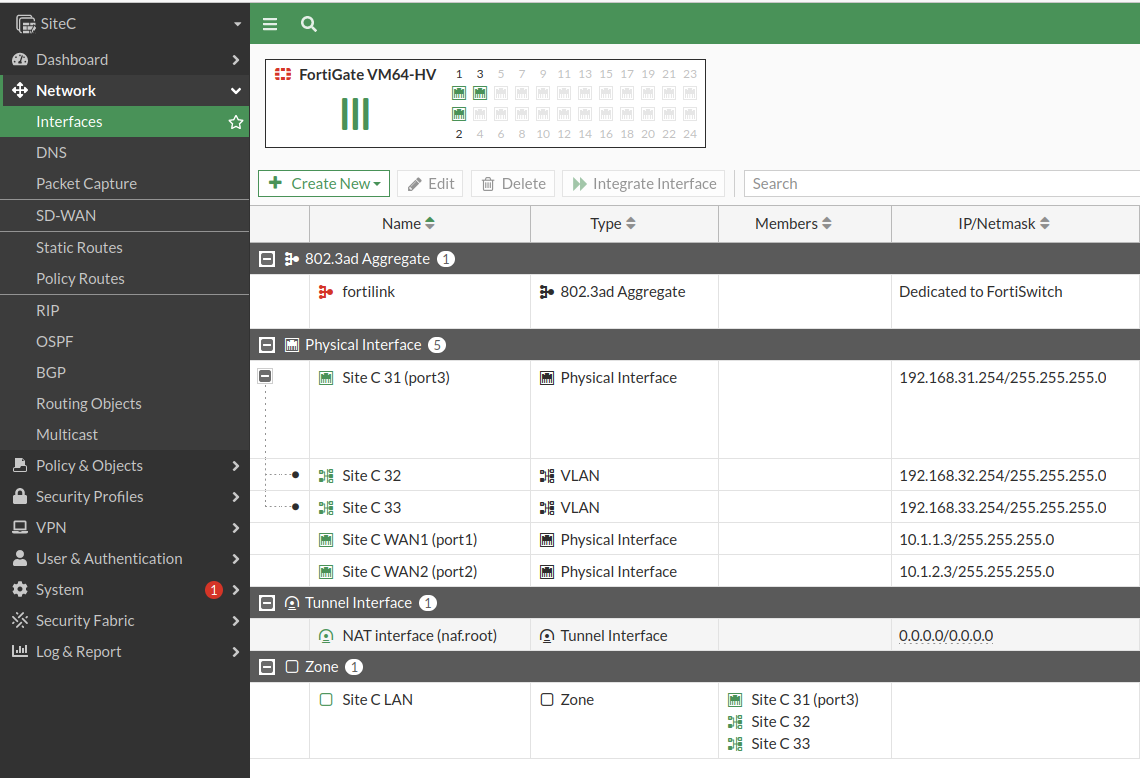](https://mdfk.goddamn.idv.tw/uploads/images/gallery/2024-08/l0zNdnTkFz.png)
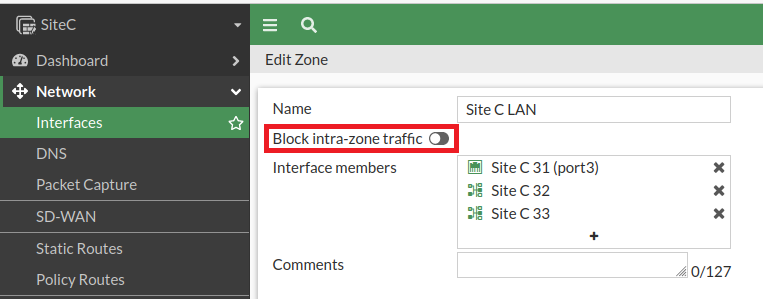
為了方便設定,我將 LAN Interface綁成一個Zone,並且不要Block內部流量互通
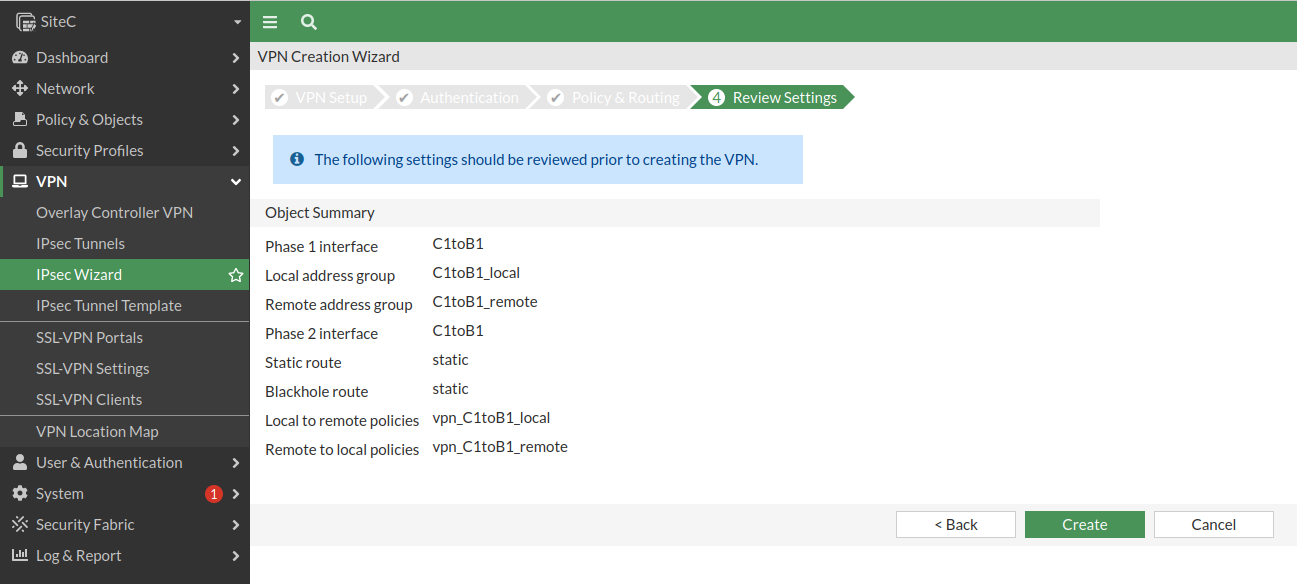
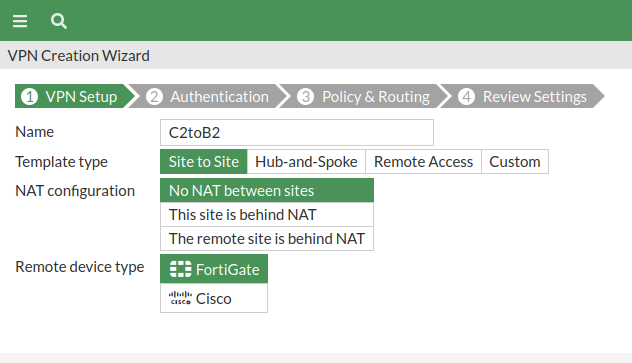
#### 設定IPSEC
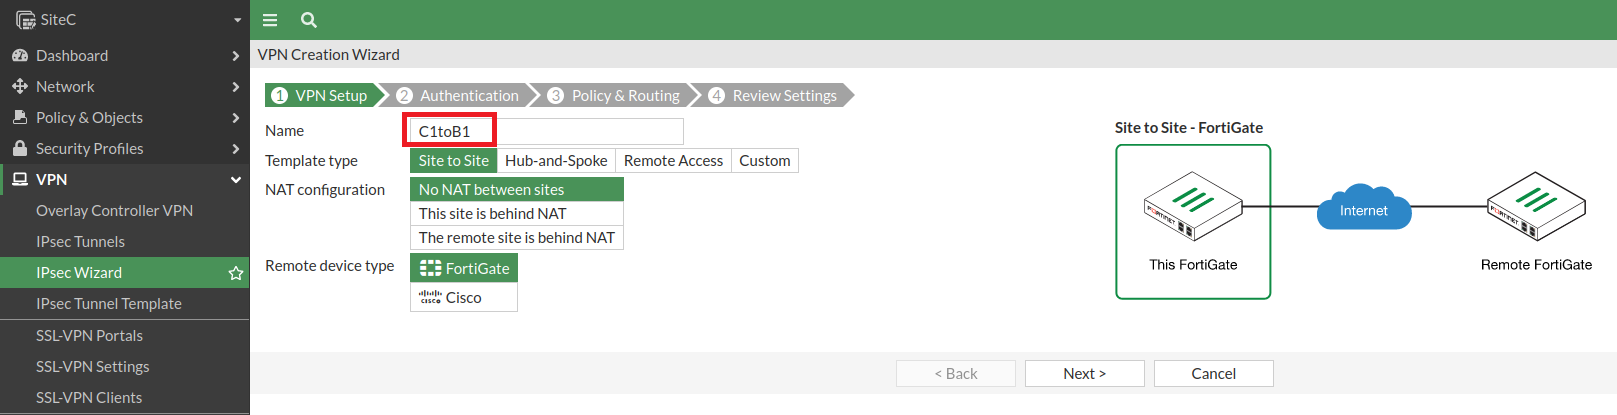
至 VPN => IPSEC 建立 WAN1 IPSEC VPN,我以 **C1toB1** 來命名
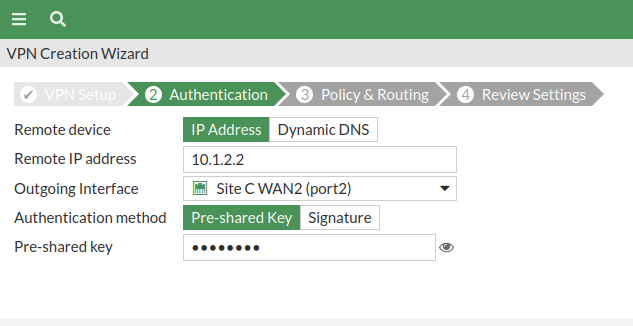
[](https://mdfk.goddamn.idv.tw/uploads/images/gallery/2024-08/3m3U67X92g.png)
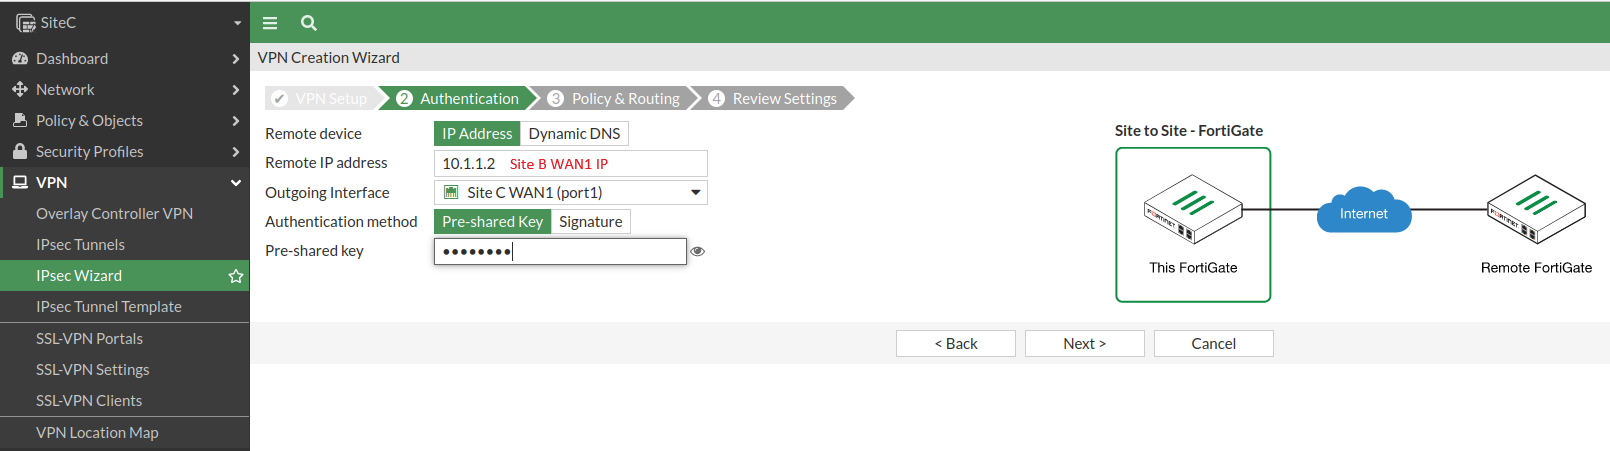
Remote IP設定**SiteB** WAN1 IP,指定Pre-shared Key
[](https://mdfk.goddamn.idv.tw/uploads/images/gallery/2024-08/eZ0XnHJnl2.png)
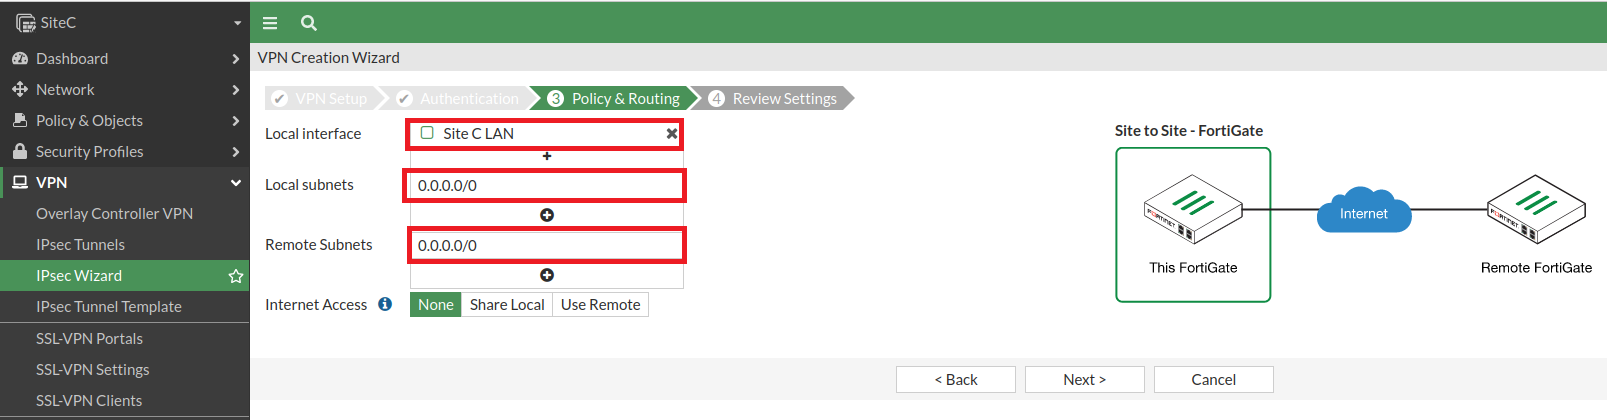
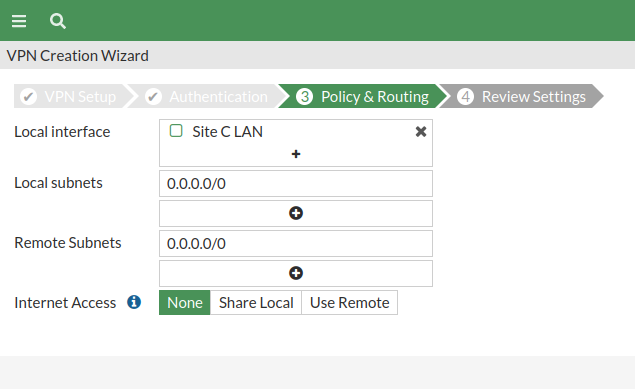
本地Interface就選剛剛做好的LAN Zone,Local & Remote Subnets 都鍵入 0.0.0.0/0
[](https://mdfk.goddamn.idv.tw/uploads/images/gallery/2024-08/JGr2UoqsTU.png)
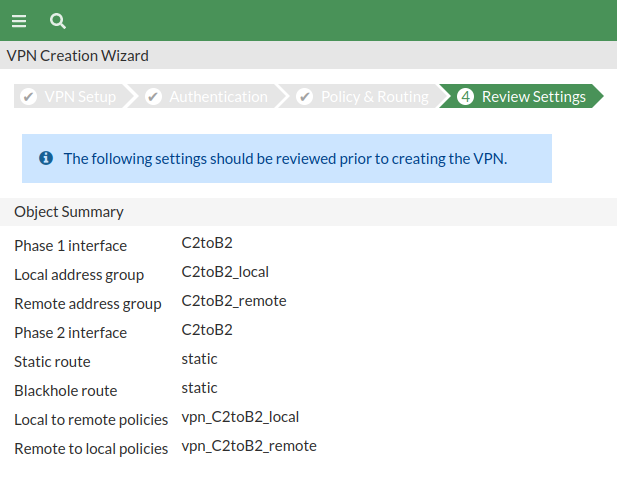
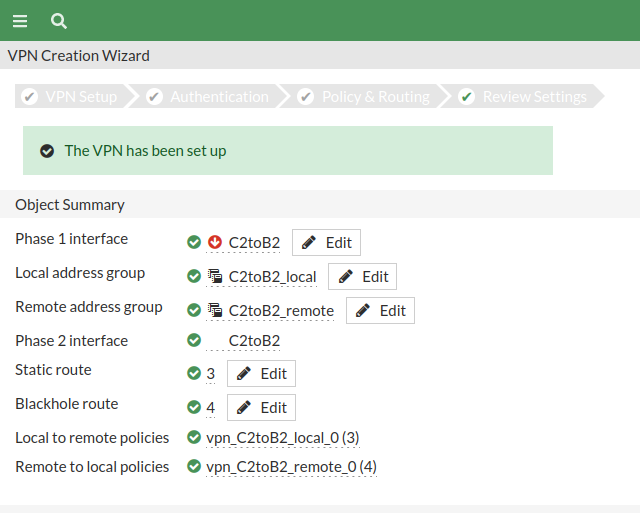
Wizard會建立一堆討厭的東西,晚一點砍掉
[](https://mdfk.goddamn.idv.tw/uploads/images/gallery/2024-08/zZrJ9RMfCm.png)
[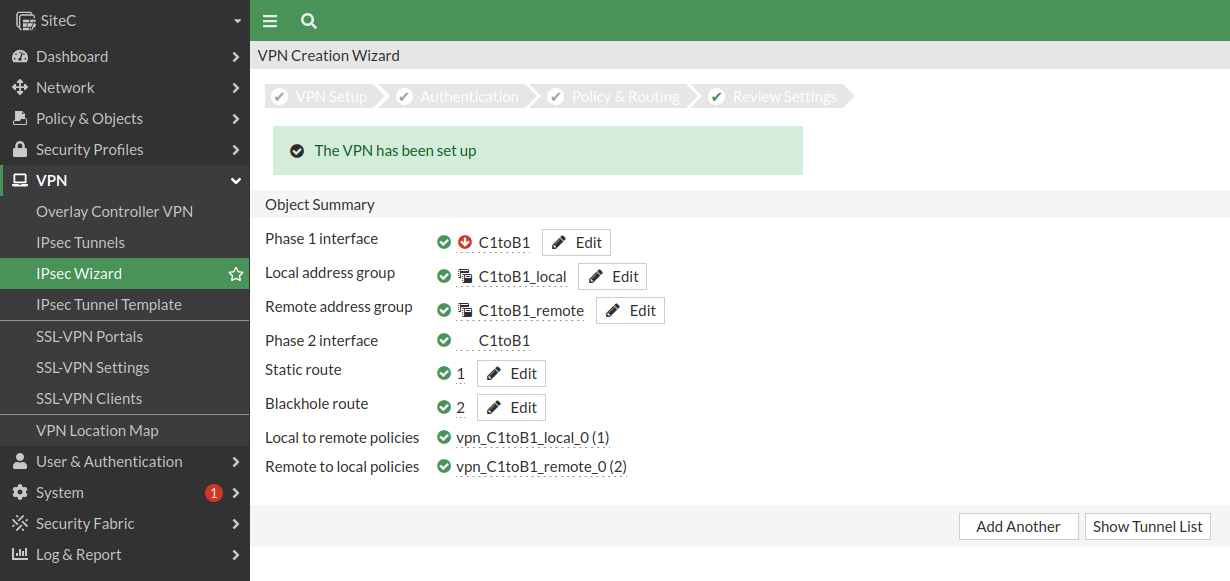](https://mdfk.goddamn.idv.tw/uploads/images/gallery/2024-08/ICrgyfRAhA.png)
建立SiteC WAN2 IPSEC VPN **C2toB2**
建好兩條VPN之後,至Policy砍掉Wizard自動建立的Policy
[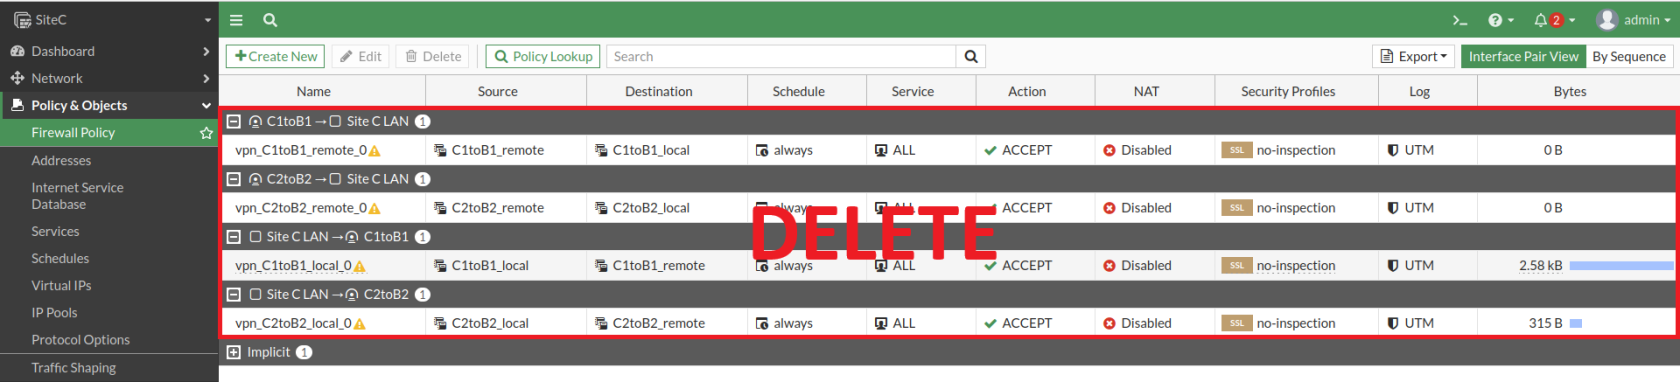](https://mdfk.goddamn.idv.tw/uploads/images/gallery/2024-08/EtZEkZ2CVQ.png)
至Static Route砍掉Wizard自動建立的路由
[](https://mdfk.goddamn.idv.tw/uploads/images/gallery/2024-08/6fcbFs6AL9.png)
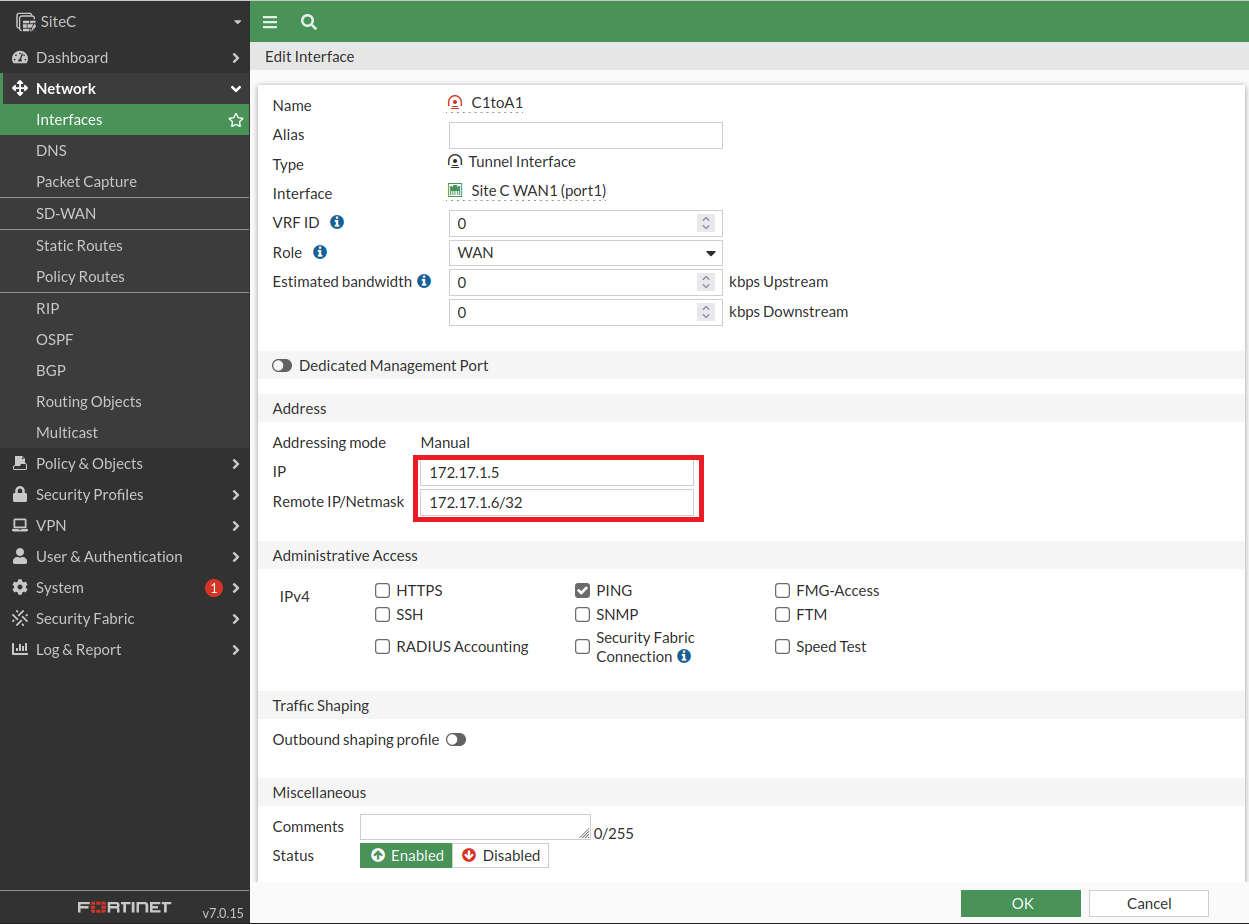
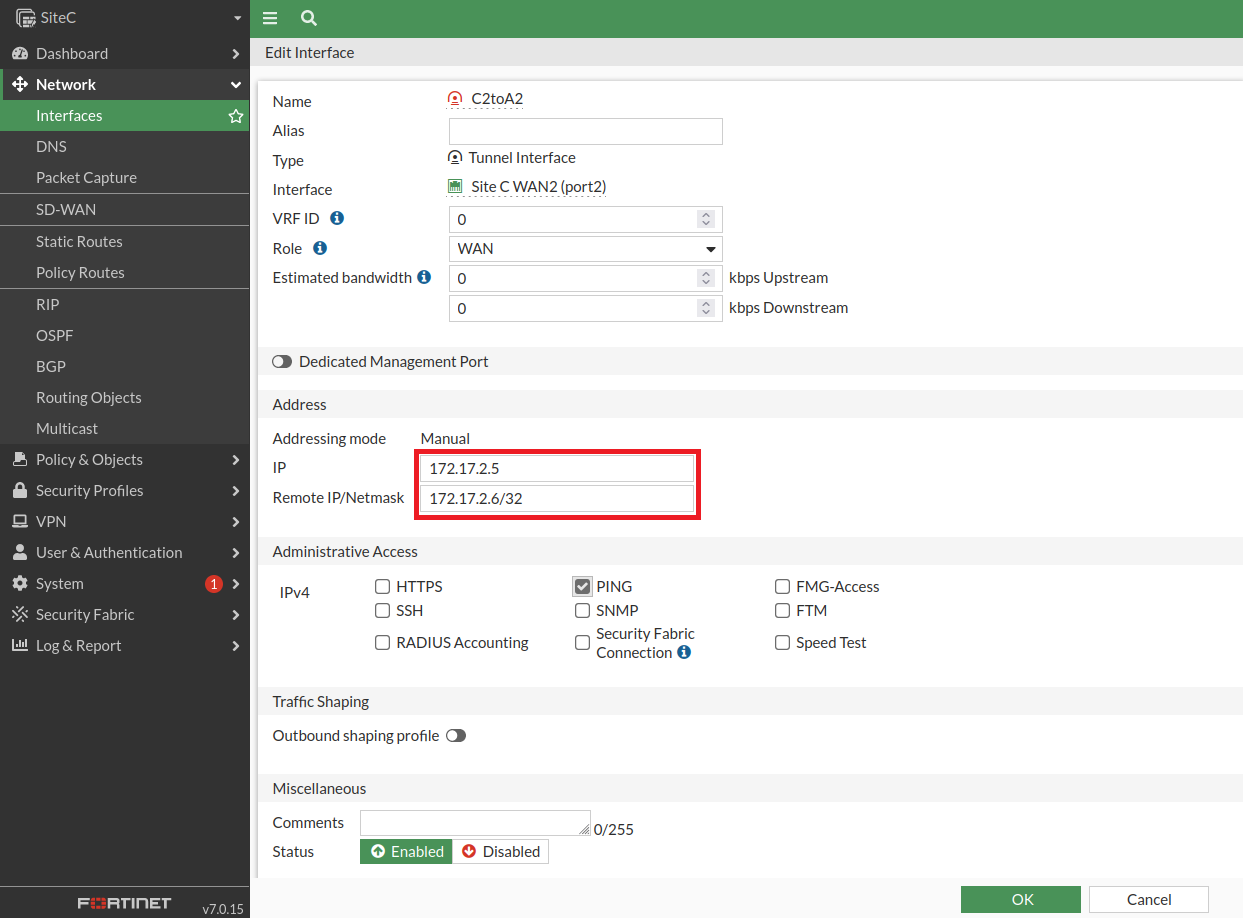
至Network Interface,來進行 **C1toB1**、**C2toB2** Interface設定
[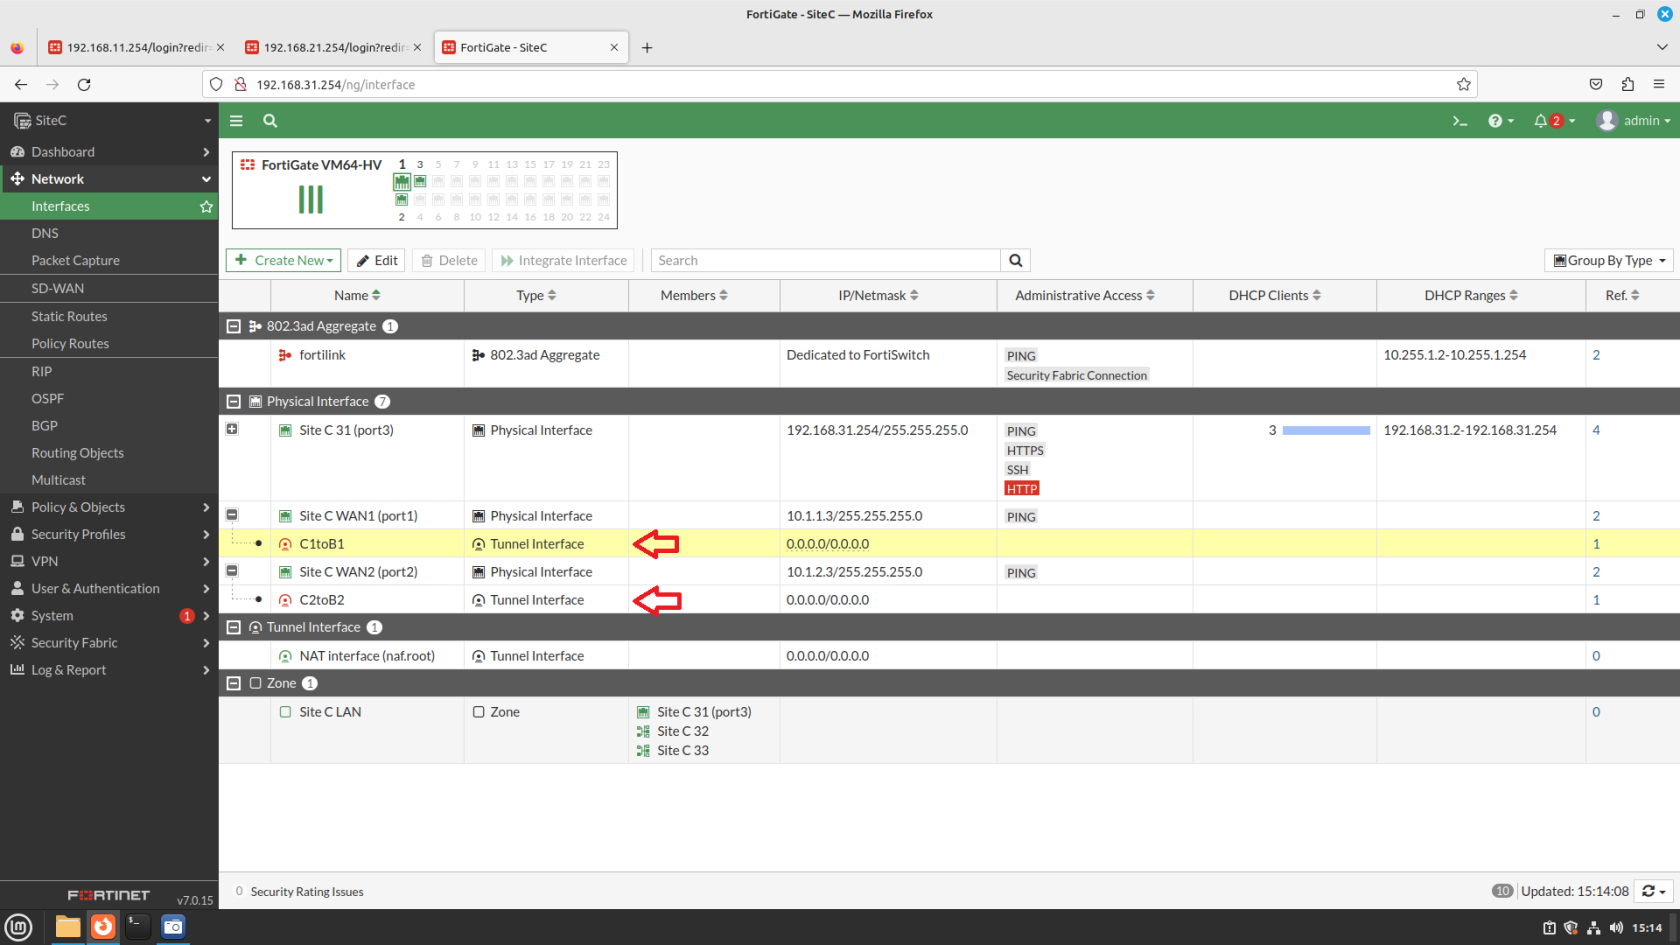](https://mdfk.goddamn.idv.tw/uploads/images/gallery/2024-08/4VsfYxICA5.png)
如下圖設定自己(SiteC)與對方(SiteB)的預先定義IP,Netmask設定 /32,開啟Ping
[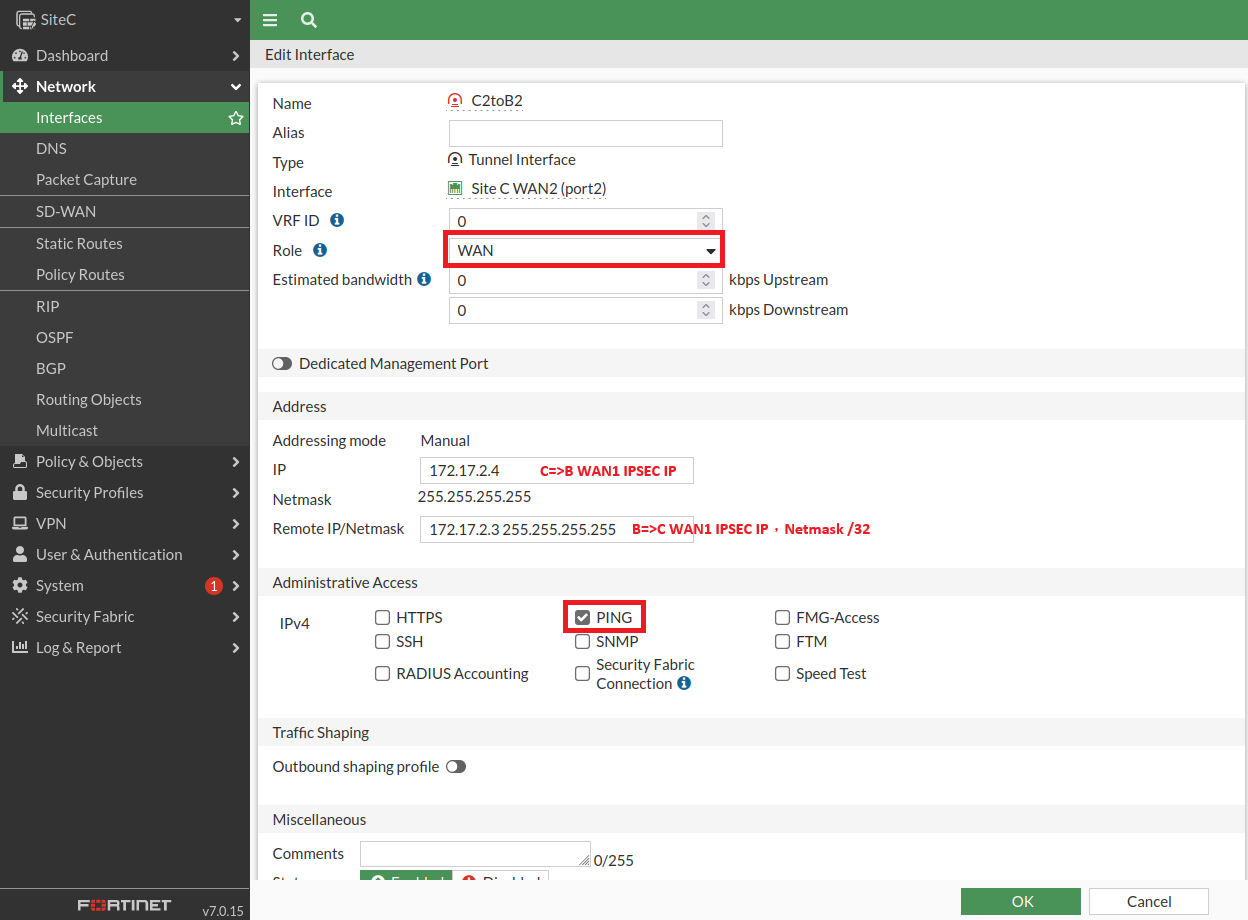](https://mdfk.goddamn.idv.tw/uploads/images/gallery/2024-08/fHBMY4qzeW.png)
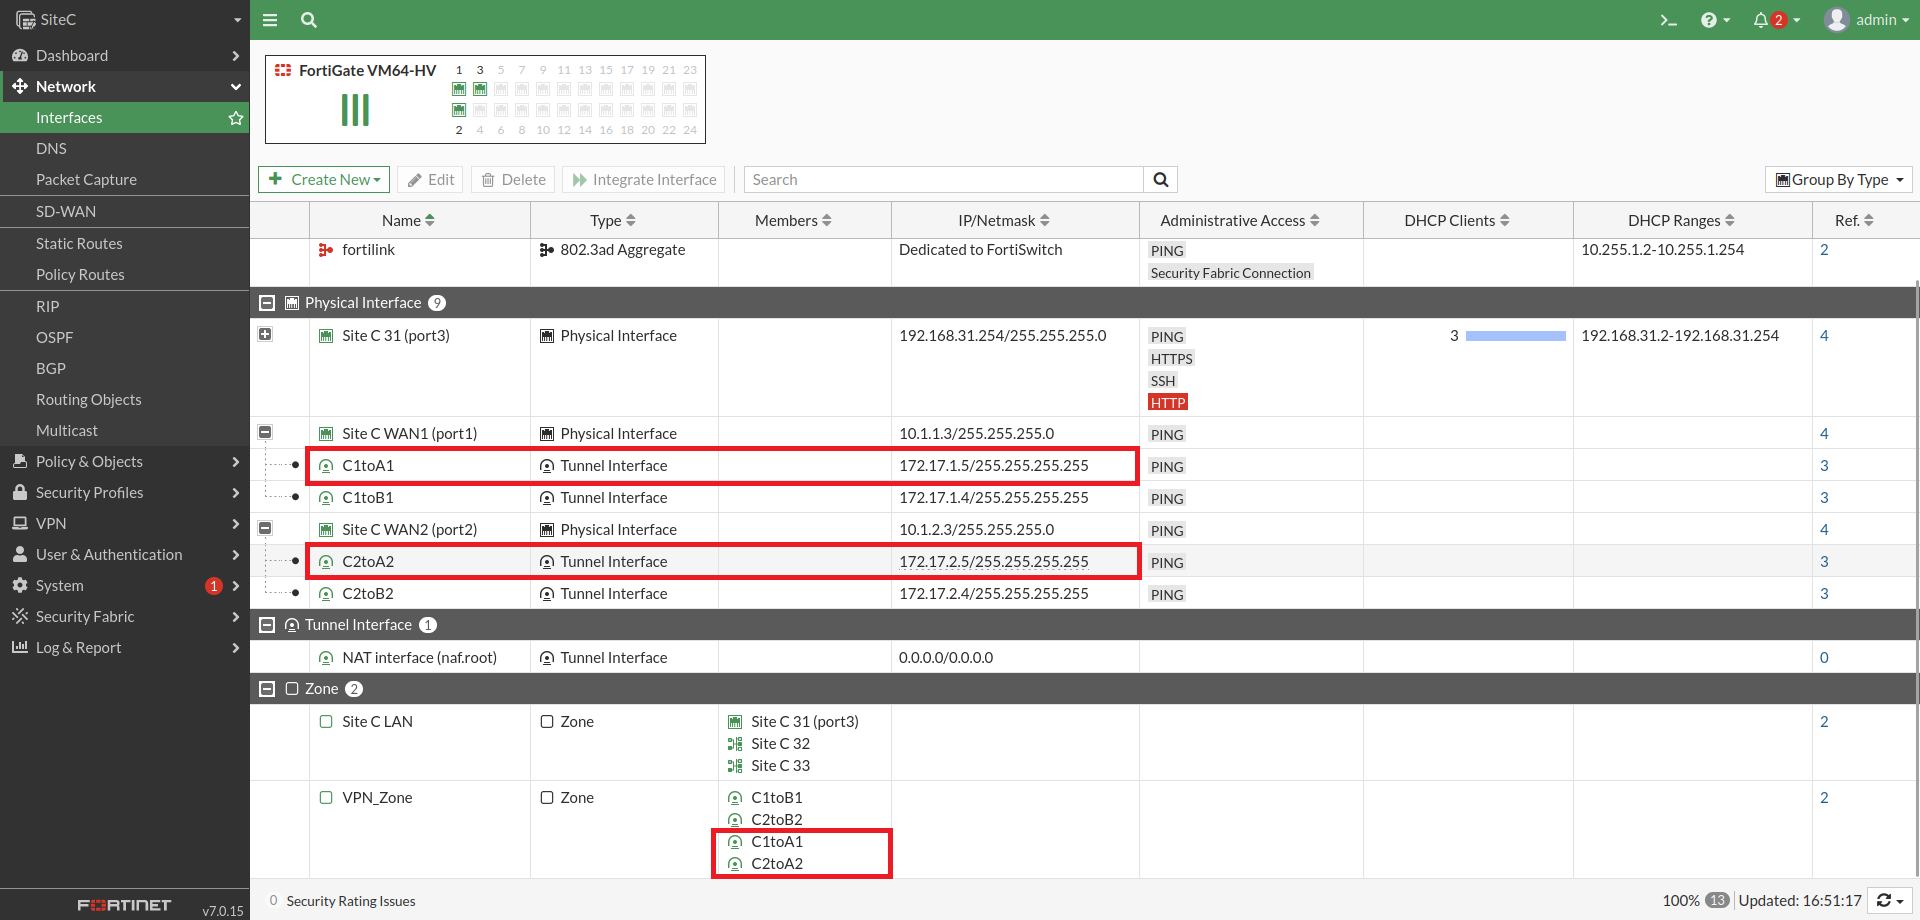
設定完後如下圖
[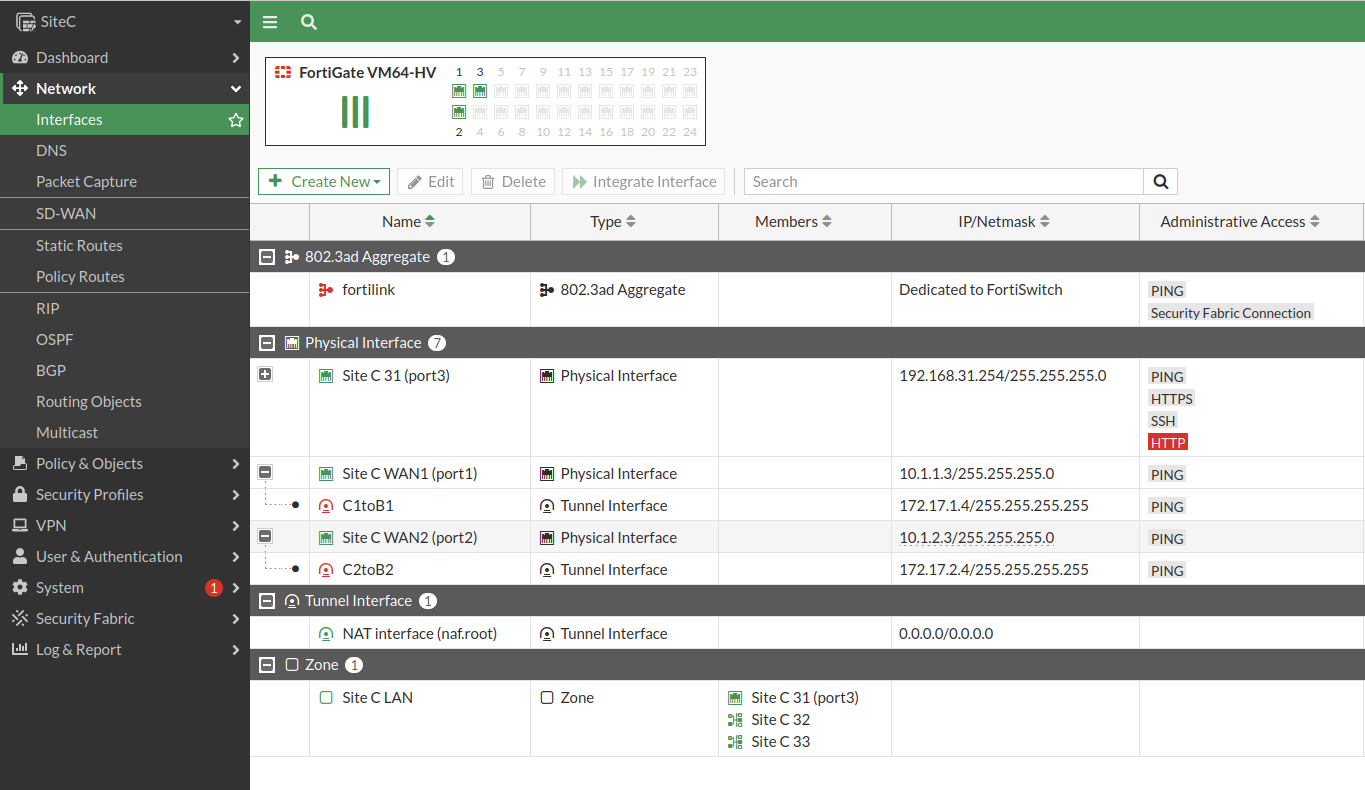](https://mdfk.goddamn.idv.tw/uploads/images/gallery/2024-08/5VeeEi88zF.png)
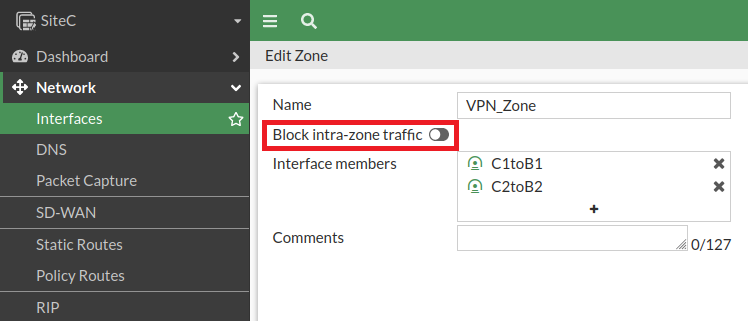
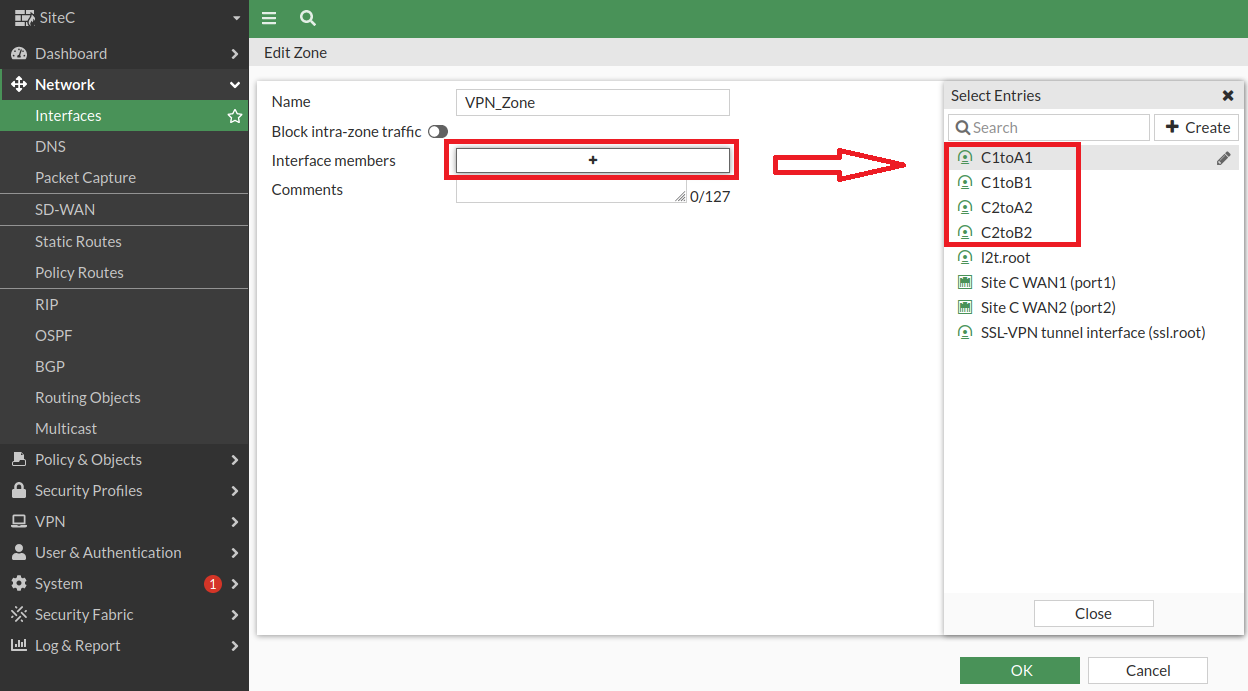
我們將兩個IPSEC VPN綁成一個Zone (**VPN\_Zone**),並且不要Block內部流量讓裡面介面能互通(後面會用到)
#### 設定Firewall Policy
建立Firewall Policy,允許LAN Zone與VPN Zone互通,**不要NAT**
[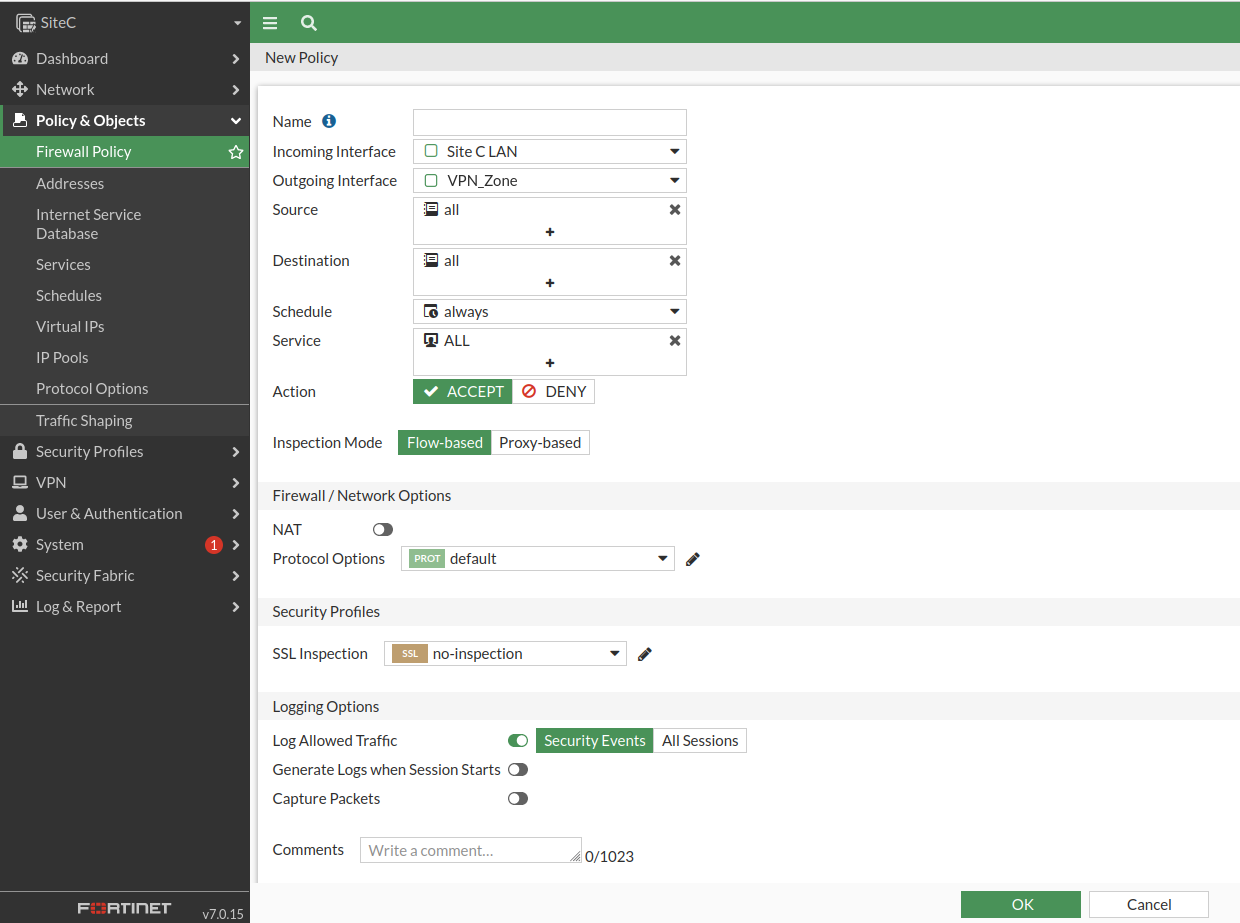](https://mdfk.goddamn.idv.tw/uploads/images/gallery/2024-08/sEIEVJ84c0.png)
[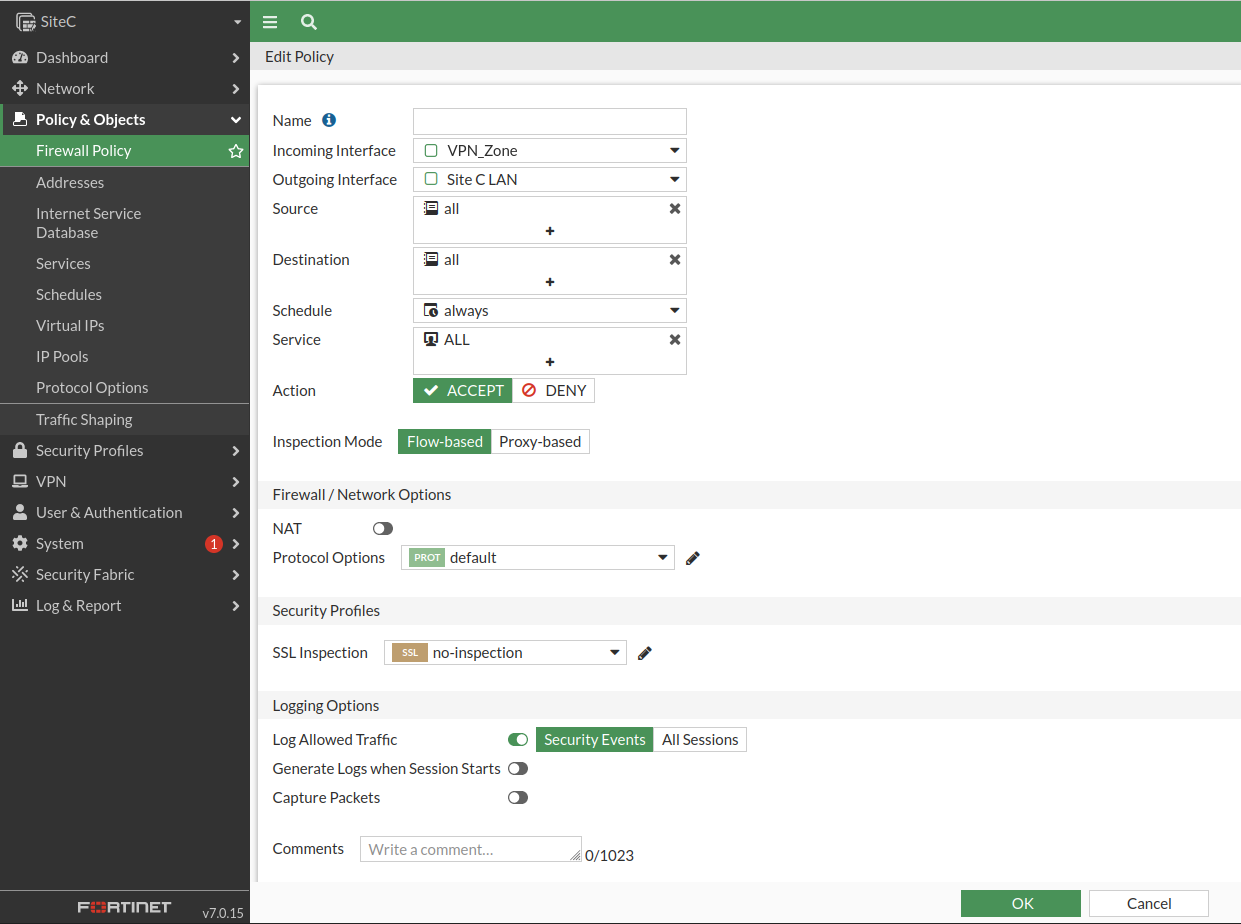](https://mdfk.goddamn.idv.tw/uploads/images/gallery/2024-08/M3YT7Pv9dF.png)
設定好後Firewall Policy如下圖
[](https://mdfk.goddamn.idv.tw/uploads/images/gallery/2024-08/V9LIkqgNkM.png)
至此完成了**SiteC** IPSEC設定,**※**請依照上面步驟去完成**SiteB** IPSEC的步驟
當 **SiteC**、**SiteB** Firewall Policy設定完成後,你應該可以發現IPSEC Turnel已經起來了
[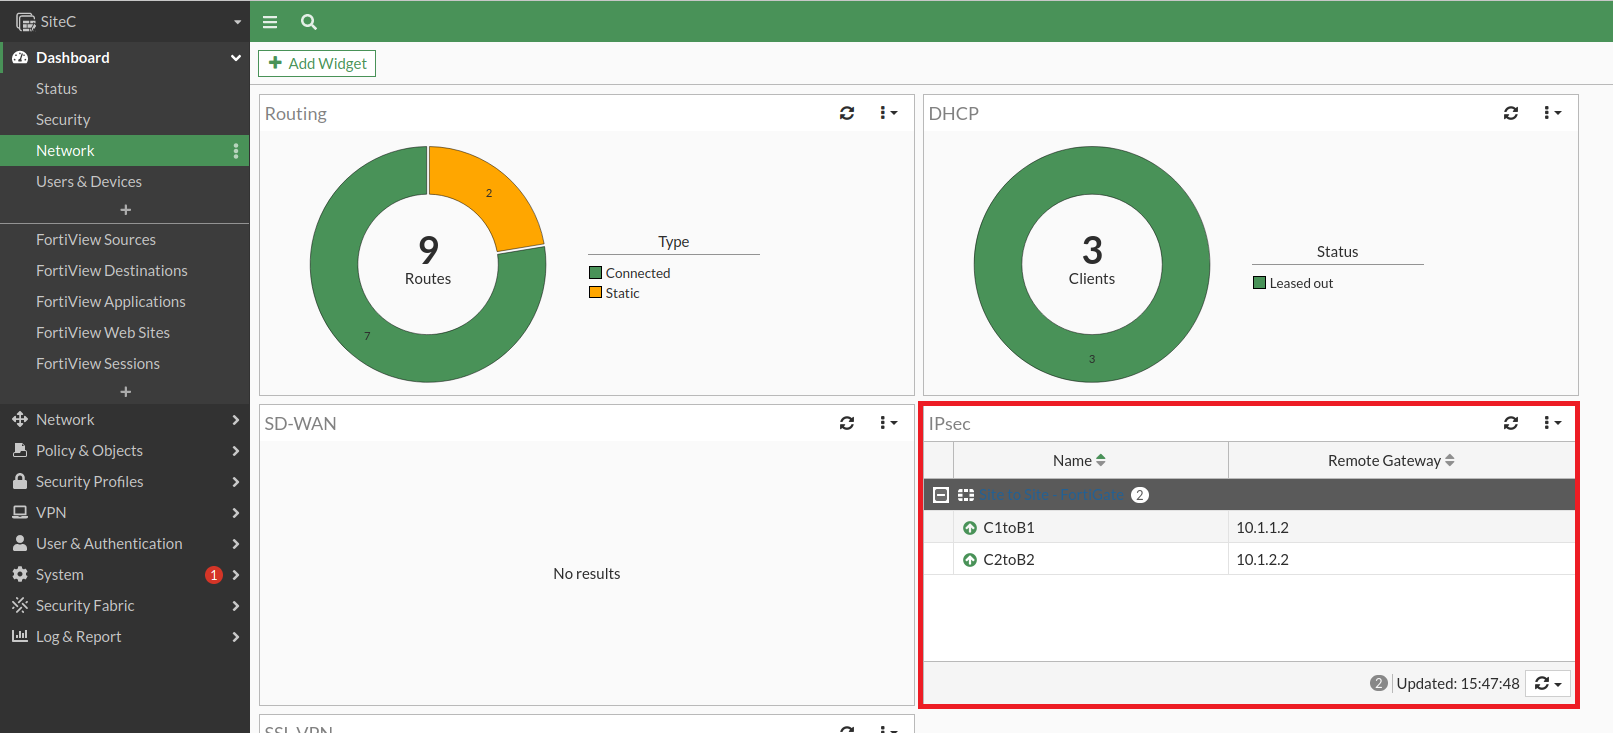](https://mdfk.goddamn.idv.tw/uploads/images/gallery/2024-08/XXeniitQgE.png)
如果還沒起來,可以透過IPSEC介面,點擊 Bring Up
[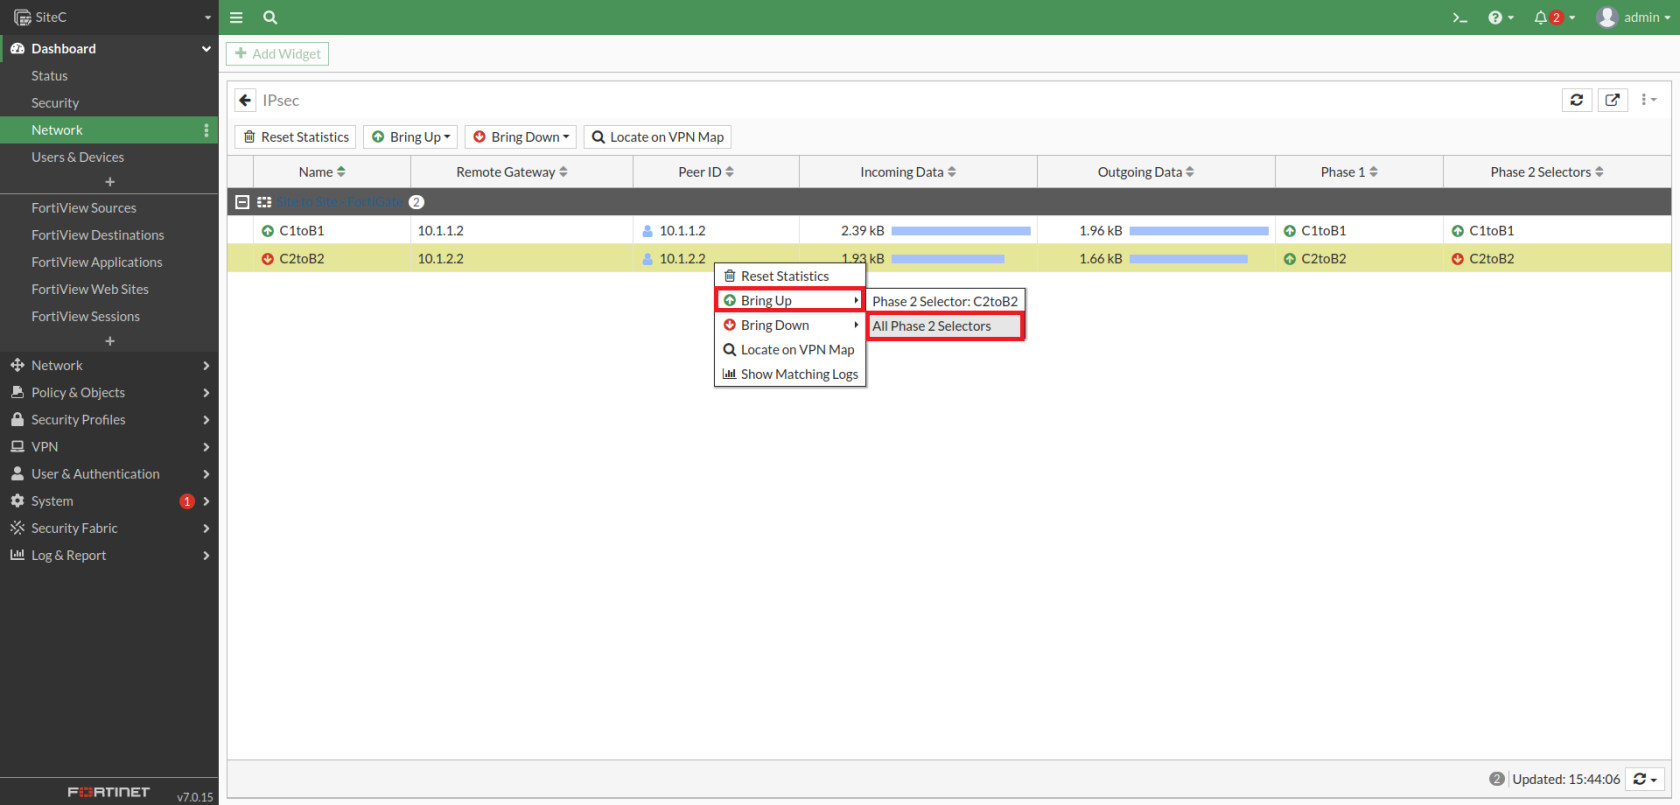](https://mdfk.goddamn.idv.tw/uploads/images/gallery/2024-08/6aD5vFwtNc.png)
從**SiteC**去Ping **SiteB **的 IPSEC IP,已經可以Ping的到,但是**SiteB**的LAN Ping不到,這是正確的
[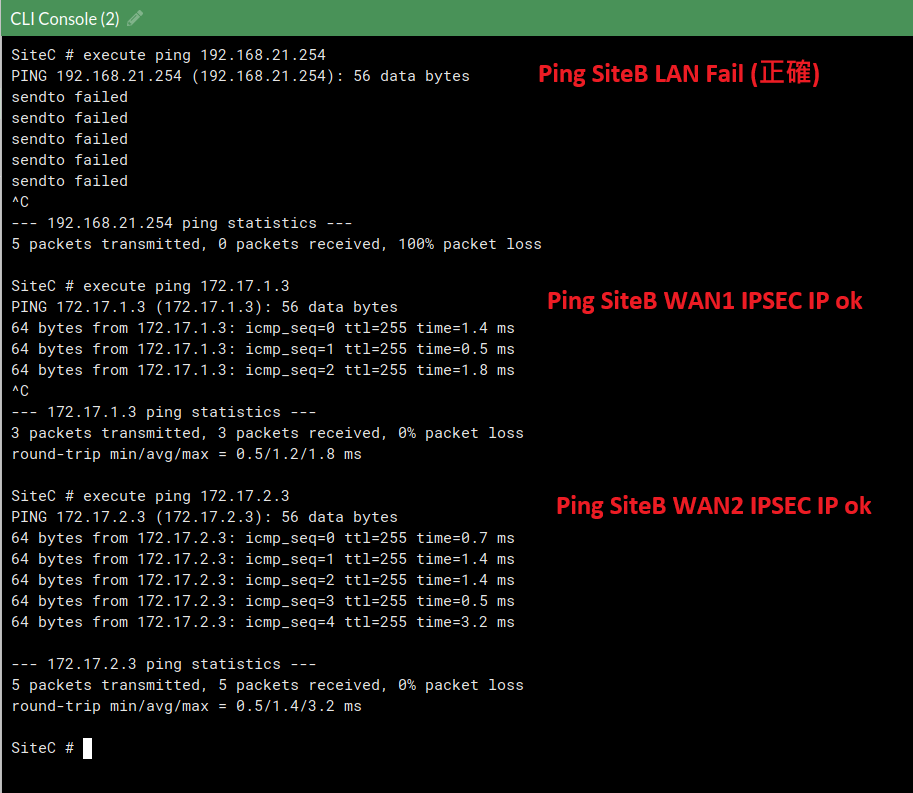](https://mdfk.goddamn.idv.tw/uploads/images/gallery/2024-08/VcLaoG6toh.png)
下圖可知 IPSEC Interface 的路由已經起來了所以Ping的到,因為沒有LAN Subnet的路由所以Ping不到,這個部分就是要靠OSPF上場了。
[](https://mdfk.goddamn.idv.tw/uploads/images/gallery/2024-08/m9YJwpMvX8.png)
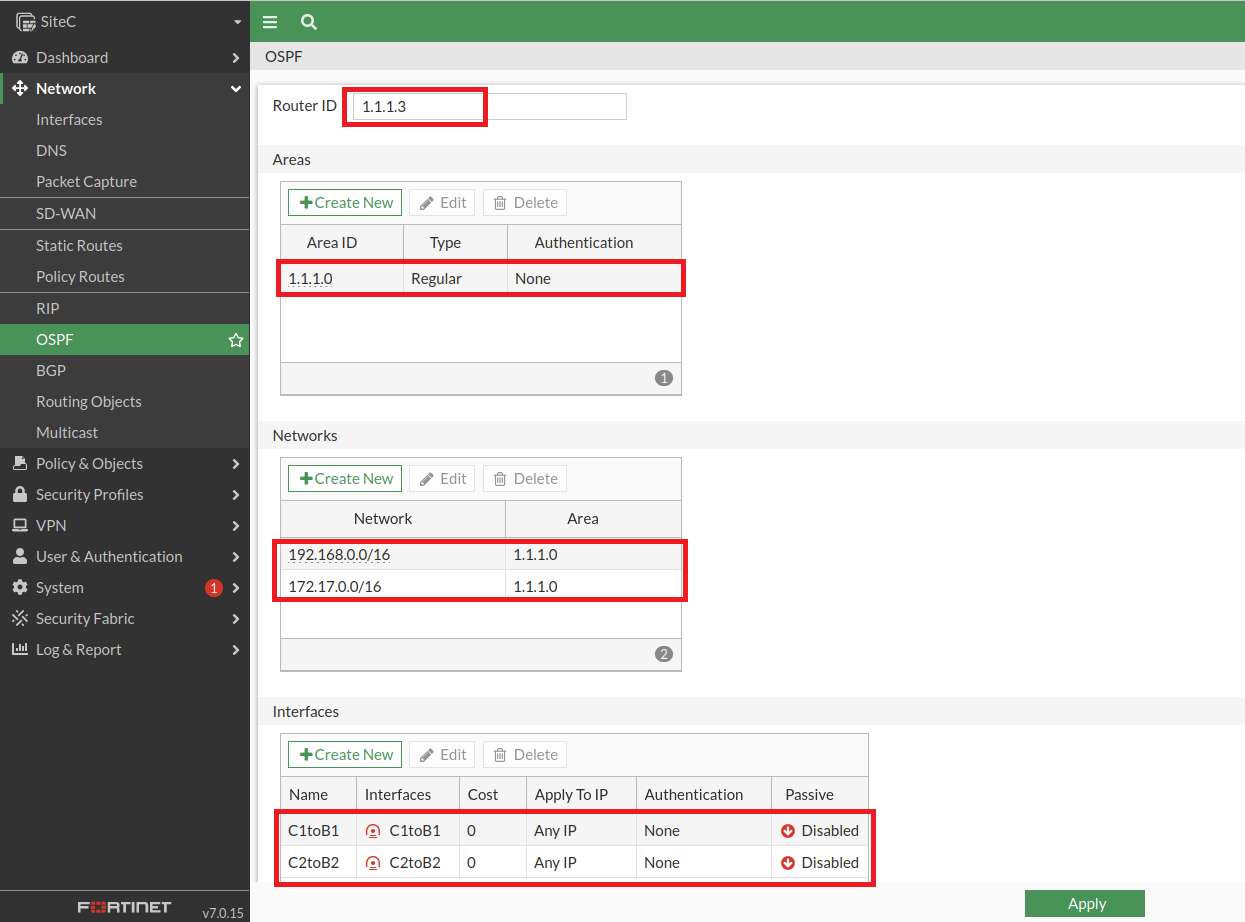
#### 設定OSPF
至 Network => OSPF,指定Router ID、Area ID、要自動交換路由的網段 **※**(需要包括IPSEC介面的路由)
[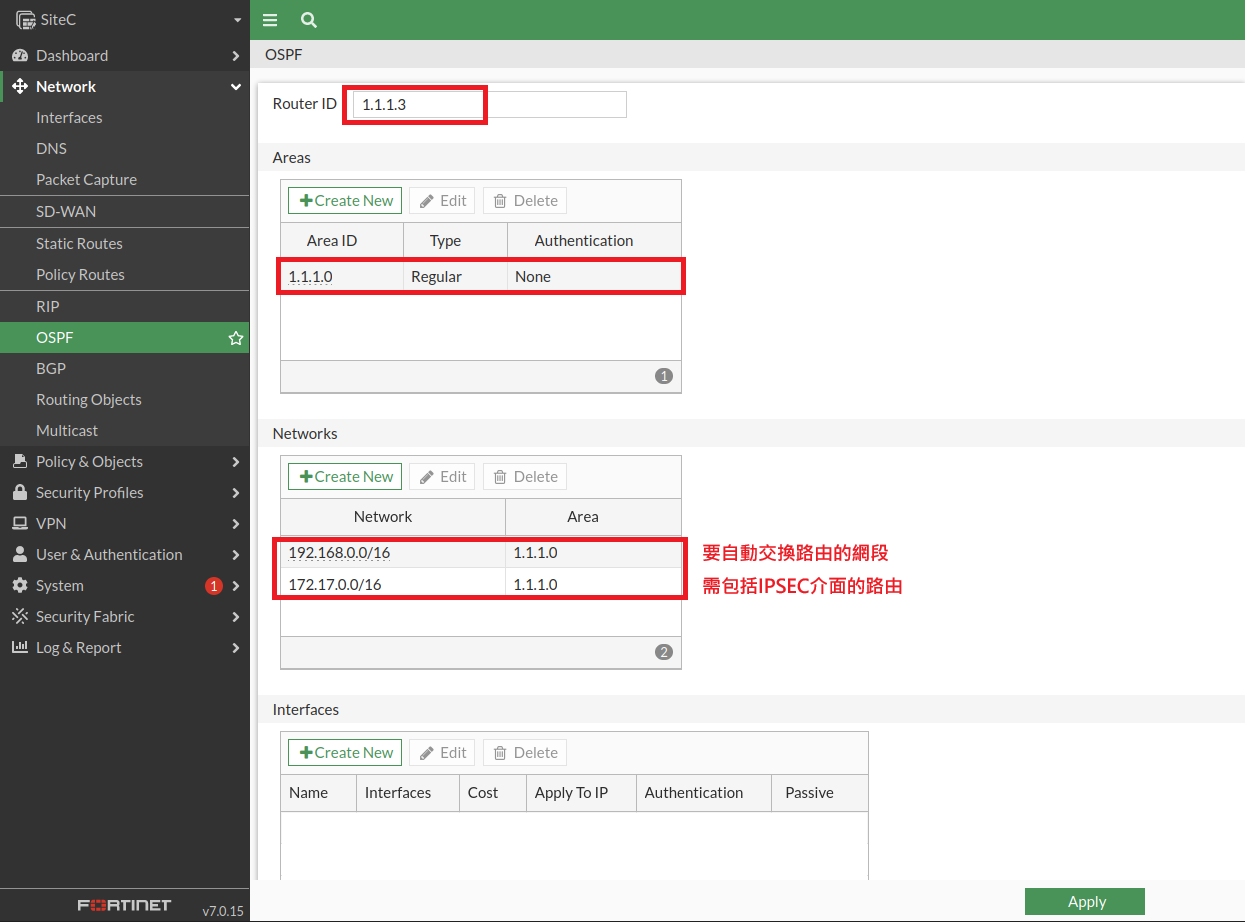](https://mdfk.goddamn.idv.tw/uploads/images/gallery/2024-08/dDPA3Vbl1Z.png)
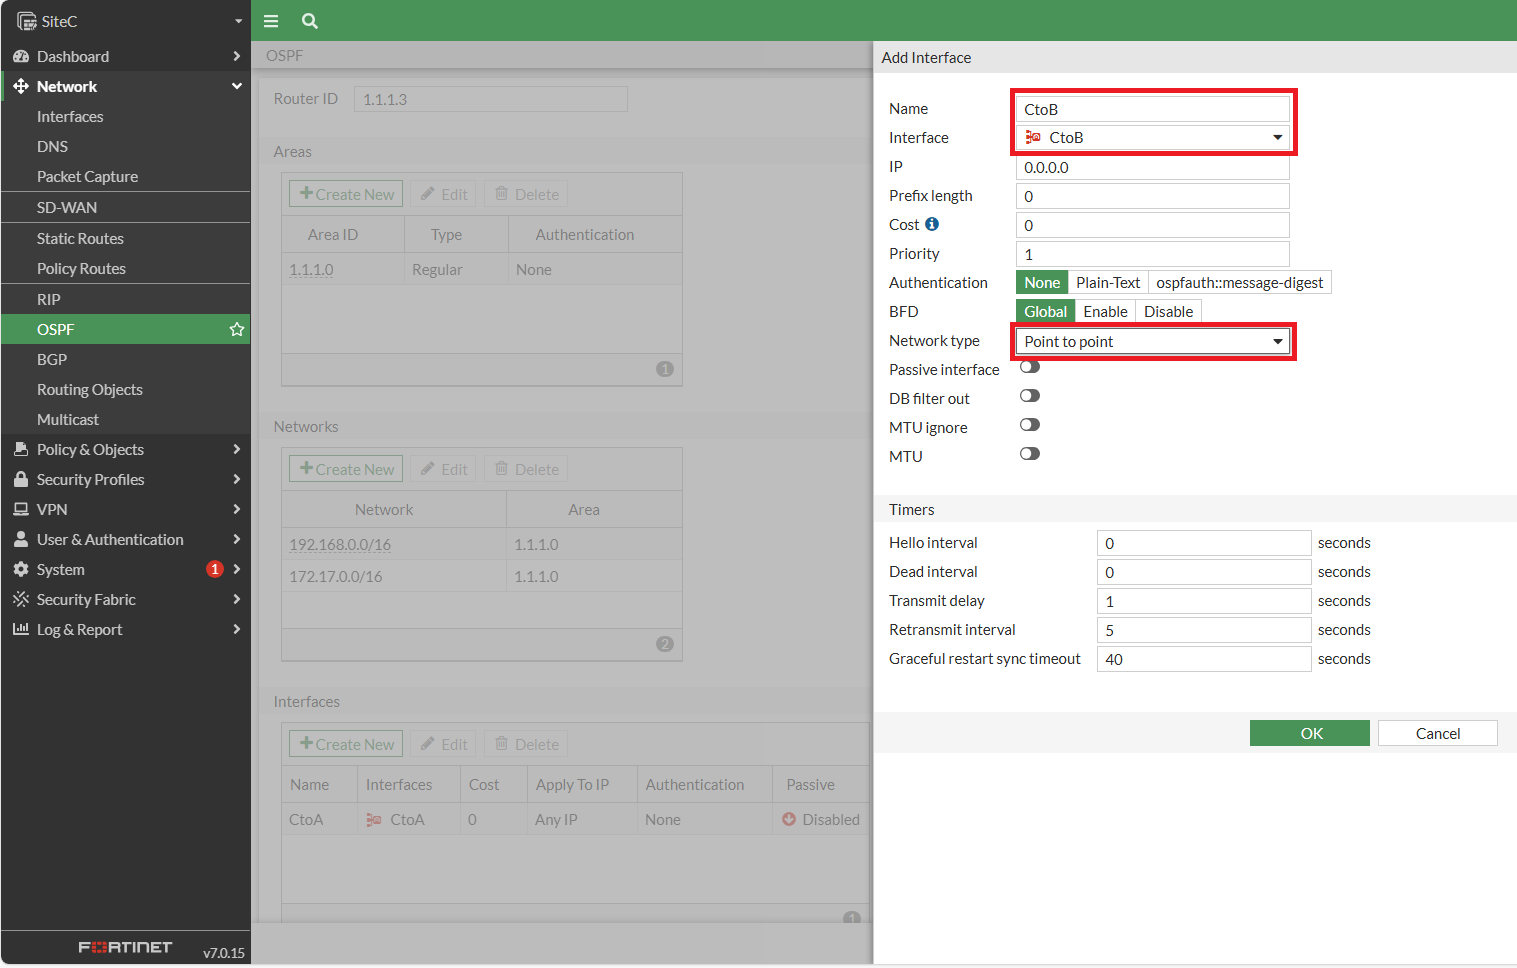
Interfaces將IPSEC介面加入,Network Type 選擇 "Point to Point"
[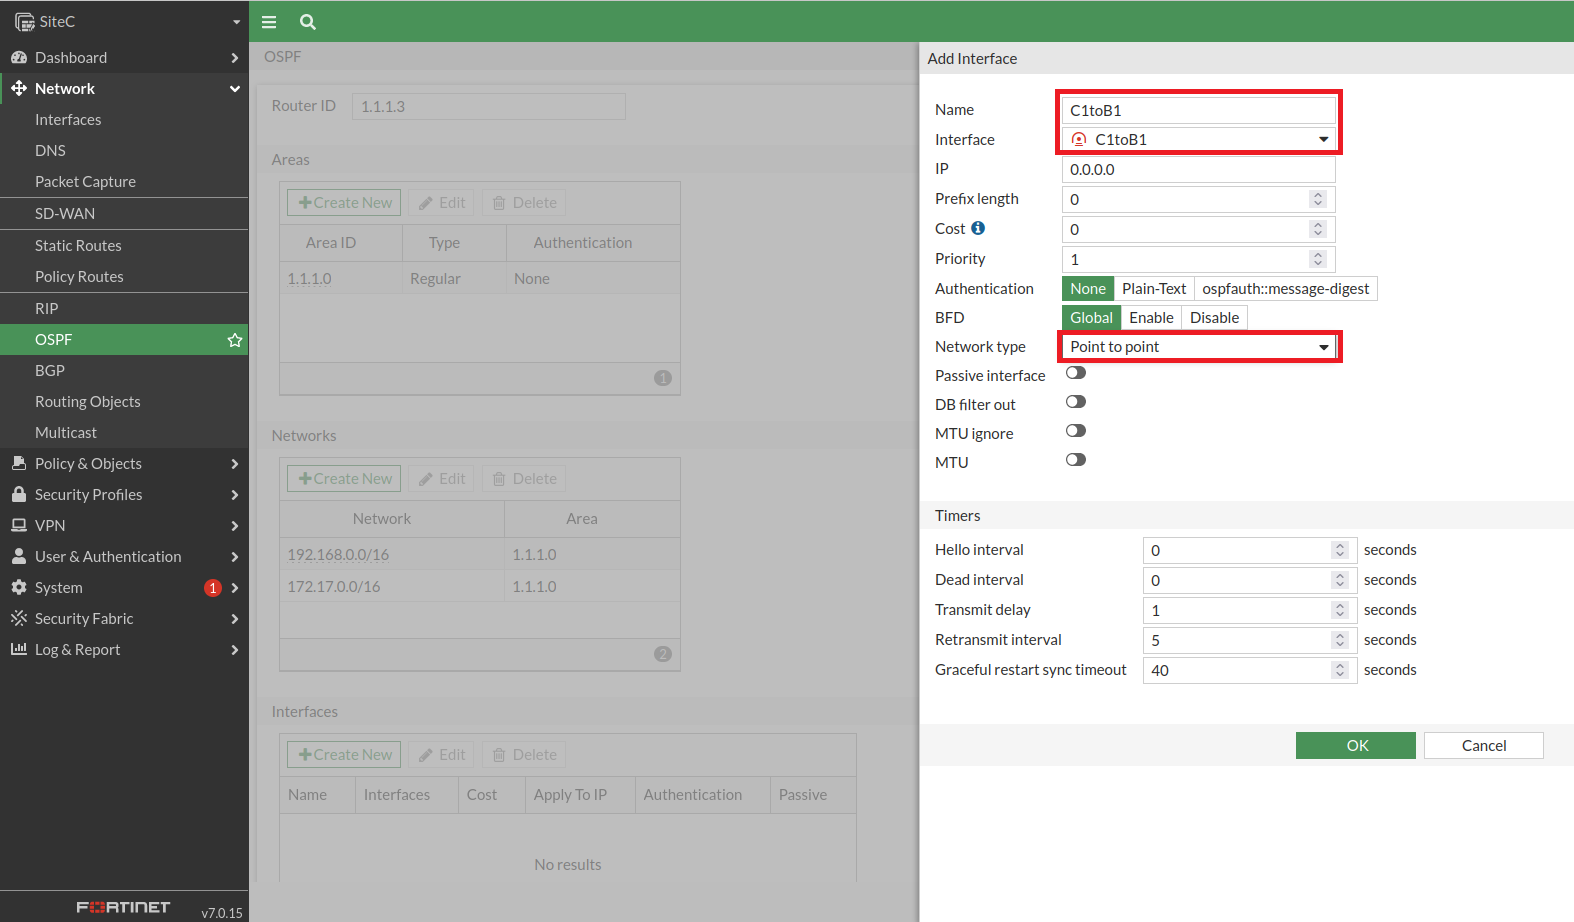](https://mdfk.goddamn.idv.tw/uploads/images/gallery/2024-08/PRIjxqbNqP.png)
[](https://mdfk.goddamn.idv.tw/uploads/images/gallery/2024-08/hE00HXLQ5k.png)
**※**請依照上面步驟去完成**SiteB** OSPF設定
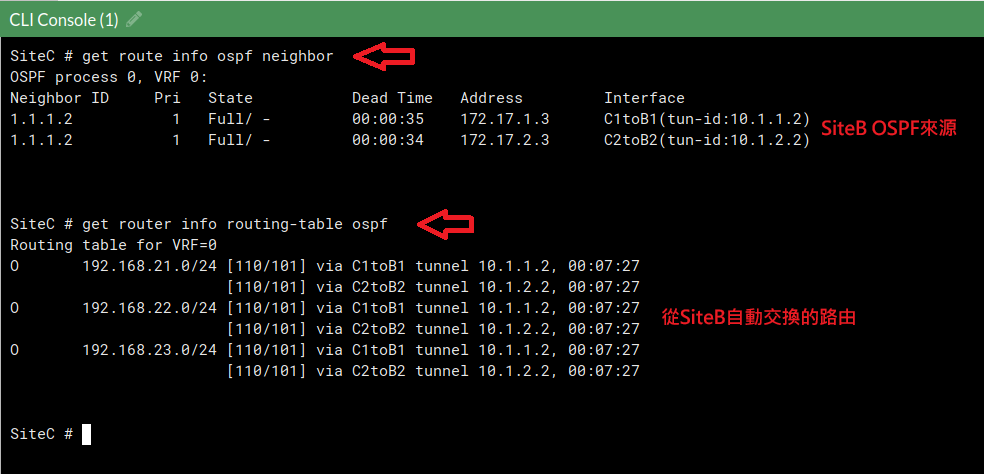
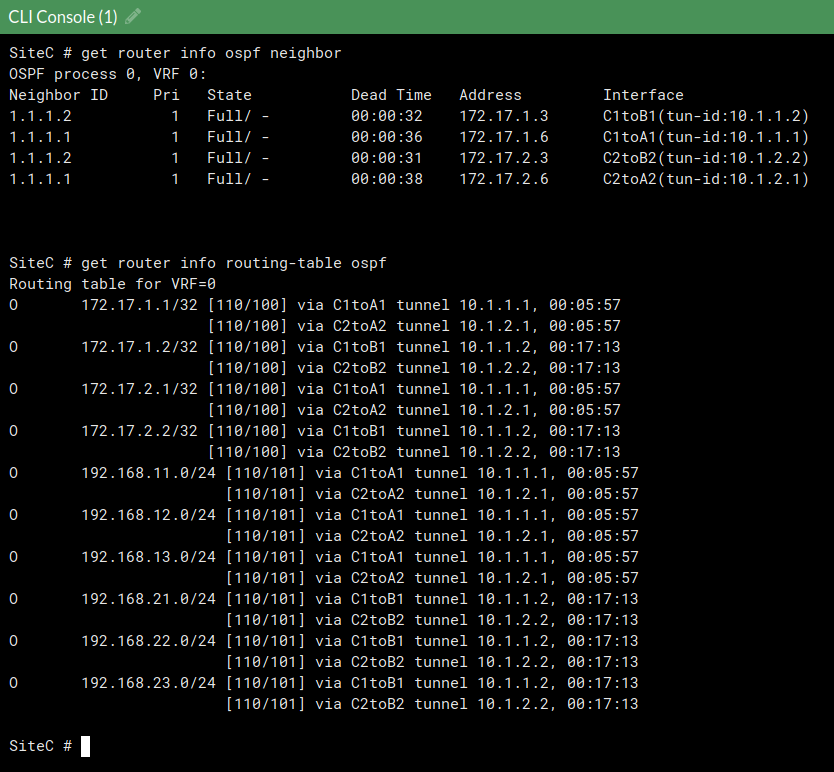
完成後至CLI Console,輸入下列指令可查詢OSPF Neighbor、OSPF路由
```
get router info ospf neighbor
get router info routing-table ospf
```
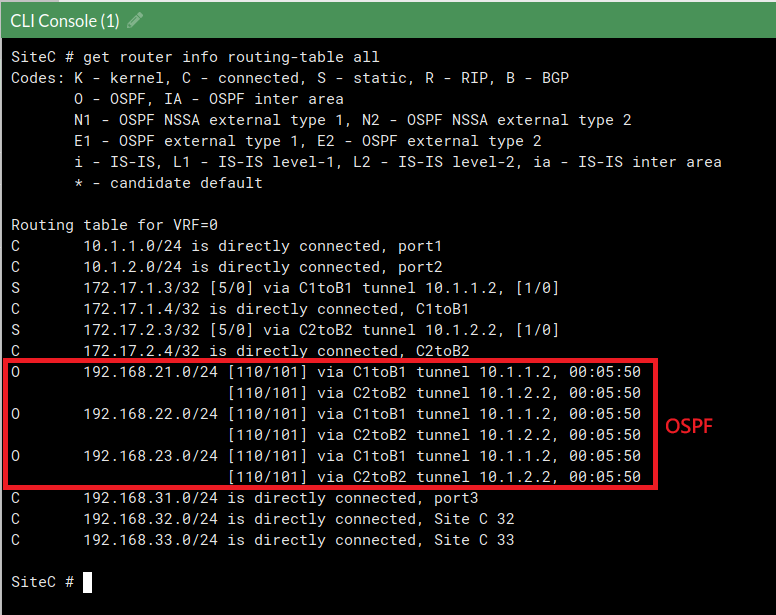
輸入下列指令顯示完整路由
```
get router info routing-table all
```
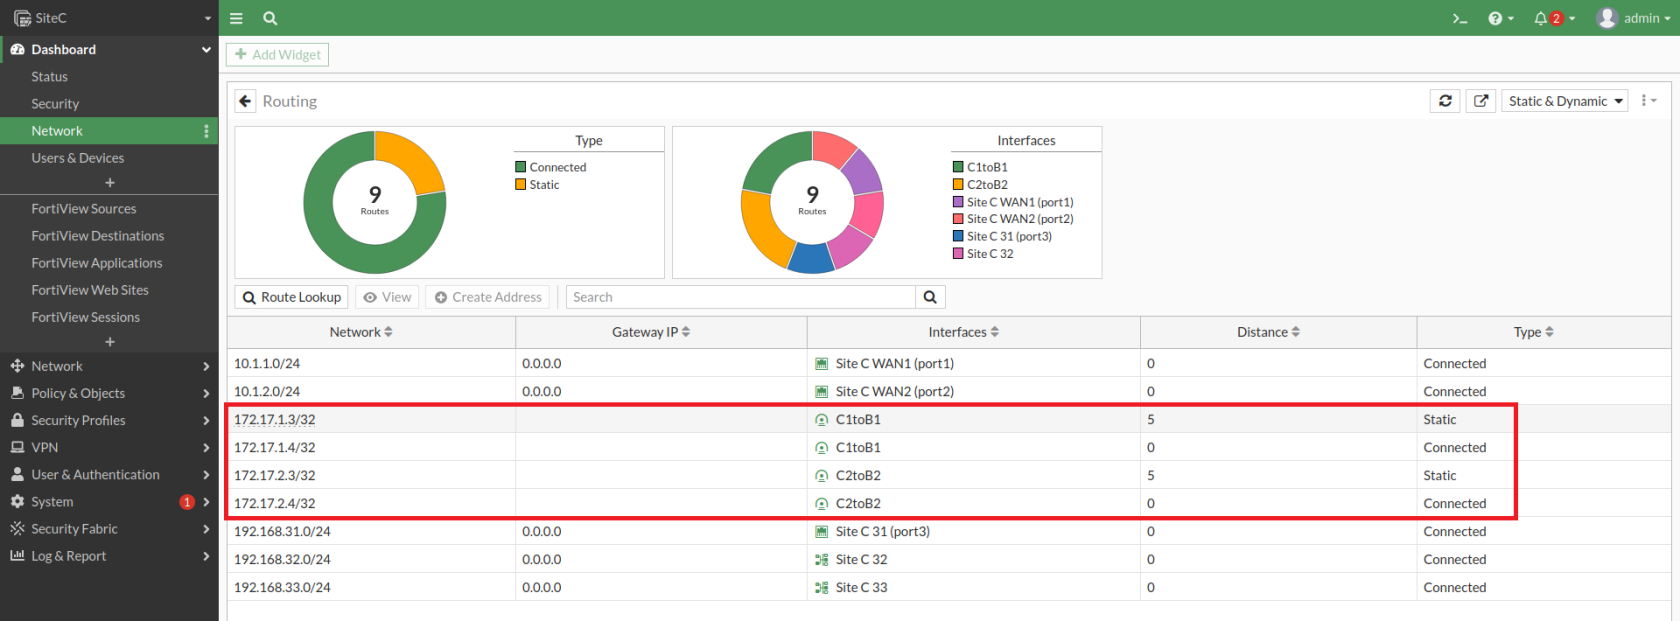
或者可由 Dashboard => Network => Routing,確認路由
[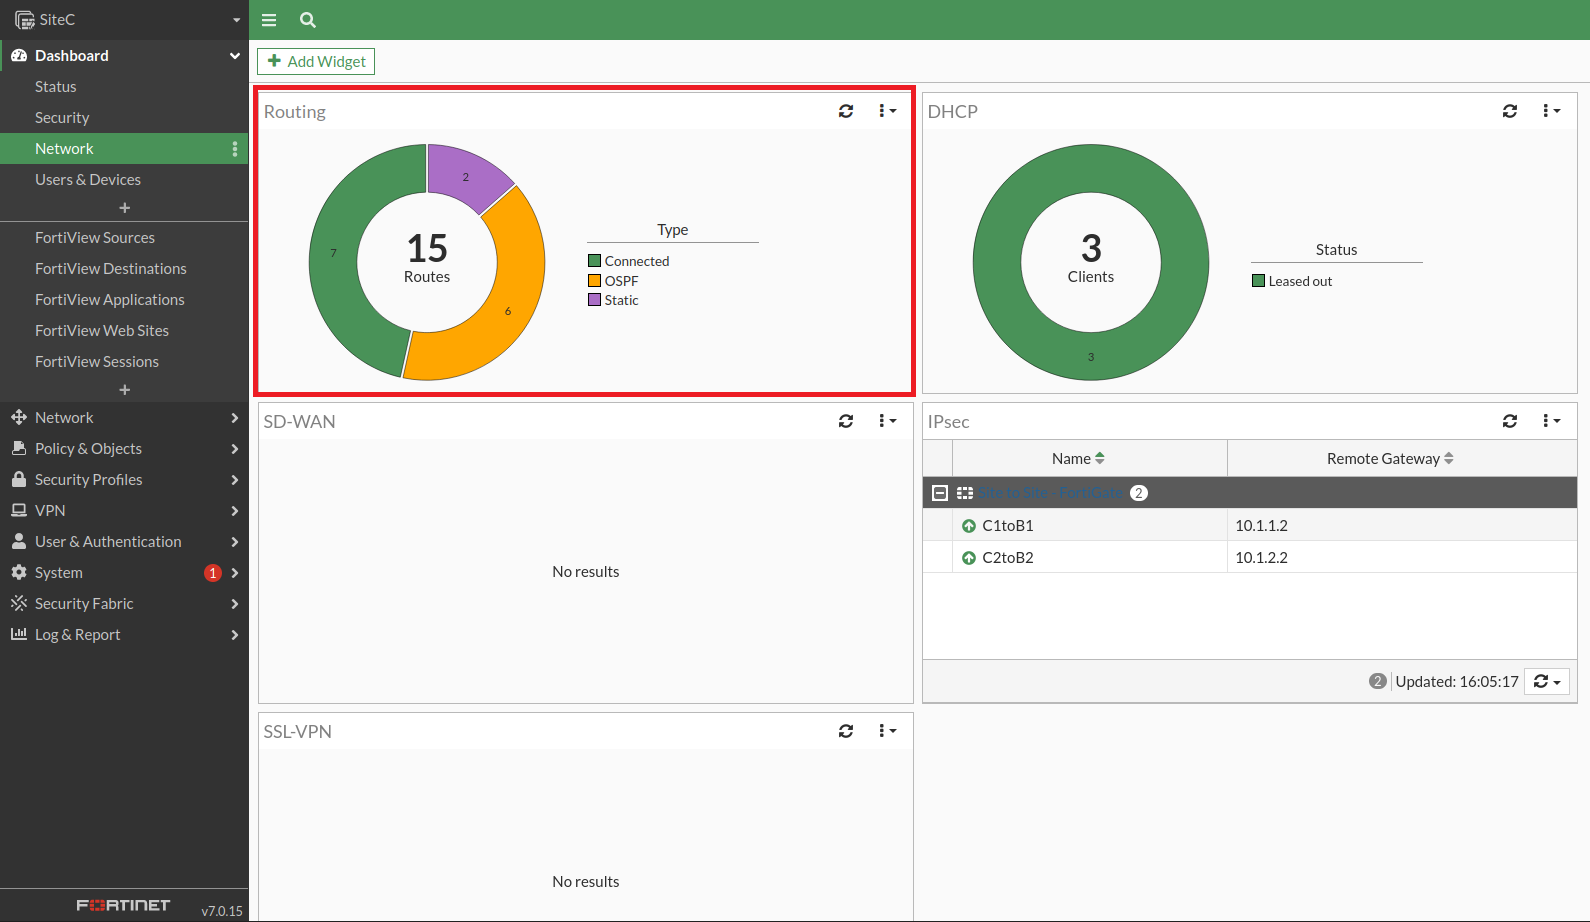](https://mdfk.goddamn.idv.tw/uploads/images/gallery/2024-08/TiKZdmiZhH.png)
[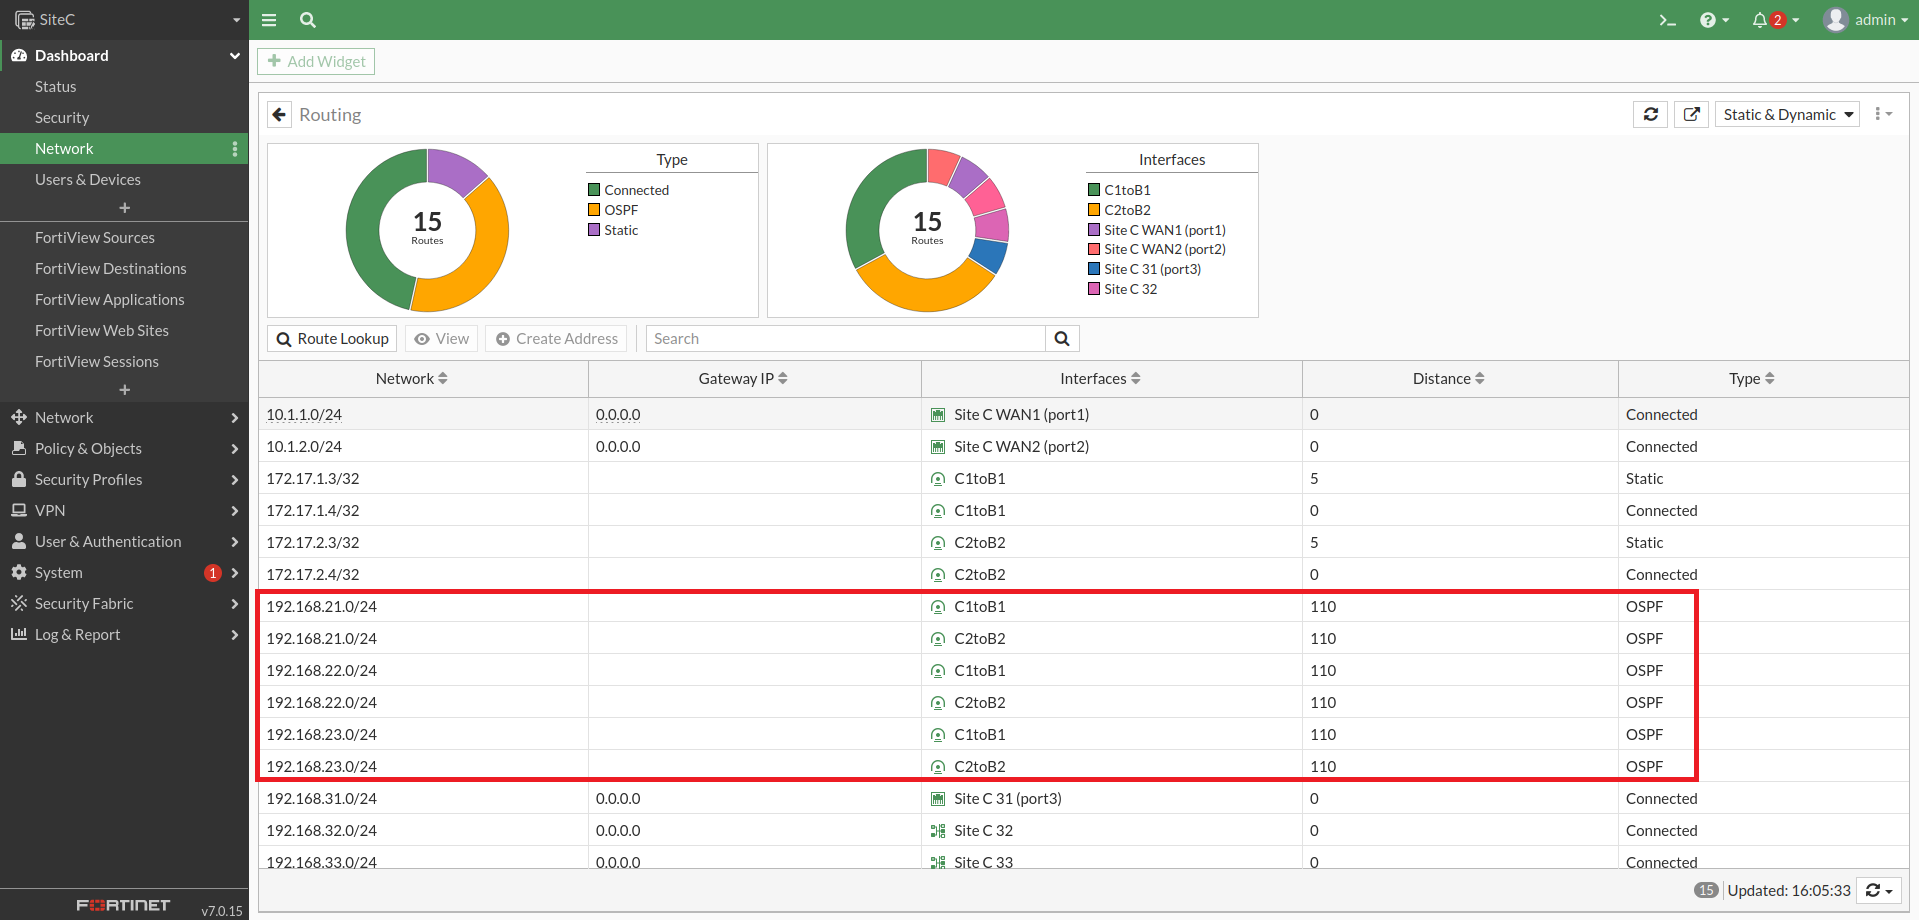](https://mdfk.goddamn.idv.tw/uploads/images/gallery/2024-08/zCNzcbSFxs.png)
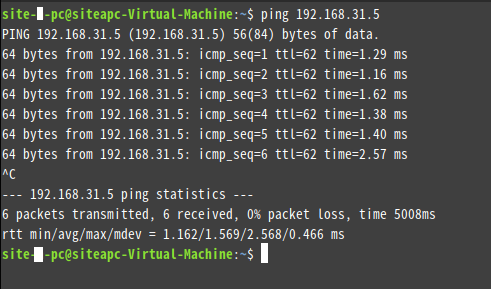
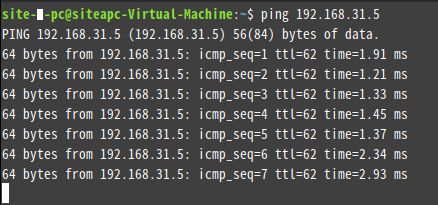
#### 連線測試
我們在**SiteB**放一台PC (192.168.21.4)、**SiteC**放一台PC (192.168.31.5)
Ping ok
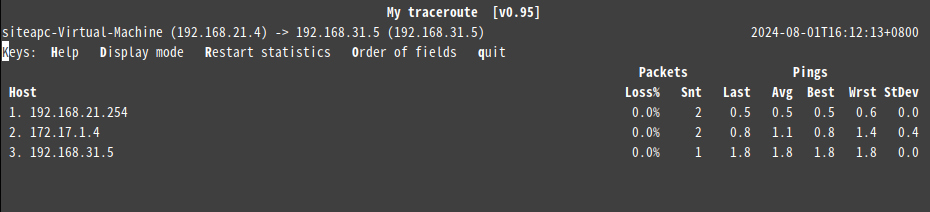
Traceroute 確認路由
### 設定過程(2)
比照上述 **SiteC** <=> **SiteB** 設定過程,來完成 **SiteA** <=> **SiteB**、**SiteC** <=> **SiteA** 的設定。
#### 設定IPSEC
設定IPSEC Turnel
[](https://mdfk.goddamn.idv.tw/uploads/images/gallery/2024-08/lOksC4E0FE.png)
#### 設定Interface
設定IPSEC Interface IP、並把新增的IPSEC加入**VPN\_Zone**
[](https://mdfk.goddamn.idv.tw/uploads/images/gallery/2024-08/YHYqdoz5Lq.png)
[](https://mdfk.goddamn.idv.tw/uploads/images/gallery/2024-08/5nbmmqIFPn.png)
[](https://mdfk.goddamn.idv.tw/uploads/images/gallery/2024-08/4Nf70SY0pE.png)
#### 設定Firewall Policy
Firewall Policy由於一開始是由Zone來設定的,所以完全不需要調整
[](https://mdfk.goddamn.idv.tw/uploads/images/gallery/2024-08/s8spk6eOct.png)
IPSEC應該就起來了
[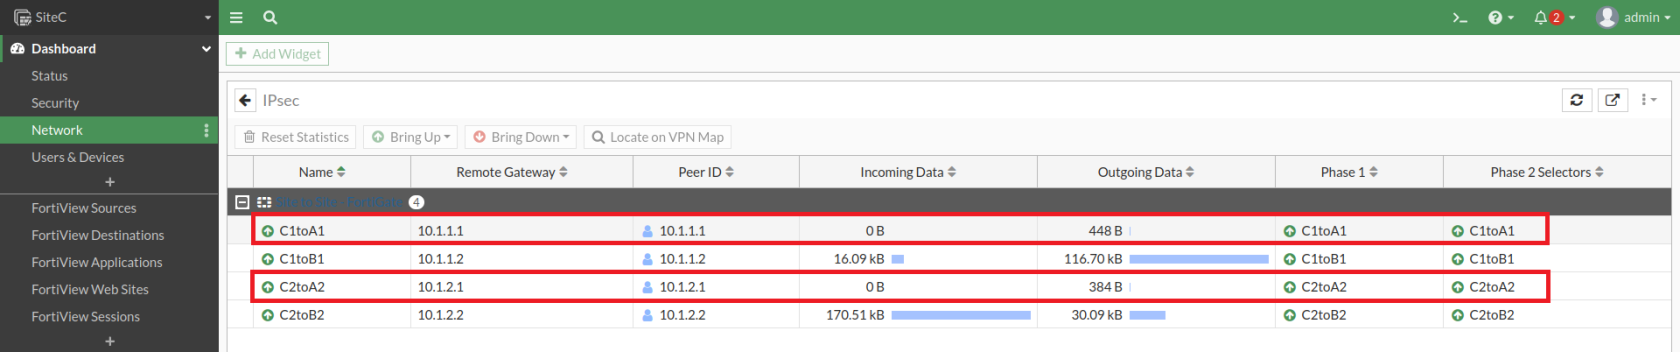](https://mdfk.goddamn.idv.tw/uploads/images/gallery/2024-08/tUe4Hnd7Su.png)
#### 設定OSPF
將新增的IPSEC介面加入
[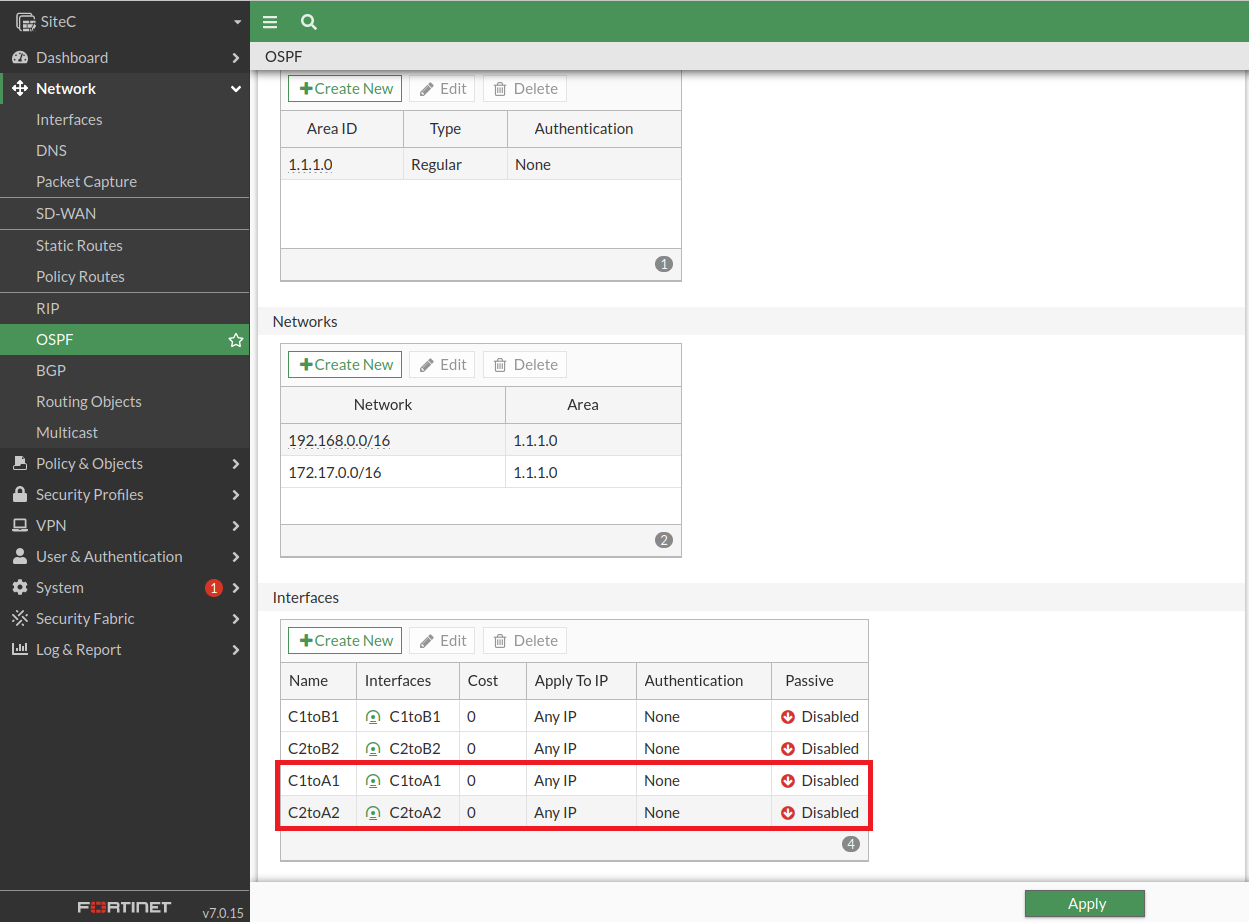](https://mdfk.goddamn.idv.tw/uploads/images/gallery/2024-08/nuhZ2CiwQq.png)
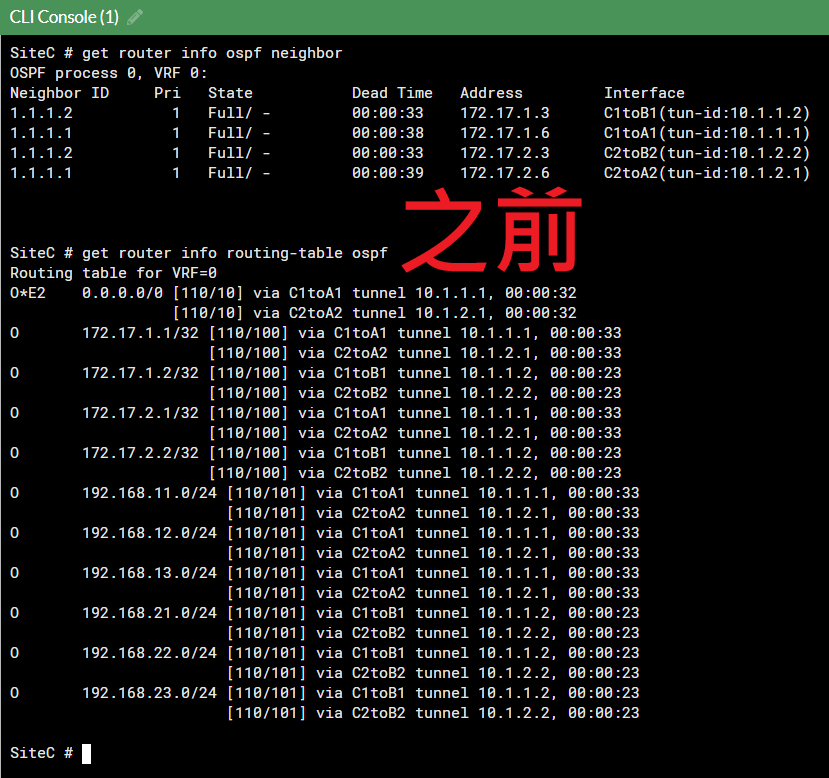
完成後至CLI Console,查詢OSPF Neighbor、OSPF路由
```
get router info ospf neighbor
get router info routing-table ospf
```
[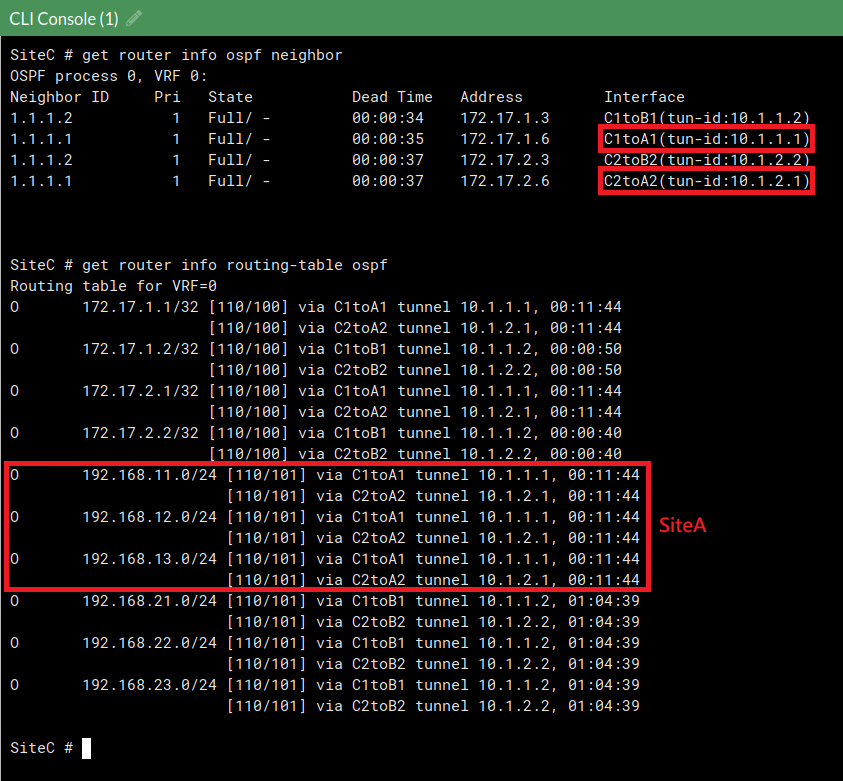](https://mdfk.goddamn.idv.tw/uploads/images/gallery/2024-08/BlIDy8HqTF.png)
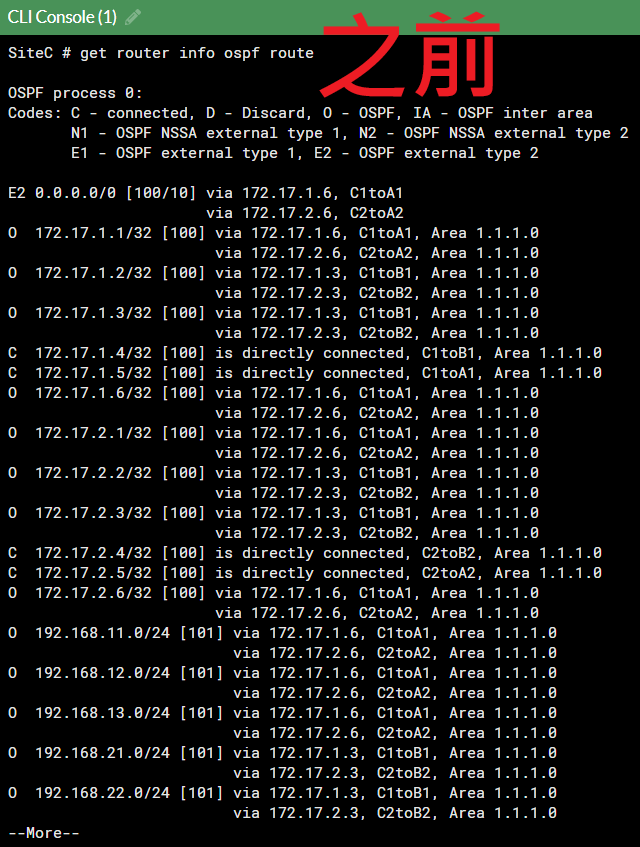
輸入下列指令顯示OSPF路由詳細資訊
```
get router info ospf route
```
[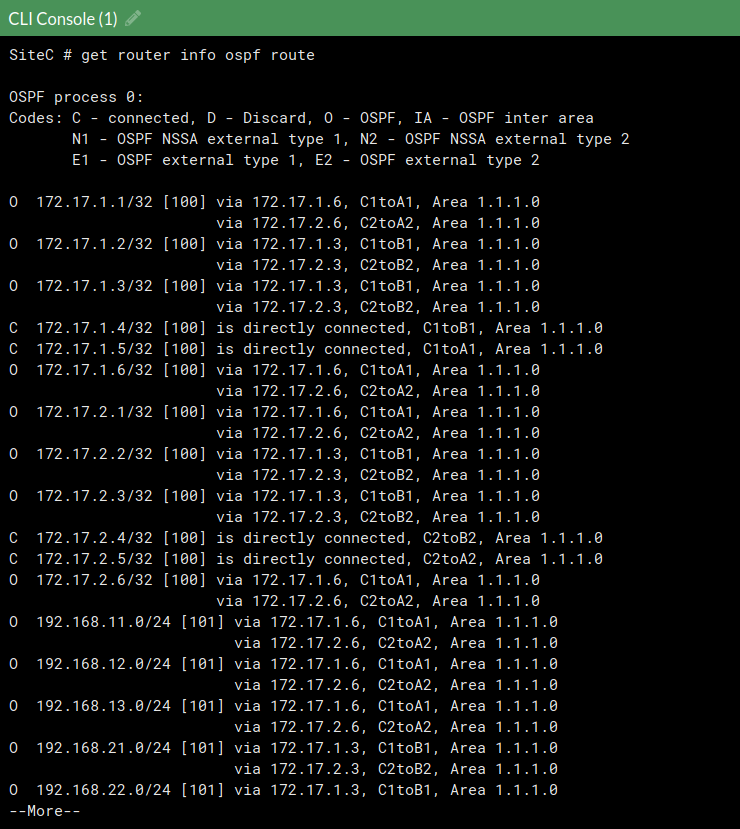](https://mdfk.goddamn.idv.tw/uploads/images/gallery/2024-08/zVFqx3V1yu.png)
#### Fail Over測試
我測試的方式如下
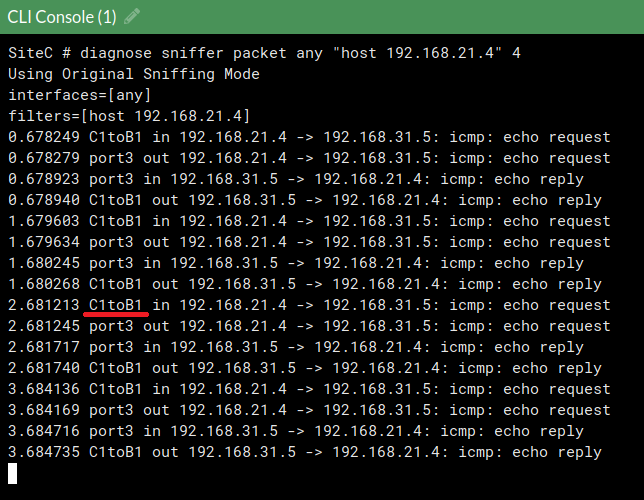
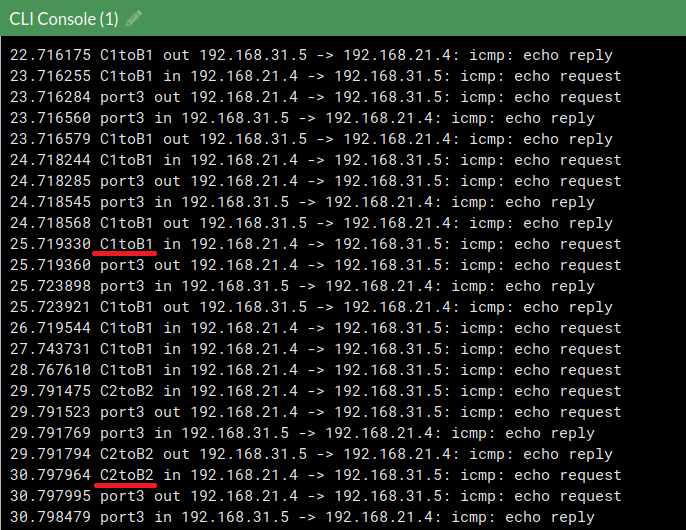
1\. 由**SiteB PC**連續Ping **SiteC PC**,先確定是走哪一條IPSEC
透過packet sniffer確認是由**C1toB1**過來的
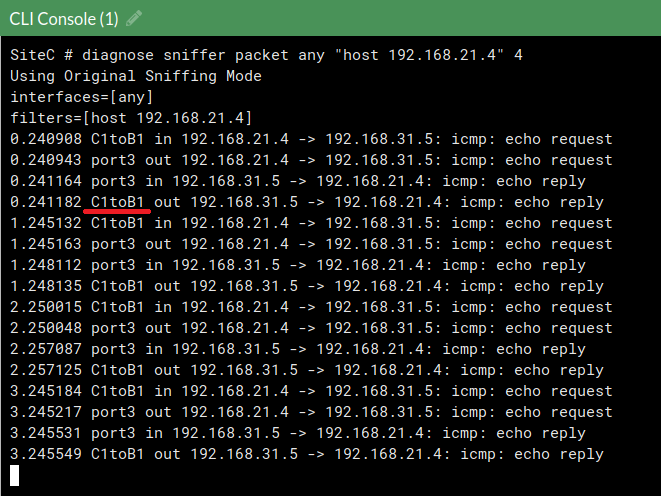
2\. 將**C1toB1** IPSEC手動斷線,觀察是否會走另一條IPSEC
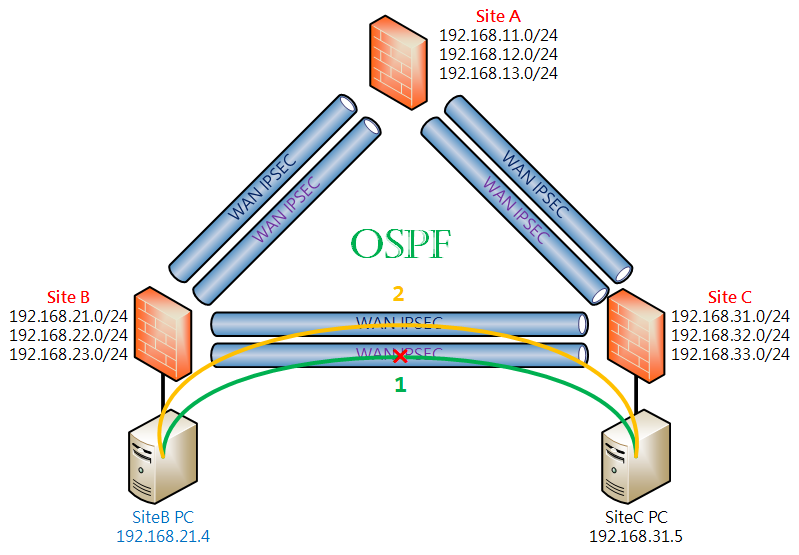
確認由**C1toB1**切到**C2toB2**
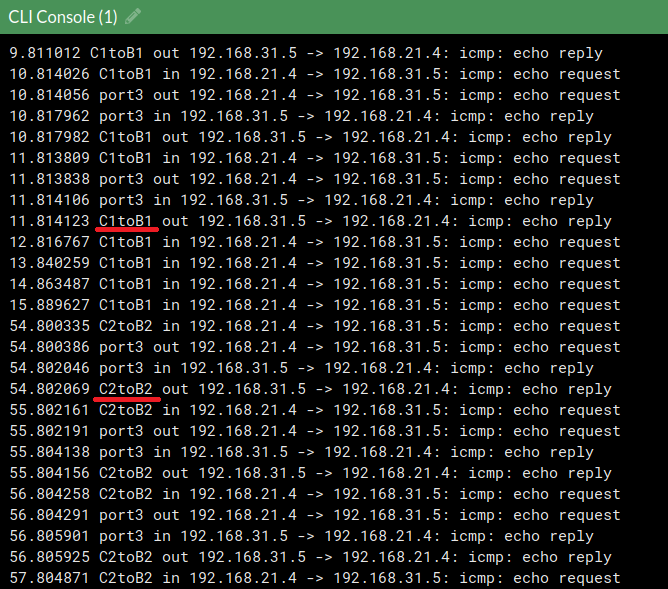
3\. 將**C2toB2**再度手動斷線,觀察流量是否會透過**SiteA**過來
確認由**C2toB2**切到**C1toA1**,流量從**SiteA**過來了
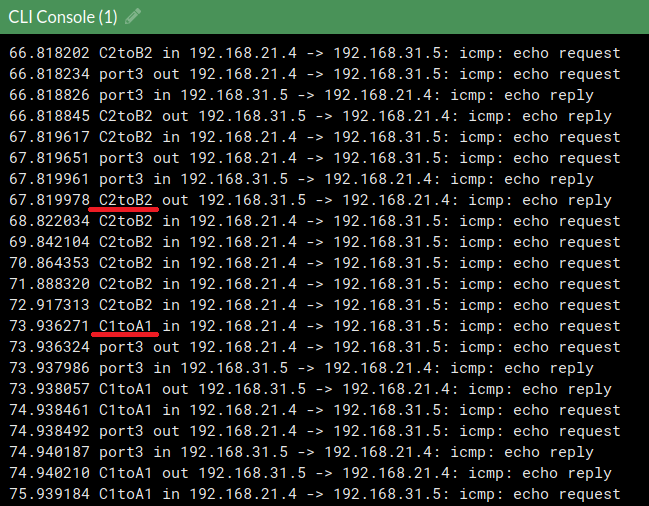
如此一來就驗證了OSPF運作ok 👍
### SDWAN設定過程
ok,OSPF運作ok了,那說好的SDWAN呢 ? 這邊哪來的SDWAN ?
別急,現在我們就來把VPN\_Zone改接成SDWAN
#### 把IPSEC從Zone移除
至Network => VPN\_Zone將IPSEC移出Zone
[](https://mdfk.goddamn.idv.tw/uploads/images/gallery/2024-08/VQJdvyHS9M.png)
#### 設定SD-WAN Zone
Network => SD-WAN => Create New => SD-WAN Zone
[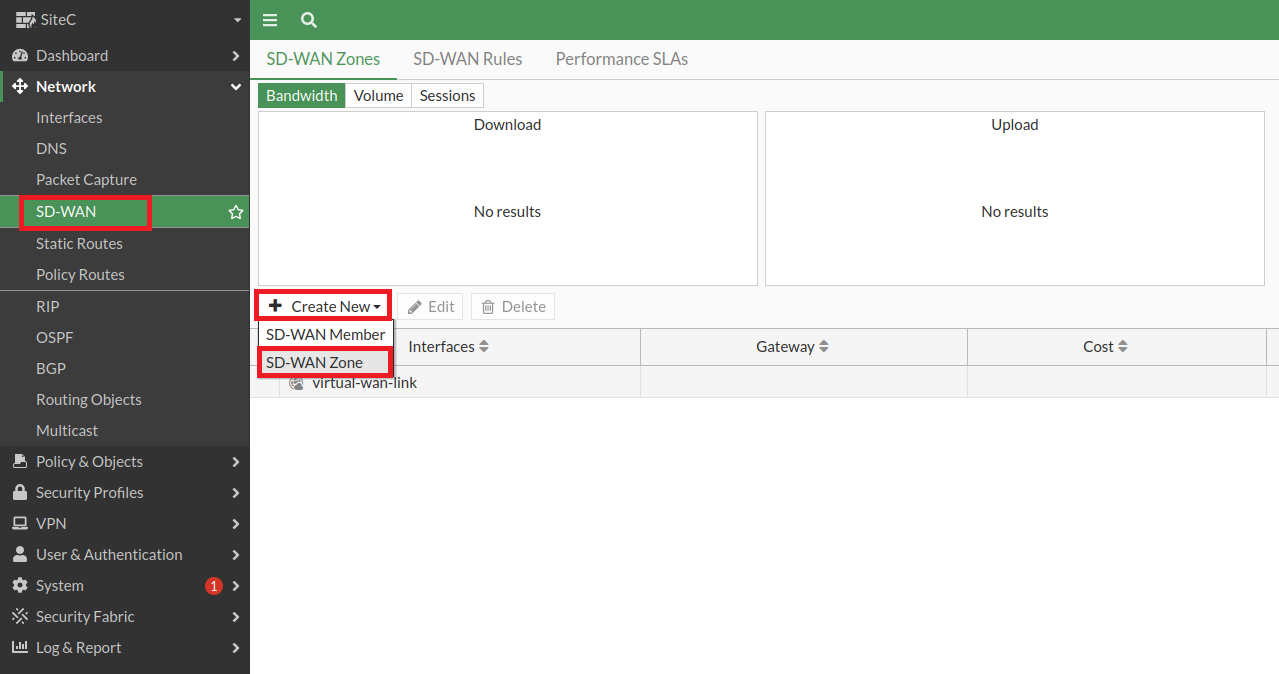](https://mdfk.goddamn.idv.tw/uploads/images/gallery/2024-08/chQO0uHmnh.png)
在此建立一個**OSPF\_SDWAN**的Zone
[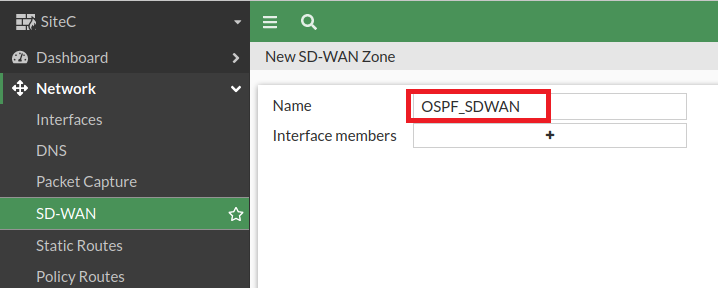](https://mdfk.goddamn.idv.tw/uploads/images/gallery/2024-08/9ysYbGaPmW.png)
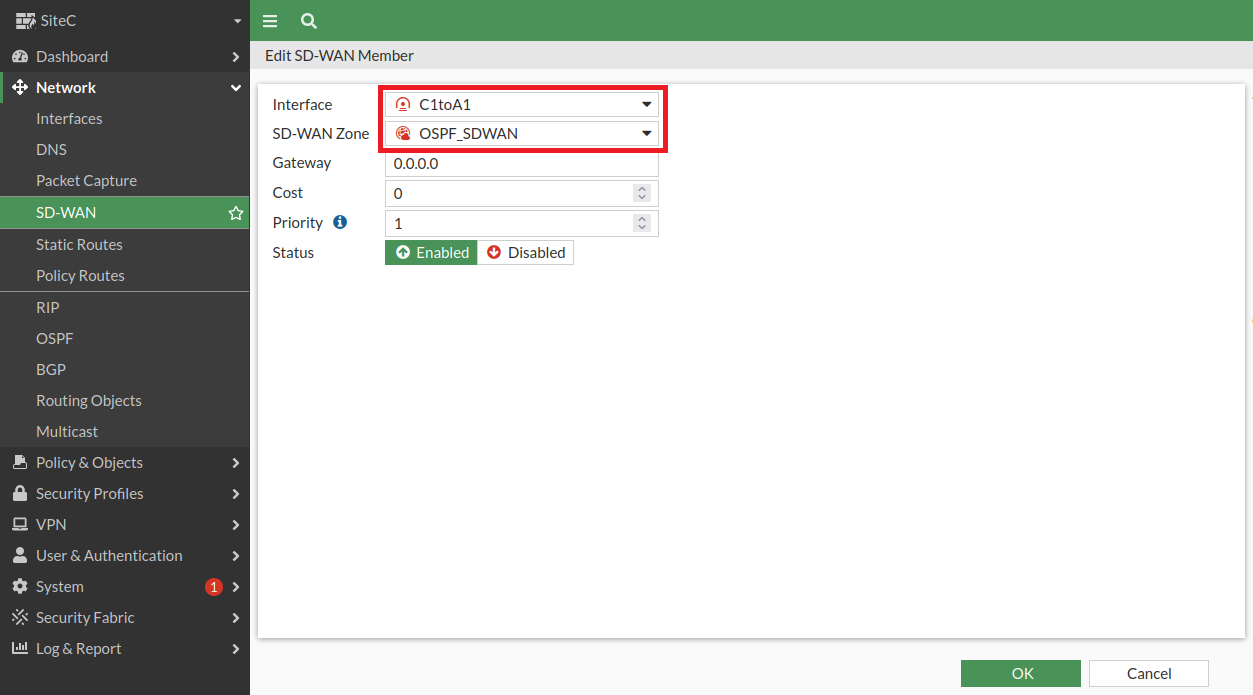
將剛剛移除Zone的四條IPSEC VPN新增至SD-WAN Member
[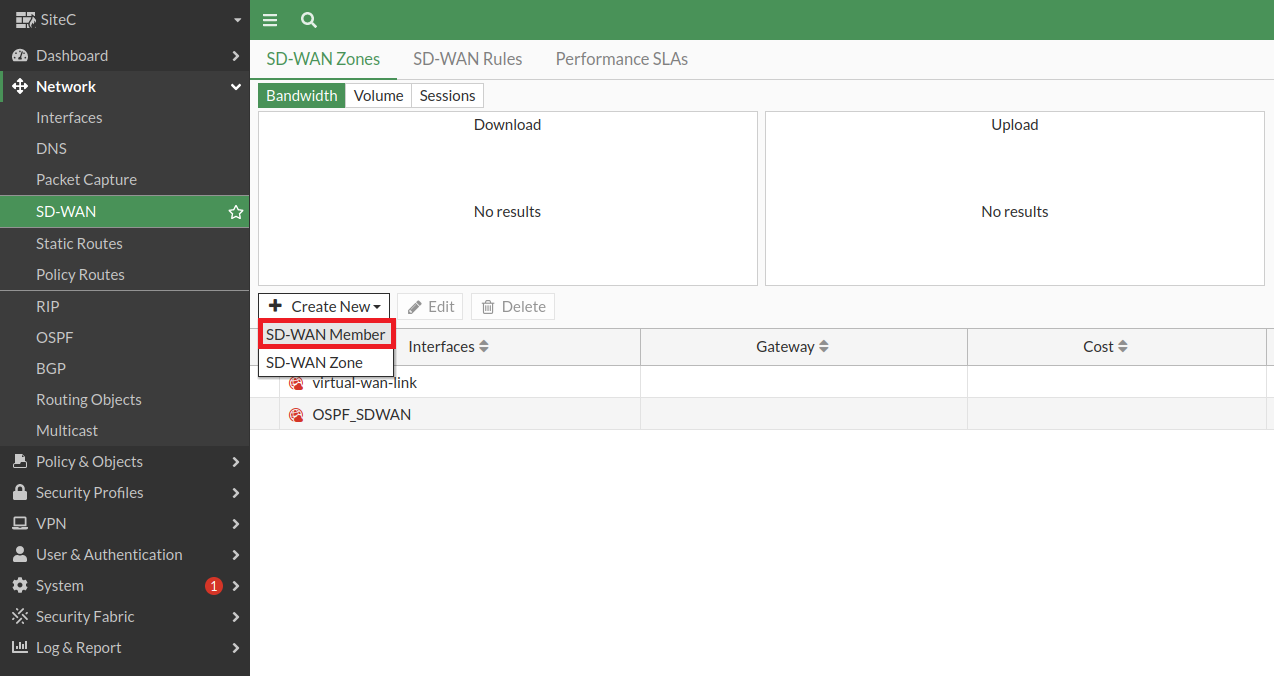](https://mdfk.goddamn.idv.tw/uploads/images/gallery/2024-08/29hKM97drp.png)
[](https://mdfk.goddamn.idv.tw/uploads/images/gallery/2024-08/ZQbbjGIK9S.png)
[](https://mdfk.goddamn.idv.tw/uploads/images/gallery/2024-08/XSxPduHy7C.png)
到Interface也可以看到SD-WAN Zone
[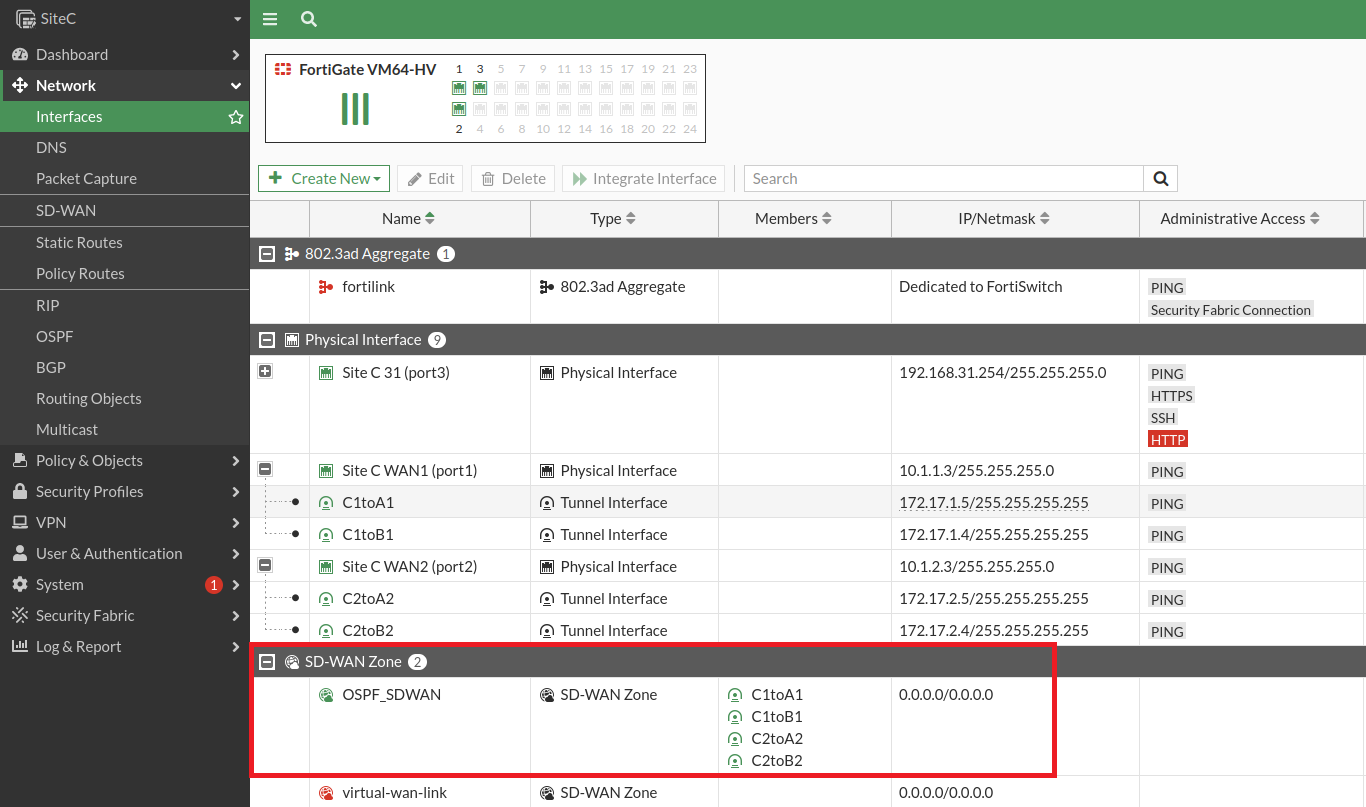](https://mdfk.goddamn.idv.tw/uploads/images/gallery/2024-08/O469EOg0Er.png)
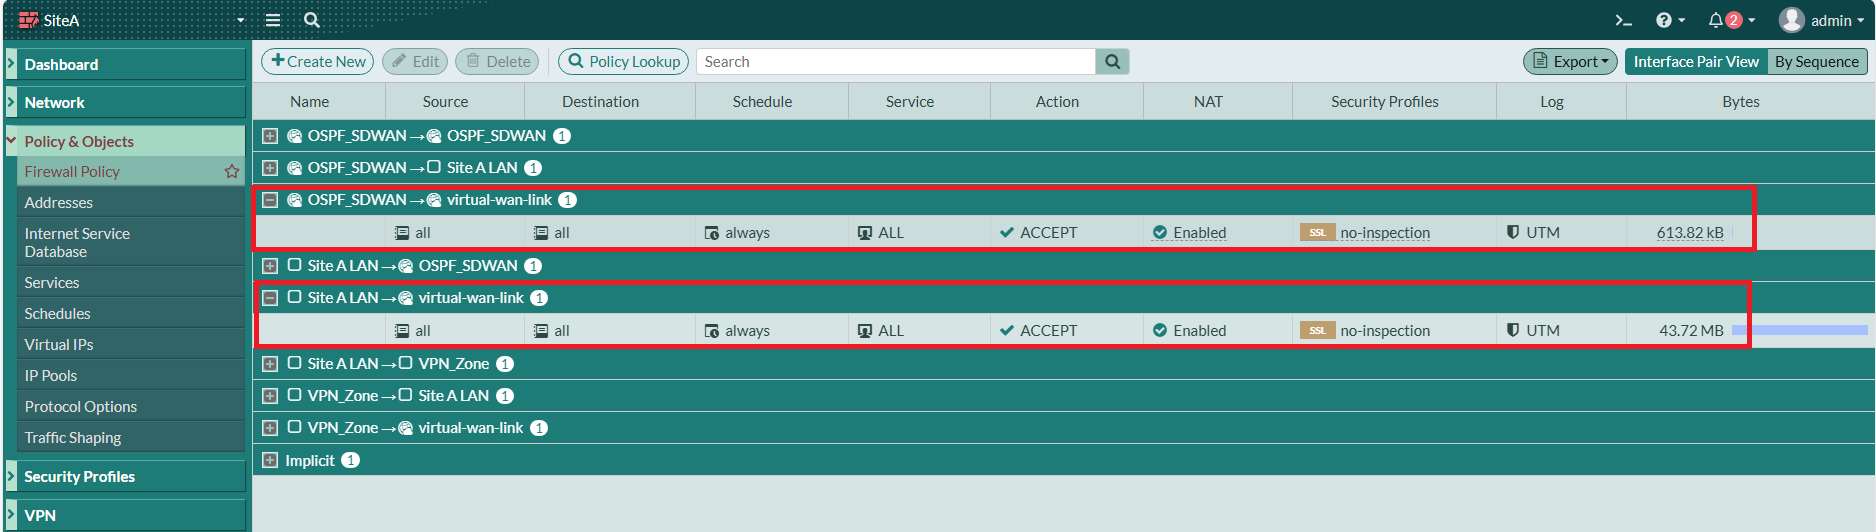
#### 建立Firewall Policy
建立 LAN <=> SDWAN、SDWAN <=> LAN的 Firewall Policy,一樣皆不要做NAT。
[](https://mdfk.goddamn.idv.tw/uploads/images/gallery/2024-08/IoIHeoqKiT.png)
[](https://mdfk.goddamn.idv.tw/uploads/images/gallery/2024-08/29VMF11P15.png)
在此要建立一條 SDWAN <=> SDWAN,使其IPSEC VPN可內部互通
[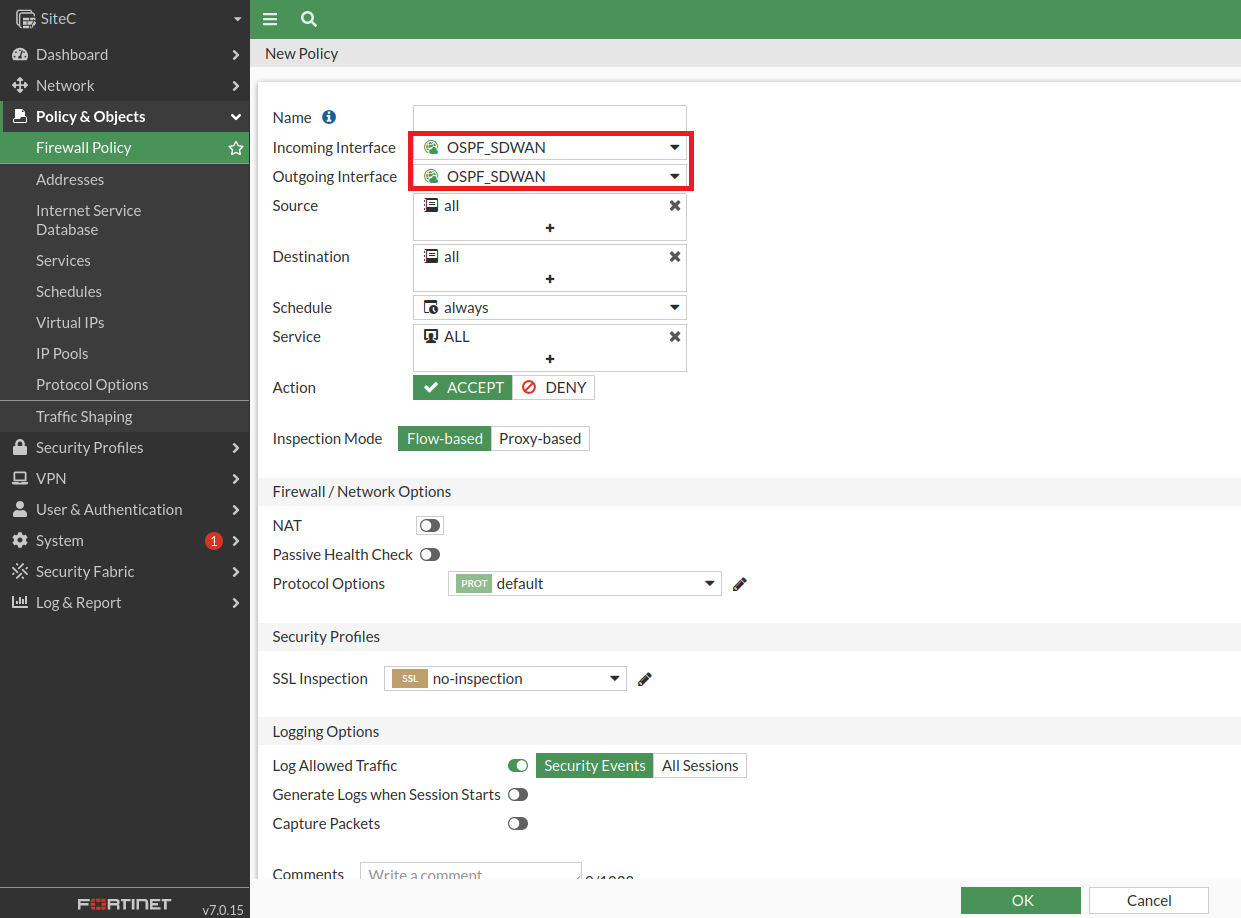](https://mdfk.goddamn.idv.tw/uploads/images/gallery/2024-08/dyxEB7Ea2t.png)
[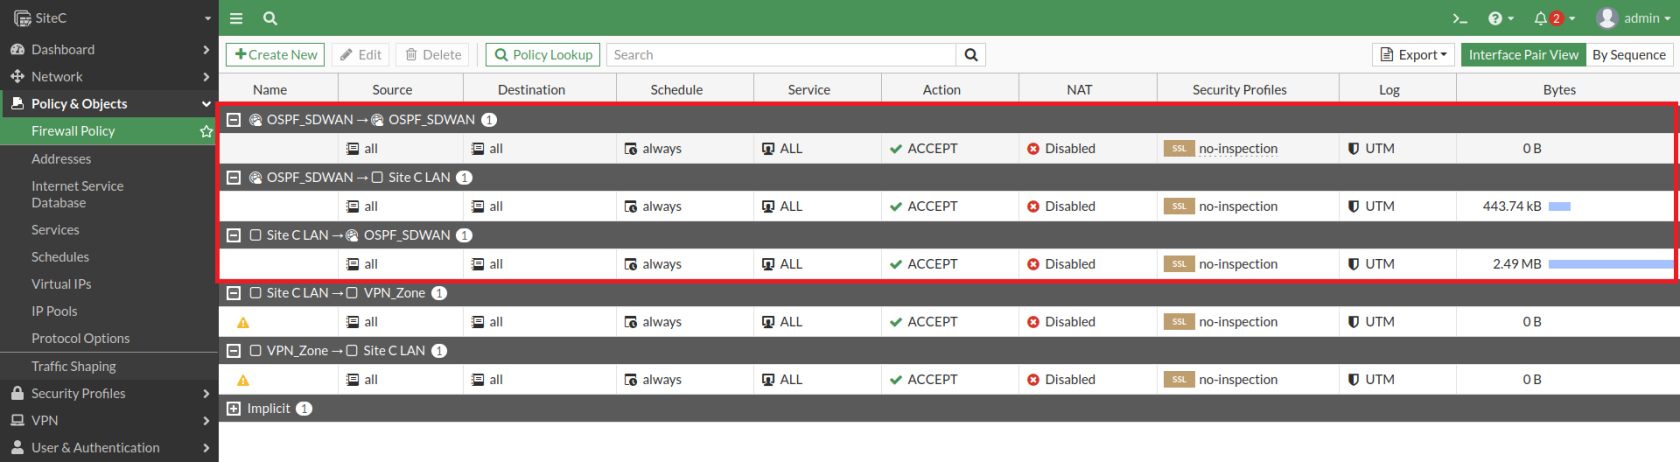](https://mdfk.goddamn.idv.tw/uploads/images/gallery/2024-08/slLhScwpQn.png)
#### OSPF設定
不需異動
[](https://mdfk.goddamn.idv.tw/uploads/images/gallery/2024-08/SOkOMo9Nnl.png)
用Console看一下OSPF Neighbor,看起來沒問題,路由也都有正確交換
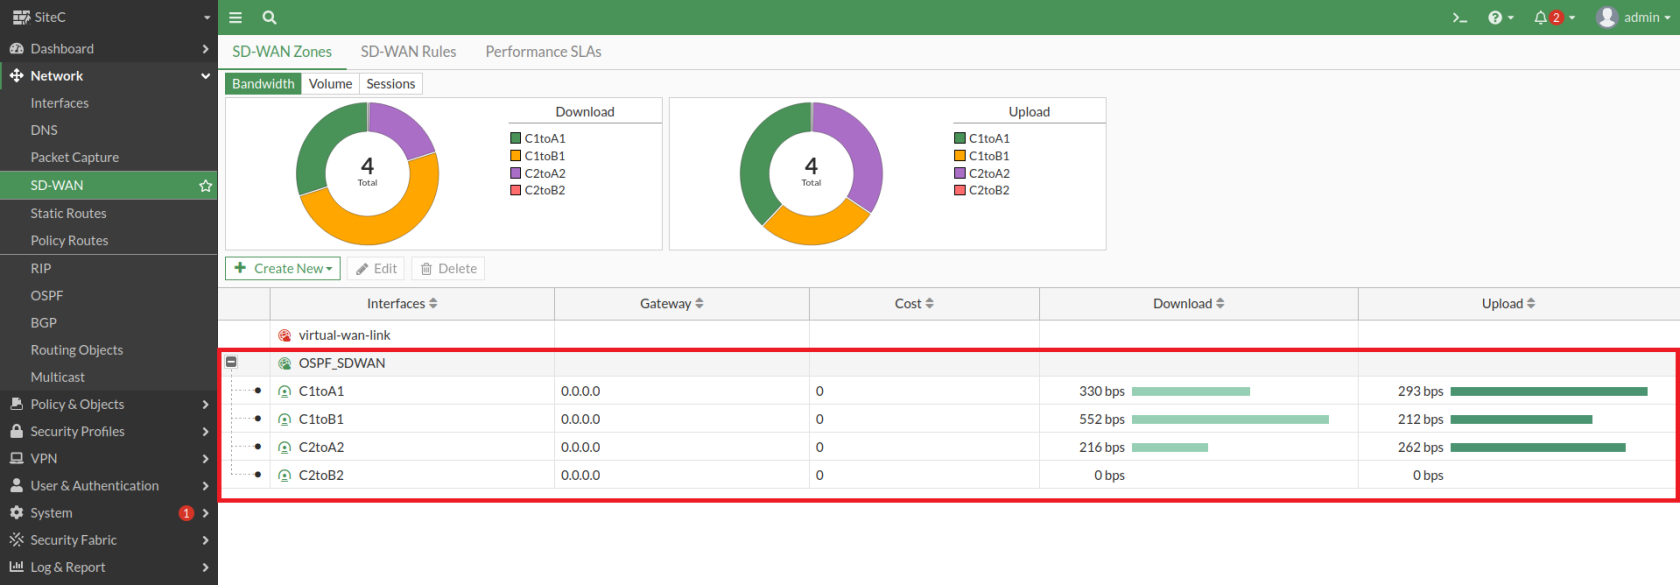
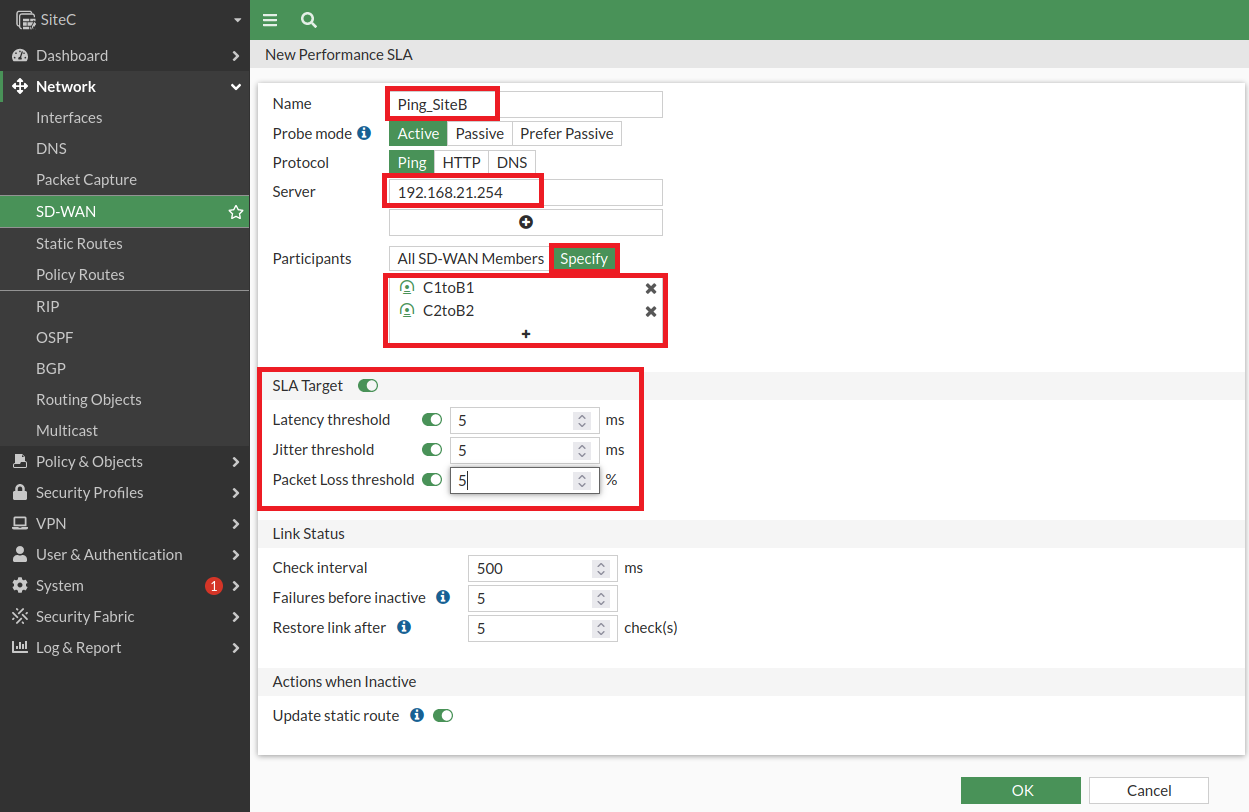
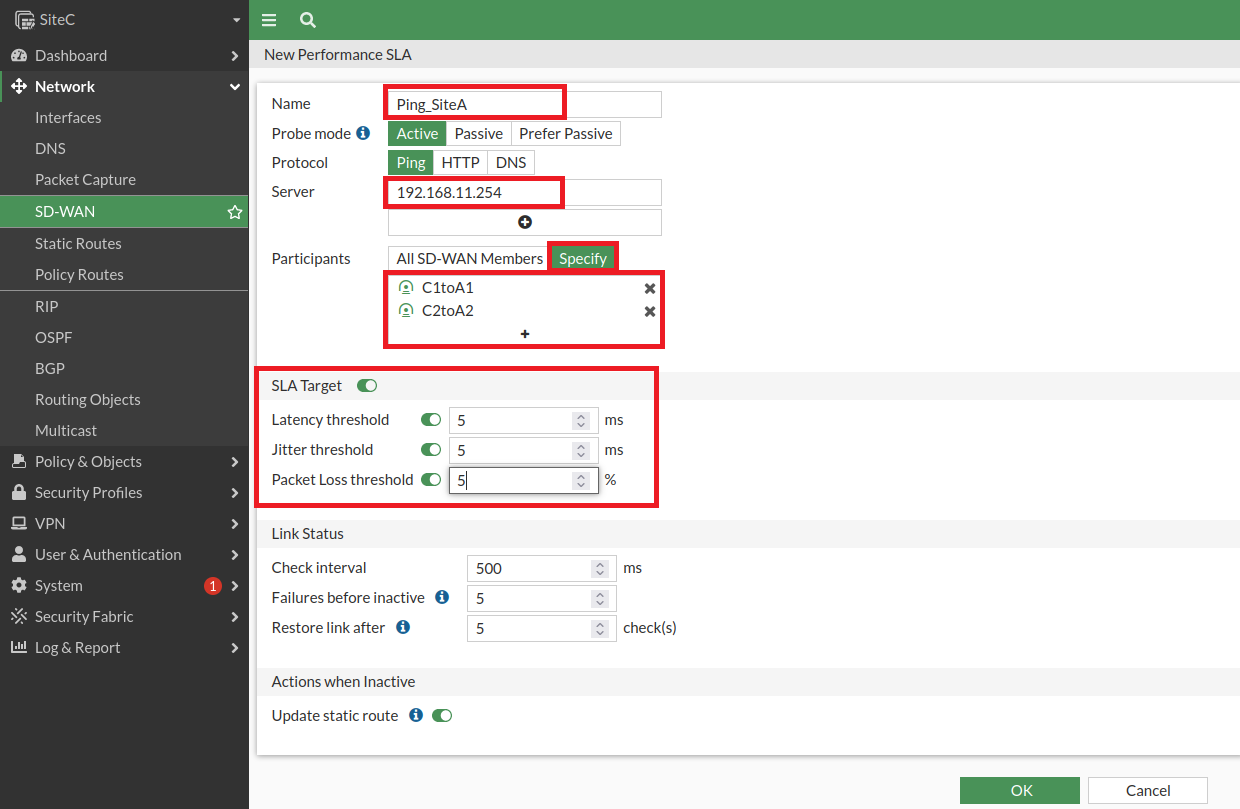
#### 設定SD-WAN Performance SLA
分別針對**SiteB**、**SiteA**設定線路SLA,檢查的對象就設為對方的Interface IP
[](https://mdfk.goddamn.idv.tw/uploads/images/gallery/2024-08/o6lBlNPEqv.png)
[](https://mdfk.goddamn.idv.tw/uploads/images/gallery/2024-08/MA4k8Cgmoi.png)
[](https://mdfk.goddamn.idv.tw/uploads/images/gallery/2024-08/iZdi5WsDjM.png)
[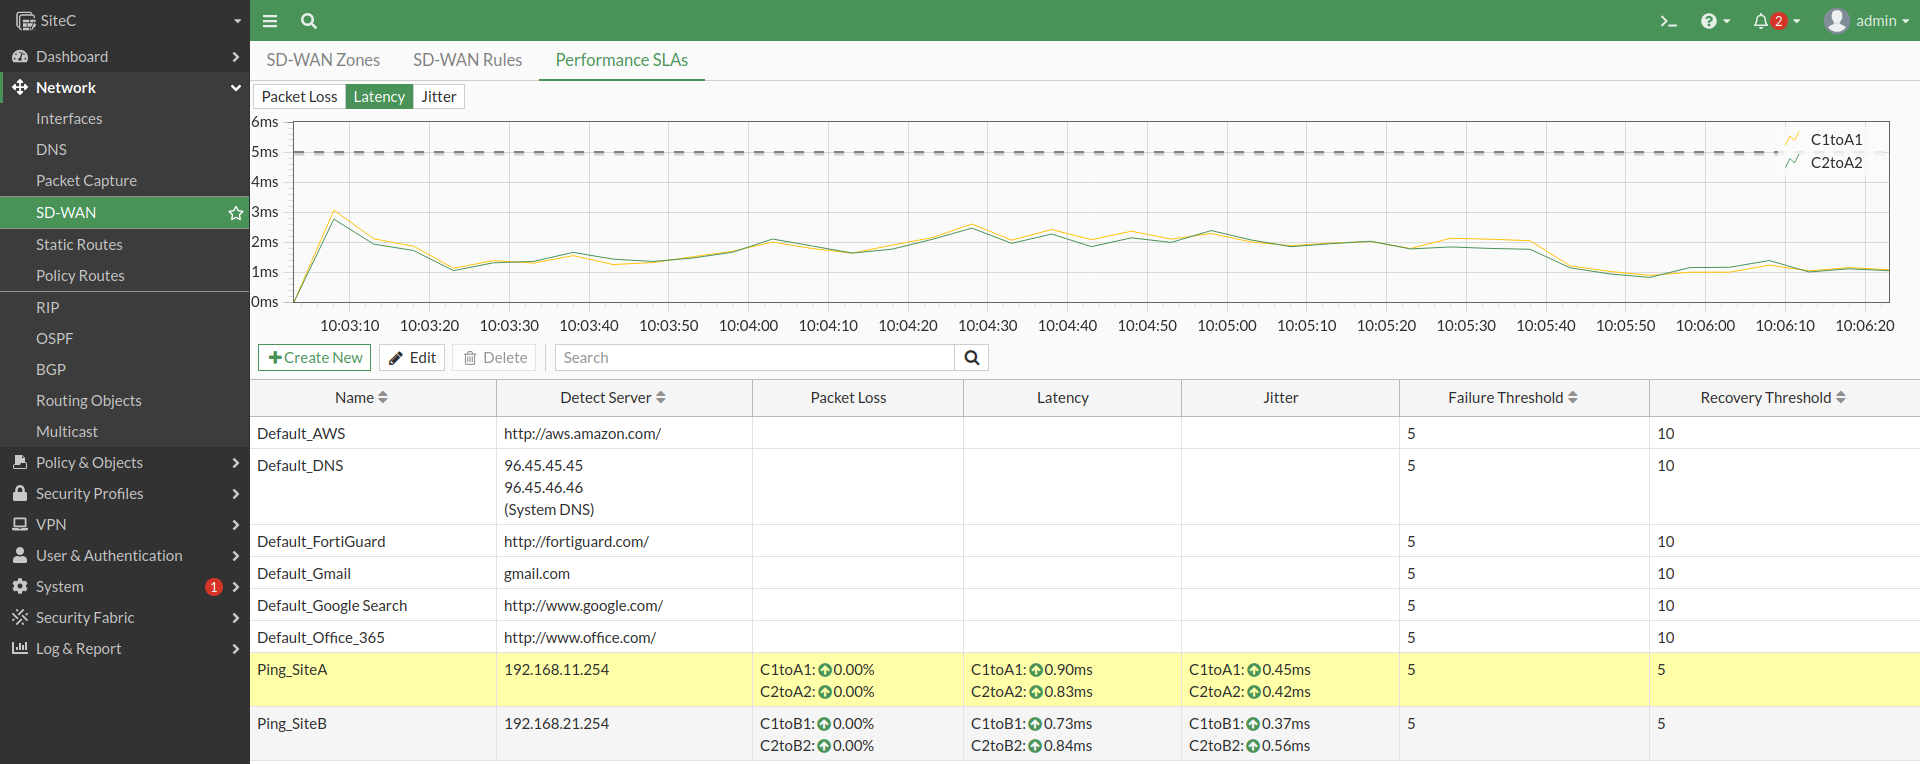](https://mdfk.goddamn.idv.tw/uploads/images/gallery/2024-08/f3PAXvxeBK.png)
[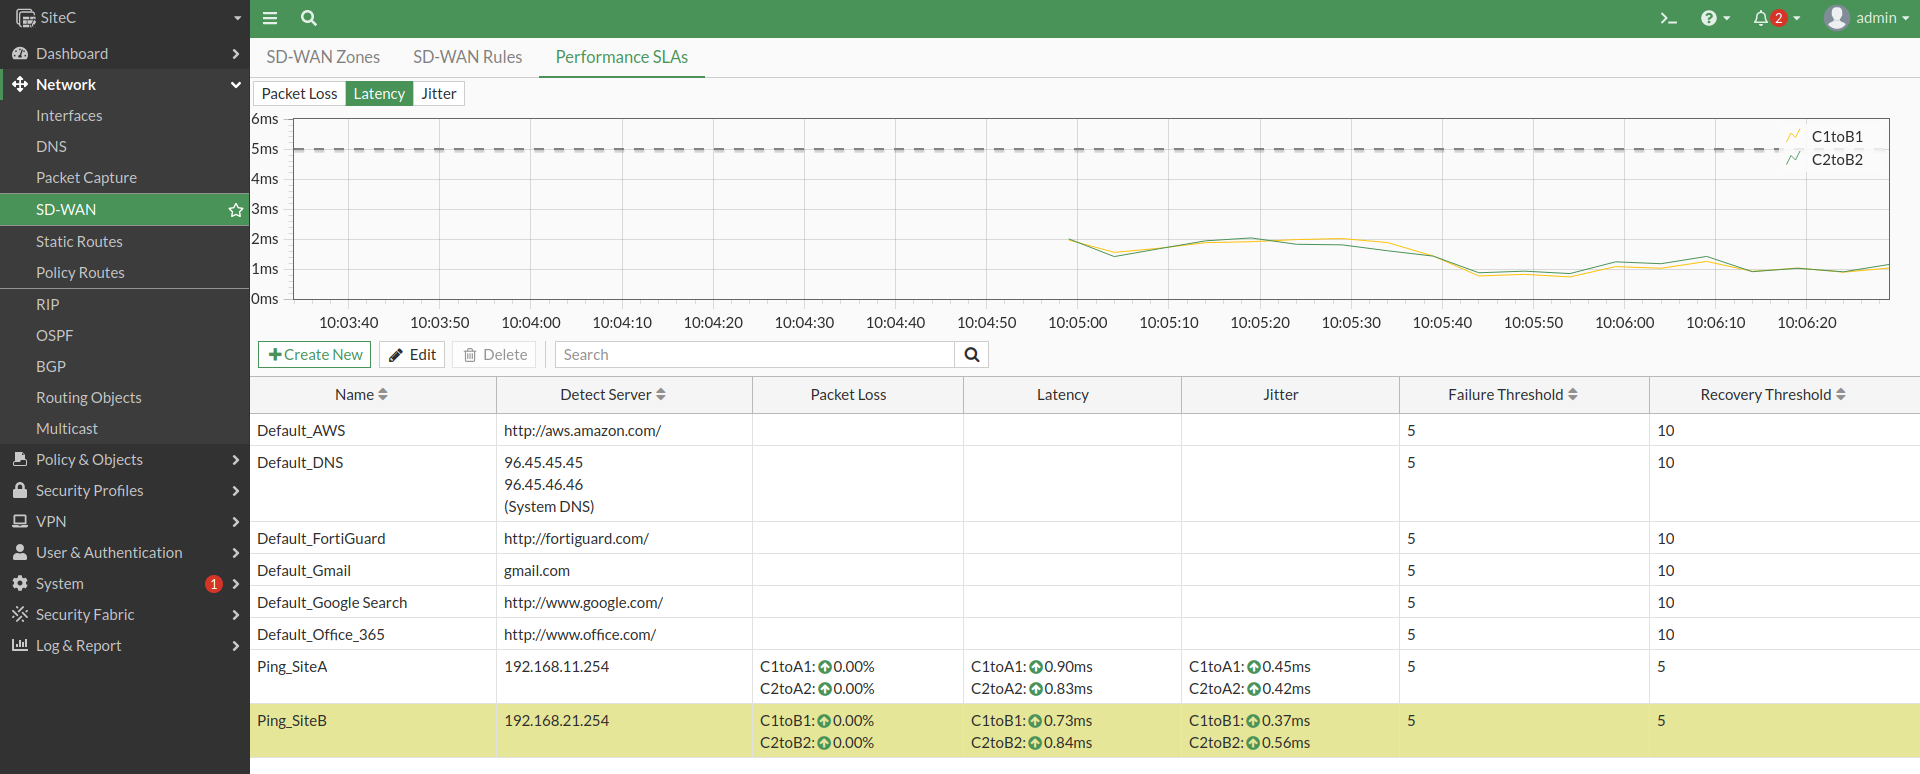](https://mdfk.goddamn.idv.tw/uploads/images/gallery/2024-08/VF0NclzZJD.png)
#### Fail Over測試
再做一次Fail Over測試
1\. 由**SiteB PC**連續Ping **SiteC PC**,先確定是走哪一條IPSEC
ok,目前是走 **C1toB1**
2\. 將**C1toB1** IPSEC手動斷線
流量改走**C2toB2**
3\. 將**C2toB2**再度手動斷線

流量改走**C2toA2**

驗證了OSPF運作ok
### 統一上網出口
最後,我們來將 **SiteA**、**SiteB**、**SiteC** 設定為統一透過 **SiteA** 出去上網

#### 設定**SiteA** Interface & SD-WAN
將**SiteA** **Port4** 接到Internet,設定SD-WAN Interface Gateway,並把**Port4**加入Default SD-WAN Zone
[](https://mdfk.goddamn.idv.tw/uploads/images/gallery/2024-08/XtxMYb9yss.png)
#### 設定**SiteA** SD-WAN Rule
設定出Internet走Default SD-WAN Zone
[](https://mdfk.goddamn.idv.tw/uploads/images/gallery/2024-08/zofU2OamqF.png)
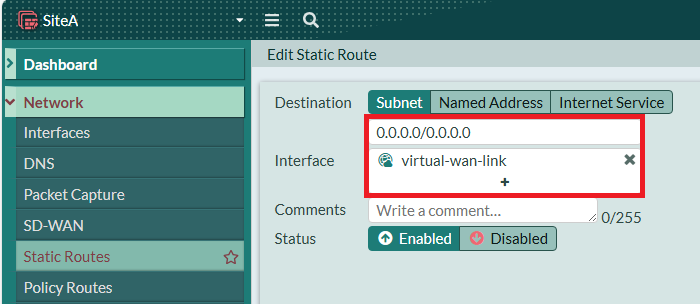
#### 設定**SiteA** Static Route
設定Default Route進Default SDWAN
[](https://mdfk.goddamn.idv.tw/uploads/images/gallery/2024-08/AmpIl84yeH.png)
#### 設定**SiteA** OSPF Inject Static Route
[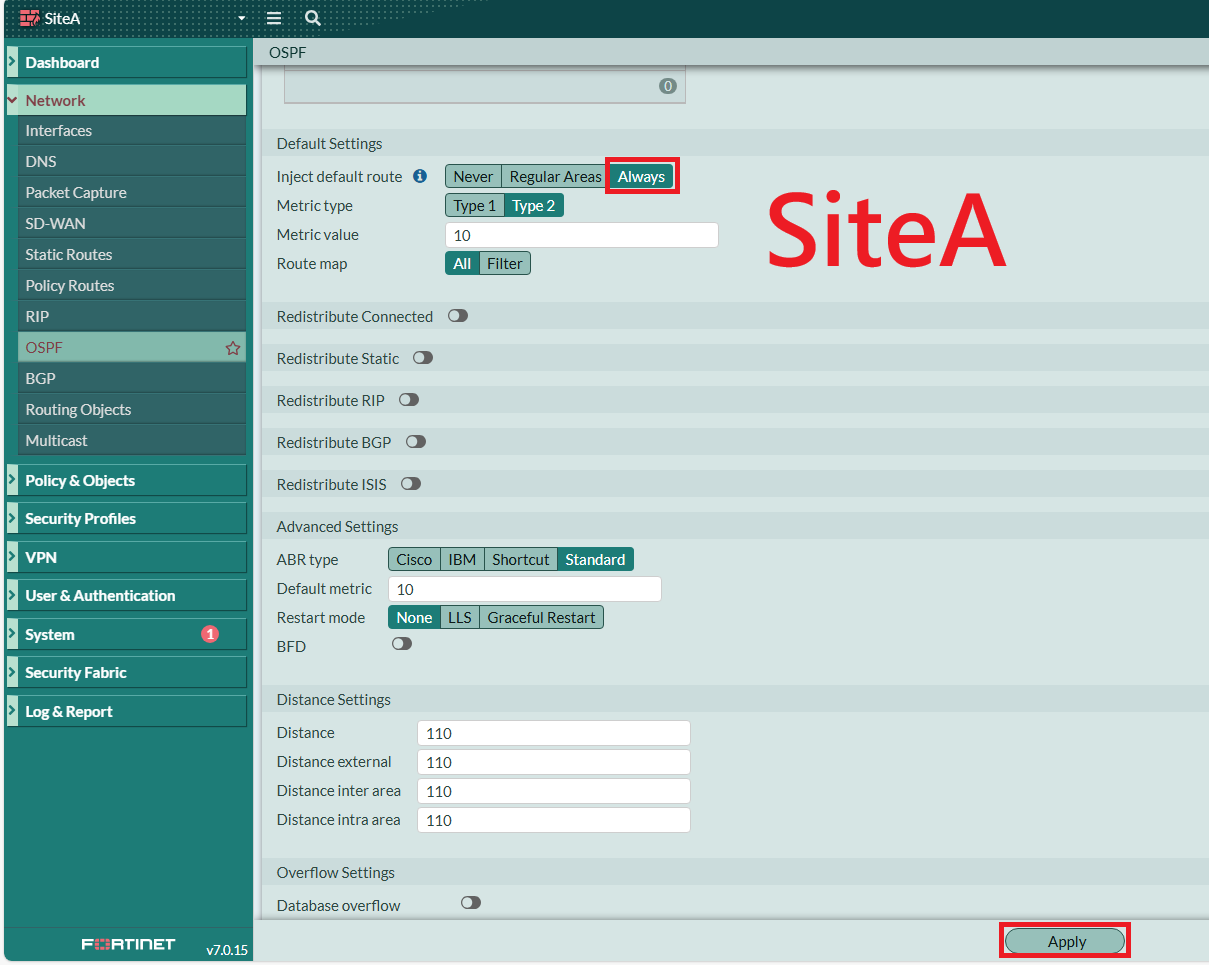](https://mdfk.goddamn.idv.tw/uploads/images/gallery/2024-08/rx9XBKhgwa.png)
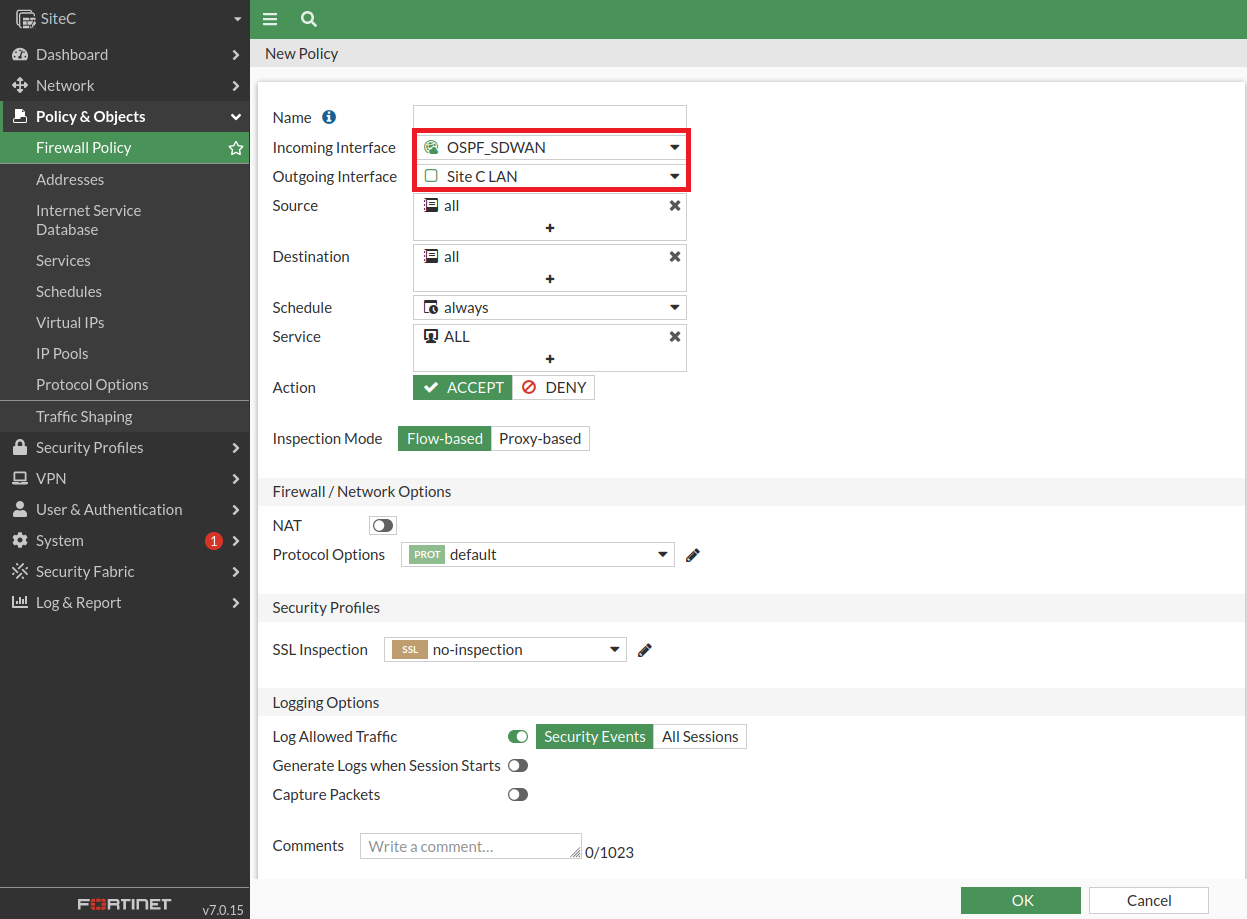
#### 設定**SiteA** Firewall Policy
設定 OSPF\_SDWAN Zone、SiteA LAN 出Internet Firewall Policy,此處需開啟**NAT**
[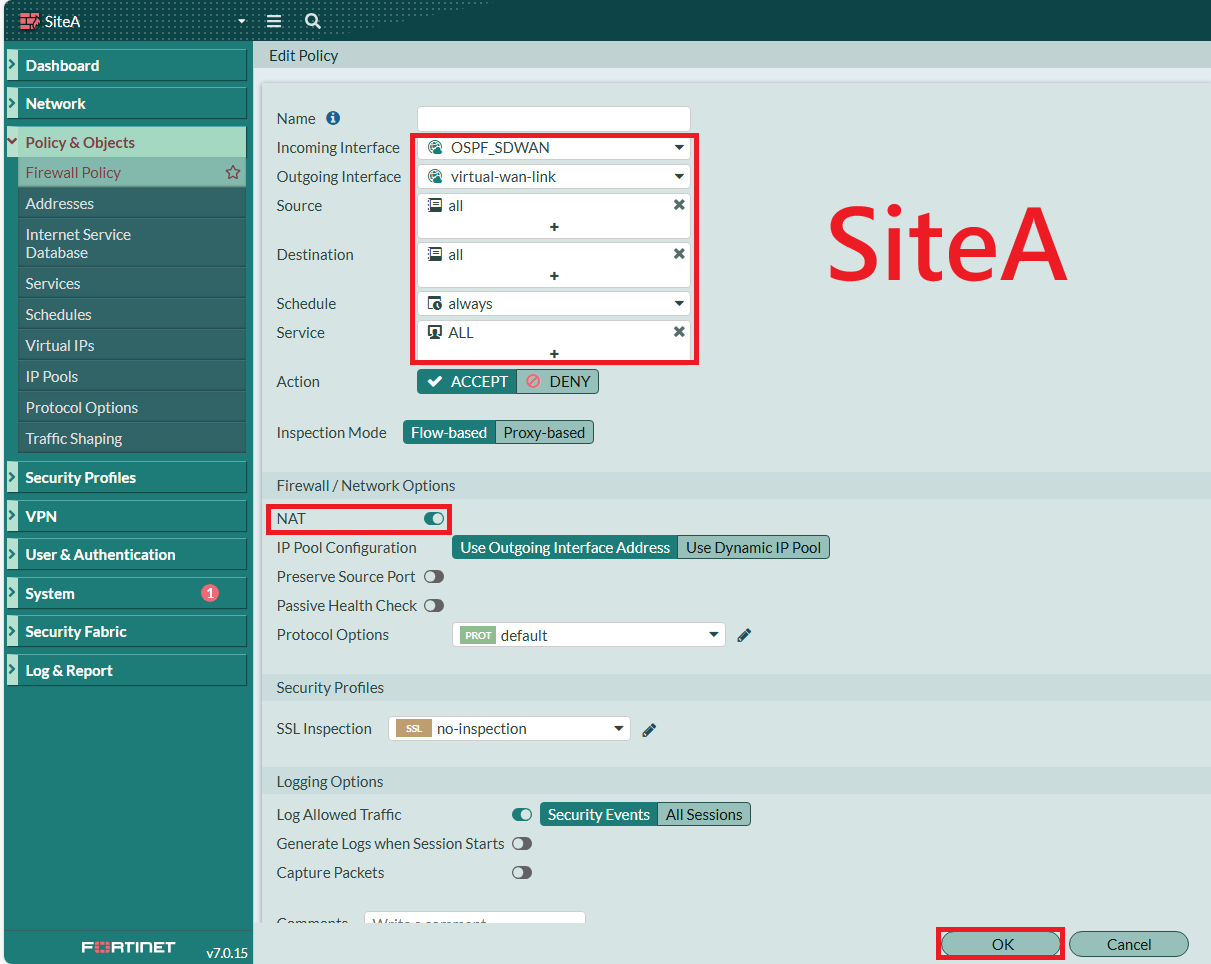](https://mdfk.goddamn.idv.tw/uploads/images/gallery/2024-08/lMDWHnfM2o.png)
[](https://mdfk.goddamn.idv.tw/uploads/images/gallery/2024-08/tbAeJy6a0G.png)
#### 確認**SiteA** Default Route
確認一下上面設定進SDWAN的Static Route
```
get router info routing-table all
```

#### 確認**SiteC** Default Route
可以發現OSPF自動生成了**SiteC** 的Default Route
[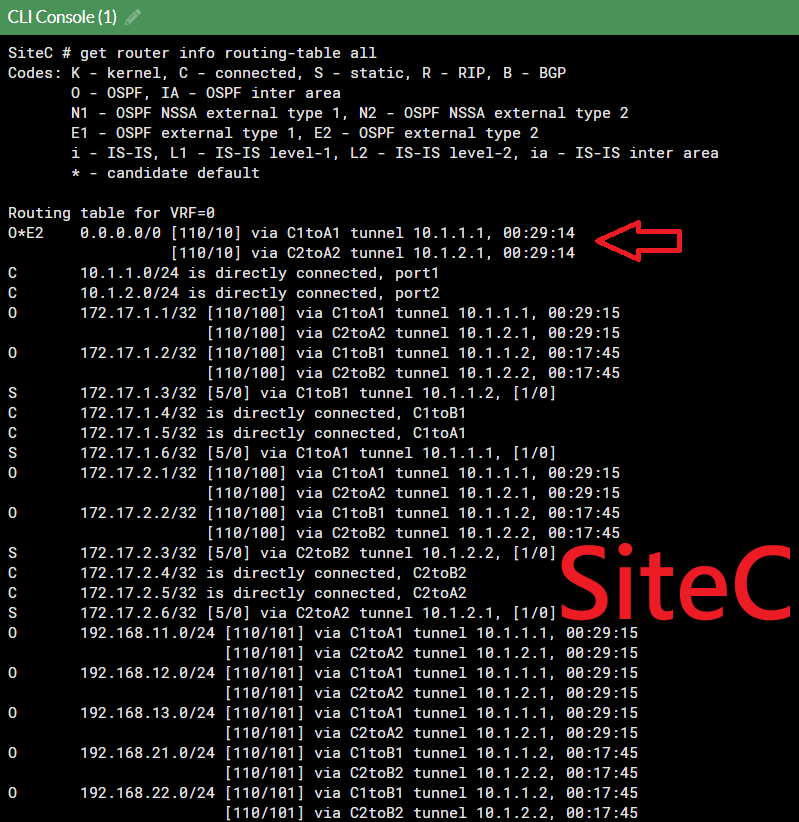](https://mdfk.goddamn.idv.tw/uploads/images/gallery/2024-08/UFgBYDnV1q.png)
到此,設定大功告成
來看一下 **SiteC** 的SDWAN Rule,沒有 !! 這是正確的
[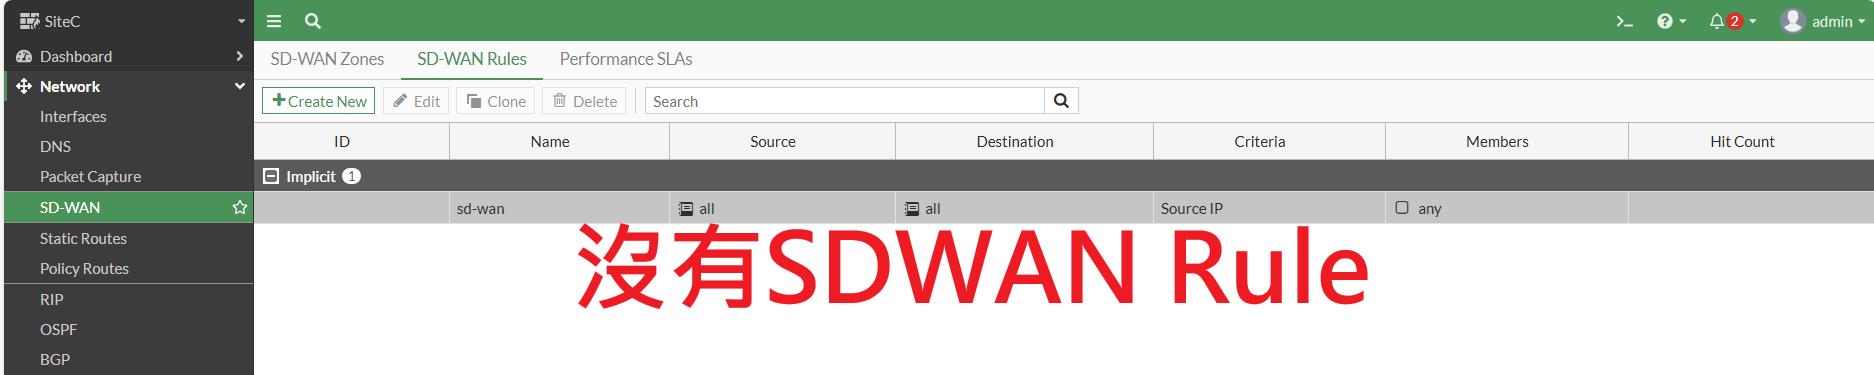](https://mdfk.goddamn.idv.tw/uploads/images/gallery/2024-08/QvIcd7znxF.png)
來看一下 **SiteC** 的Static Route,沒有 !! 這是正確的,因為路由我們全靠OSPF
[](https://mdfk.goddamn.idv.tw/uploads/images/gallery/2024-08/F2QCf0RoaX.png)
**※熟知SD-WAN設定的人應該知道※**
**SD-WAN設定至少要包含四個步驟**
1. **SD-WAN線路設定**
2. **SD-WAN Rule設定**
3. **Static Route 指向SD-WAN**
4. **Firewall Policy**
**SiteC** 我們只做了 **1.** 跟 **4.** ,但卻沒有做 **2.** 跟 **3.**,也就是說**其實針對LAN的部分Fortigate SD-WAN功能根本沒生效**,我們只是因為需要SD-WAN Performance SLA來監測OSPF線路的狀態,所以硬把SDWAN Interface當作是上面的Zone來使用,也就是說其實**理論上這樣設定是有問題的**,但其實這樣設定有其好處。
[](https://mdfk.goddamn.idv.tw/uploads/images/gallery/2024-08/f3PAXvxeBK.png)
有用過OSPF的MIS應該就能體會,這應該是最困擾所有MIS的事情,就是你根本不知道OSPF裡面的狀態,鍵人我就曾碰過兩地間的OSPF其中一條線路掉包很嚴重,但一直很難查出來的窘境,讓我們繼續看下去...
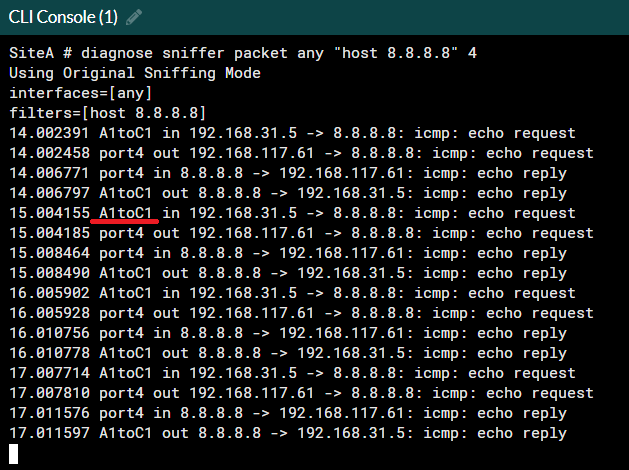
#### Internet連線測試
由**SiteC** PC持續發動Traceroute 8.8.8.8
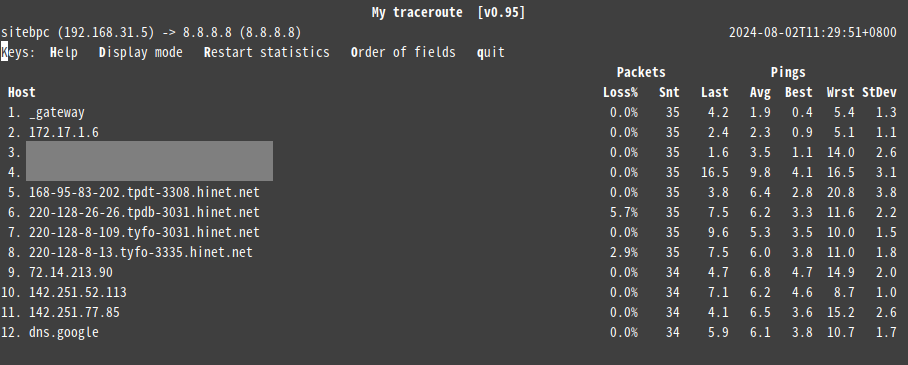
確認是走**A1toC1**
將**A1toC1**斷線,改走**A2toC2**
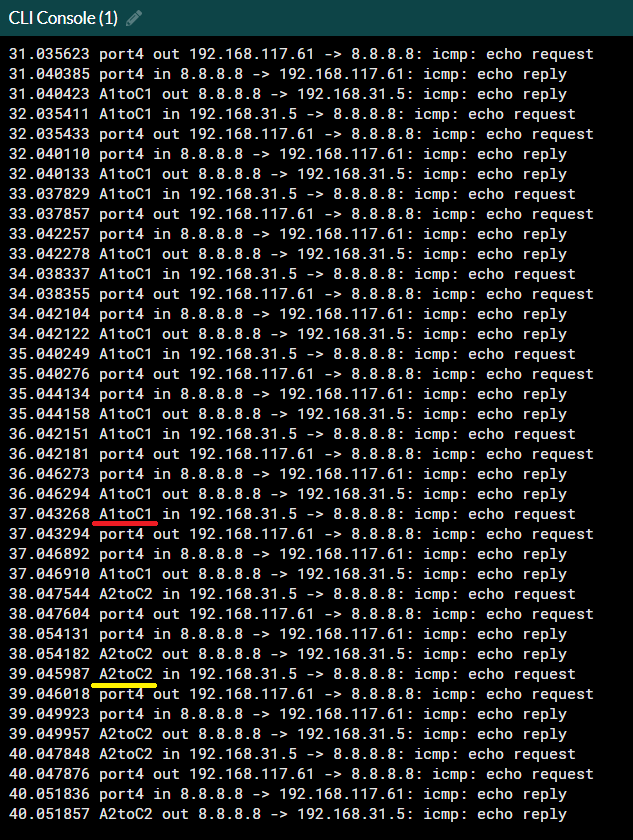
將**A2toC2**斷線,流量改走**SiteB** **A1toB1** 過來
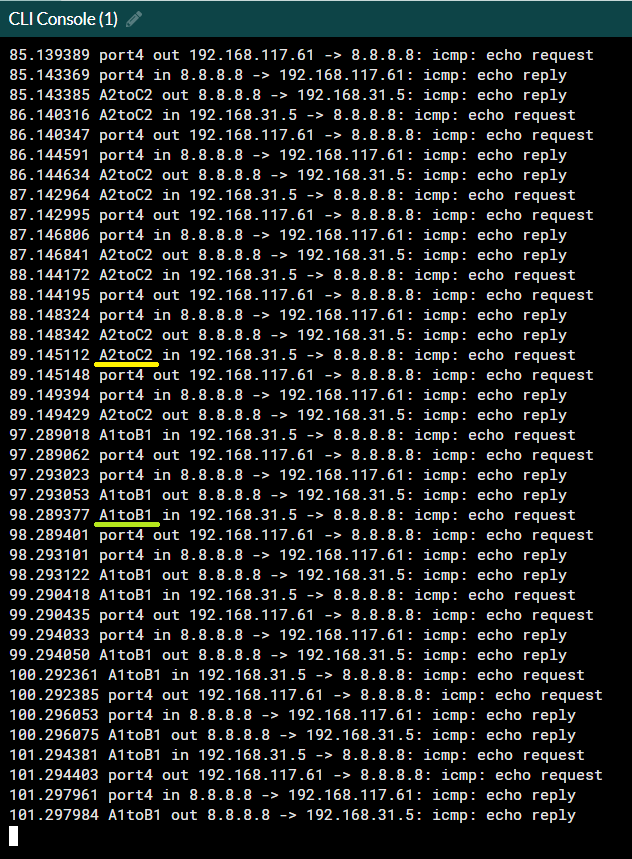
運作完美 **ദ്ദി ༎ຶ‿༎ຶ )**
### OSPF Load Balance 測試
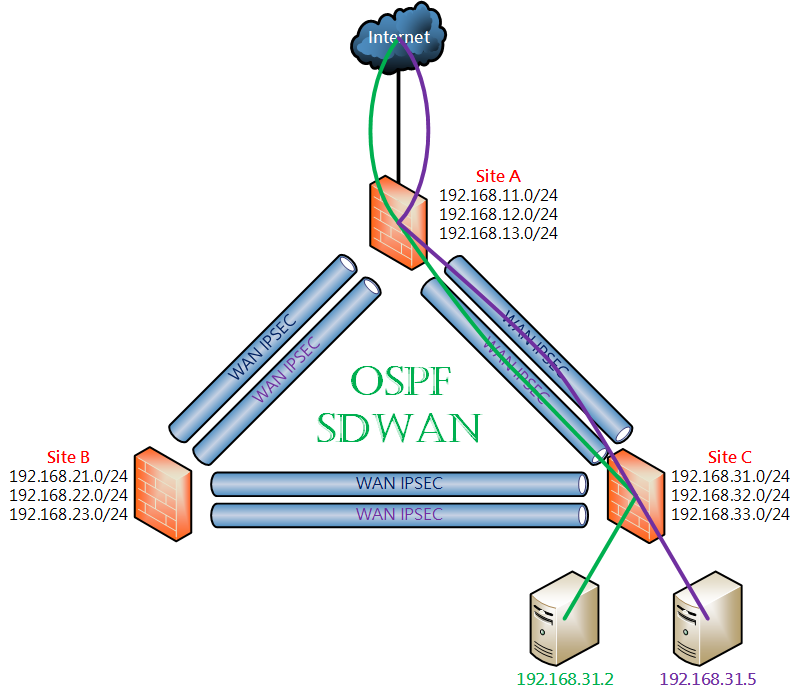
來驗證OSPF Load Balance是否正常,鍵人我將兩台PC都放到**SiteC**,透過這兩台PC分別Ping **SiteA**不同的Interface。
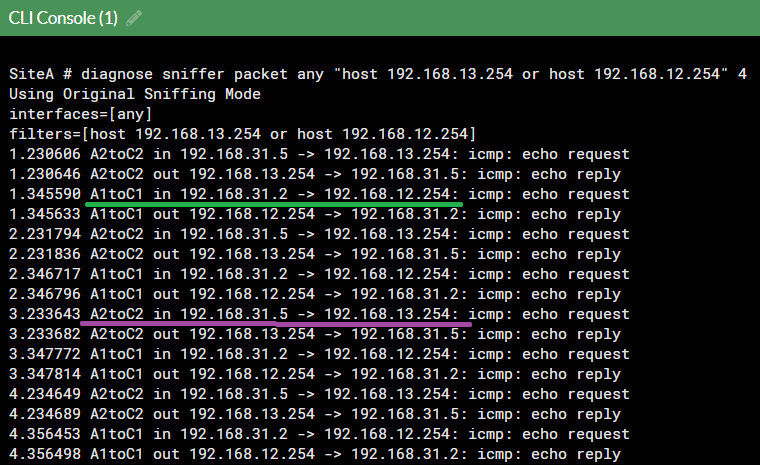
**192.168.31.2**走**A1toC1**去192.168.12.254,**192.168.31.5**走**A2toC2**去192.168.13.254,由此證明 IPSEC OSPF Load Balancing ok。
透過這兩台PC分別Ping Internet 8.8.8.8。
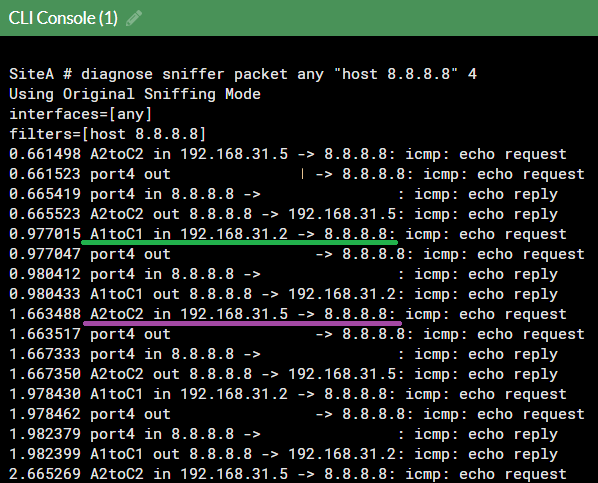
**192.168.31.2**走**A1toC1**去 8.8.8.8,**192.168.31.5**走**A2toC2**去 8.8.8.8,由此證明 IPSEC SDWAN Load Balancing ok。
### 結語
我中間有提到過,有用過OSPF的MIS應該就能體會,監測OSPF線路品質是最困擾所有MIS的事情,就是你根本不知道OSPF裡面的狀態好壞,鍵人我就曾碰過兩地間的OSPF其中一條線路掉包很嚴重但很難查出來的窘境,經過實作發現Fortigate 目前SD-WAN在IPSEC OSPF的搭配上雖然可以運作,**但其實針對LAN的部分SD-WAN功能根本沒生效**,也就是說其實**理論上這樣設定是有問題的**,我們只是因為需要SD-WAN Performance SLA來監測OSPF線路的狀態,所以硬把SDWAN Interface當作是上面的Zone來使用。
但透過SD-WAN下能夠監測OSPF線路品質,利用SD-WAN Performance SLA 的偵測機制確實可以大大的幫助OSPF線路狀況的研判與監測,且還是可以自動交換路由,依然提供給大家參考。
# Fortigate IPSEC Aggregate + OSPF + SDWAN 實作
### 參考資料
[https://docs.fortinet.com/document/fortigate/6.2.16/cookbook/25967/equal-cost-multi-path](https://docs.fortinet.com/document/fortigate/6.2.16/cookbook/25967/equal-cost-multi-path)
[https://docs.fortinet.com/document/fortigate/6.4.0/administration-guide/779544/ipsec-aggregate-for-redundancy-and-traffic-load-balancing](https://docs.fortinet.com/document/fortigate/6.4.0/administration-guide/779544/ipsec-aggregate-for-redundancy-and-traffic-load-balancing)
### 前言
延續前一篇技術分享 [Fortigate IPSEC + OSPF + SDWAN 實作](https://mdfk.goddamn.idv.tw/books/fortigate/page/fortigate-ipsec-ospf-sdwan),在該篇中OSPF不但能自動交換路由,同時也能 **Fail Over** 與 **Load Balance** 的特性,在內部交換與上網時的彈性線路切換,這在Fortigate上稱為**ECMP**的機制 (Equal-Cost Multi-Path),但在Fortigate中還有另一個方式可以做到 IPSEC Fail Over 與 Load Balance 的功能,就是所謂的 **IPSEC Aggregate**,此篇帶大家來看看怎麼搞,並分析其優劣。
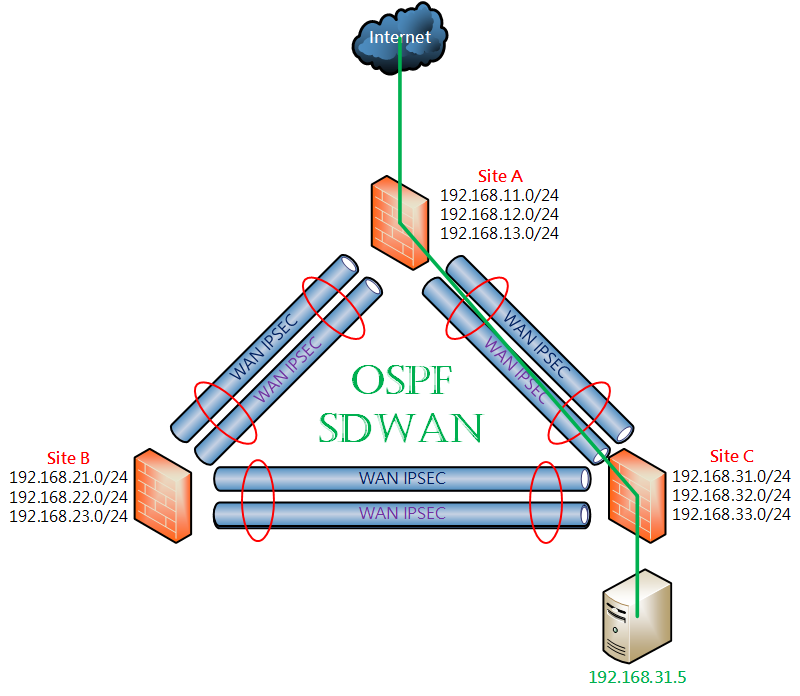
### 環境說明

**設計概念:** 三個Site透過 IPSEC Aggregate +OSPF+SDWAN 來達成多線路OSPF動態路由,任一條線路故障時可透過其他線路接續連線,並透過SDWAN來監測線路品質狀況,同時由於資訊安全控管的原則希望能統一由同一個Gateway進出。
**Firmware Ver. :** Fortigate-VM 7.0.15
|
| **WAN IP**
| **LAN Subnets**
| **WAN IPSEC IP**
|
| **SiteA**
| WAN1 10.1.1.1
WAN2 10.1.2.1
Port4 (to Internet)
| 192.168.11.254/24
192.168.12.254/24
192.168.13.254/24
| **AtoB** 172.17.1.1
**AtoC** 172.17.1.6
|
| **SiteB**
| WAN1 10.1.1.2
WAN2 10.1.2.2
| 192.168.21.254/24
192.168.22.254/24
192.168.23.254/24
| **BtoA** 172.17.1.2
**BtoC** 172.17.1.3
|
| **SiteC**
| WAN1 10.1.1.3
WAN2 10.1.2.3
| 192.168.31.254/24
192.168.32.254/24
192.168.33.254/24
| **CtoB** 172.17.1.4
**CtoA** 172.17.1.5
|
### 設定過程
我們直接接續前一篇的設定繼續做,有問題的人請參照前一篇技術分享 [Fortigate IPSEC + OSPF + SDWAN 實作](https://mdfk.goddamn.idv.tw/books/fortigate/page/fortigate-ipsec-ospf-sdwan) 。
**※**以下設定皆以一台**SiteC**為範例,請對照該台設定相關對應設定至**SiteB** & **SiteA**。
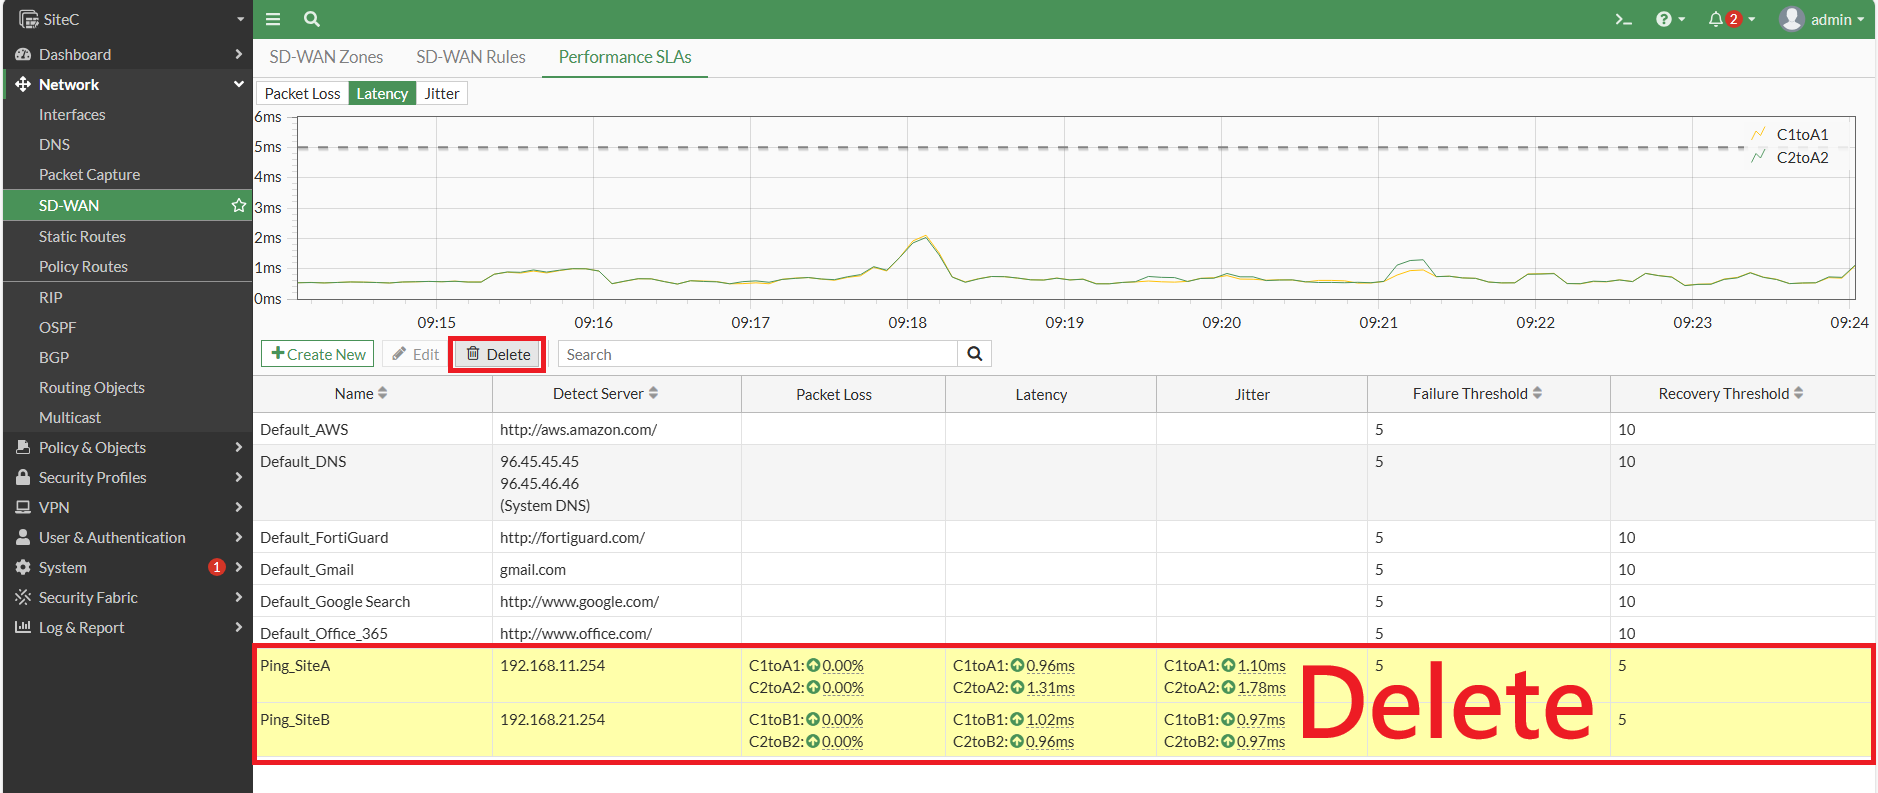
#### 移除SD-WAN IPSEC設定
Delete SD-WAN Performance SLA
[](https://mdfk.goddamn.idv.tw/uploads/images/gallery/2024-08/6QCBer0jk4.png)
Delete SD-WAN Members
[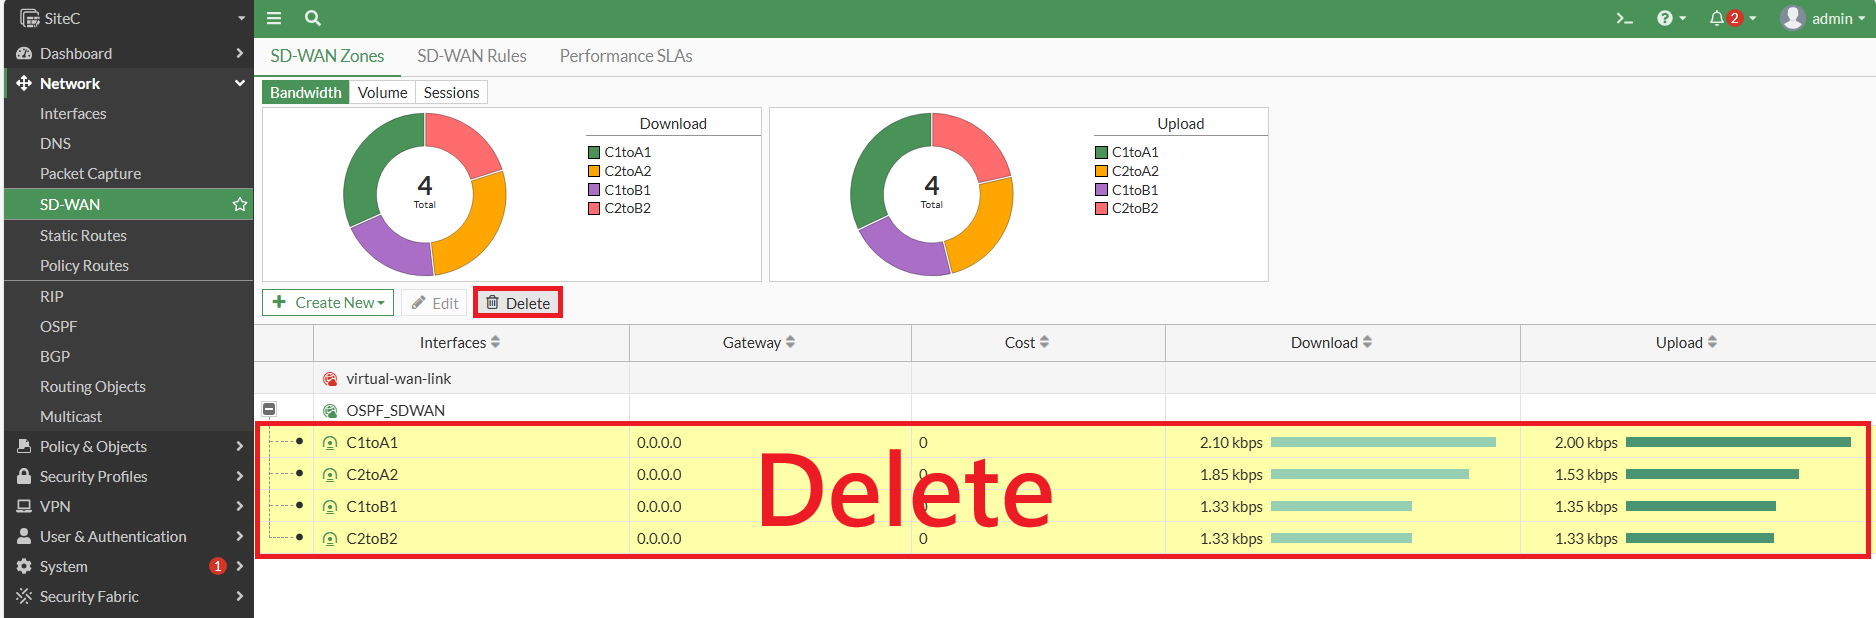](https://mdfk.goddamn.idv.tw/uploads/images/gallery/2024-08/zoKswUmyJd.png)
#### 移除OSPF IPSEC設定
Delete IPSEC Interface,完成後 **要Apply !!** (鍵人我不知道忘了多少次 ......)
[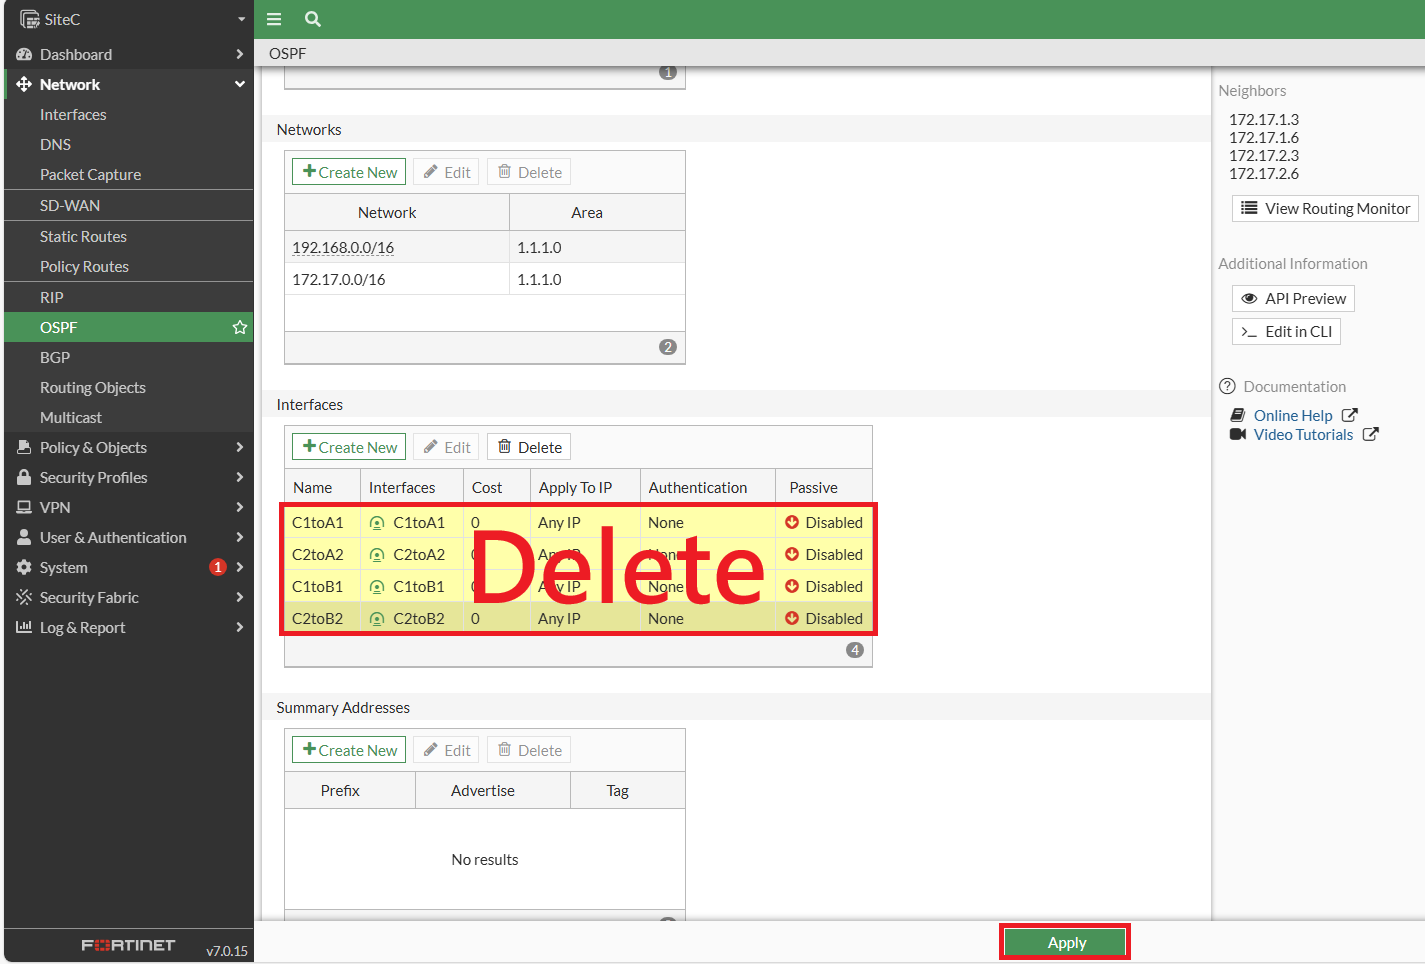](https://mdfk.goddamn.idv.tw/uploads/images/gallery/2024-08/fSwWrhaKfm.png)
#### **建立IPSEC Aggregate**
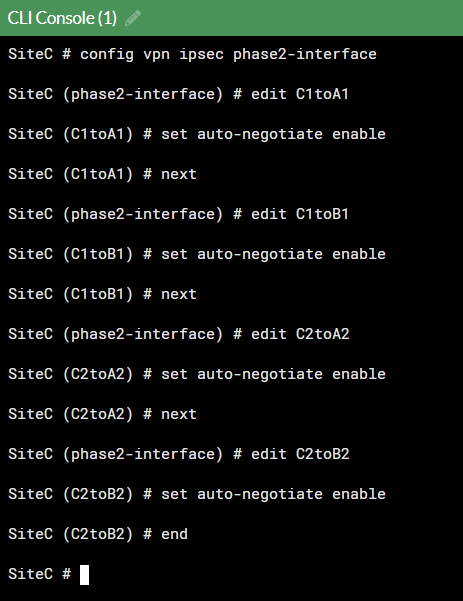
在Console輸入下列指令
```
config vpn ipsec phase2-interface
edit C1toA1
set auto-negotiate enable
next
edit C1toB1
set auto-negotiate enable
next
edit C2toA2
set auto-negotiate enable
next
edit C2toB2
set auto-negotiate enable
end
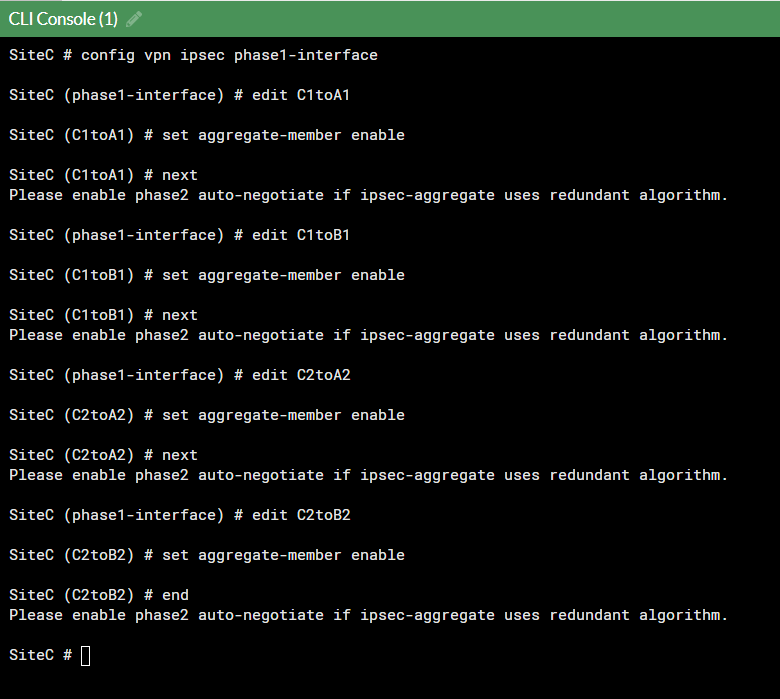
config vpn ipsec phase1-interface
edit C1toA1
set aggregate-member enable
next
edit C1toB1
set aggregate-member enable
next
edit C2toA2
set aggregate-member enable
next
edit C2toB2
set aggregate-member enable
end
```
VPN => IPSEC Turnnels => Create New => IPSEC Aggregate
[](https://mdfk.goddamn.idv.tw/uploads/images/gallery/2024-08/qQ0r0q5lCo.png)
建立 Aggregate,名稱取為**CtoA**,將**C1toA1**、**C2toA2**選起來
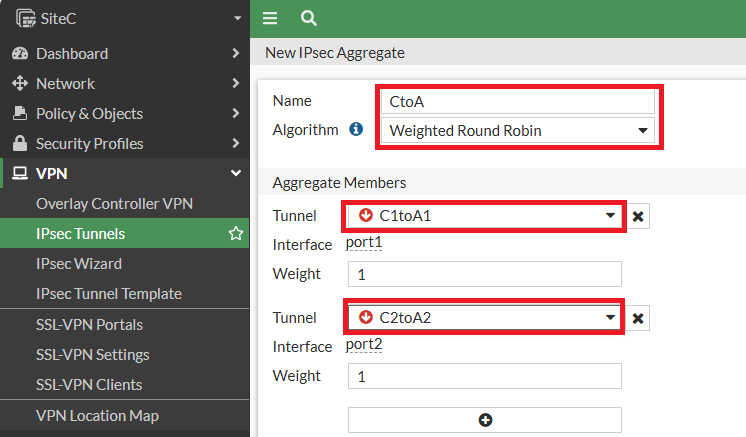
建立第二個 Aggregate **CtoB** 如法炮製
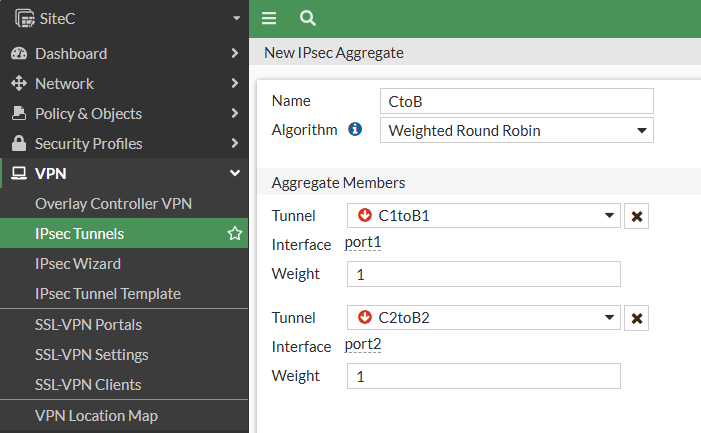
完成後如下圖
[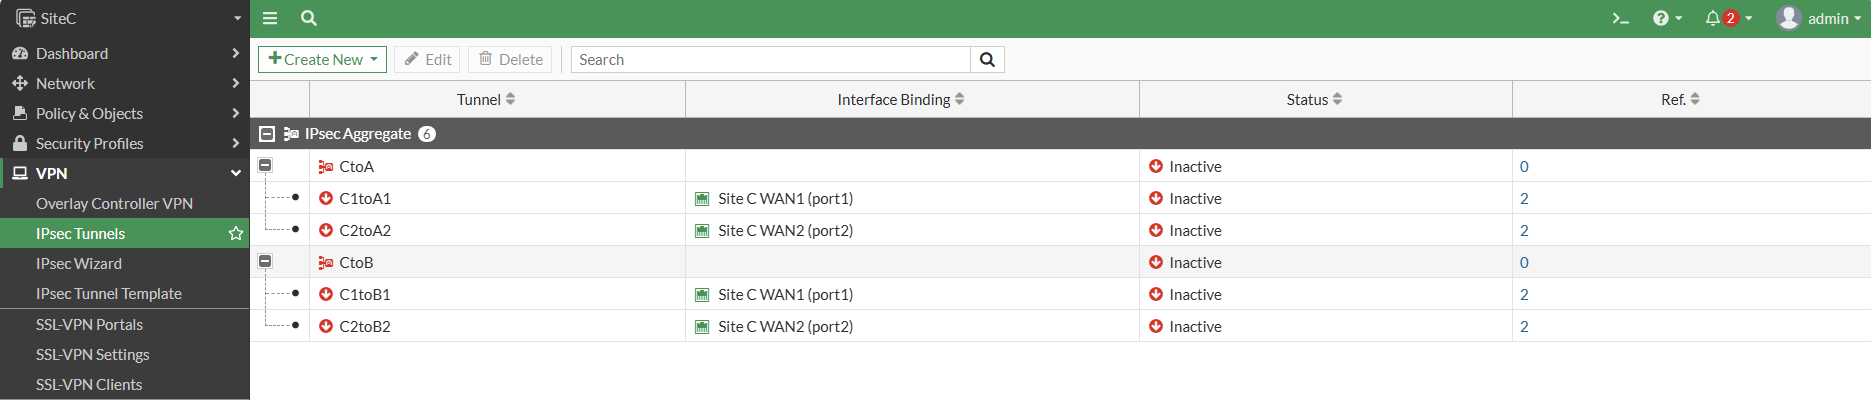](https://mdfk.goddamn.idv.tw/uploads/images/gallery/2024-08/AtCWzqKUuq.png)
#### 設定 IPSEC Aggregate Interface IP
完成Aggregate後發現,IPSEC Interface的IP都被移除了,把它們設回去
[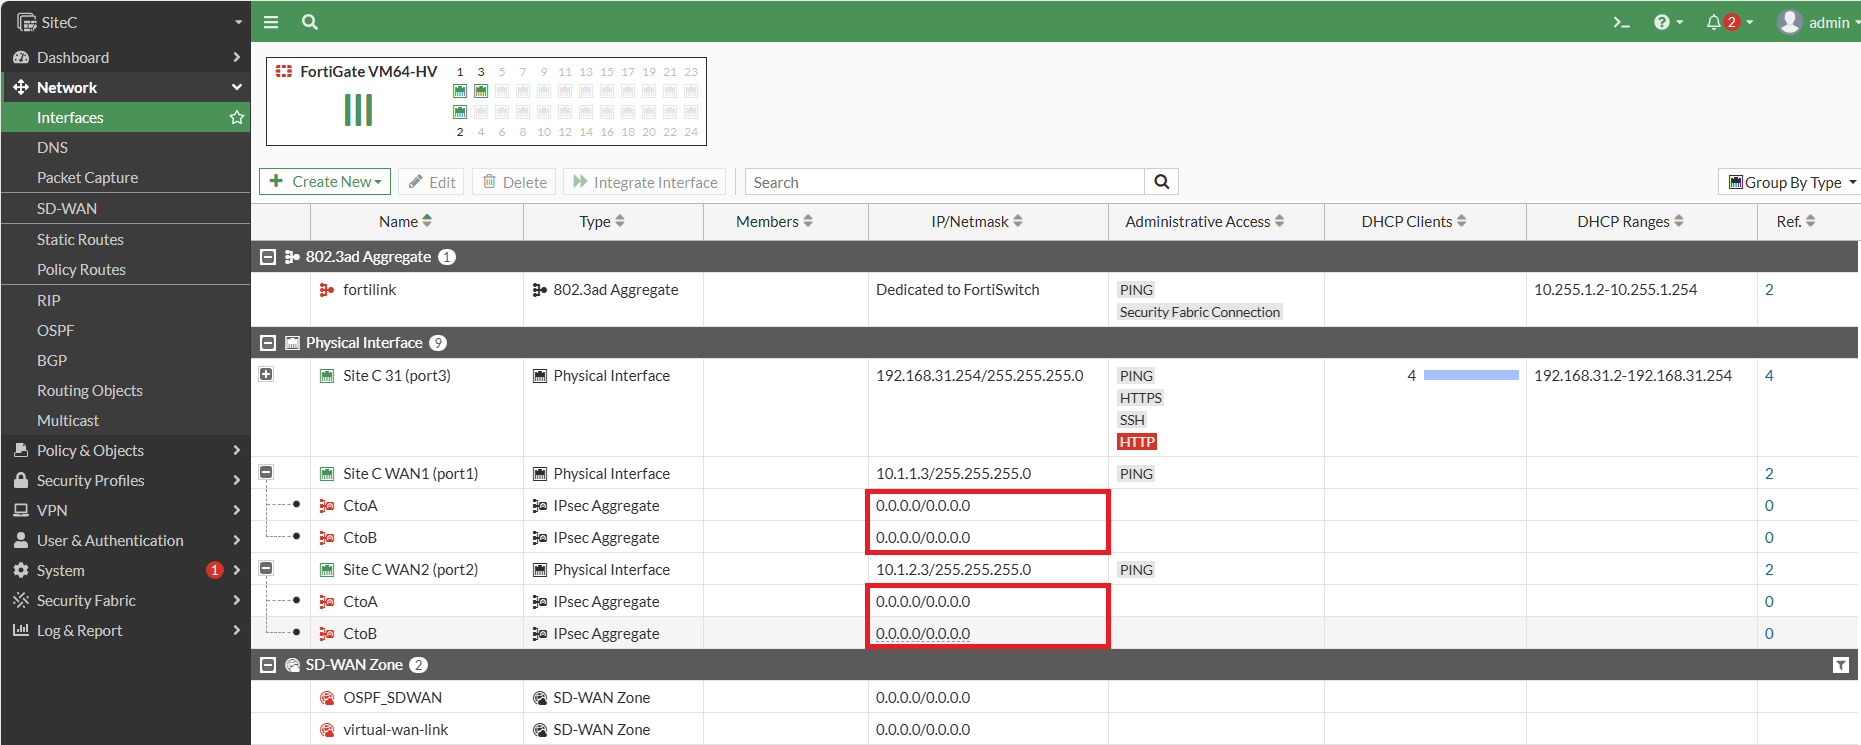](https://mdfk.goddamn.idv.tw/uploads/images/gallery/2024-08/0J7lVab0OD.png)
[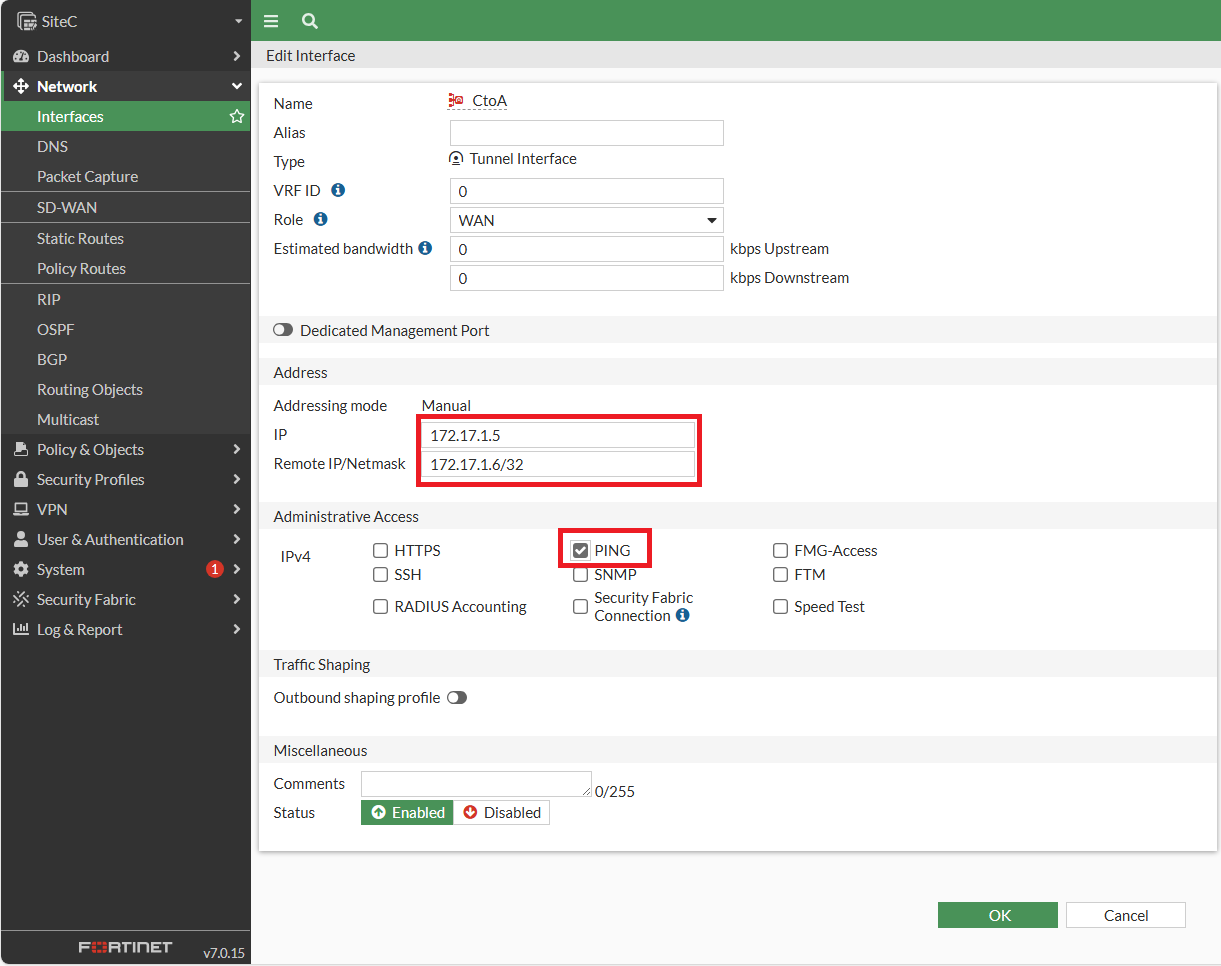](https://mdfk.goddamn.idv.tw/uploads/images/gallery/2024-08/u9kM5CBPe6.png)
[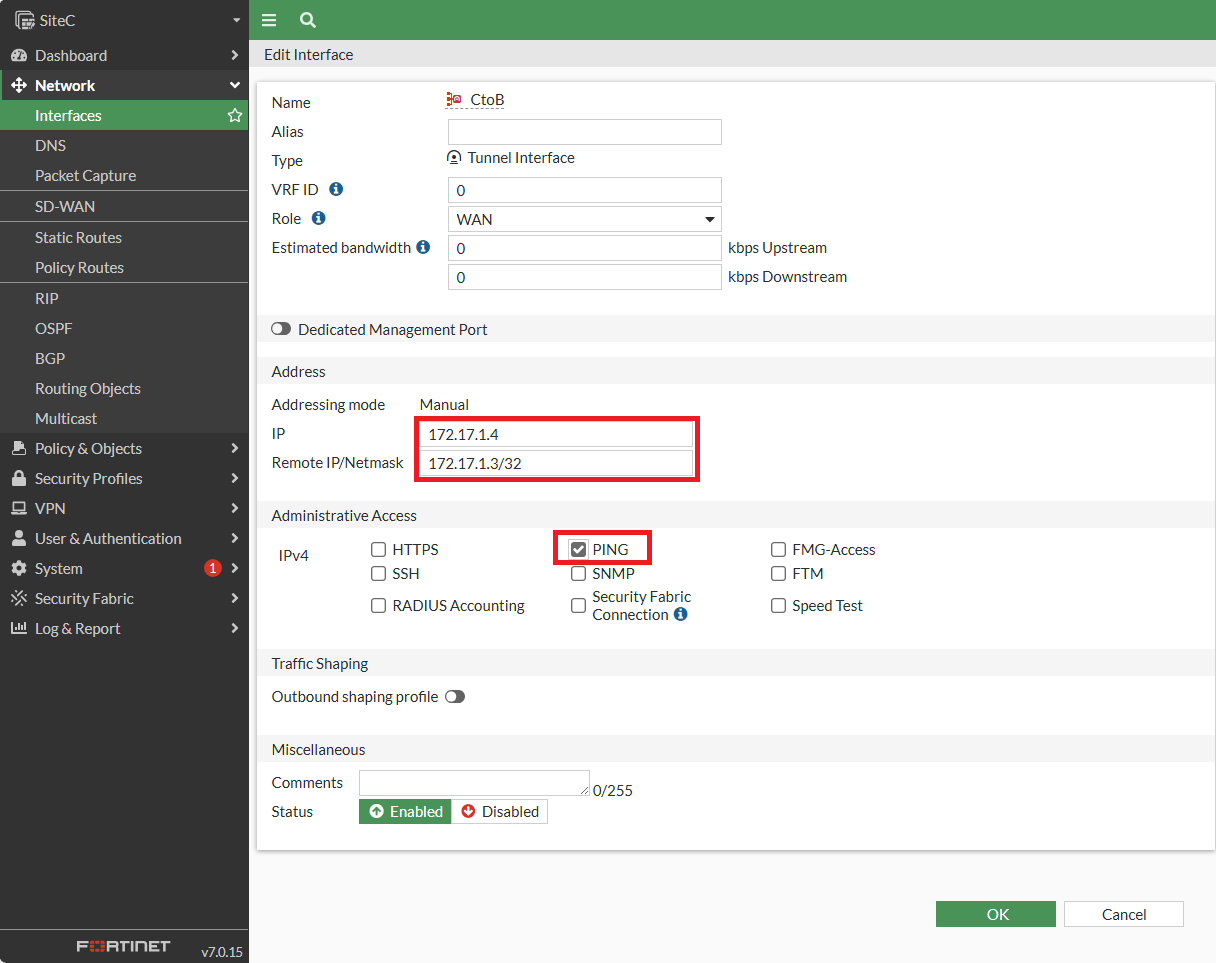](https://mdfk.goddamn.idv.tw/uploads/images/gallery/2024-08/B4sAMIzvov.png)
完成如下圖
[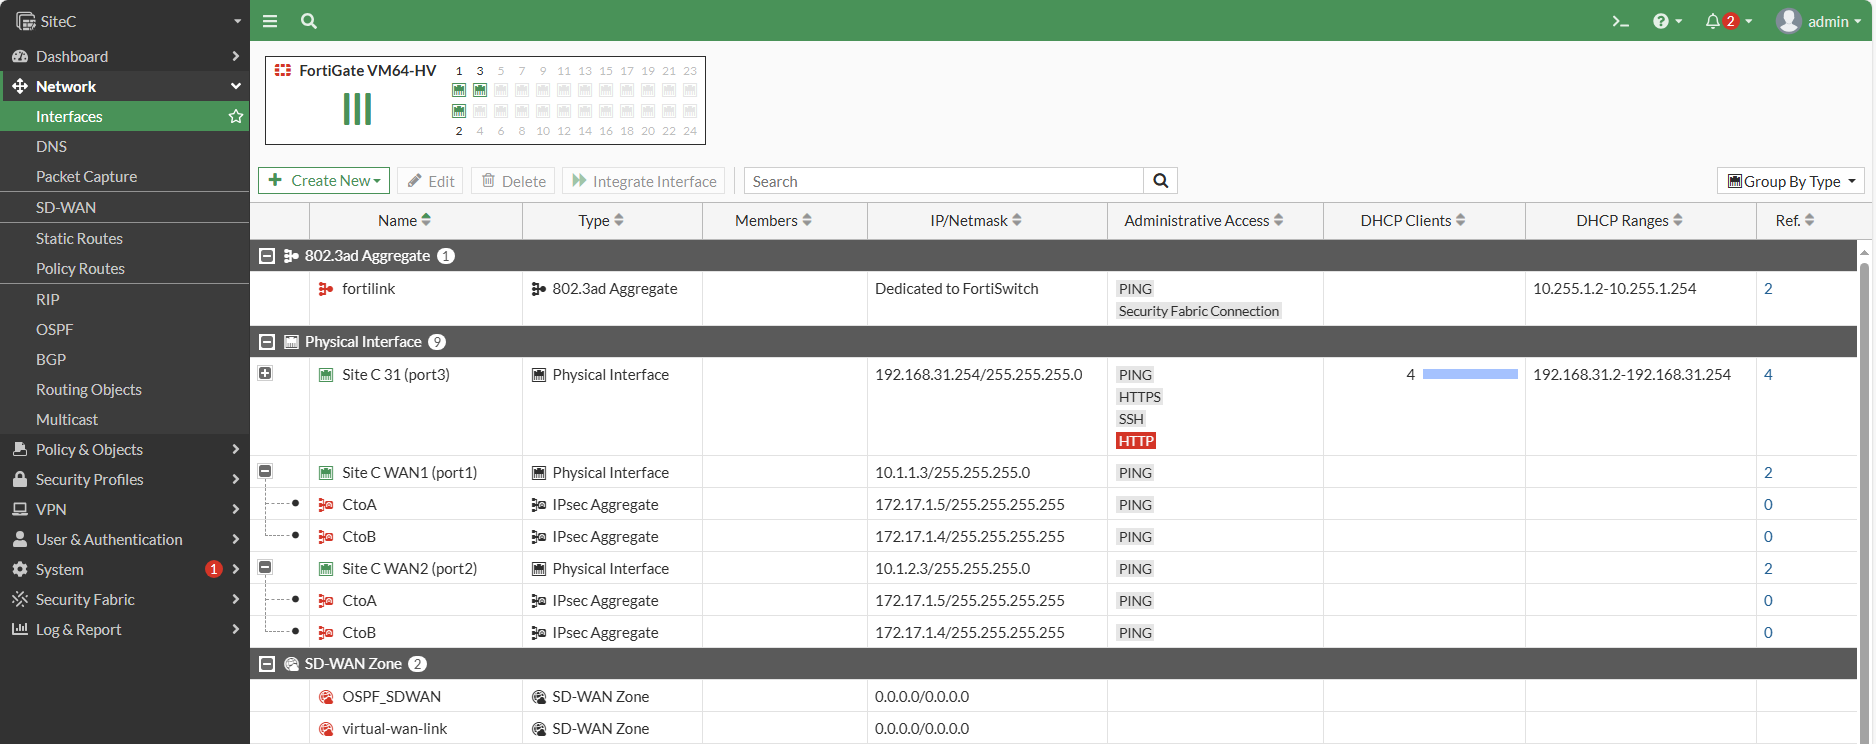](https://mdfk.goddamn.idv.tw/uploads/images/gallery/2024-08/HWndFm3DwO.png)
#### 設定OSPF Interface
[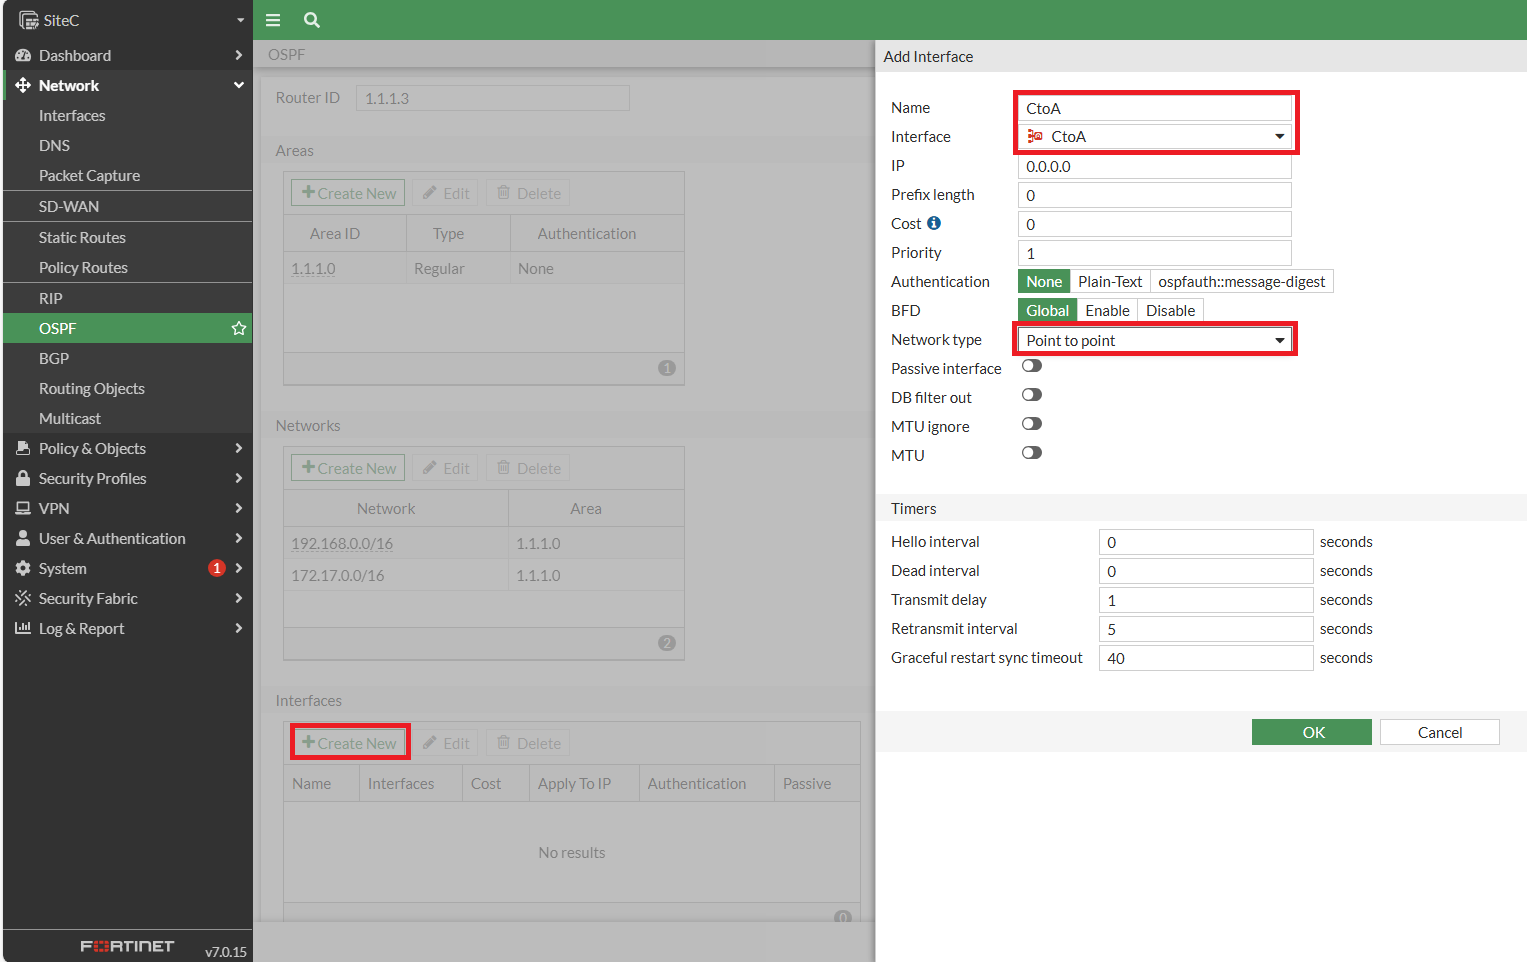](https://mdfk.goddamn.idv.tw/uploads/images/gallery/2024-08/xVDYMIipML.png)
[](https://mdfk.goddamn.idv.tw/uploads/images/gallery/2024-08/9fxNzaaQJT.png)
完成如下圖,記得**要Apply !!** (鍵人我不知道忘了多少次 ...... Again ...... )
[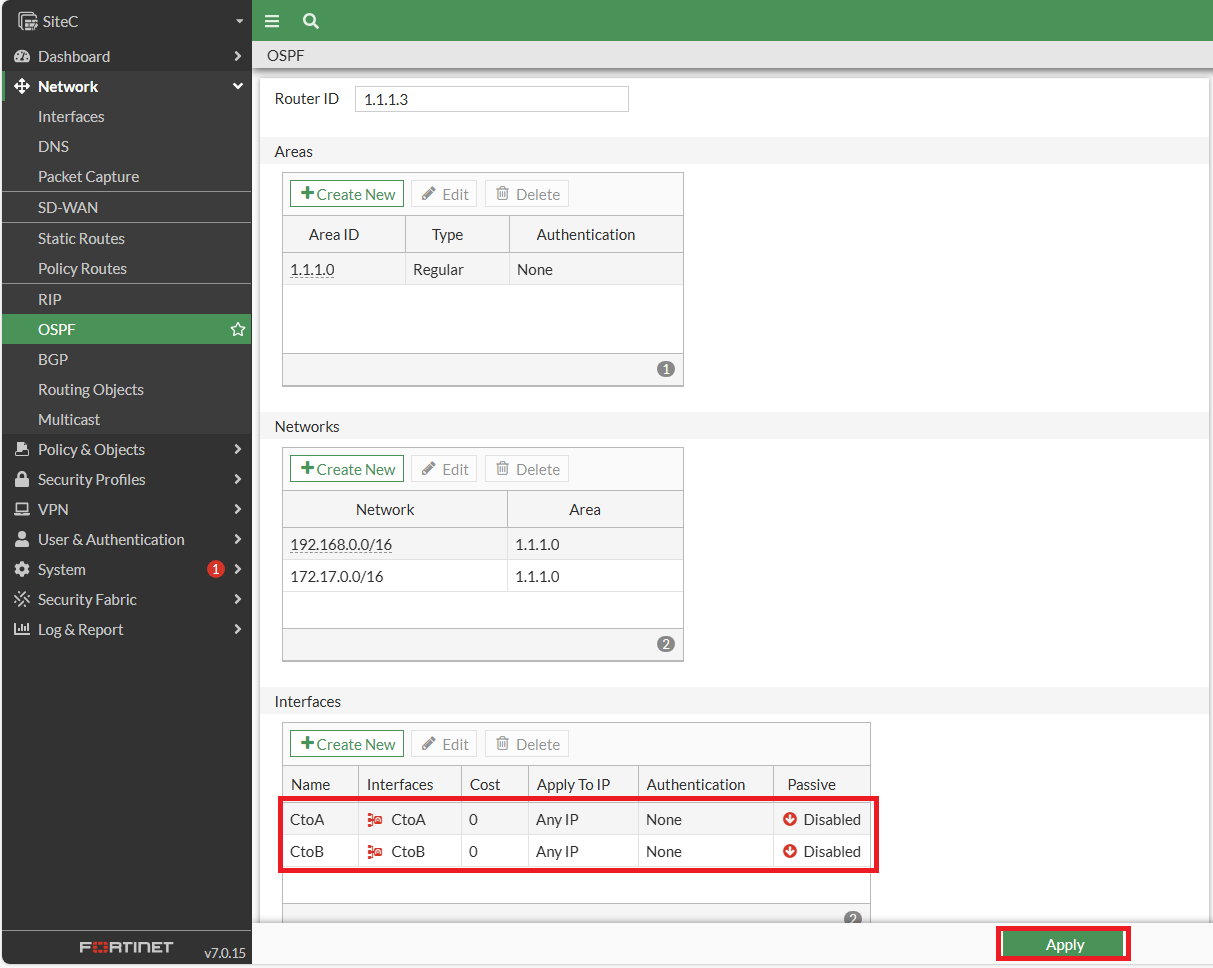](https://mdfk.goddamn.idv.tw/uploads/images/gallery/2024-08/JuJPlpeJ13.png)
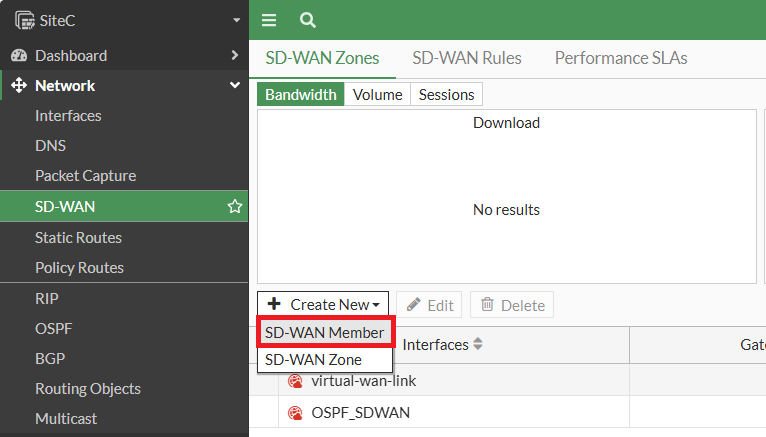
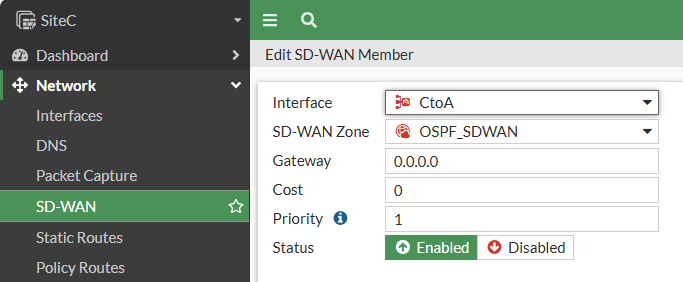
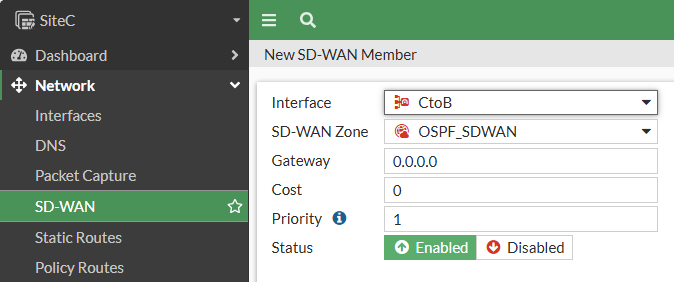
#### 設定SD-WAN
新增 SD-WAN Member
把**CtoA**、**CtoB** 加入**OSPF\_SDWAN** Zone
完成如下圖
[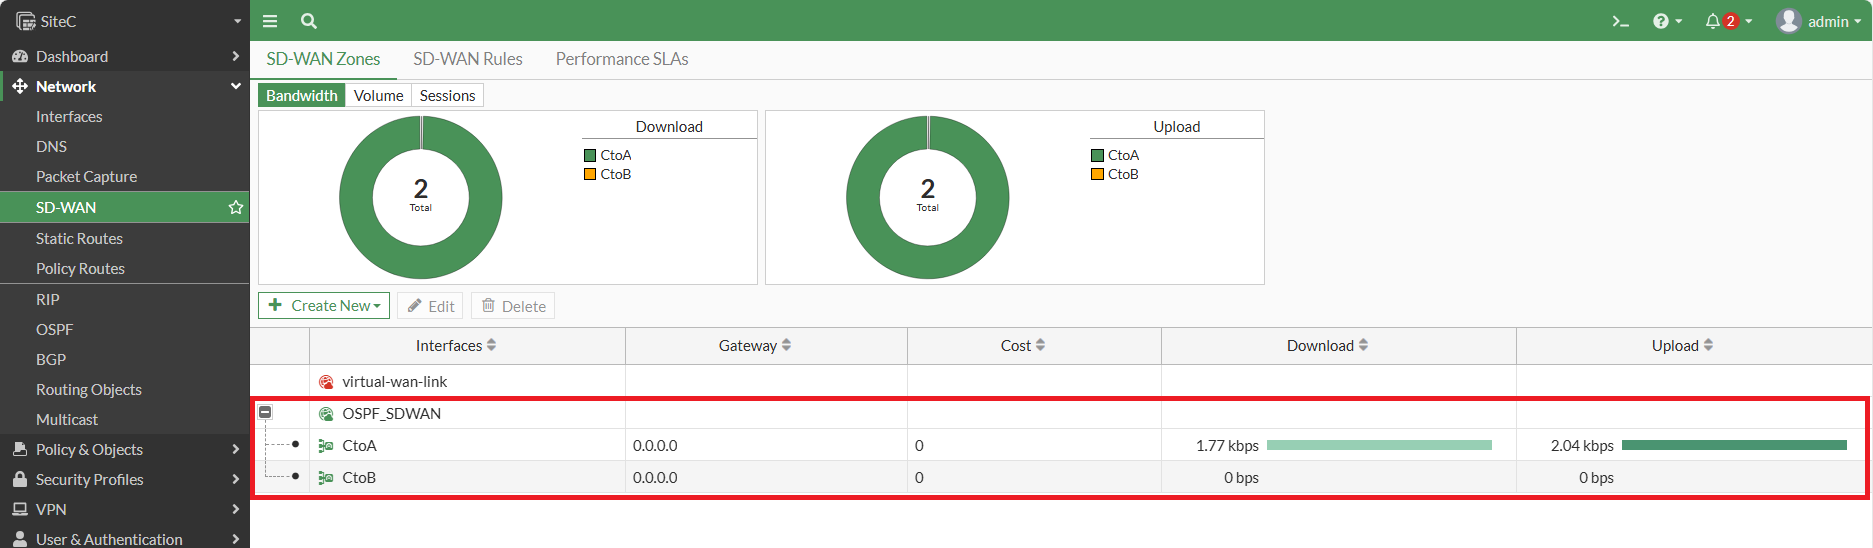](https://mdfk.goddamn.idv.tw/uploads/images/gallery/2024-08/XpX4LzNB0c.png)
重建 SD-WAN Performance SLA
[](https://mdfk.goddamn.idv.tw/uploads/images/gallery/2024-08/d6IUpkIc80.png)
[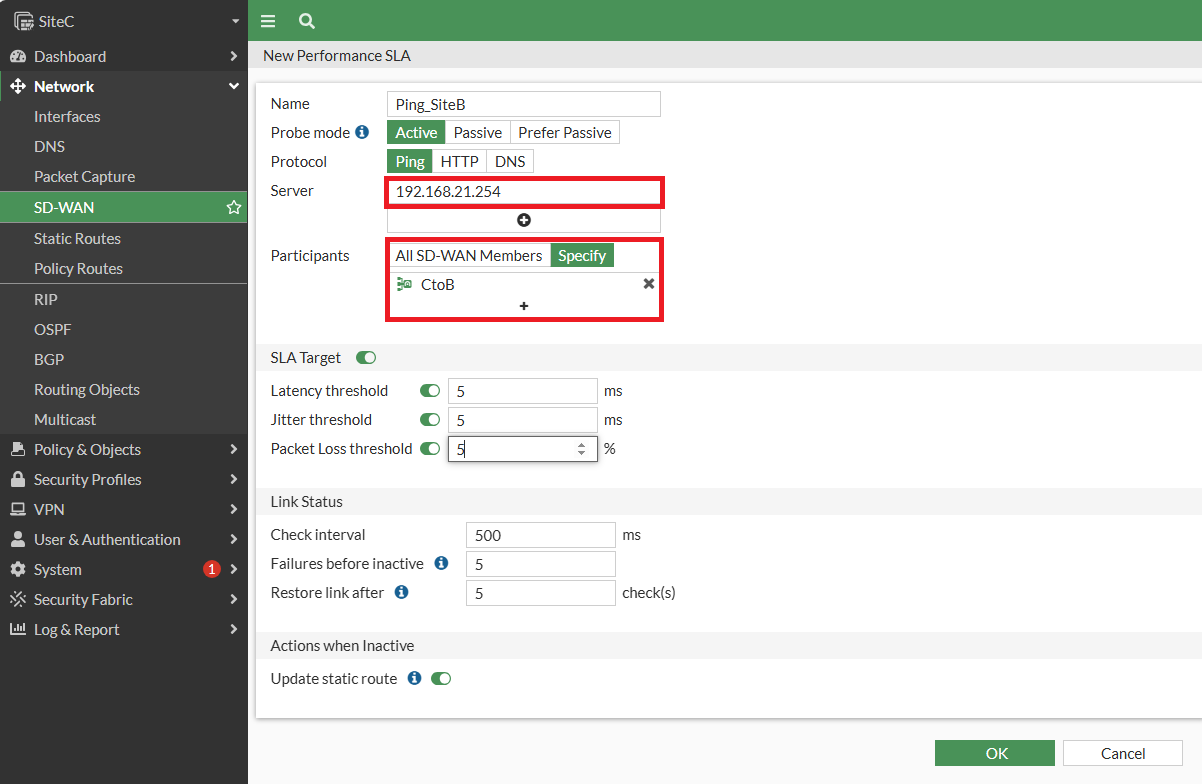](https://mdfk.goddamn.idv.tw/uploads/images/gallery/2024-08/3SesZrI9RB.png)
Performance SLA 完成如下圖
[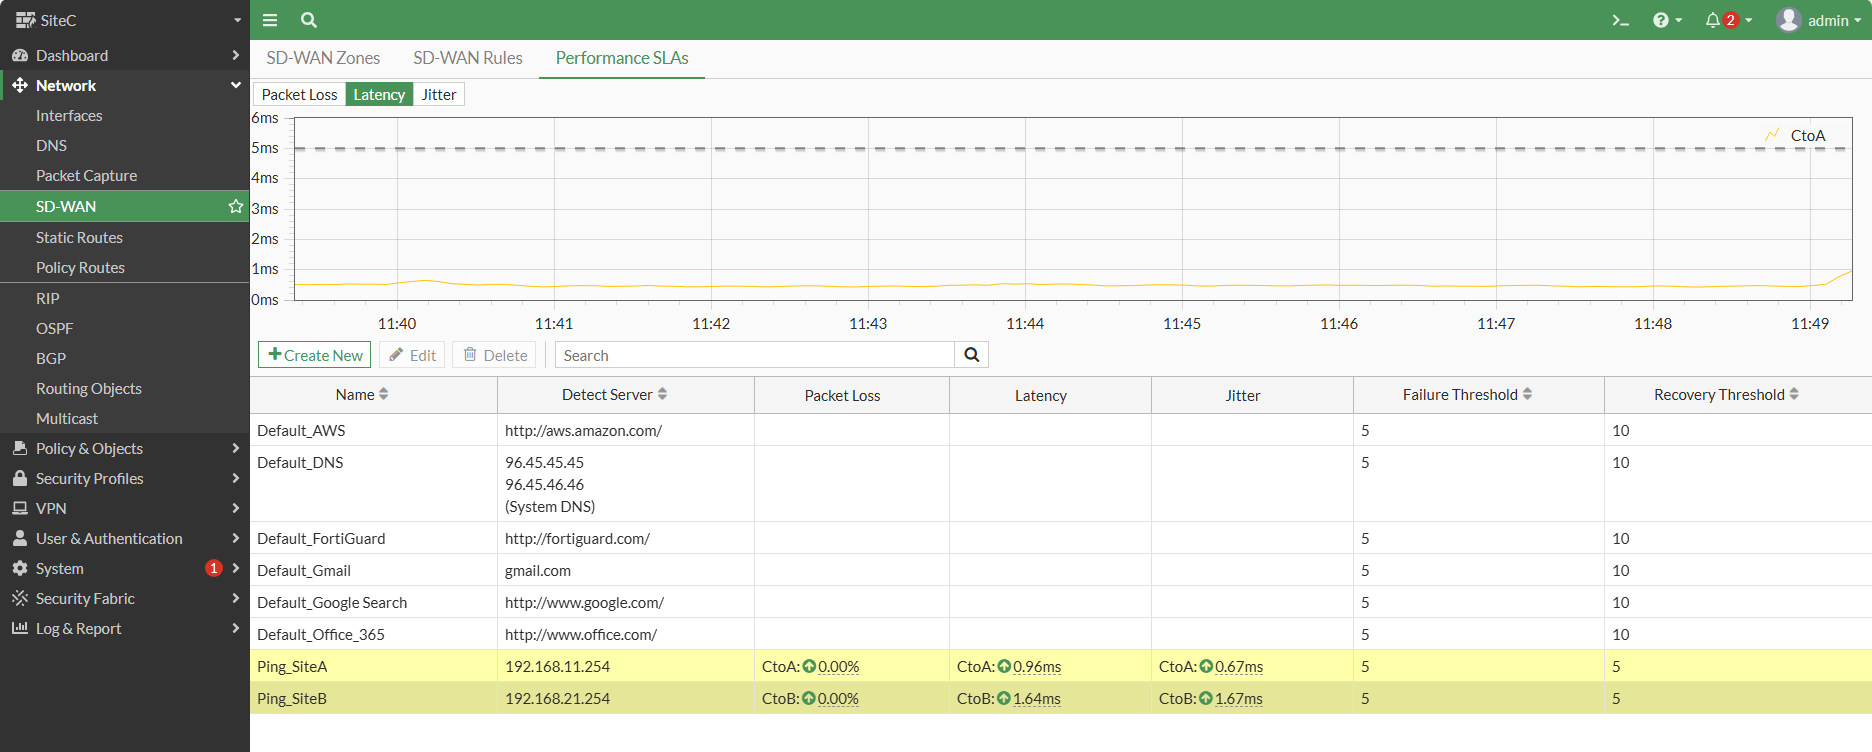](https://mdfk.goddamn.idv.tw/uploads/images/gallery/2024-08/x6Bfocue8U.png)
設定至此全部完成
> **※ 以防有人忘記了,在此我們沒有建立Firewall Policy的原因是上一篇我們已經制定好了**
>
> **路由的部分全部交由OSPF處理,SiteB、SiteC 請不要設定任何Static Route進入SD-WAN。**
### 狀態確認
#### OSPF 狀態
```
get router info ospf neighbor
get router info routing-table ospf
```
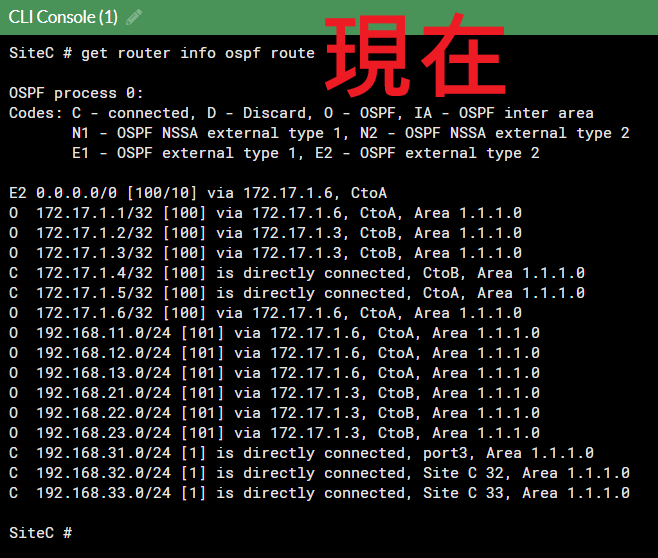
```
get router info ospf route
```
```
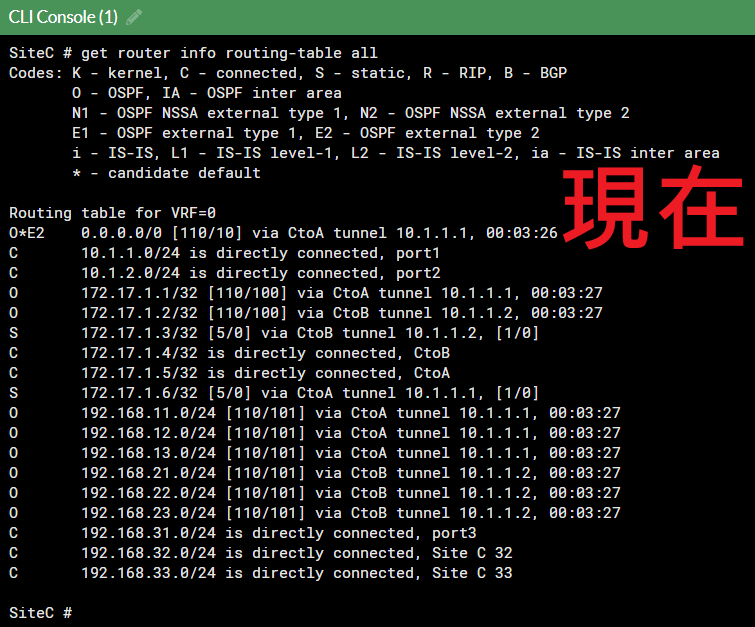
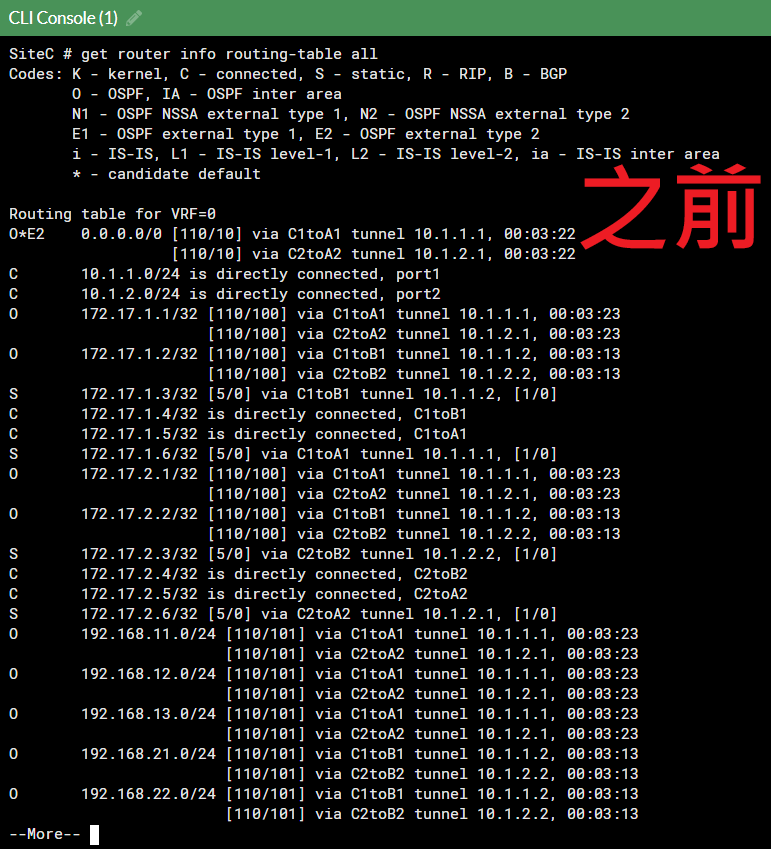
get router info routing-table all
```
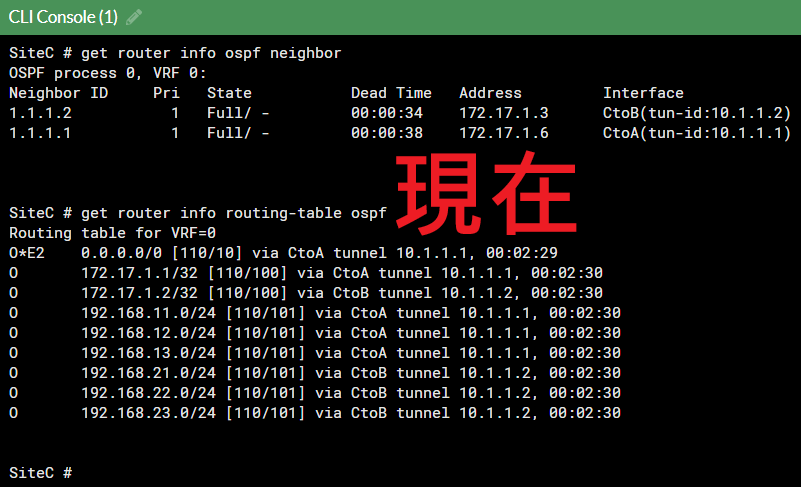
#### IPSEC 狀態
[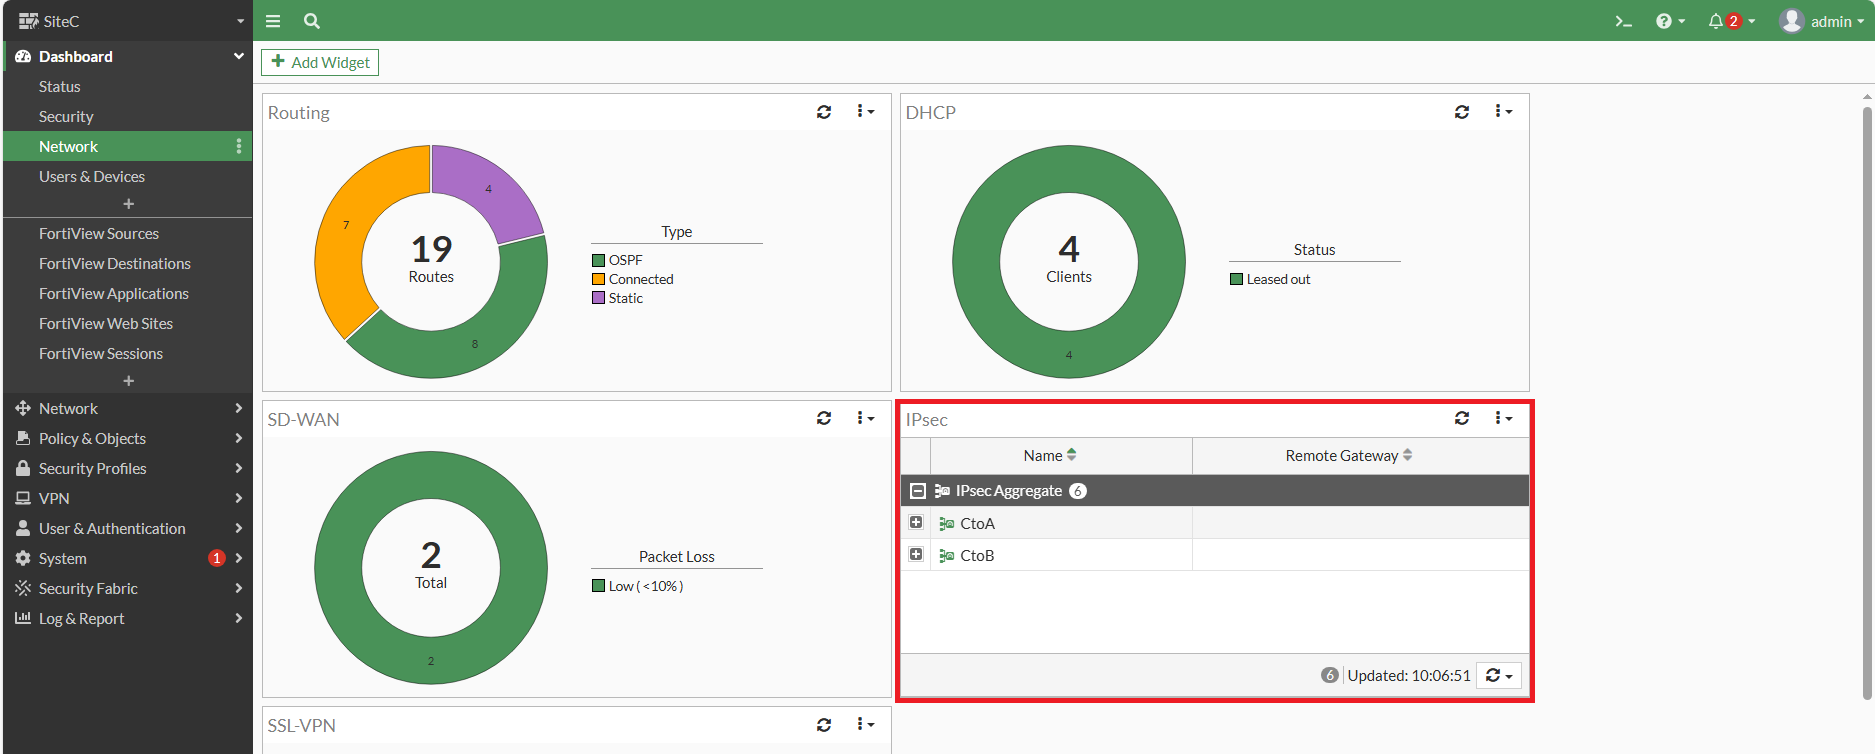](https://mdfk.goddamn.idv.tw/uploads/images/gallery/2024-08/jJs6tDdhJr.png)
[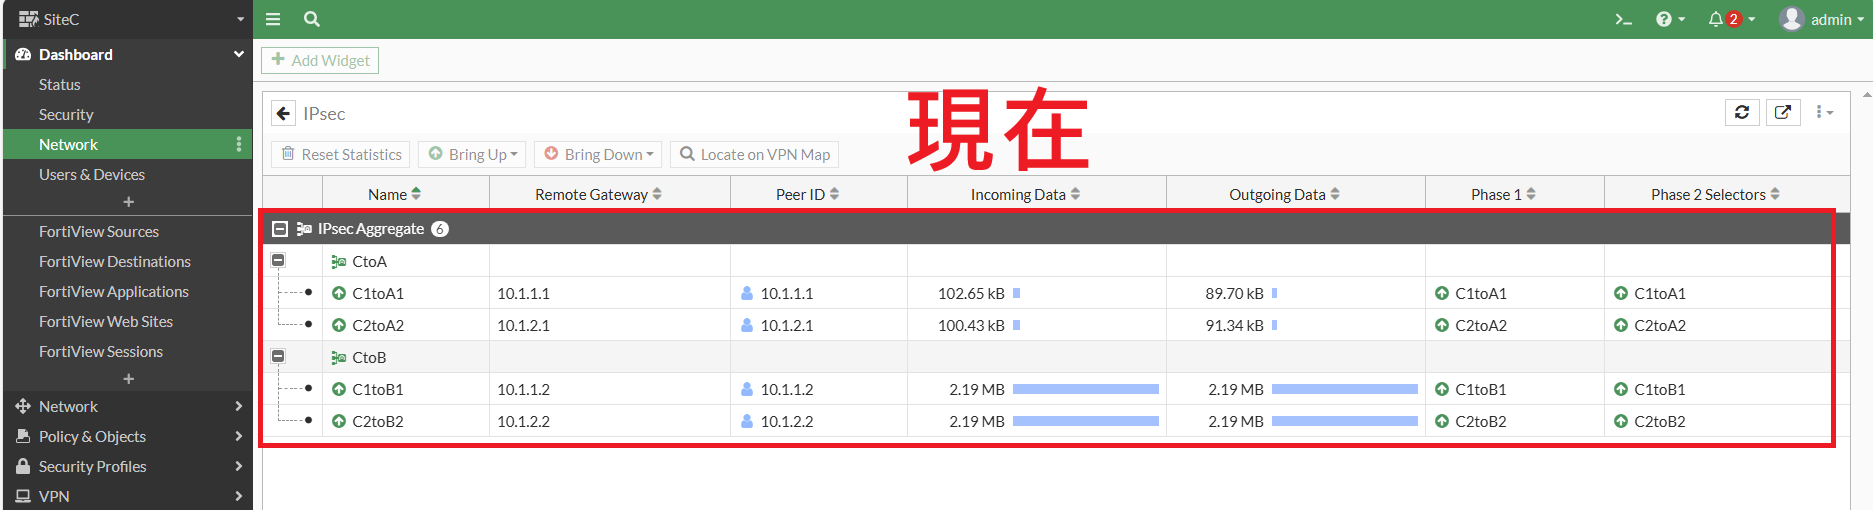](https://mdfk.goddamn.idv.tw/uploads/images/gallery/2024-08/u1y2WM4t7p.png)
[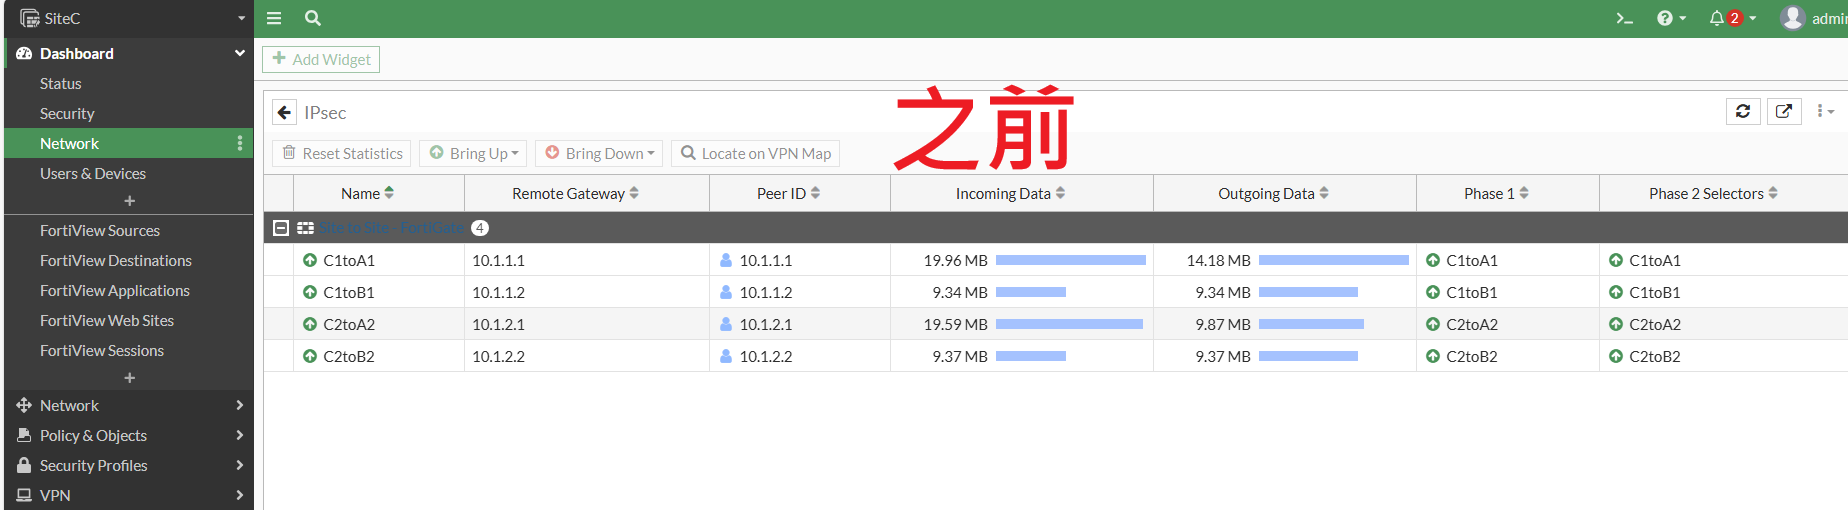](https://mdfk.goddamn.idv.tw/uploads/images/gallery/2024-08/bolpu1gtNl.png)
> **※**比較過後,是不是看到流量分配的比之前更平均了 ?
####
### 連線測試
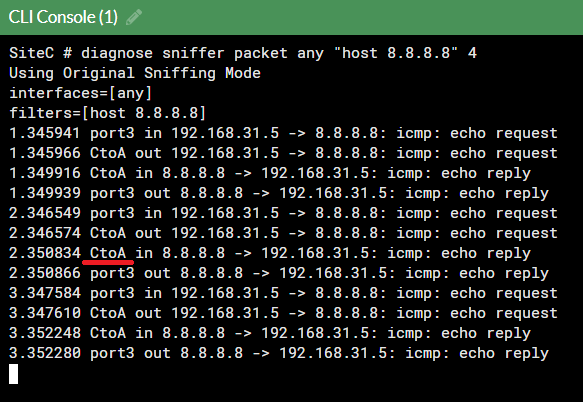
[](https://mdfk.goddamn.idv.tw/uploads/images/gallery/2024-08/CsxiymUtiT.png)
從**SiteC** PC 連續Ping 8.8.8.8,透過Sniffer可知道是走**CtoA**
將 **CtoA** 斷線,流量改走 **CtoB**
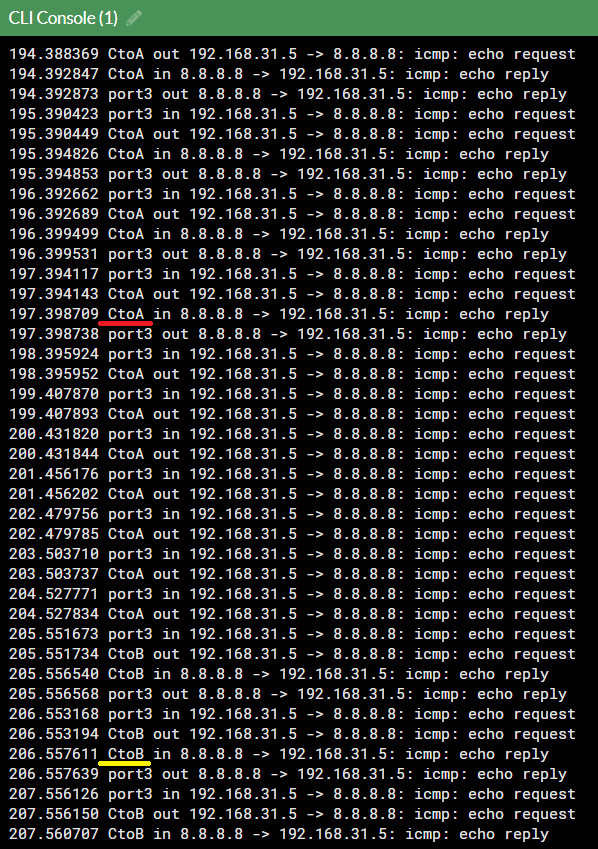
將 **CtoA** 恢復,流量又回到 **CtoA**
有此可證明Fail Over正常運作
### Pros and Cons
所以,一路看下來,整體設定變得更簡潔、流量分配更平均,這樣設定應該是更好的選擇 ...... 吧 ?
讓我們來看看 IPSEC Aggregate的問題
#### 問題1
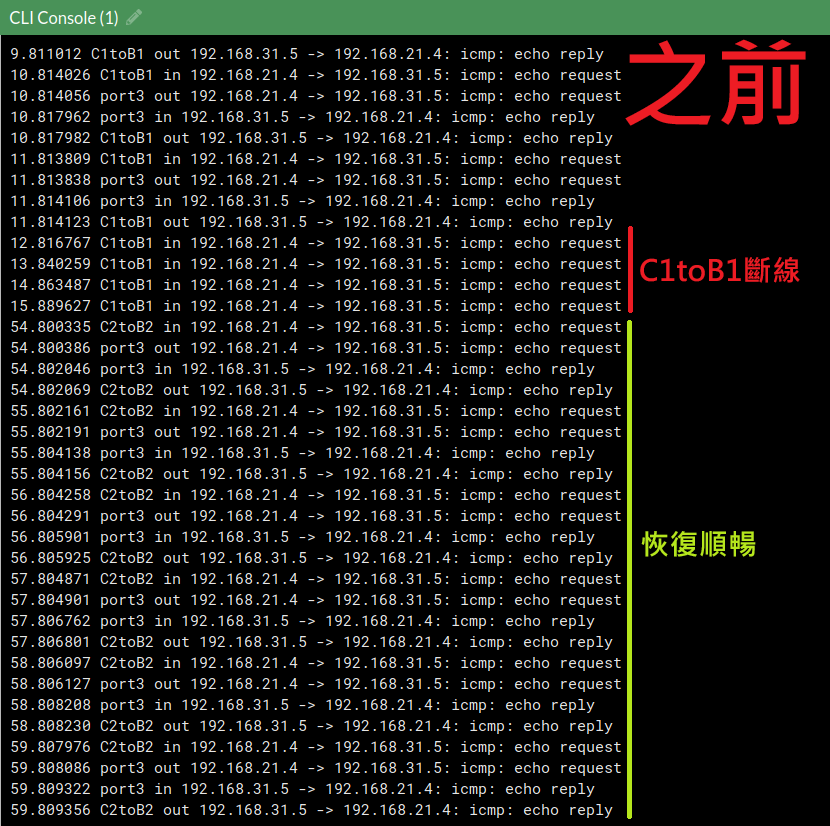
回到上面的Fail Over測試,其實鍵人我不是只單純做了**CtoA**斷線測試,我其實是優先做**C1toA1**的斷線測試
[](https://mdfk.goddamn.idv.tw/uploads/images/gallery/2024-08/AUXClr9RrO.png)
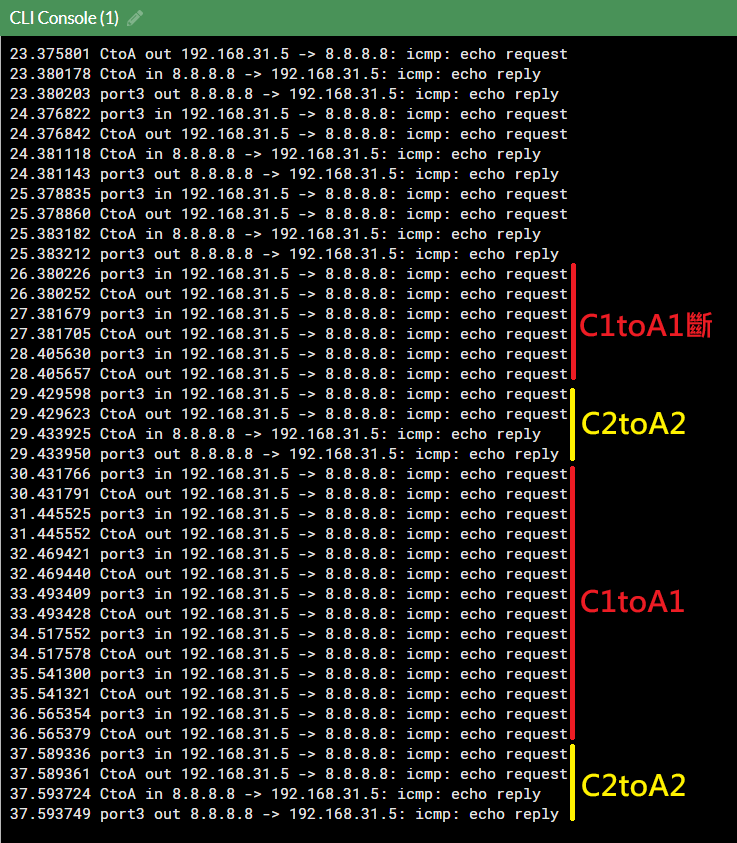
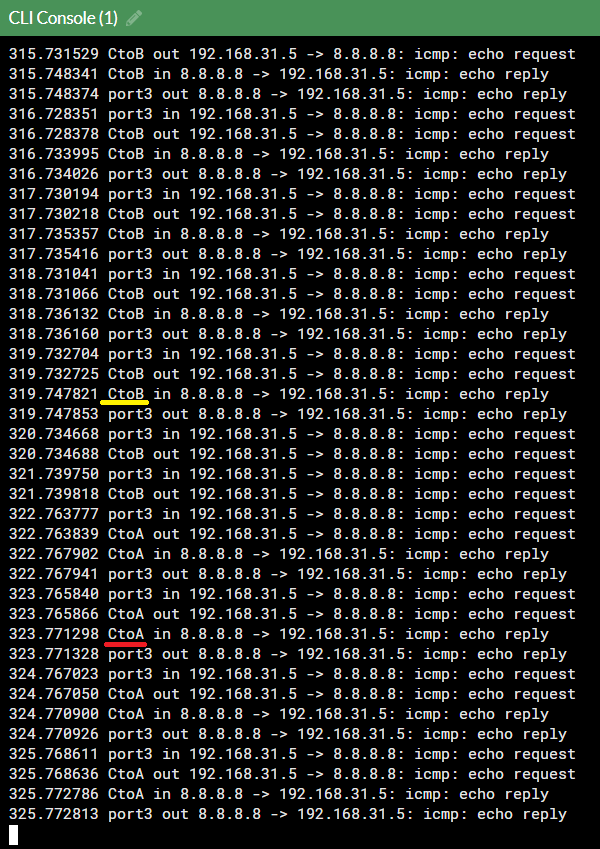
看到了嗎 ? IPSEC Aggregate下,因為IPSEC斷線偵測比較慢,所以Aggregate還是很盡責地將封包分給兩條IPSEC所以會導致掉封包,等到IPSEC斷乾淨了之後才恢復順暢(如下圖)
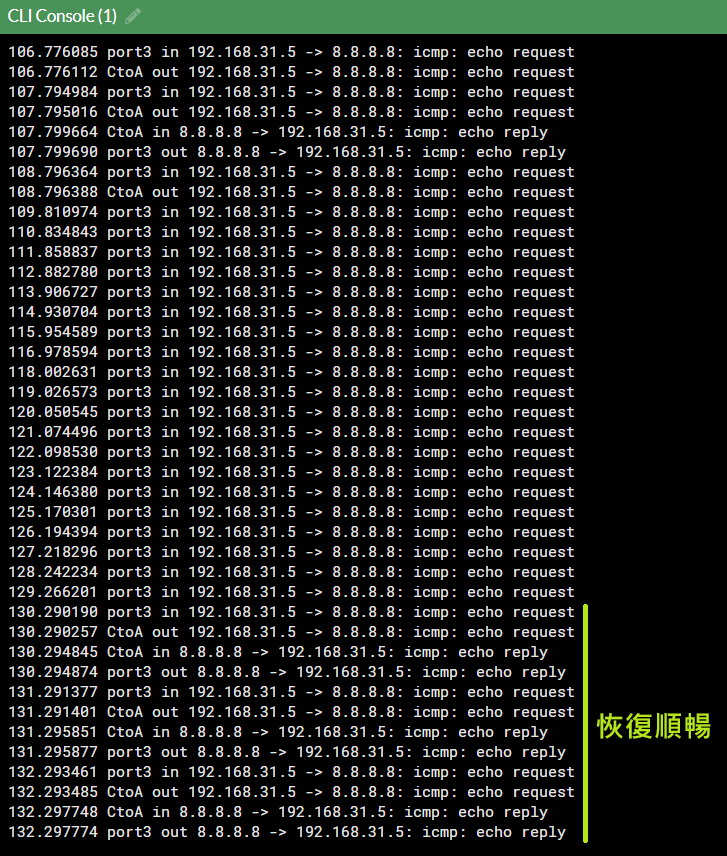
你要說這個問題會很嚴重嗎 ? 也不見得,但是相較於沒有Aggregate以OSPF的切換機制來說是慢得多了
[](https://mdfk.goddamn.idv.tw/uploads/images/gallery/2024-08/ah4cWmd4ri.png)
#### 問題2
還記得我們最初為什麼要嘗試把OSPF去結合SD-WAN嗎 ? 就是因為要去監測OSPF線路品質是很困難的事情,所以雖然這樣設定SD-WAN完全沒有生效,但能藉由SD-WAN Performance SLA去監測OSPF線路品質還是一件很棒的事。
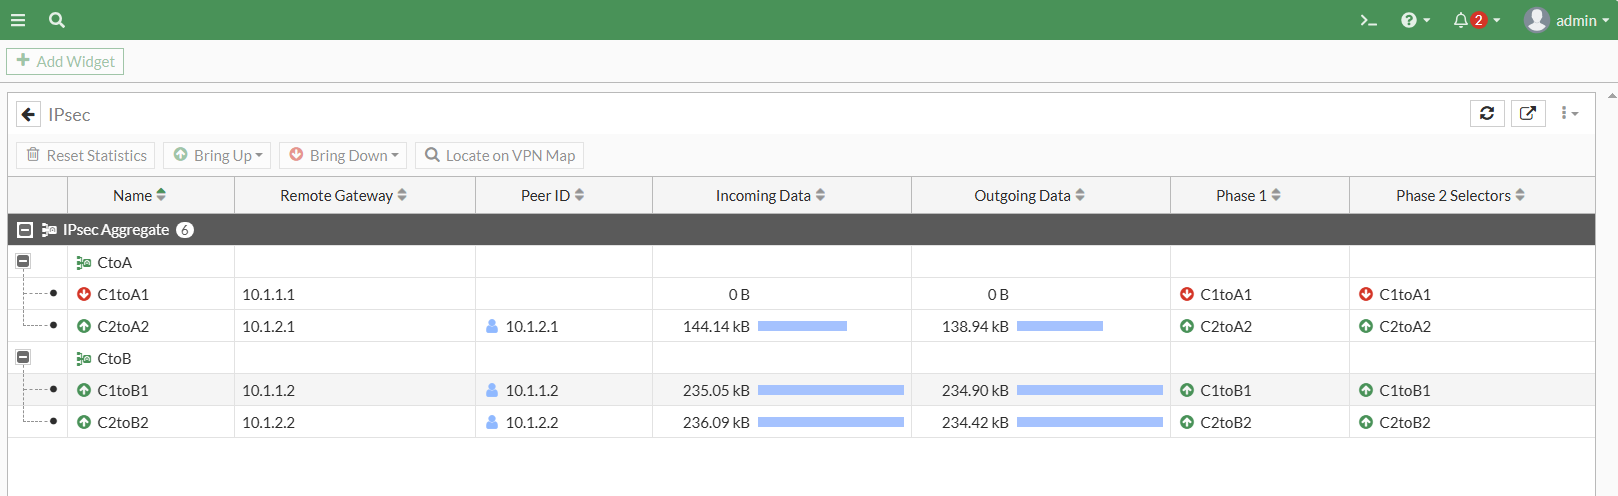
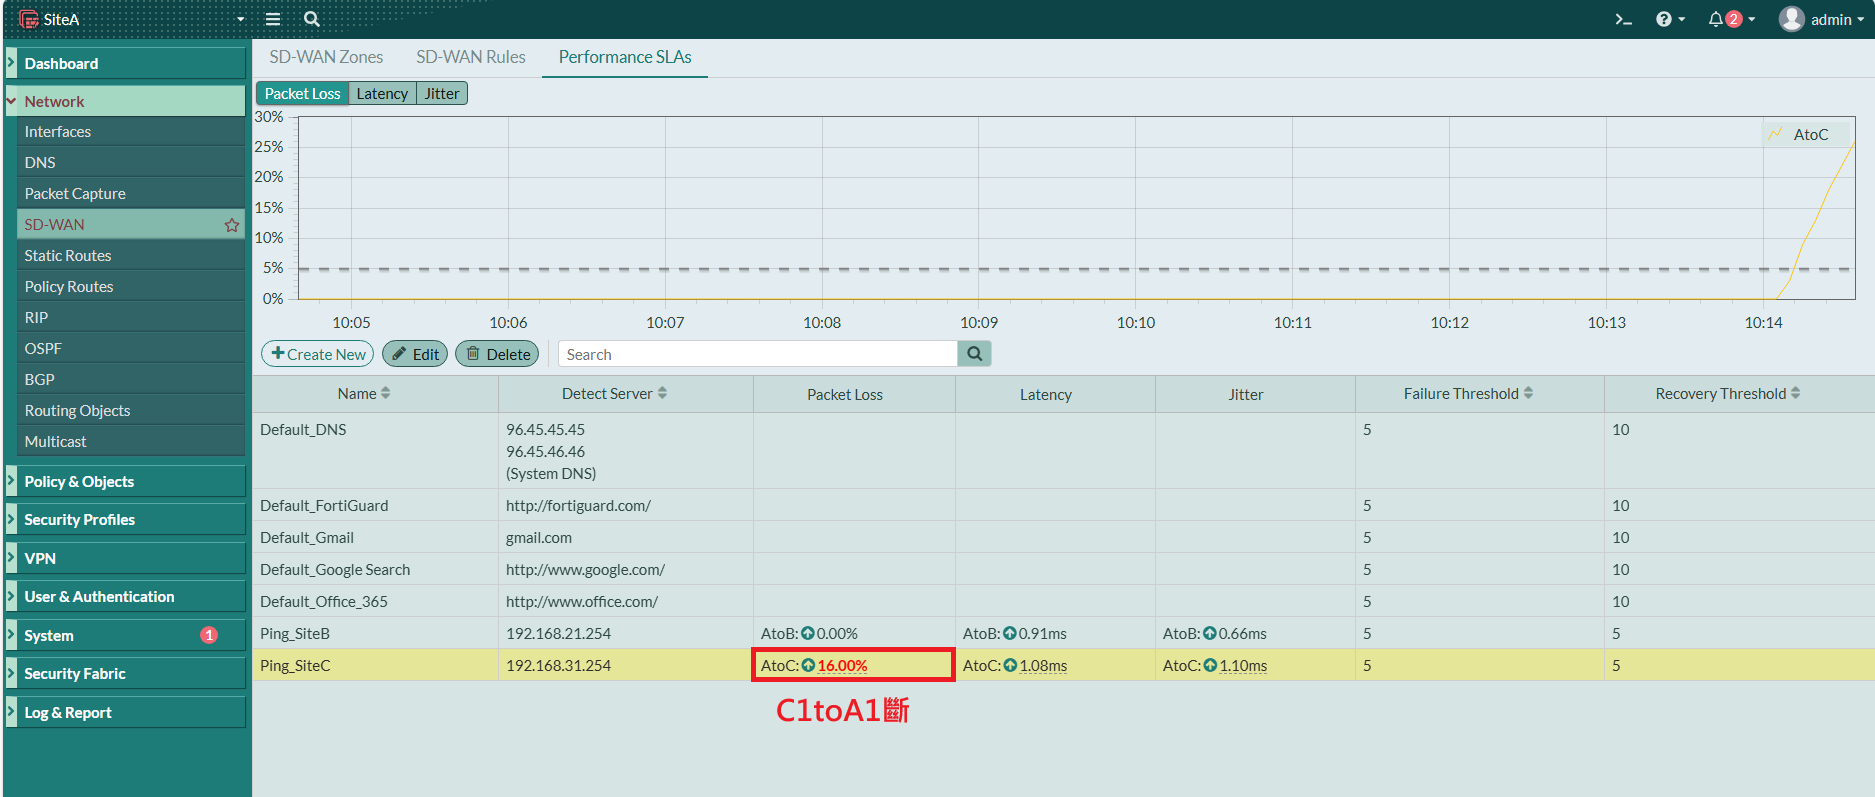
但一旦IPSEC Aggregate之後,SD-WAN Performace SLA監測機制就失去意義了,下圖是以**SiteA**的角度來看**C1toA1**斷線
[](https://mdfk.goddamn.idv.tw/uploads/images/gallery/2024-08/OzMCBqagPC.png)
看到了嗎 ? 上圖只知道**AtoC**有掉包,但卻無法直觀的得知是由於**C1toA1**斷線所造成的
再來請看下圖,這是實務上容易發生的,當整個**SiteC** WAN1斷了的時候,**C1toA1** & **C1toB1** 會同時斷線。
[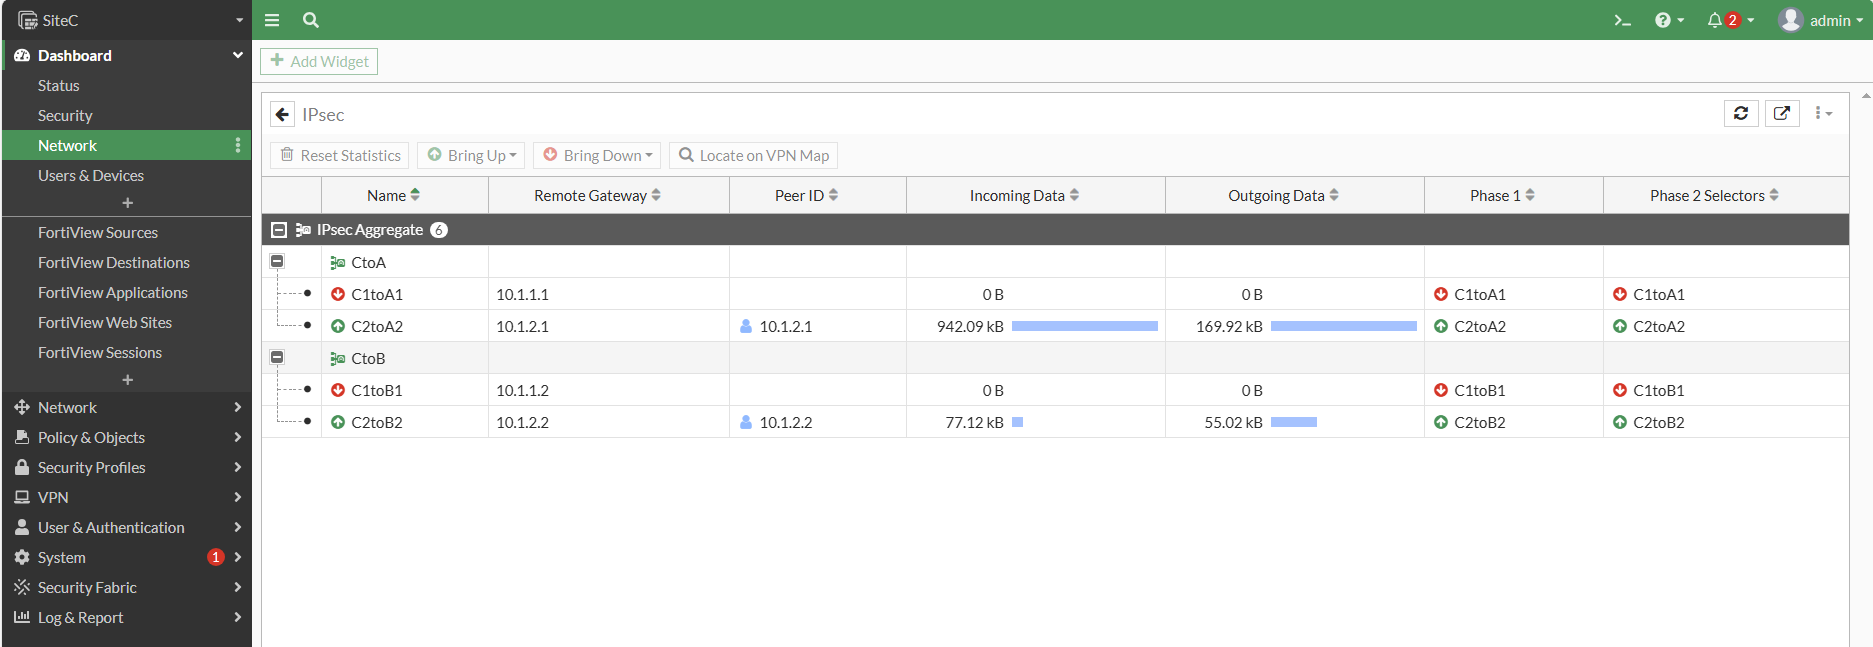](https://mdfk.goddamn.idv.tw/uploads/images/gallery/2024-08/uNasXY6yKC.png)
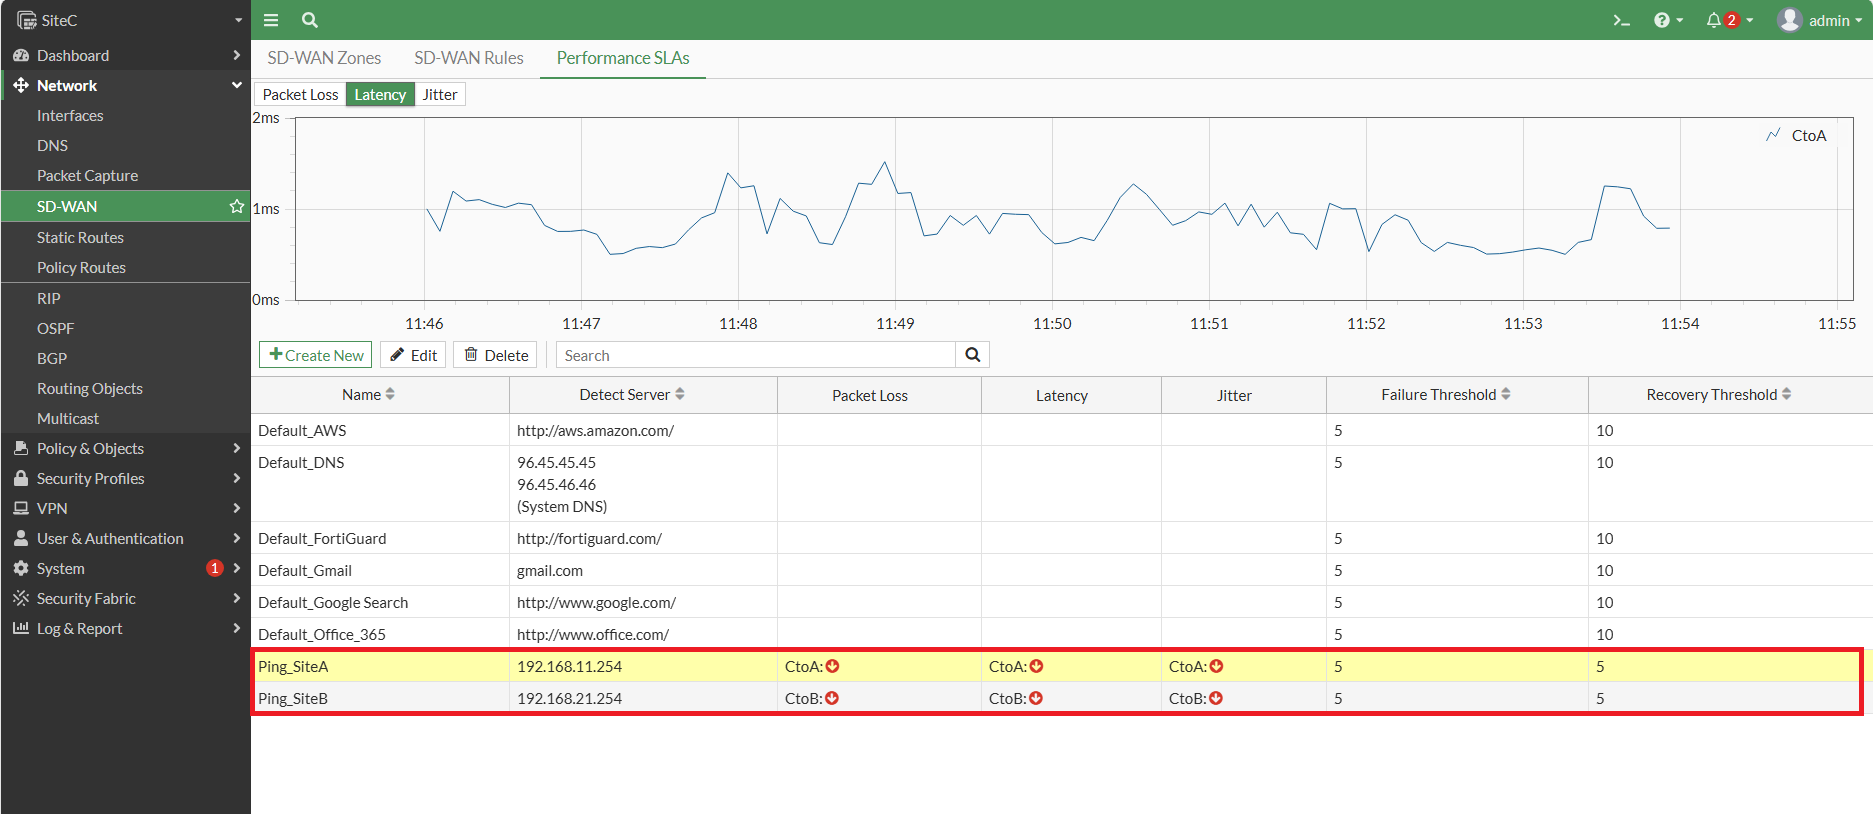
但在IPSEC還沒切乾淨網路還沒恢復通順的期間,SD-WAN Performance SLA有可能會變成這樣
[](https://mdfk.goddamn.idv.tw/uploads/images/gallery/2024-08/iF2O1rAoEw.png)
對,就像上圖,顯示上**SiteA**、**SiteB**都斷了,但其實沒斷還能夠連線,偵測要等恢復通順才會回來,那這樣就大大的降低了利用SD-WAN Performance SLA監測的意義與正確性。
#### 優勢
說完了問題,IPSEC Aggregate還是有優勢的地方
記得一開始前言的地方,我有提到沒有Aggregate的時候,Fortigate是透過OSPF ECMP的方式來達成Fail Over & Load Balance的,預設的ECMP Policy是基於 Source-IP-Base 去作分流,也就是如下圖
[](https://mdfk.goddamn.idv.tw/uploads/images/gallery/2024-08/wuQFxrLrYD.png)
也因為ECMP是Source-IP-Base的關係,單一Source IP的**流量無法超過單一線路頻寬**,假設你WAN1、WAN2皆為100M/100M,在ECMP 單一Source IP 最大流量就是100M。
但再看一次上面那張圖,反而佐證了透過IPSEC Aggregate Fortigate會去拆分封包分別丟入兩個IPSEC Turnnel

所以我們可以確定,在IPSEC Aggregate下,單一Source IP的流量**可以超過單一條線路頻寬**,也就是WAN1、WAN2皆為100M/100M,在IPSEC Aggregate下單一Source IP 最大流量可達 200M。
#### 優劣比較
綜合以上優劣,僅以下表呈現鍵人我的推薦程度,✅較為推薦,❌較不推薦
| | IPSEC | IPSEC Aggregate |
| 動態路由 | ✅ | ✅ |
| Fail Over | ✅ | ✅ |
| Load Balance | ✅ | ✅ |
| 線路監控 | ✅ | ❌ |
| 即時切換 | ✅ | ❌ |
| 整合頻寬 | ❌ | ✅ |
如果是鍵人我,我會選擇 IPSEC 不作 Aggregate,這樣才能充分發揮OSPF的優勢
但在某些不是這麼Critical的Site,線路頻寬小且無法升速的區域 (比方說偏鄉地區),IPSEC Aggregate依然是個不錯的選擇