# Fortigate PPPOE IPSEC ADVPN 實作
### 參考資料
[https://docs.fortinet.com/document/fortigate/7.4.4/administration-guide/853412/ipsec-vpn-wizard-hub-and-spoke-advpn-support](https://docs.fortinet.com/document/fortigate/7.4.4/administration-guide/853412/ipsec-vpn-wizard-hub-and-spoke-advpn-support)
### 前言
利用Fortigate來建立 Site to Site IPSEC VPN不是難事,IPSEC的前提必需兩個Site都有固定IP,但是如果某間企業門市眾多,為了經費考量想利用便宜的家用型PPPOE VDSL來佈建分點,又想要透過統一的企業上網出口來作資安控管,在Fortigate上也有支援這種Solution稱為**ADVPN (Auto-Discover VPN)**。
同時上次帶大家實做了[Fortigate IPSEC+iBGP](https://mdfk.goddamn.idv.tw/books/fortigate/page/fortigate-ipsec-ibgp),我有提到過到過其實企業內部使用iBGP的機率很低,大多是都是走OSPF居多,但是在**ADVPN**下預設就是走BGP,此篇實做帶大家看看ADVPN怎麼搞。
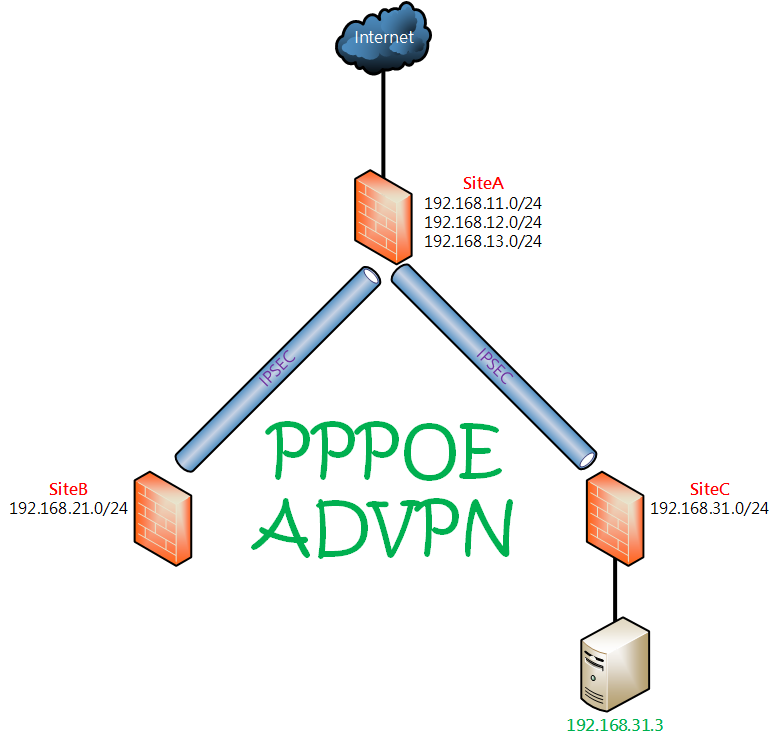
### 環境說明
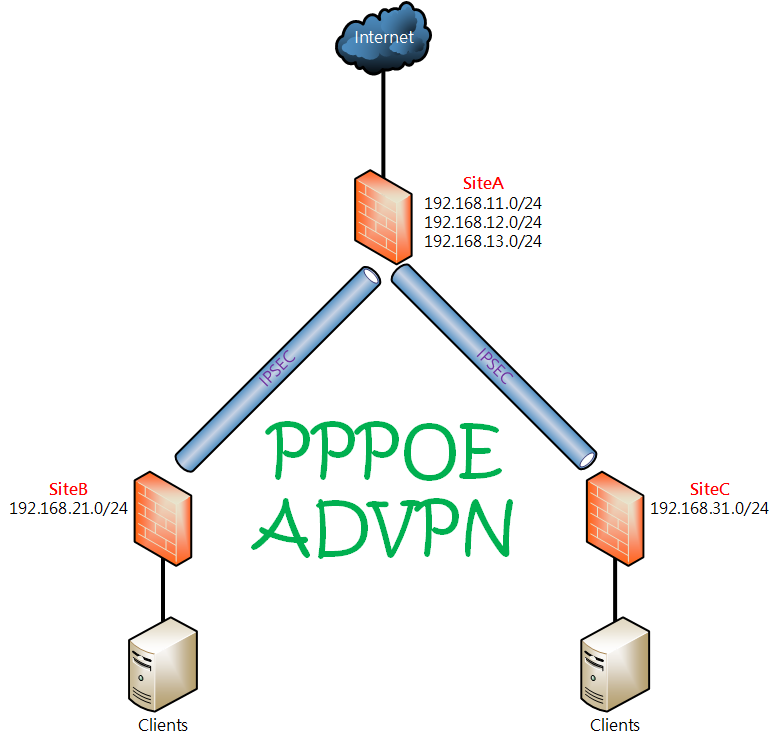
**設計概念:** **SiteA** **(HQ)**有固定IP,其餘分點 **SiteB**、**SiteC** 皆使用**PPPOE**,同時由於資訊安全控管的原則希望能Internet流量統一由同一個Gateway進出。
**Firmware Ver. :** Fortigate-VM 7.0.15
|
| **WAN IP**
| **LAN Subnets**
| **WAN IPSEC IP**
|
| **SiteA**
| WAN1 10.1.1.1
Gateway 10.1.1.254
| 192.168.11.254/24
192.168.12.254/24
192.168.13.254/24
| 172.17.1.1
|
| **SiteB**
| WAN1 PPPOE
(以DHCP模擬)
| 192.168.21.254/24
| 172.17.1.2
|
| **SiteC**
| WAN1 PPPOE
(以DHCP模擬)
| 192.168.31.254/24
| 172.17.1.3
|
### Hub設定過程
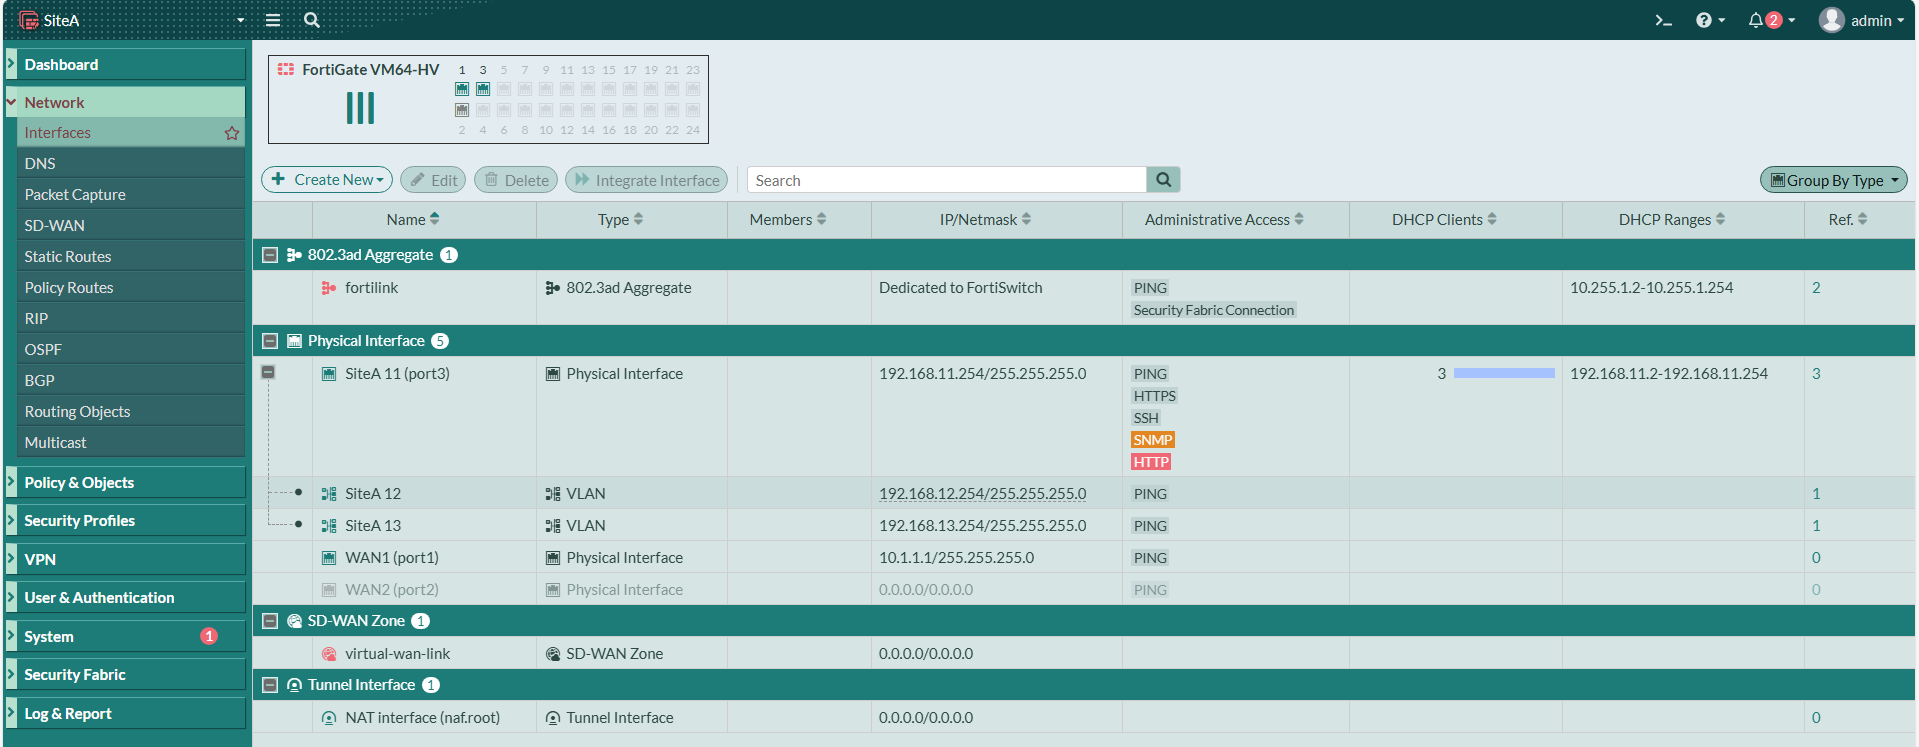
#### **SiteA**設定Interface
首先我們先將SiteA的WAN1、Local Subnets 192.168.11.254/24、192.168.12.254/24、192.168.13.254/24設定好。
[](https://mdfk.goddamn.idv.tw/uploads/images/gallery/2024-08/okrrvbsasx.png)
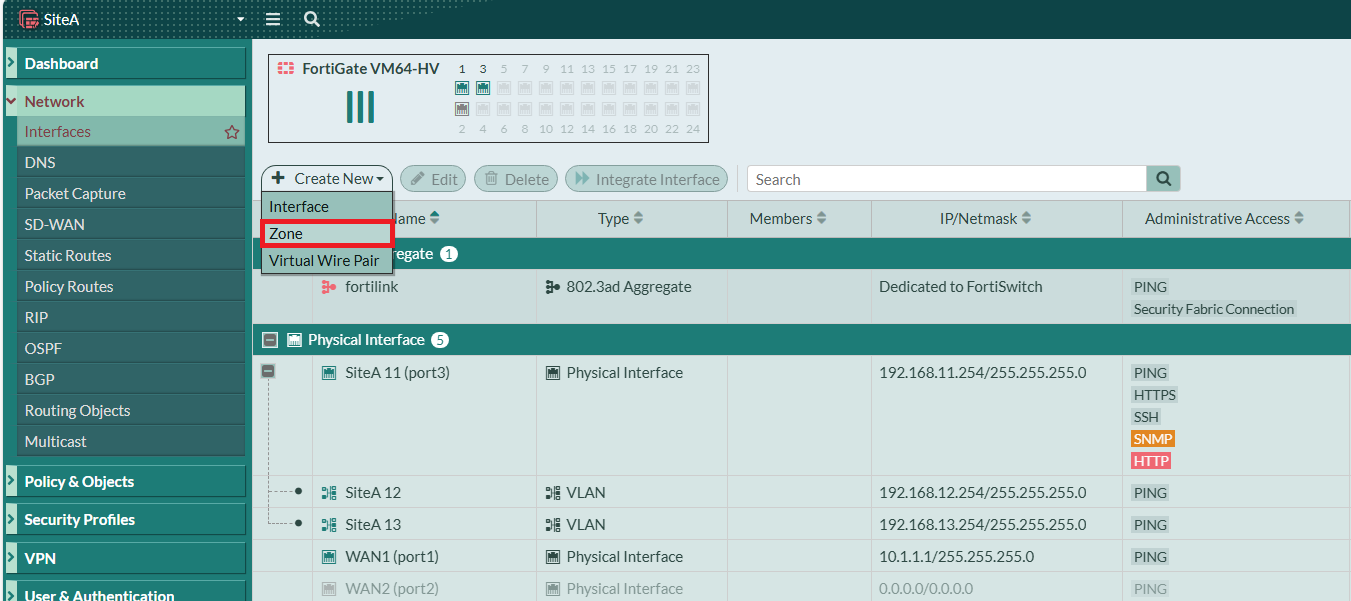
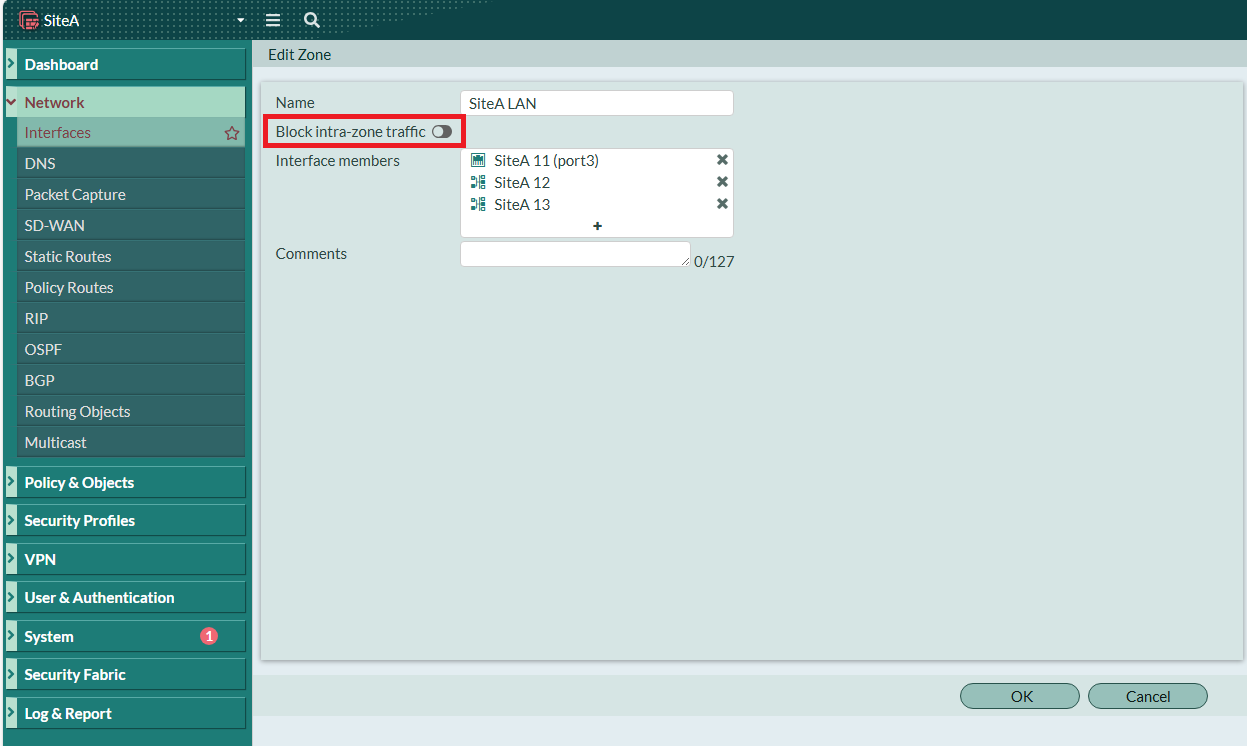
為了後續設定方便,我將三個Subnets綁成一個Zone,並且允許Interface之間互相溝通。
#### 設定**SiteA**上網
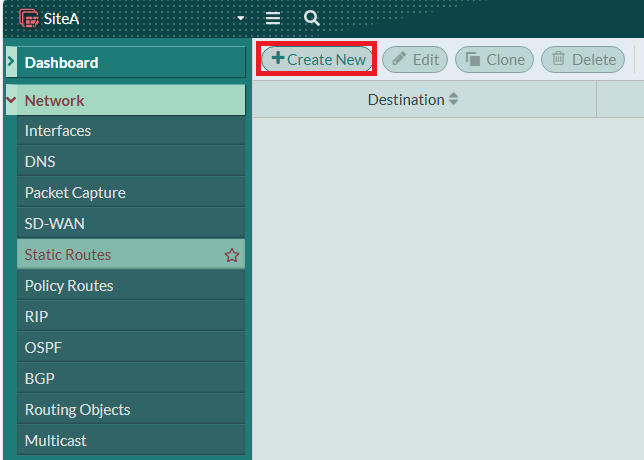
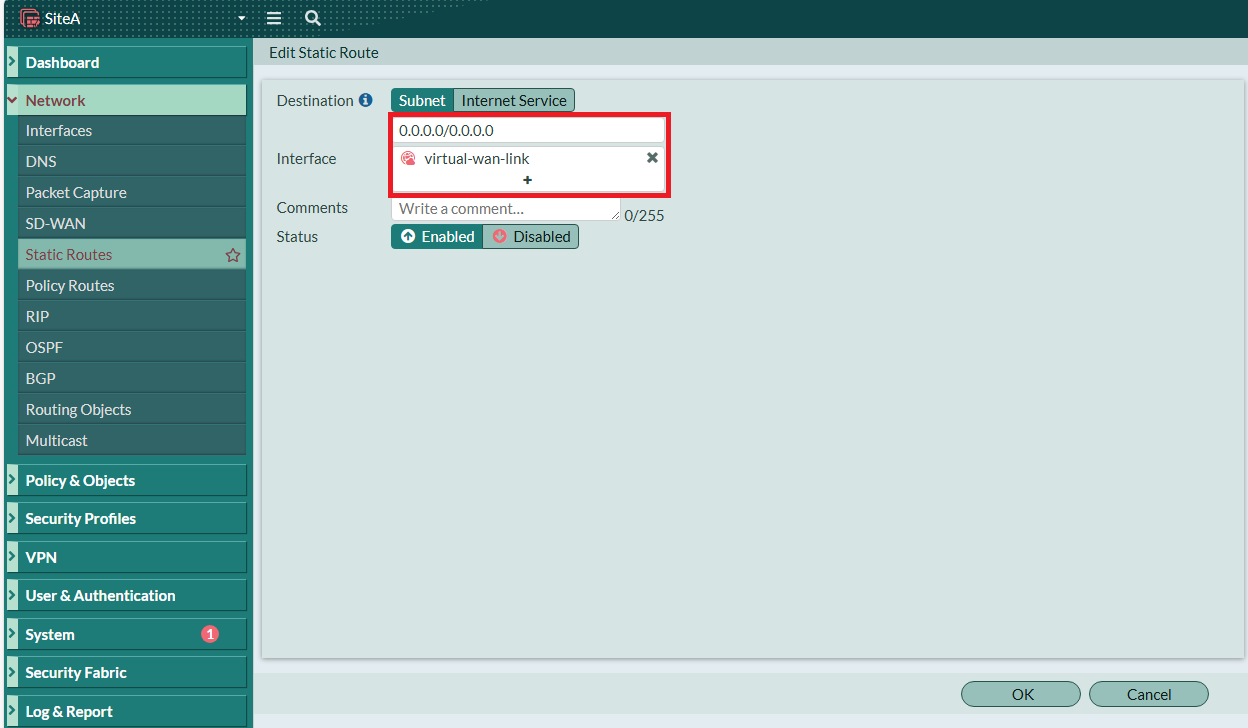
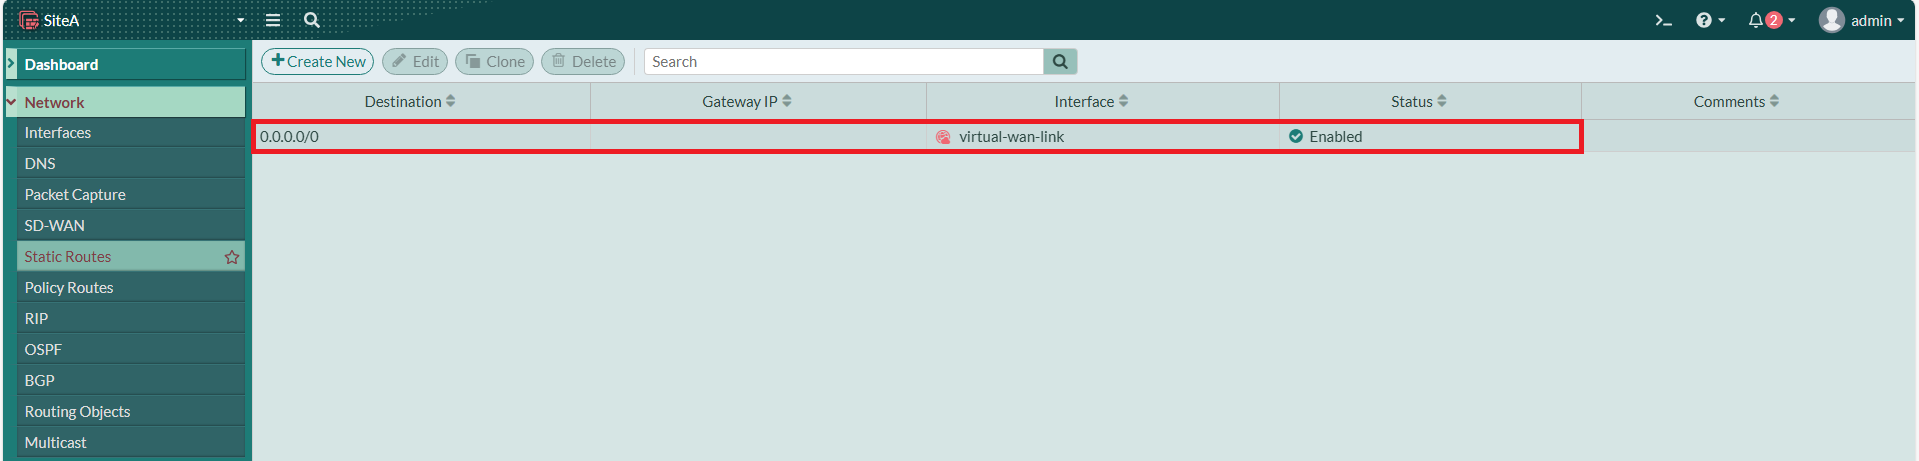
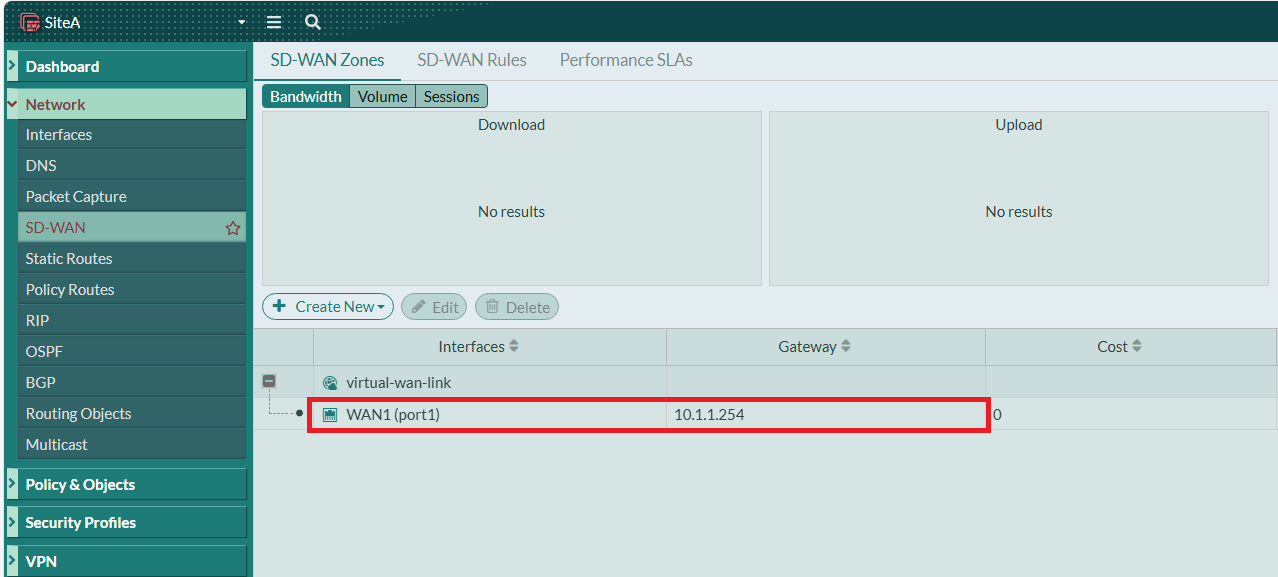
新增一筆 Static Route 0.0.0.0/0 進到 Default SD-WAN Zone
[](https://mdfk.goddamn.idv.tw/uploads/images/gallery/2024-08/5Jfs3iOPoF.png)
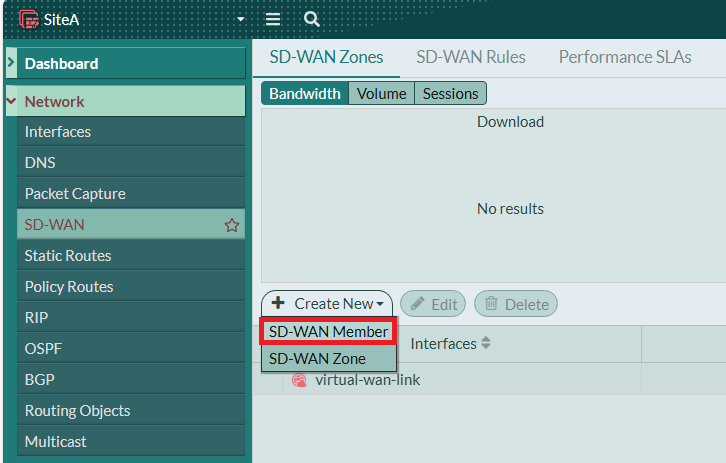
將 WAN1 加入 Default SD-WAN Zone 的 Member,並設定Gateway

#### 建立 **SiteA** IPSEC ADVPN HUB
至 VPN 建立 IPSEC Tunnel
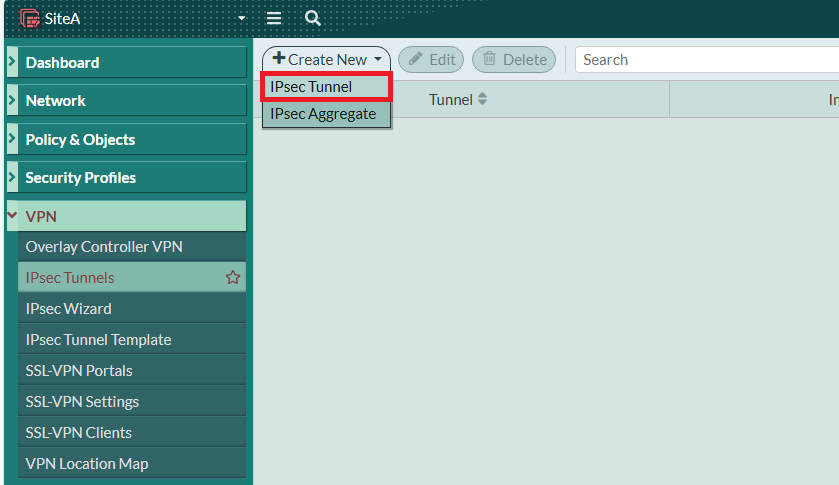
選擇 Hub-and-Spoke,角色選擇 Hub
[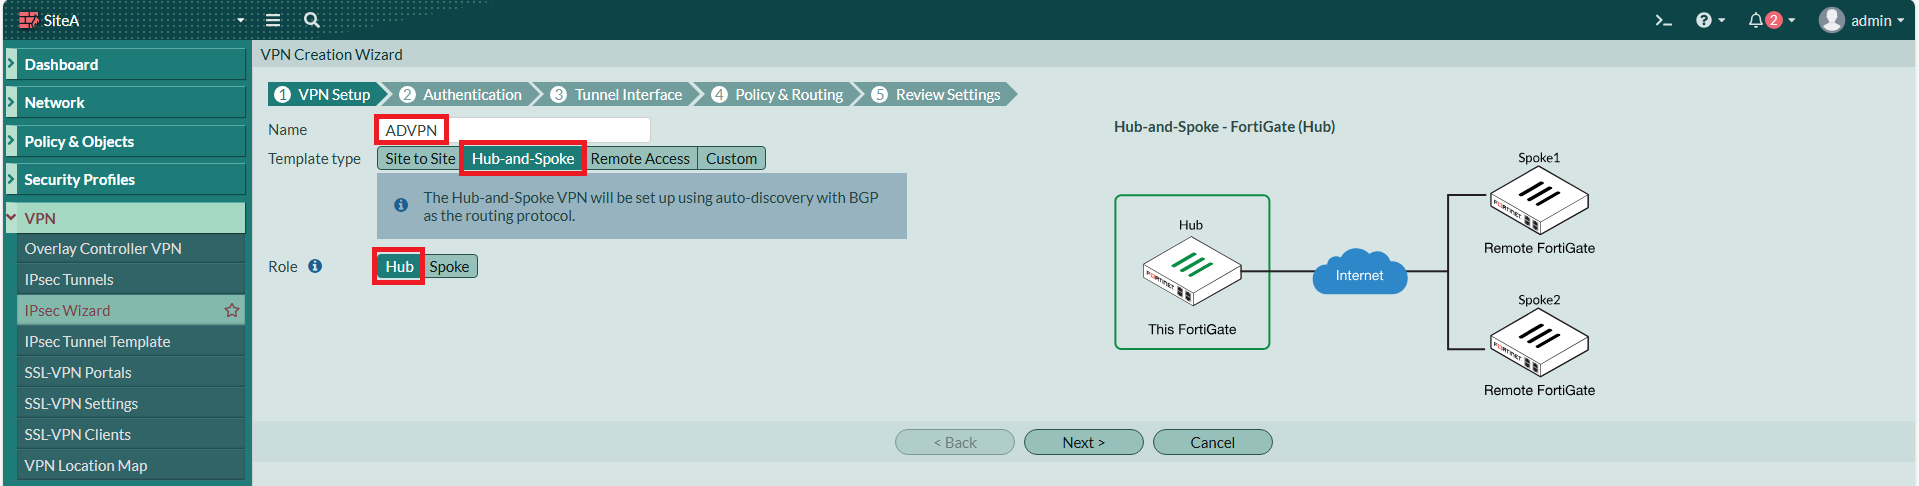](https://mdfk.goddamn.idv.tw/uploads/images/gallery/2024-08/XODFh8iIR5.png)
Interface選擇剛剛設定好的WAN1,指定一個Pre-shared Key
[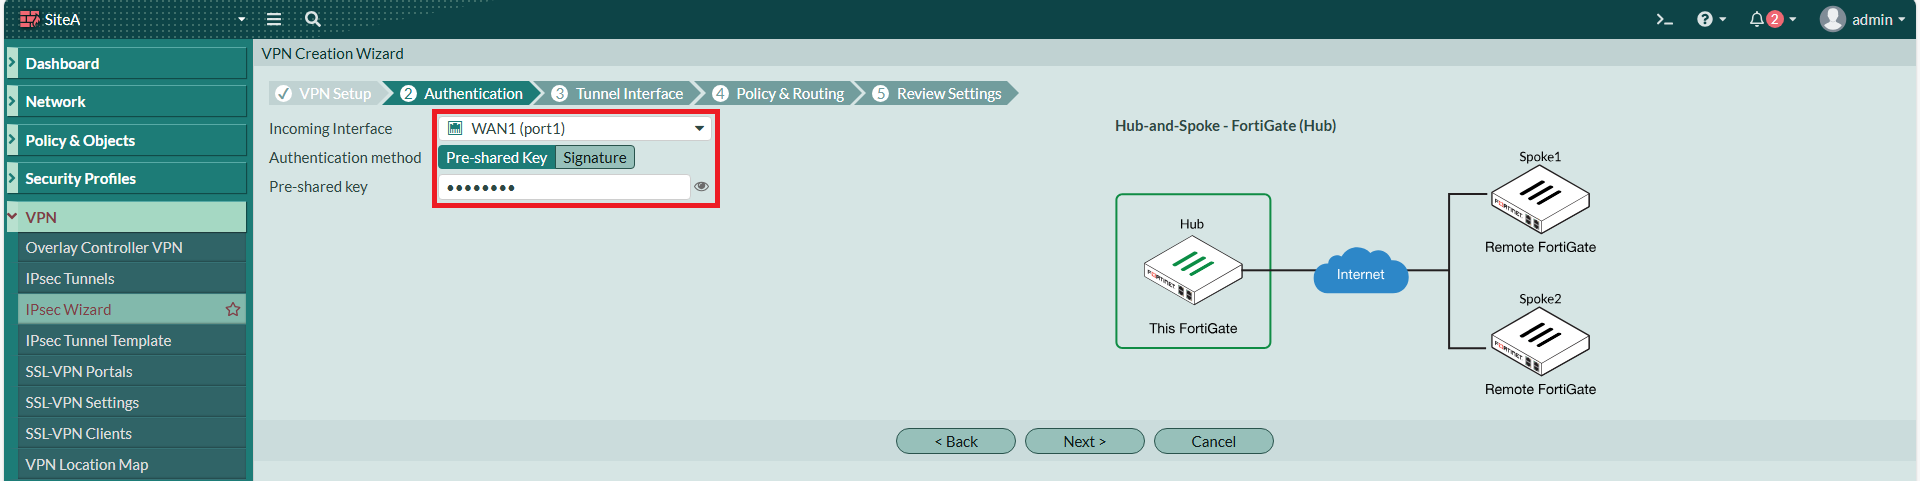](https://mdfk.goddamn.idv.tw/uploads/images/gallery/2024-08/8zF1N6iHBF.png)
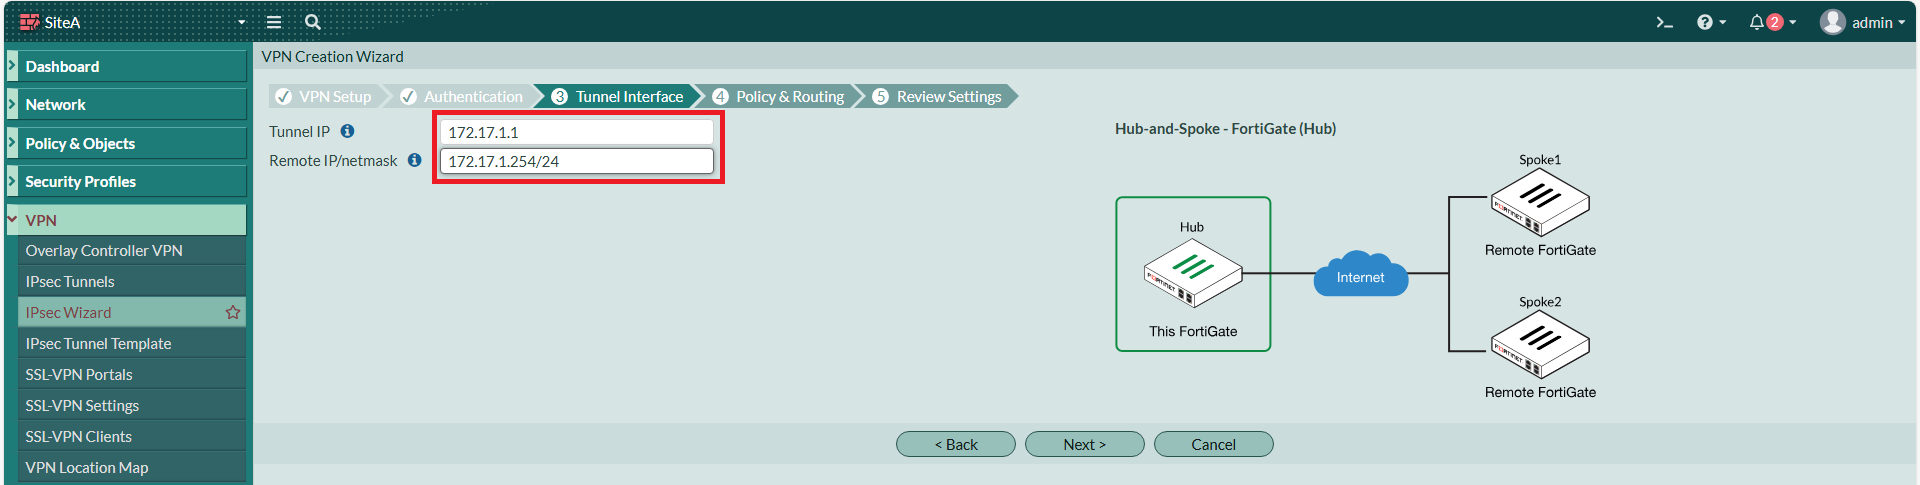
本地IP設為 172.17.1.1,Remote IP 隨便打,我選擇設為 172.17.1.254/24
[](https://mdfk.goddamn.idv.tw/uploads/images/gallery/2024-08/0TfqPFnyav.png)
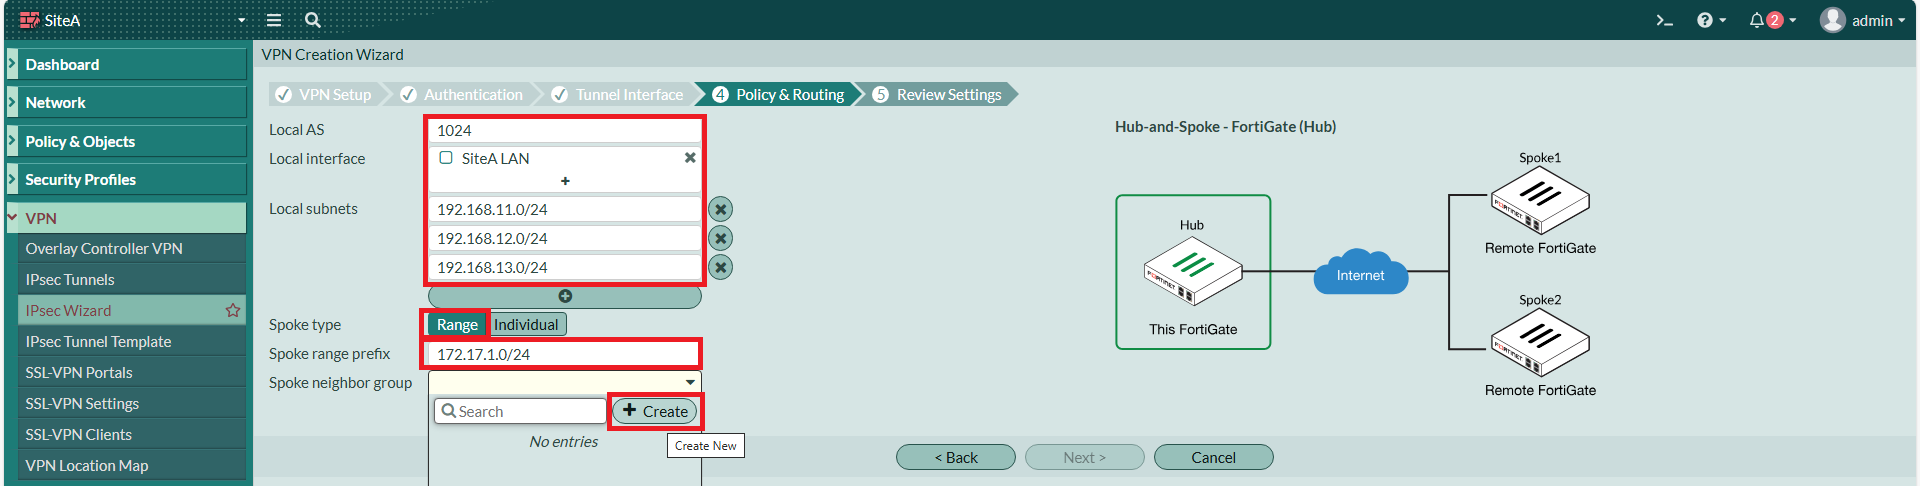
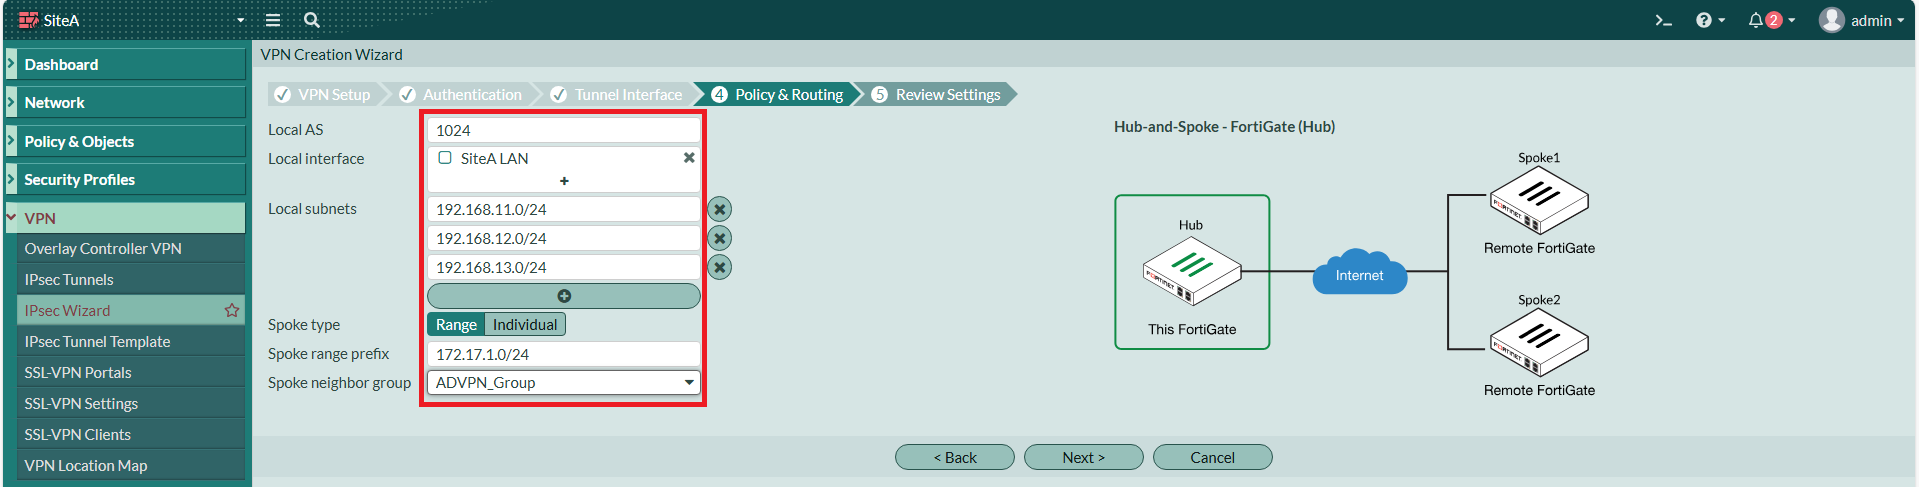
本地端AS我設為1024、本地端介面選擇上面建好的Zone、鍵入Local Subnets、Spoke Type 選擇 Range,指定Spoke 的 IP Range,並建立一個Spoke Neighbor Group。
[](https://mdfk.goddamn.idv.tw/uploads/images/gallery/2024-08/wPtMzTetq3.png)
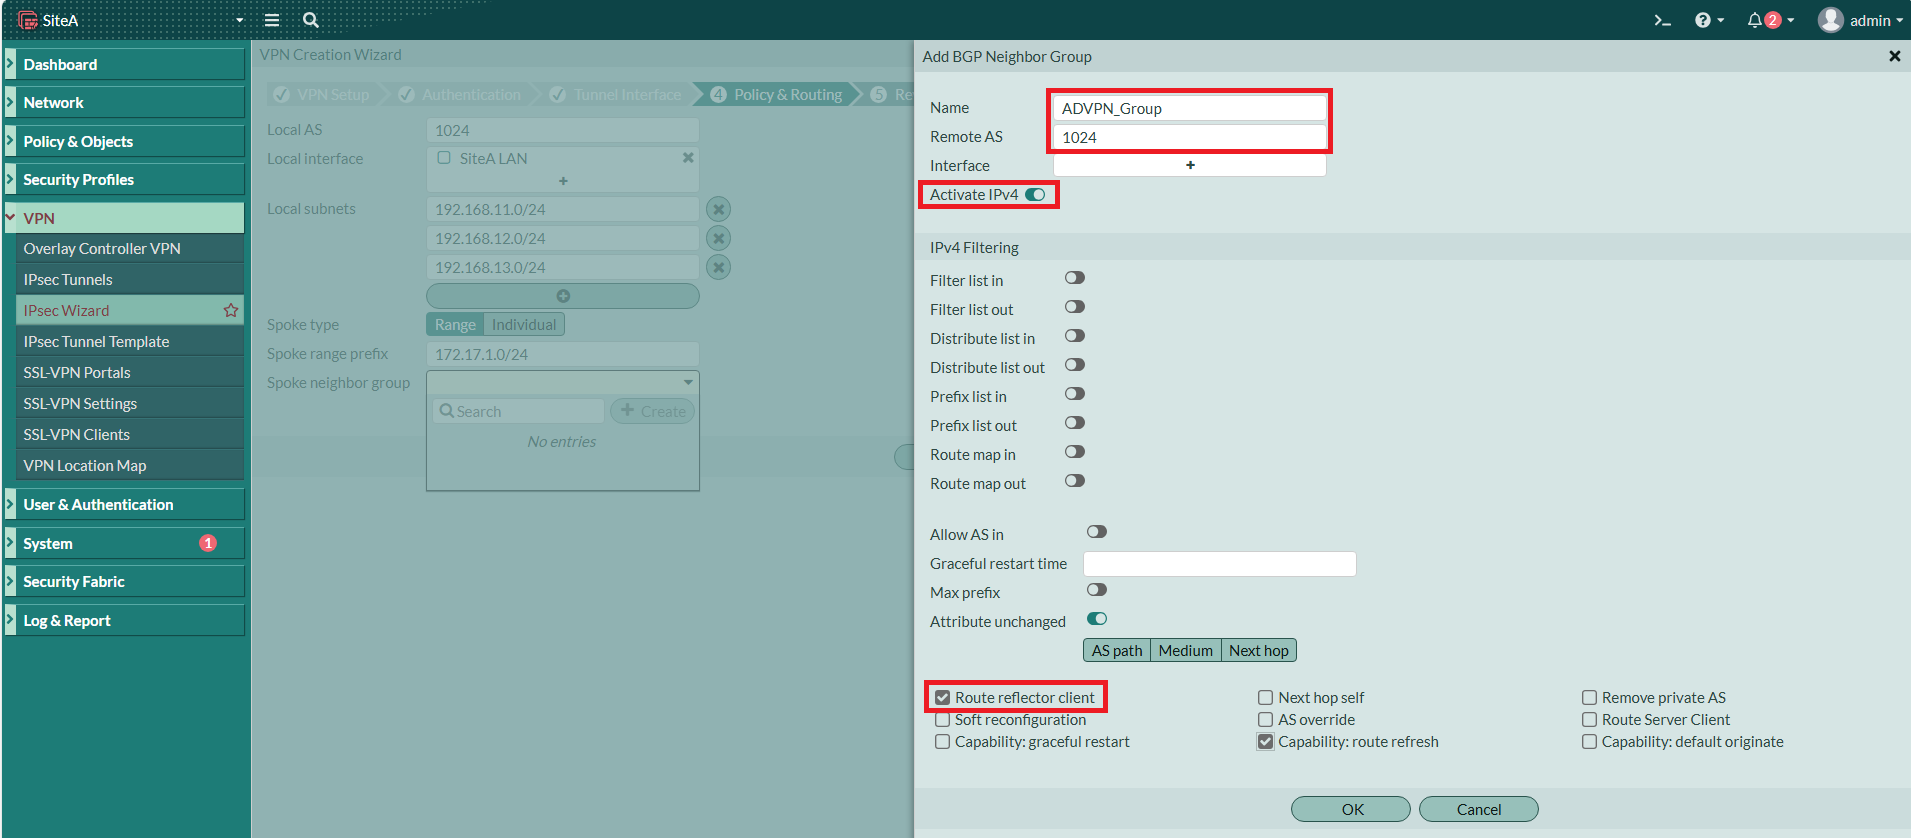
Neighbor Group Remote AS也設為1024、Activate IPv4,勾選 Route Reflector Client。
[](https://mdfk.goddamn.idv.tw/uploads/images/gallery/2024-08/7kPq98ygb1.png)
[](https://mdfk.goddamn.idv.tw/uploads/images/gallery/2024-08/AEv0gqPw0X.png)
Wizzard建立完成
[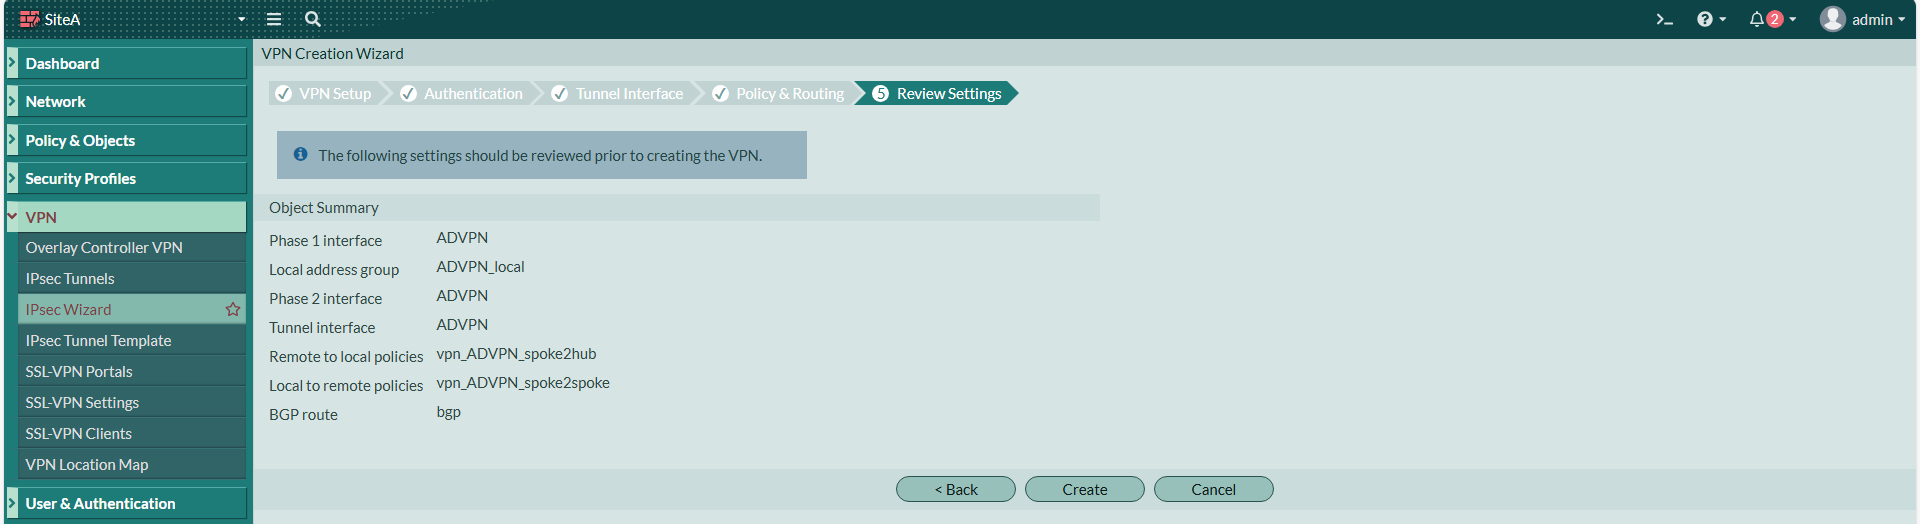](https://mdfk.goddamn.idv.tw/uploads/images/gallery/2024-08/pE7u2eH8IV.png)
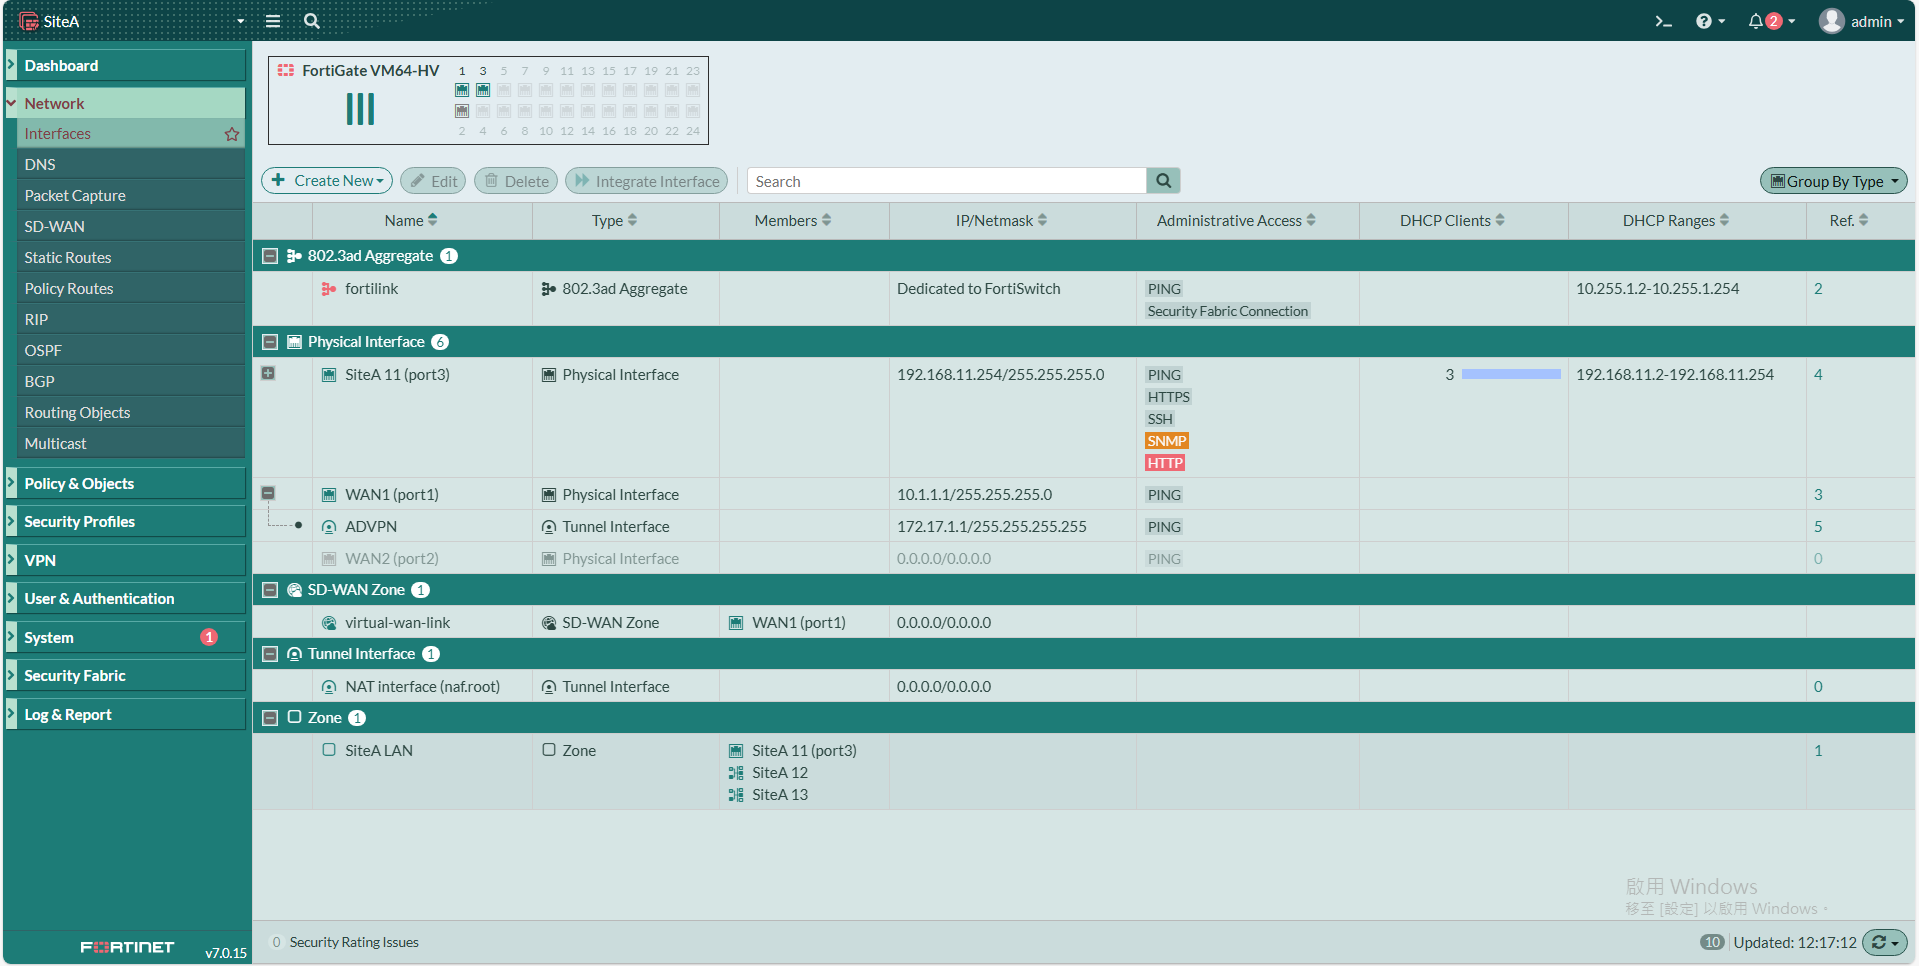
[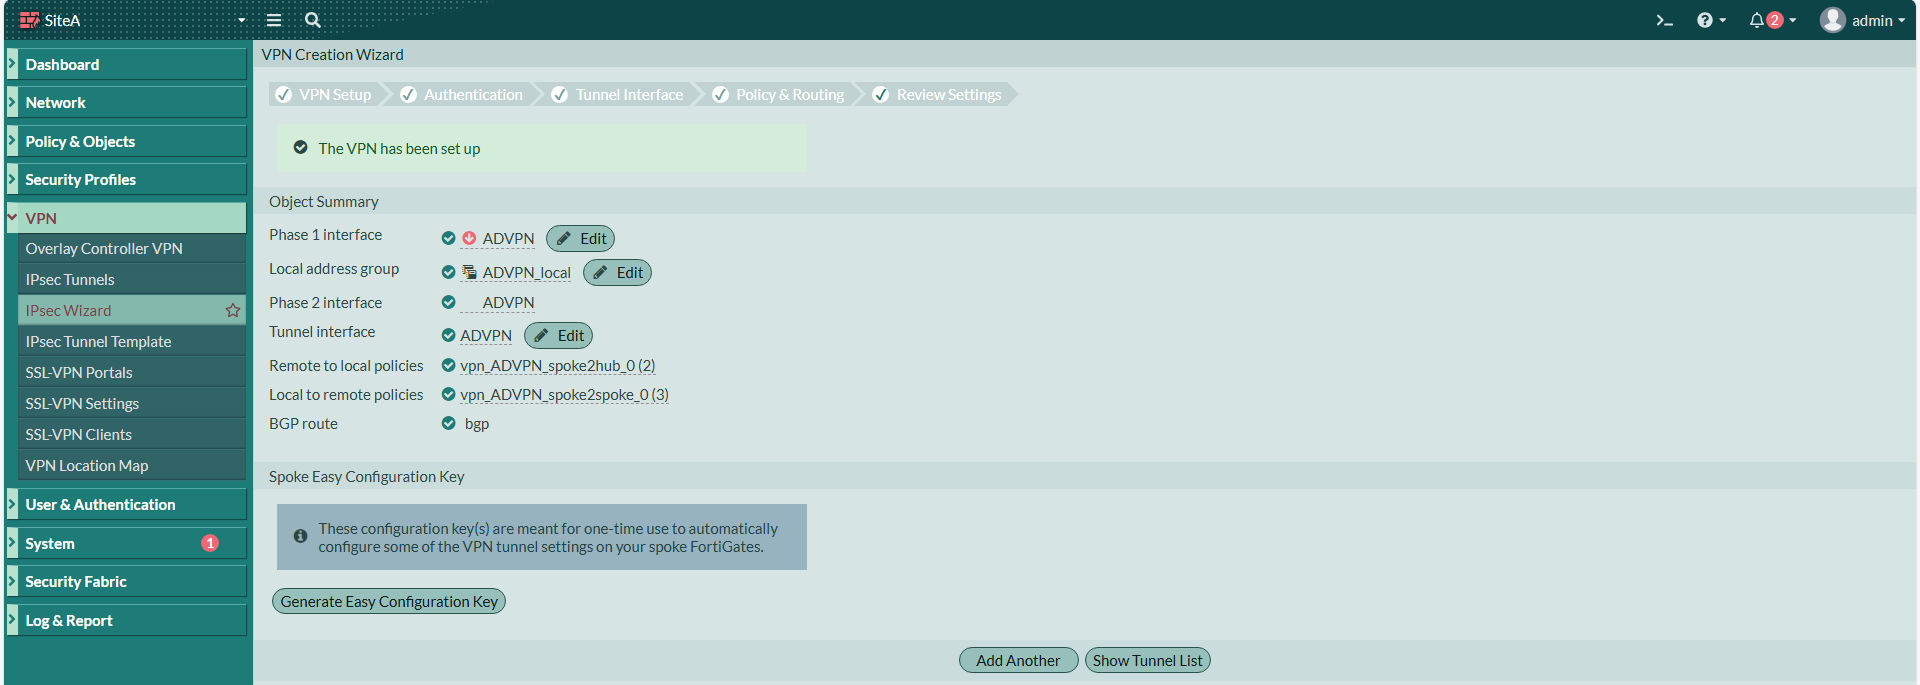](https://mdfk.goddamn.idv.tw/uploads/images/gallery/2024-08/Xt0TZl3DBQ.png)
回到Interface,將**ADVPN** Interface 的 Ping 打開
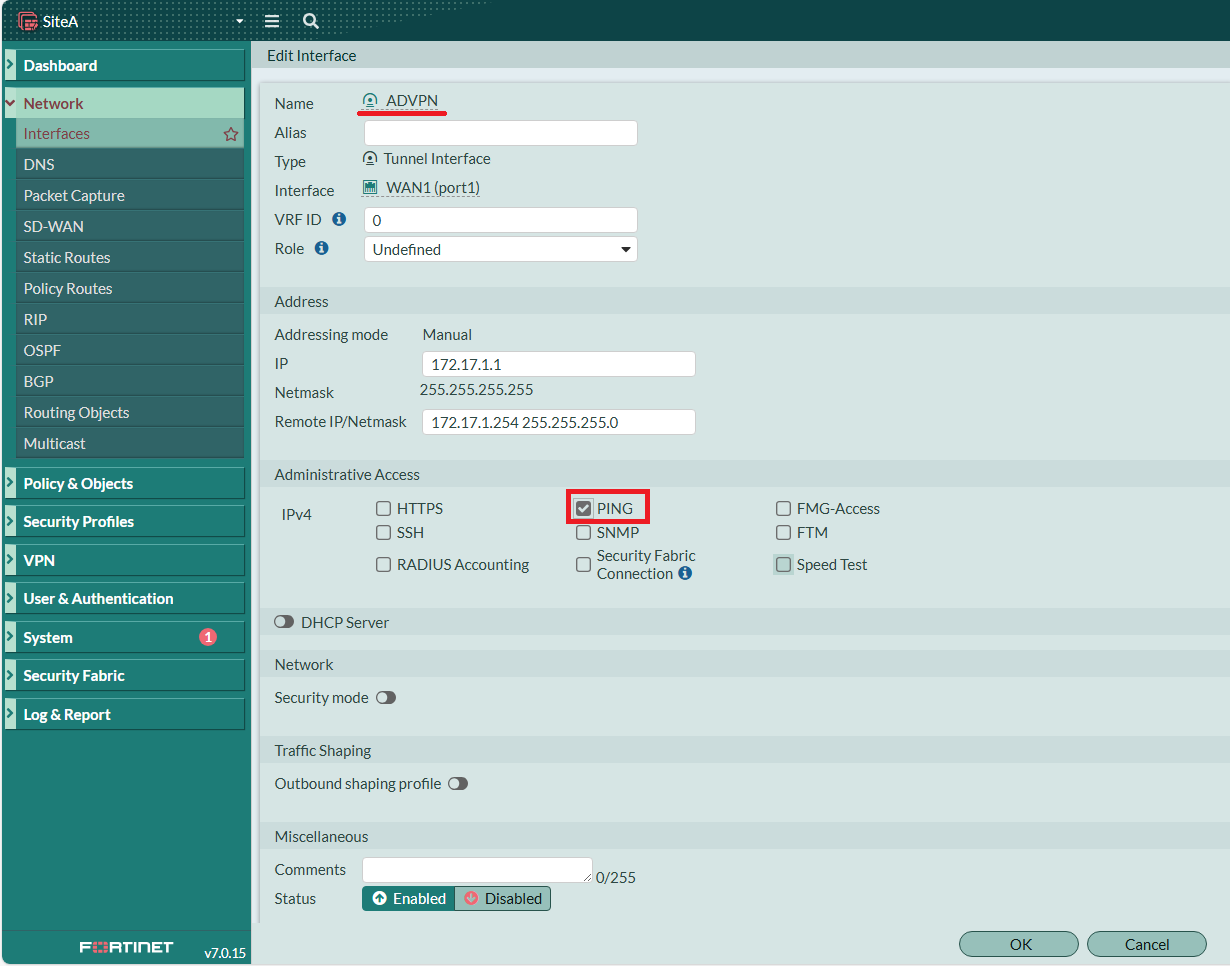
[](https://mdfk.goddamn.idv.tw/uploads/images/gallery/2024-08/WiqhEEGoFB.png)
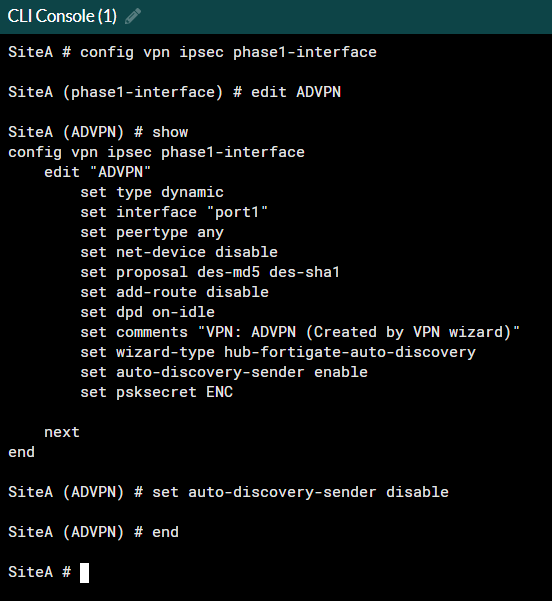
由於在這個情境下,ADVPN Full Mesh 是無法使用的,所以我們輸入下面指令來關閉自動建立 Spoke 之間IPSEC的功能。
```
config vpn ipsec phase1-interface
edit ADVPN
set auto-discovery-sender disable
end
```
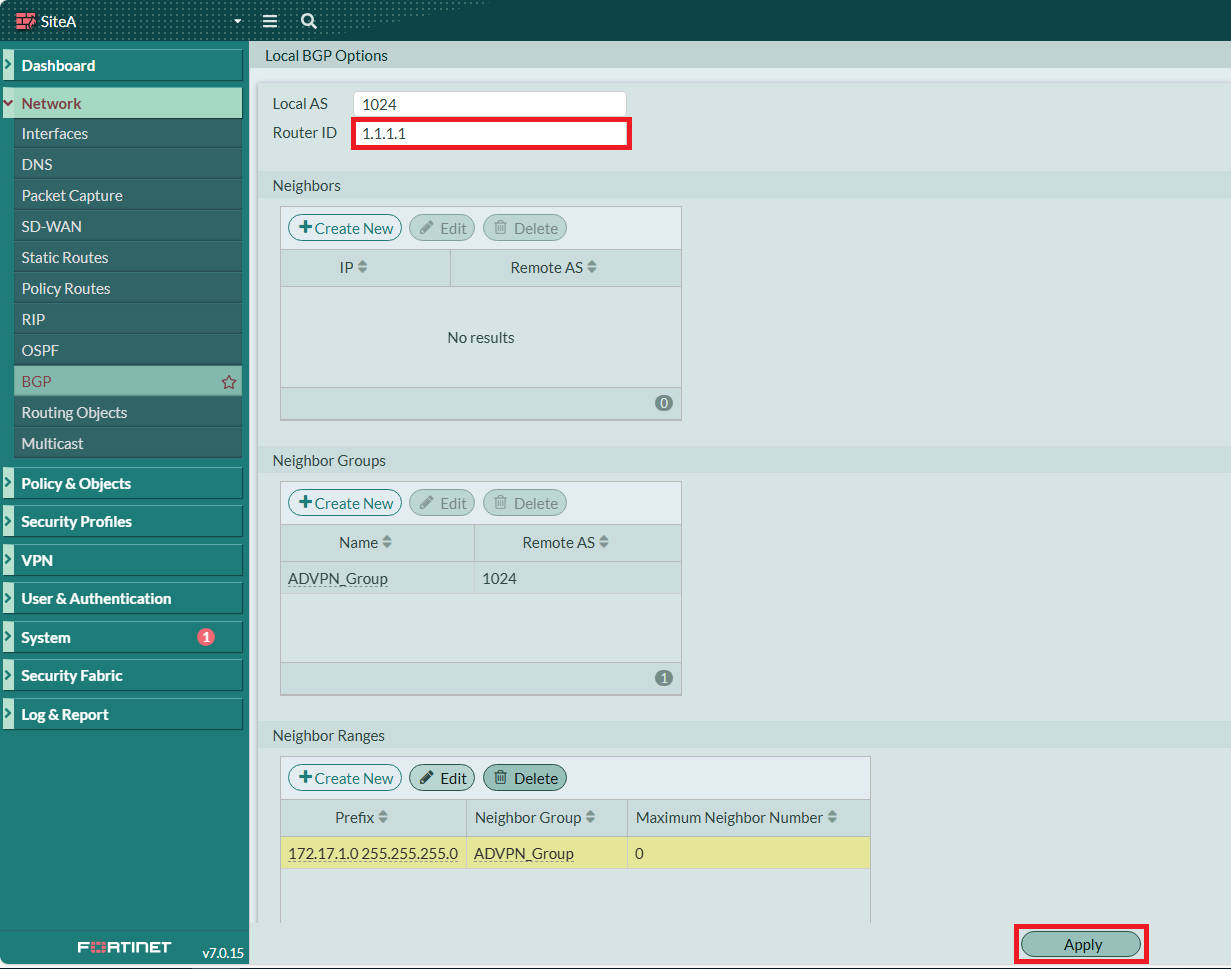
#### 設定BGP
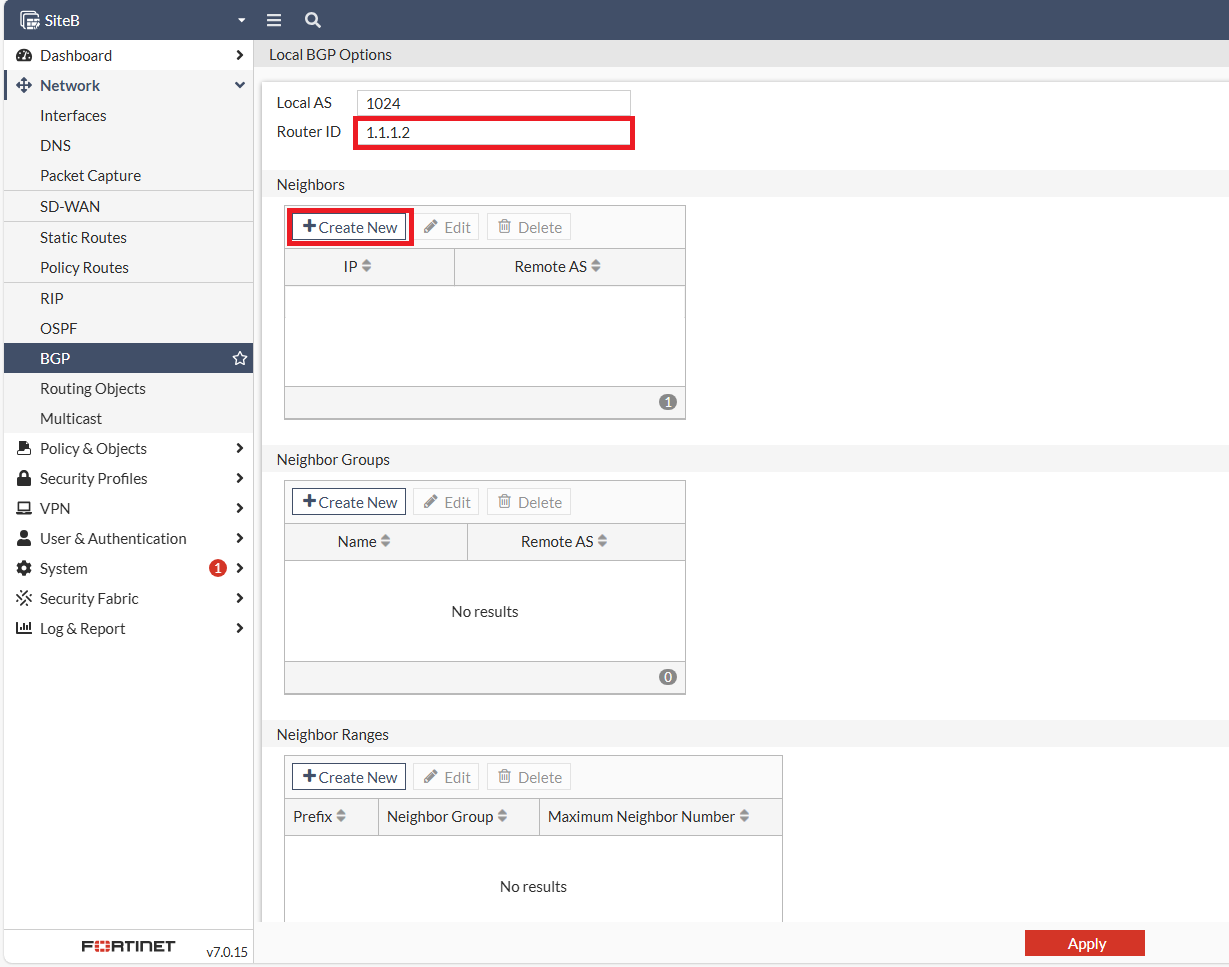
設定SiteA的Router ID,記得**要Apply !!** (鍵人我不知道忘了多少次 ...... Again ...... )
#### 設定Firewall Policy
Wizzard會幫我們建立兩條Policy,但我們還需要更多
[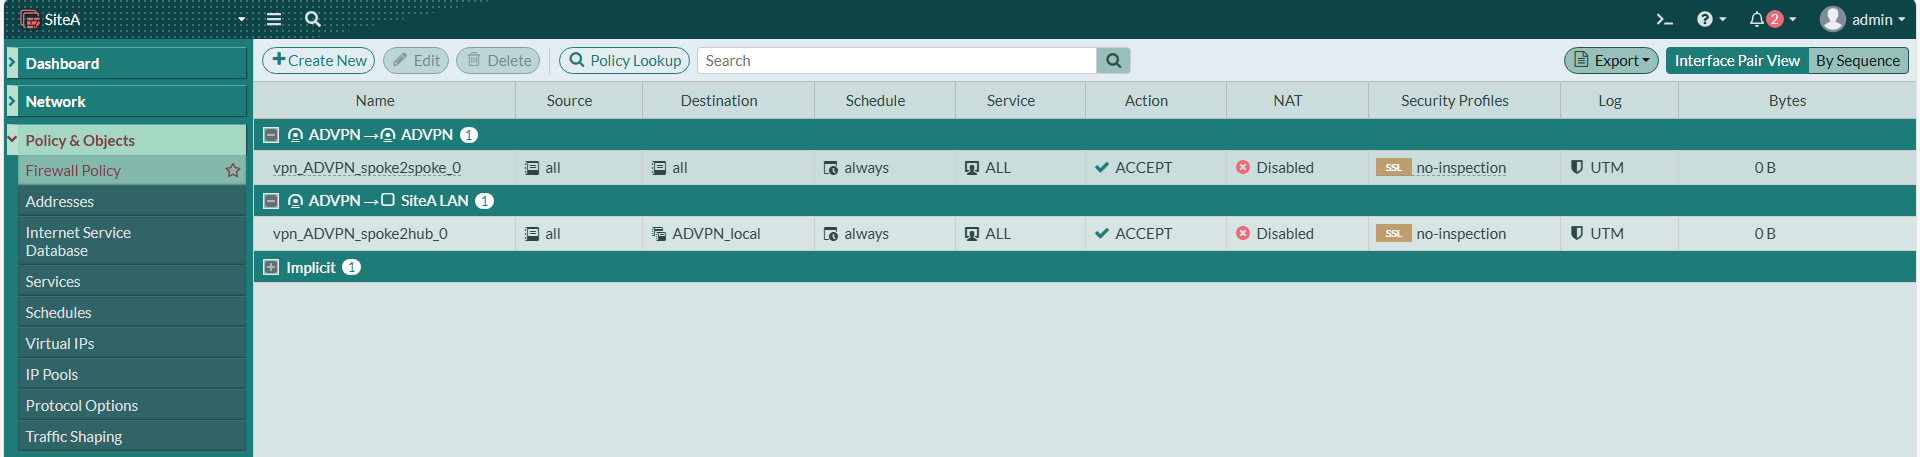](https://mdfk.goddamn.idv.tw/uploads/images/gallery/2024-08/He6GzbrAw2.png)
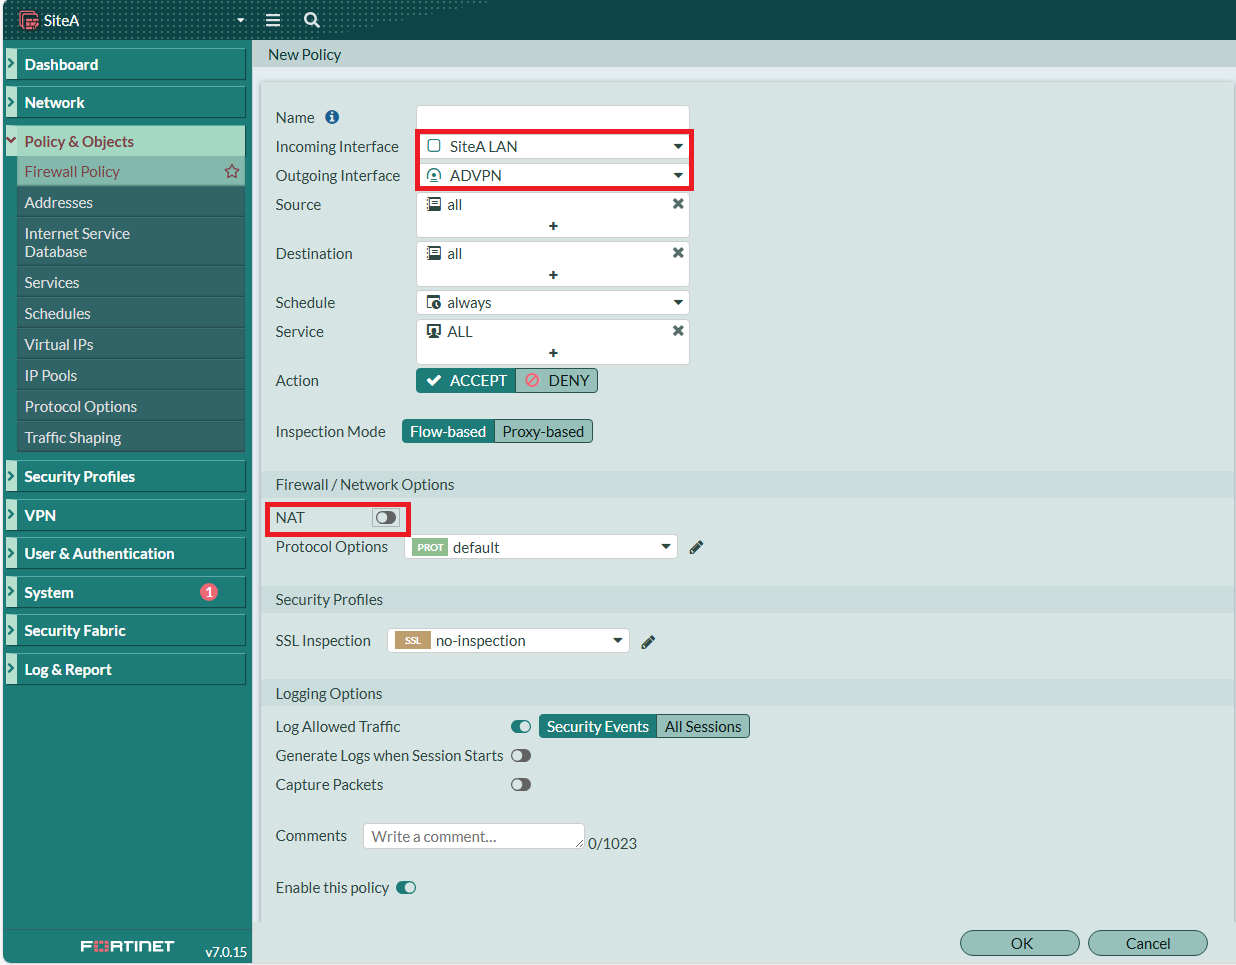
建立 SiteA LAN => ADVPN,不做NAT
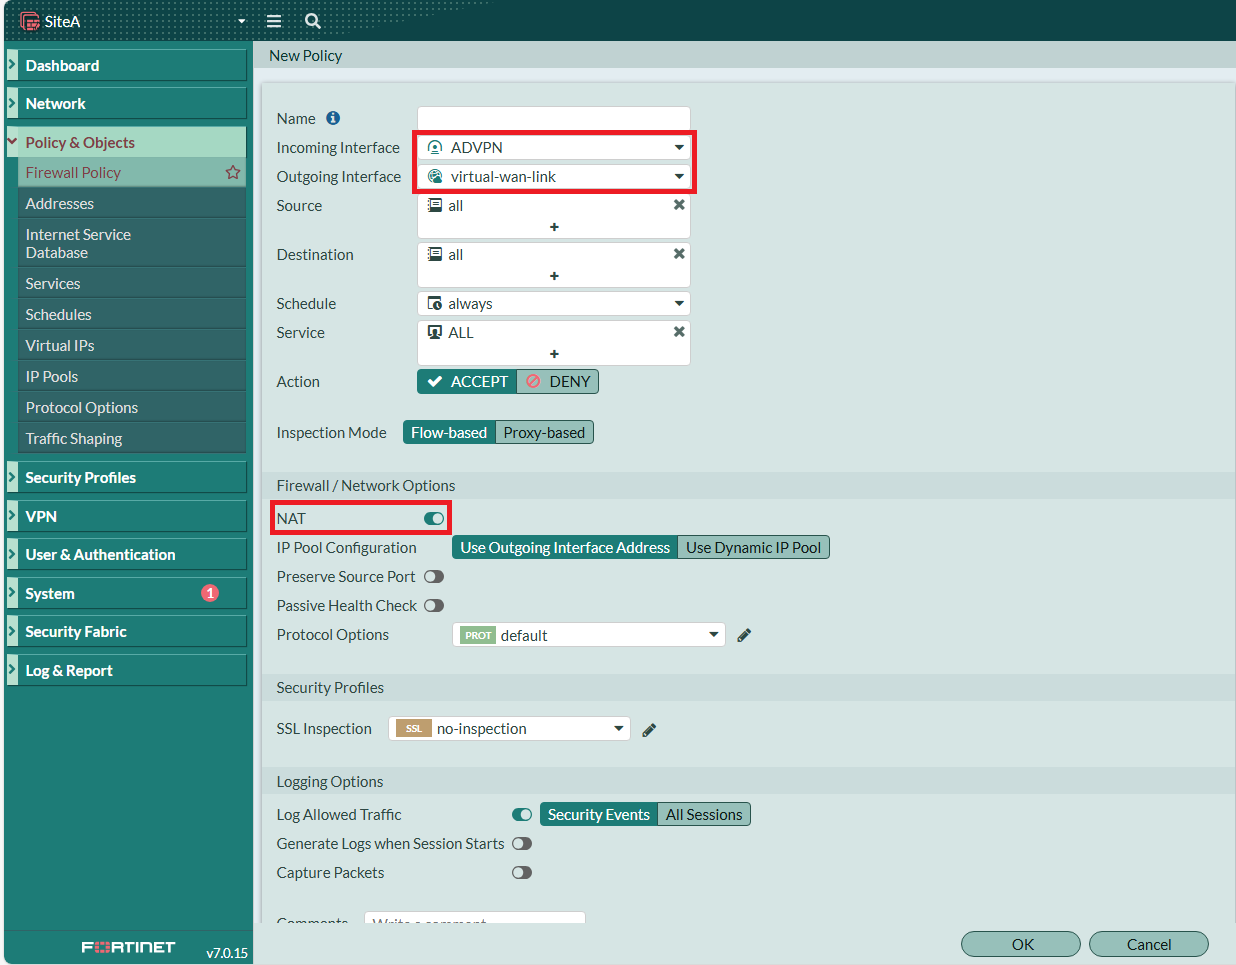
建立 ADVPN => SD-WAN 上網用,要做NAT
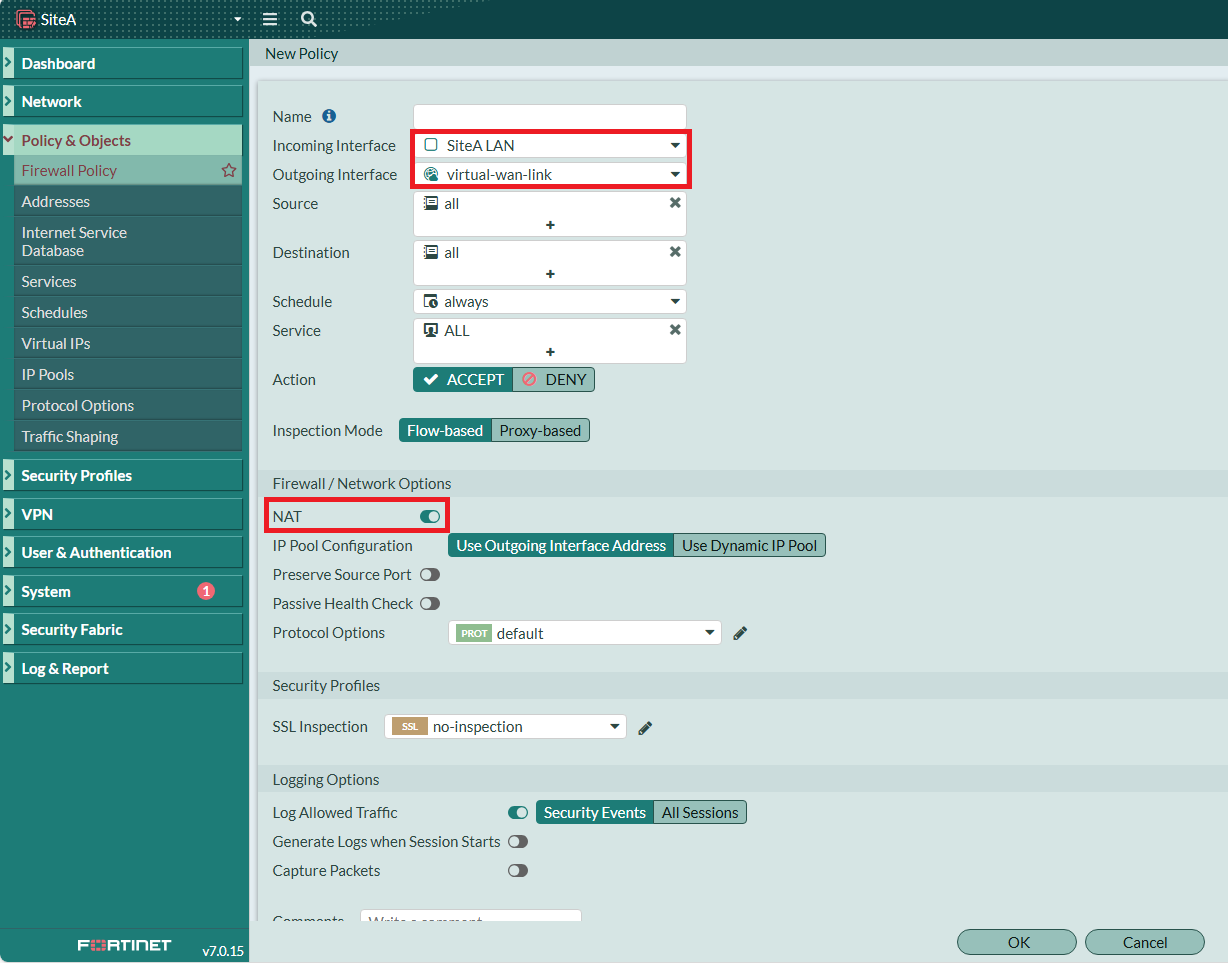
建立 SiteA LAN => SD-WAN 上網用,要做NAT
**SiteA** 設定至此大功告成
[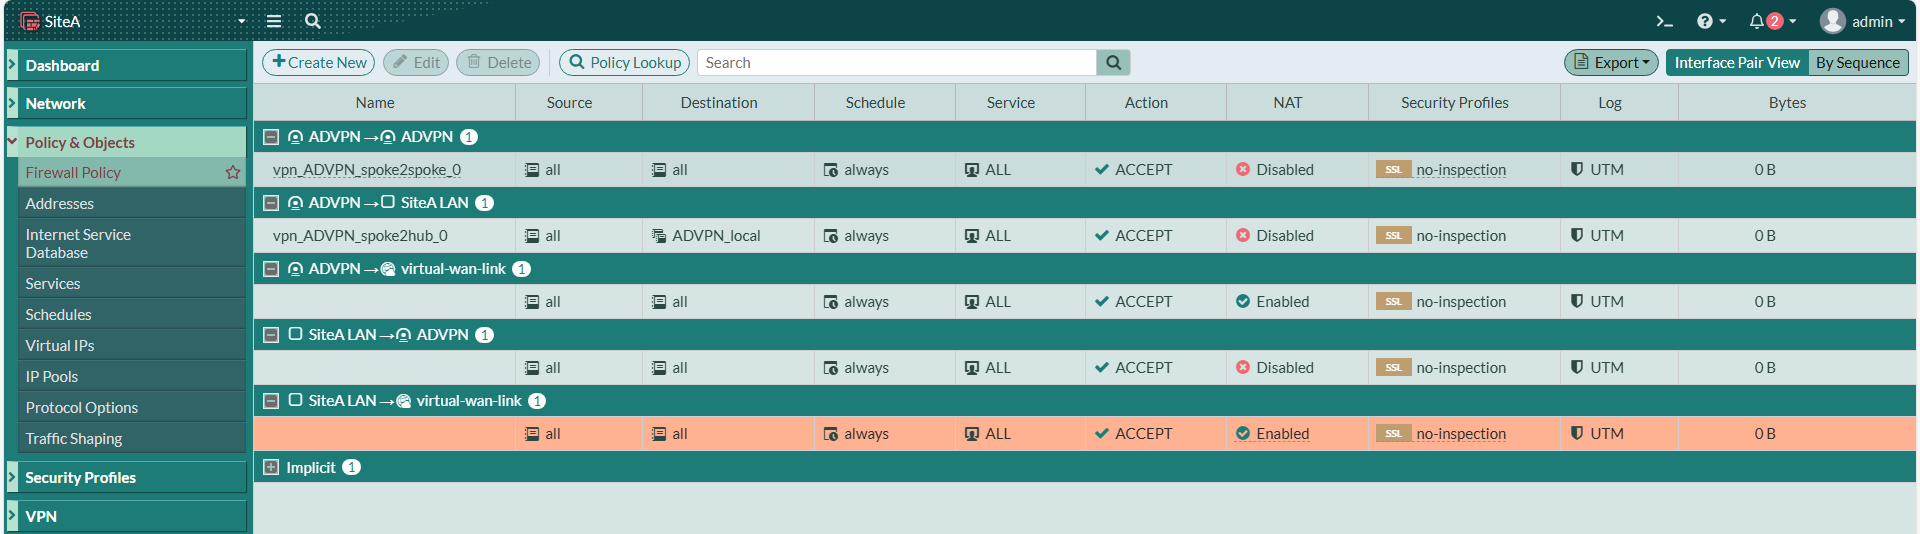](https://mdfk.goddamn.idv.tw/uploads/images/gallery/2024-08/z0wH5QQVZY.png)
### Spoke設定過程
#### **SiteB**設定Interface
一樣,先設定好**SiteB**的Interface
[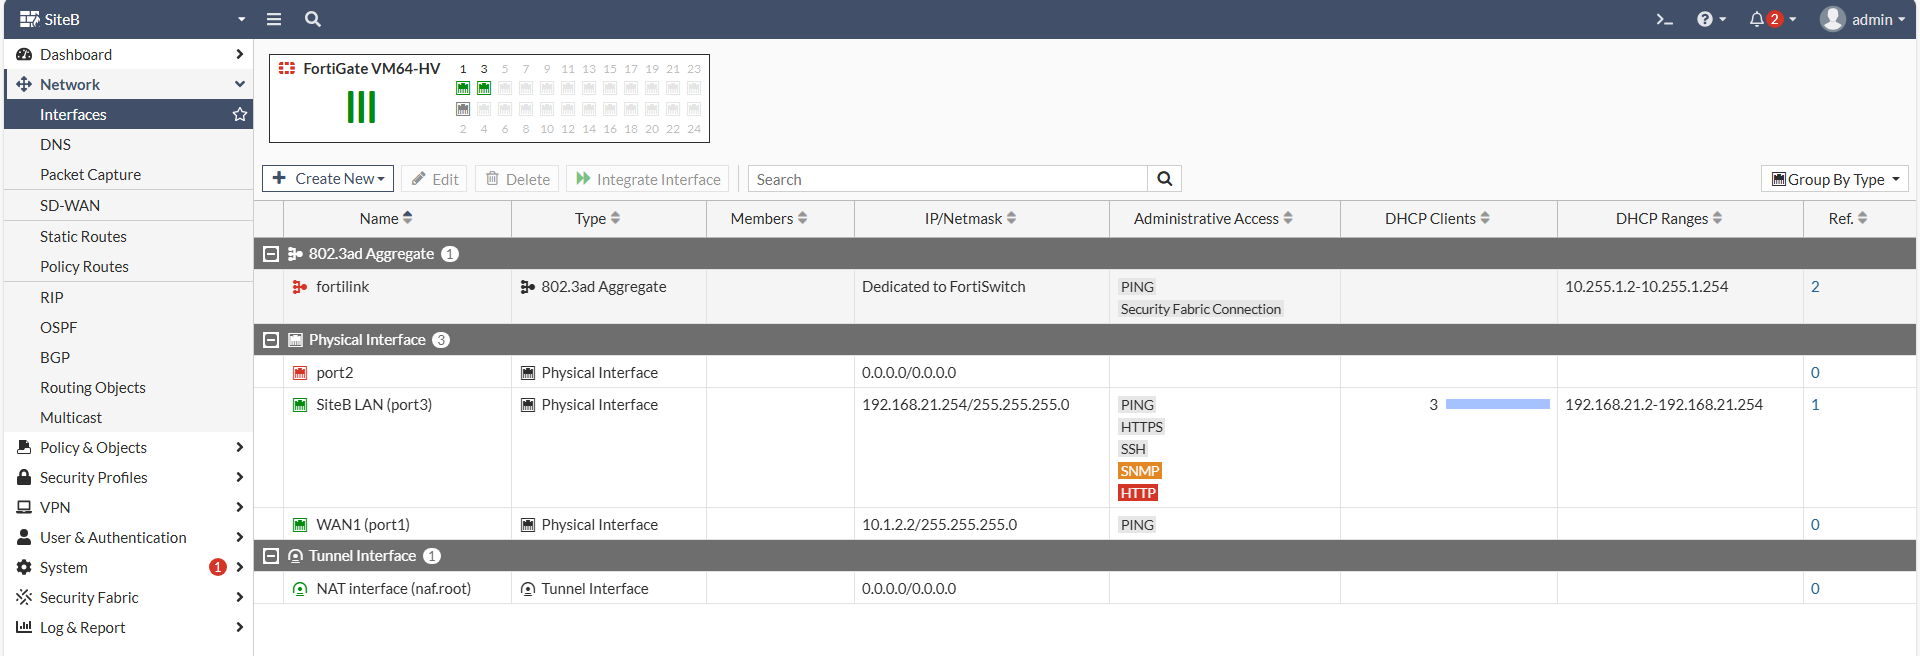](https://mdfk.goddamn.idv.tw/uploads/images/gallery/2024-08/qFIJcQzcN7.png)
WAN的部分,我用DHCP來模擬PPPOE,可以看到自動取得了IP & Gateway
[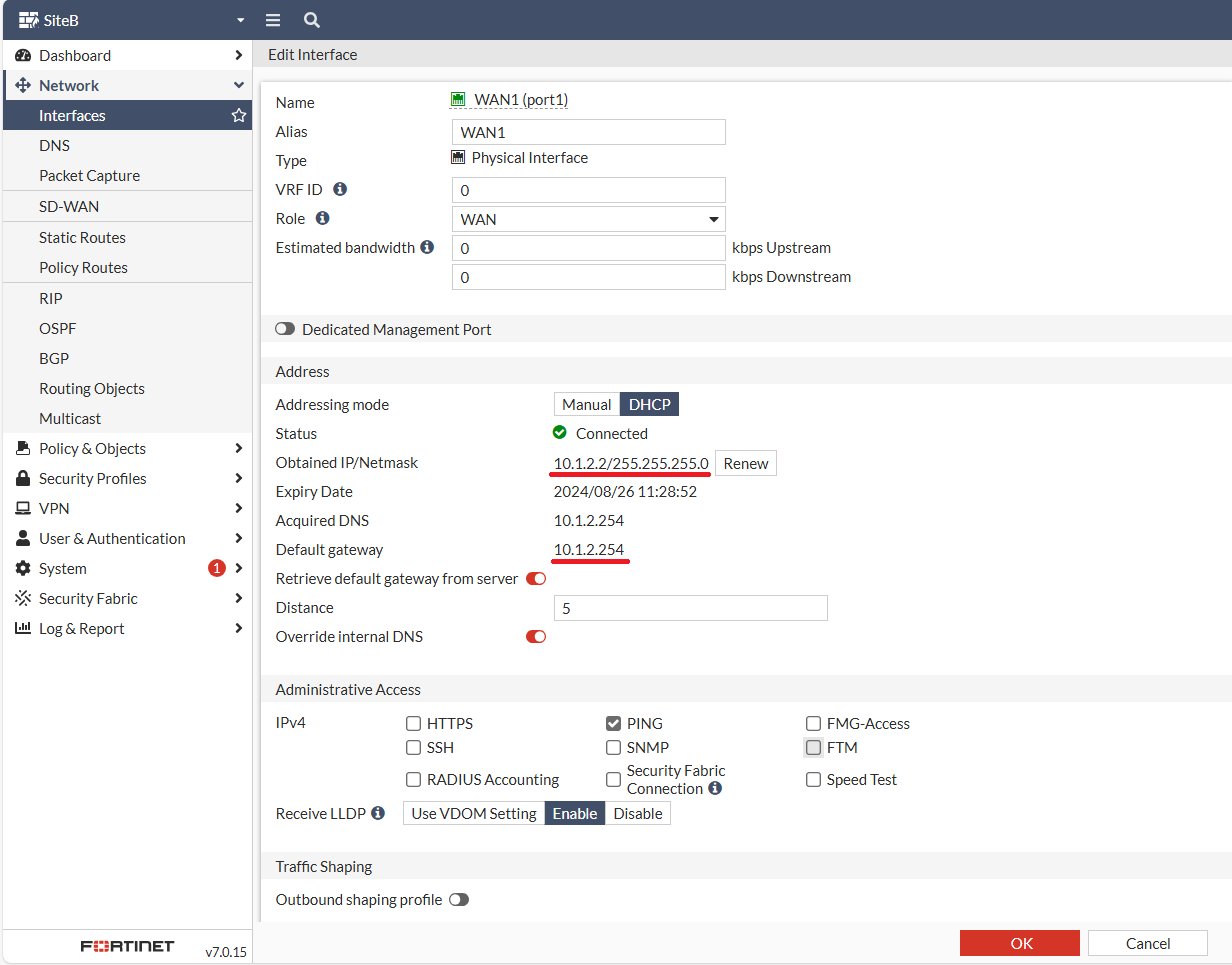](https://mdfk.goddamn.idv.tw/uploads/images/gallery/2024-08/fnMRgPJyHt.png)
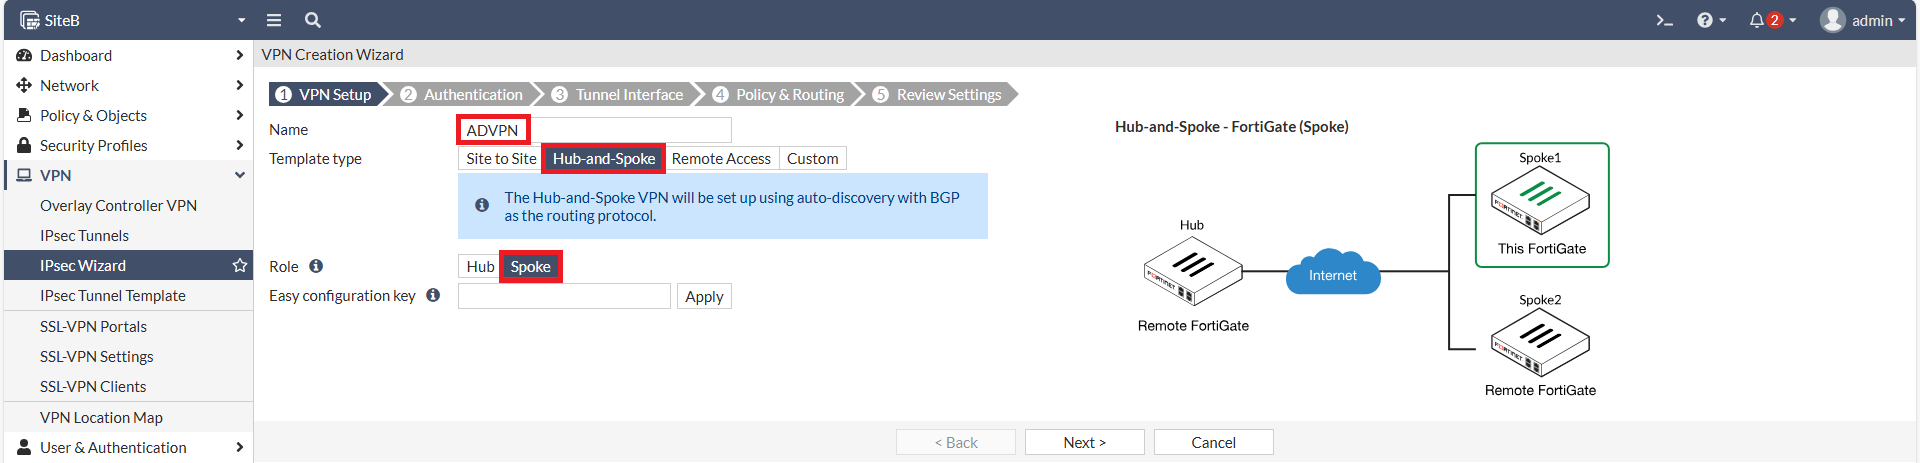
#### 建立 **SiteB** IPSEC ADVPN Spoke
至 VPN 建立 IPSEC Tunnel
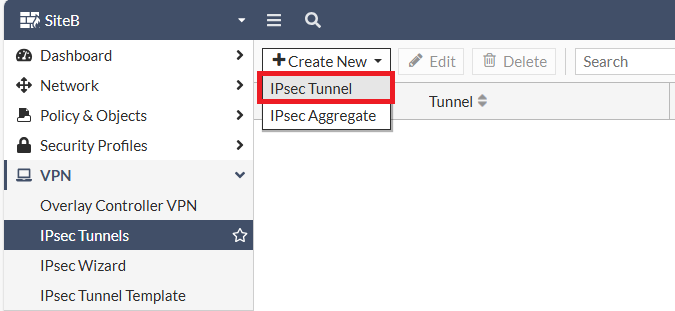
這一次我們選擇建立Spoke
[](https://mdfk.goddamn.idv.tw/uploads/images/gallery/2024-08/53aDM05u1C.png)
鍵入SiteA的WAN IP、Pre-shared Key
[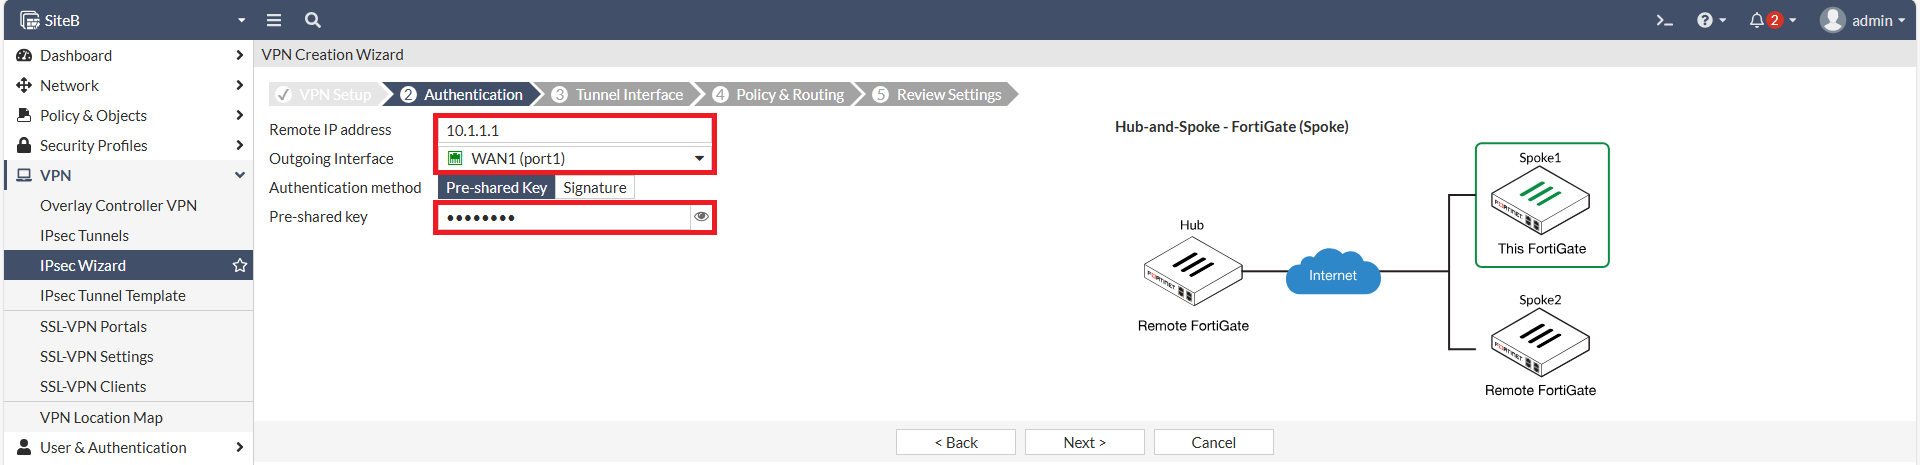](https://mdfk.goddamn.idv.tw/uploads/images/gallery/2024-08/Biuf8l2QRr.png)
設定Local IPSEC IP、Remote IP設為**SiteA**的 IPSEC IP 172.17.1.1/24
[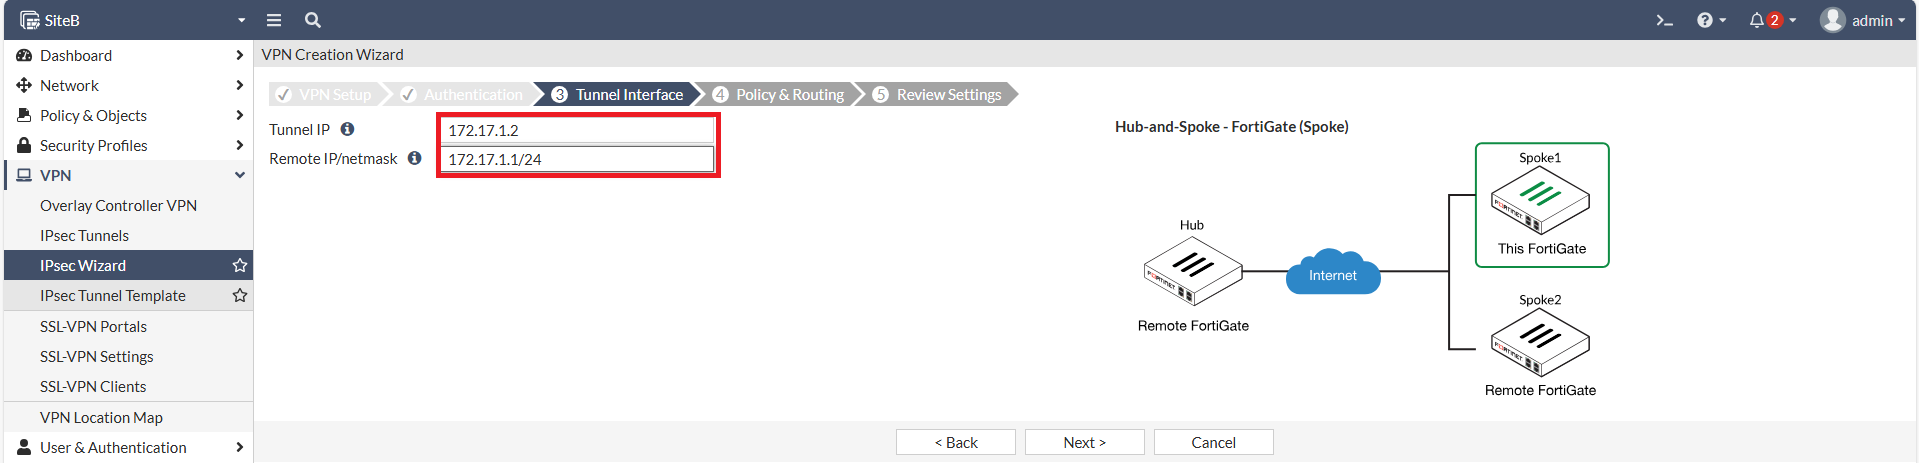](https://mdfk.goddamn.idv.tw/uploads/images/gallery/2024-08/H3mKEBol2B.png)
設定Local AS、Local Interface、Local Subnets。
[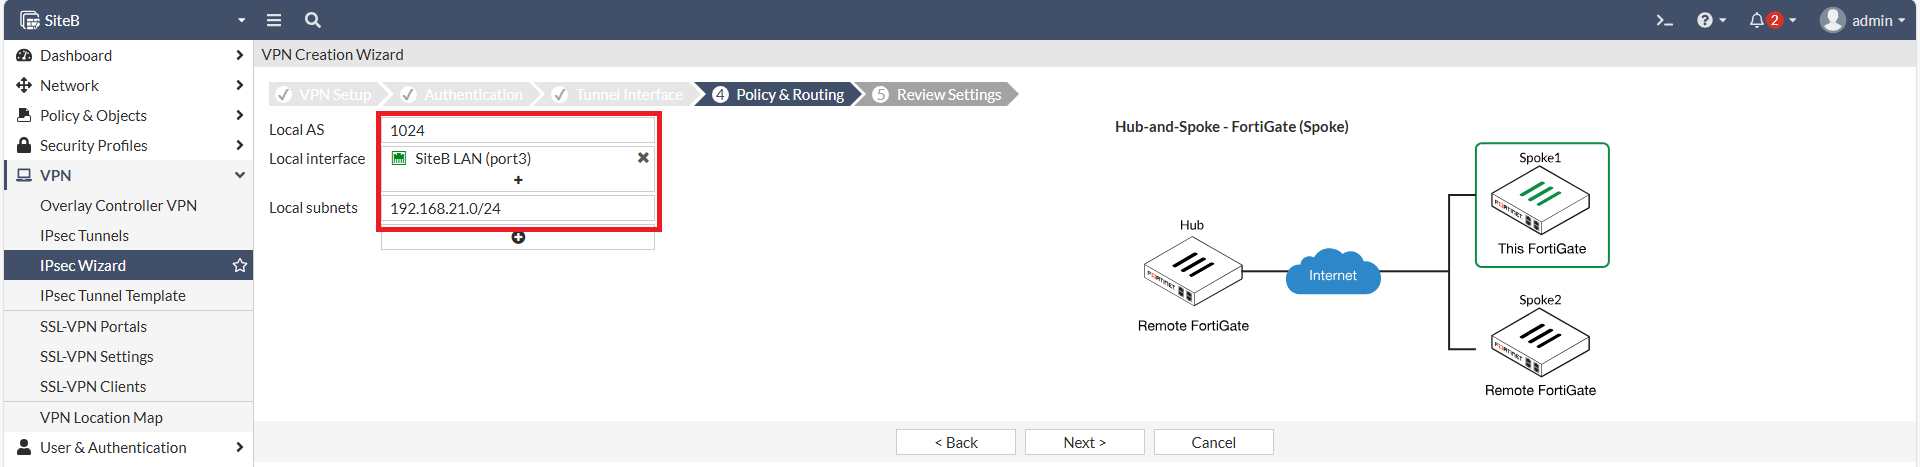](https://mdfk.goddamn.idv.tw/uploads/images/gallery/2024-08/2DIDRXGYxx.png)
Wizzard建立完成
[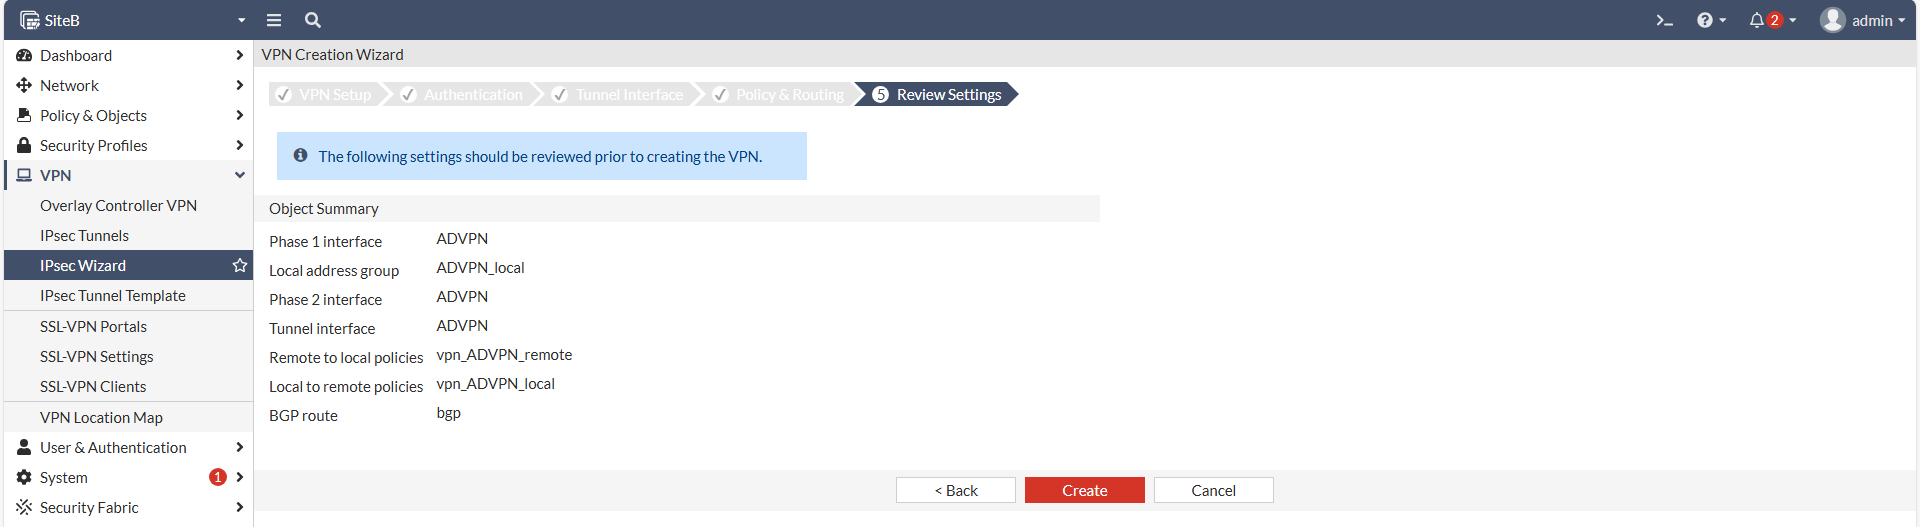](https://mdfk.goddamn.idv.tw/uploads/images/gallery/2024-08/FZlnT6PMcI.png)
[](https://mdfk.goddamn.idv.tw/uploads/images/gallery/2024-08/EZnpaJSjaq.png)
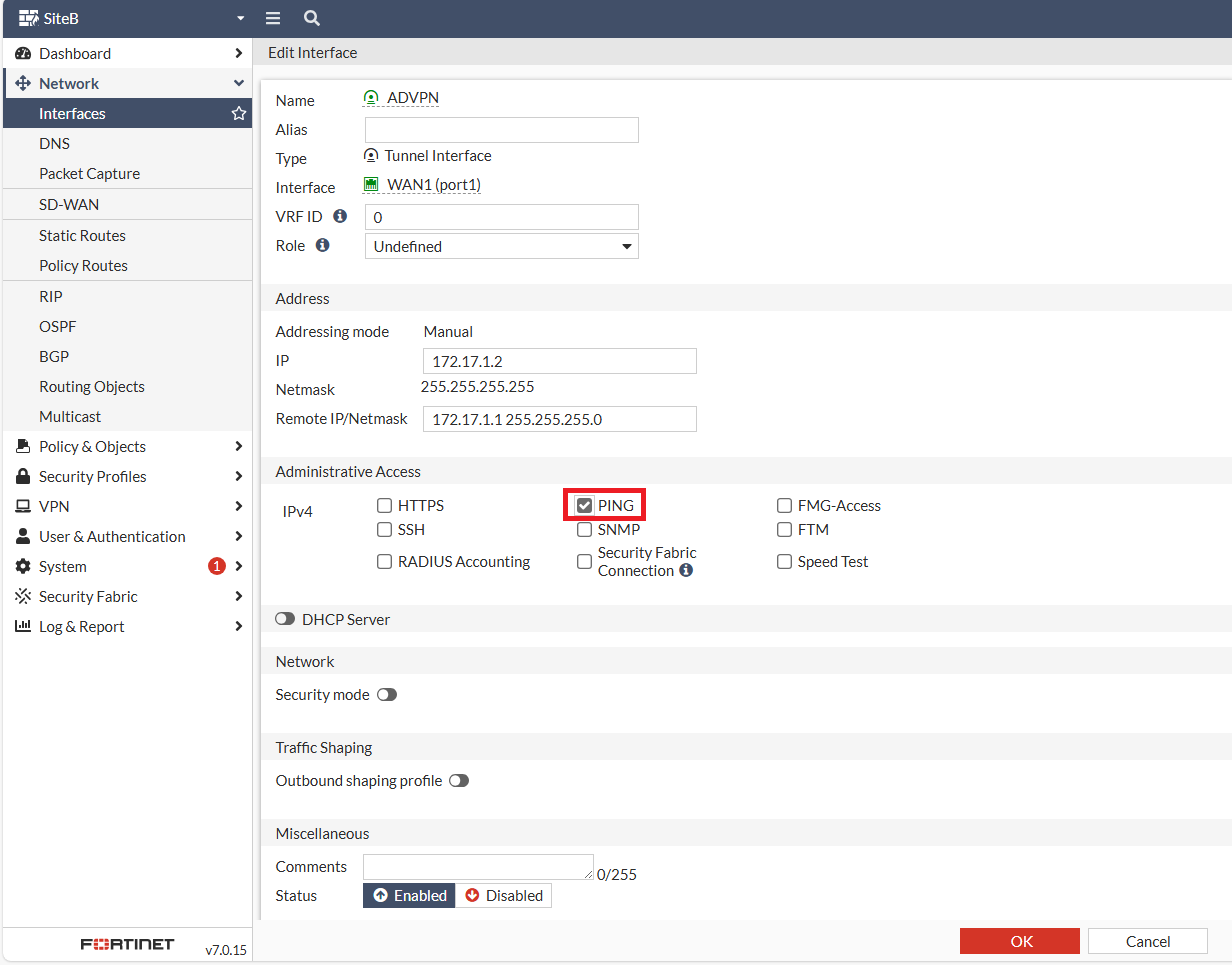
回到Interface,一樣將**ADVPN** Interface 的 Ping 打開,我就不贅述了。
#### 設定BGP
設定**SiteB**的Router ID、Neighbors設定 **SiteA** 的IPSEC IP
Update Source 選擇 ADVPN
[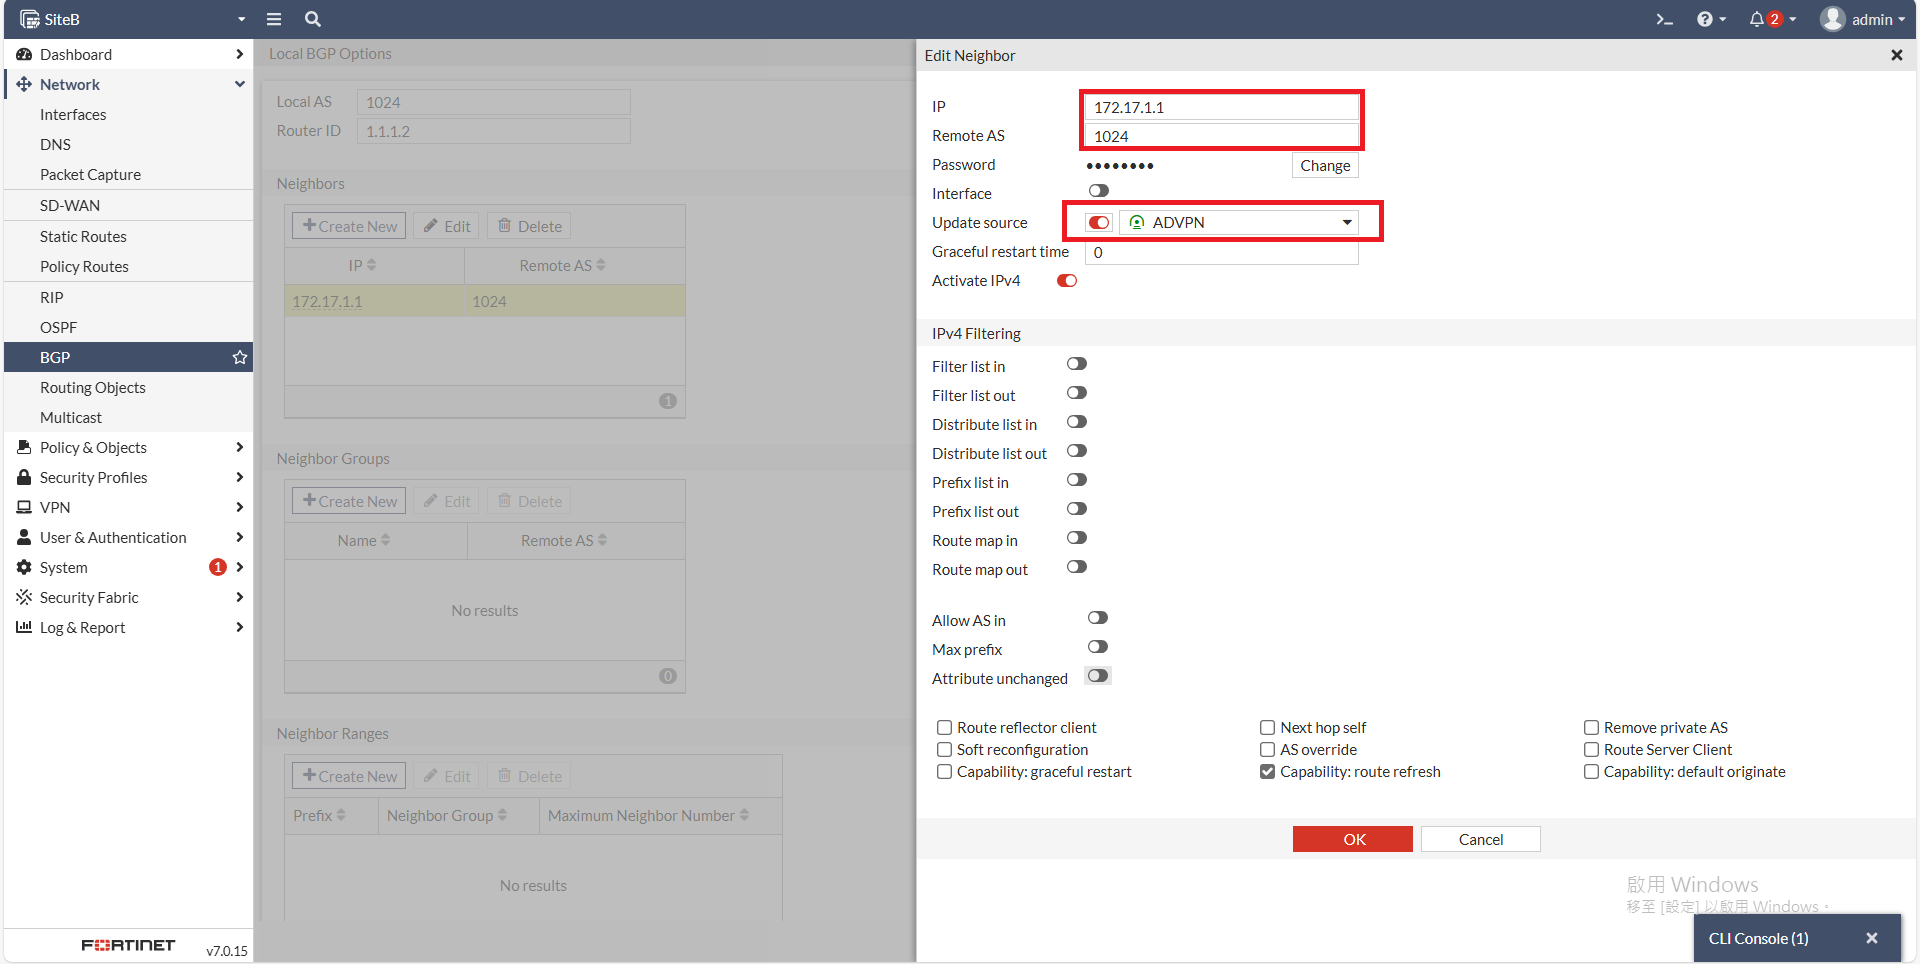](https://mdfk.goddamn.idv.tw/uploads/images/gallery/2024-08/o9mSHVIlKO.png)
記得**要Apply !!**
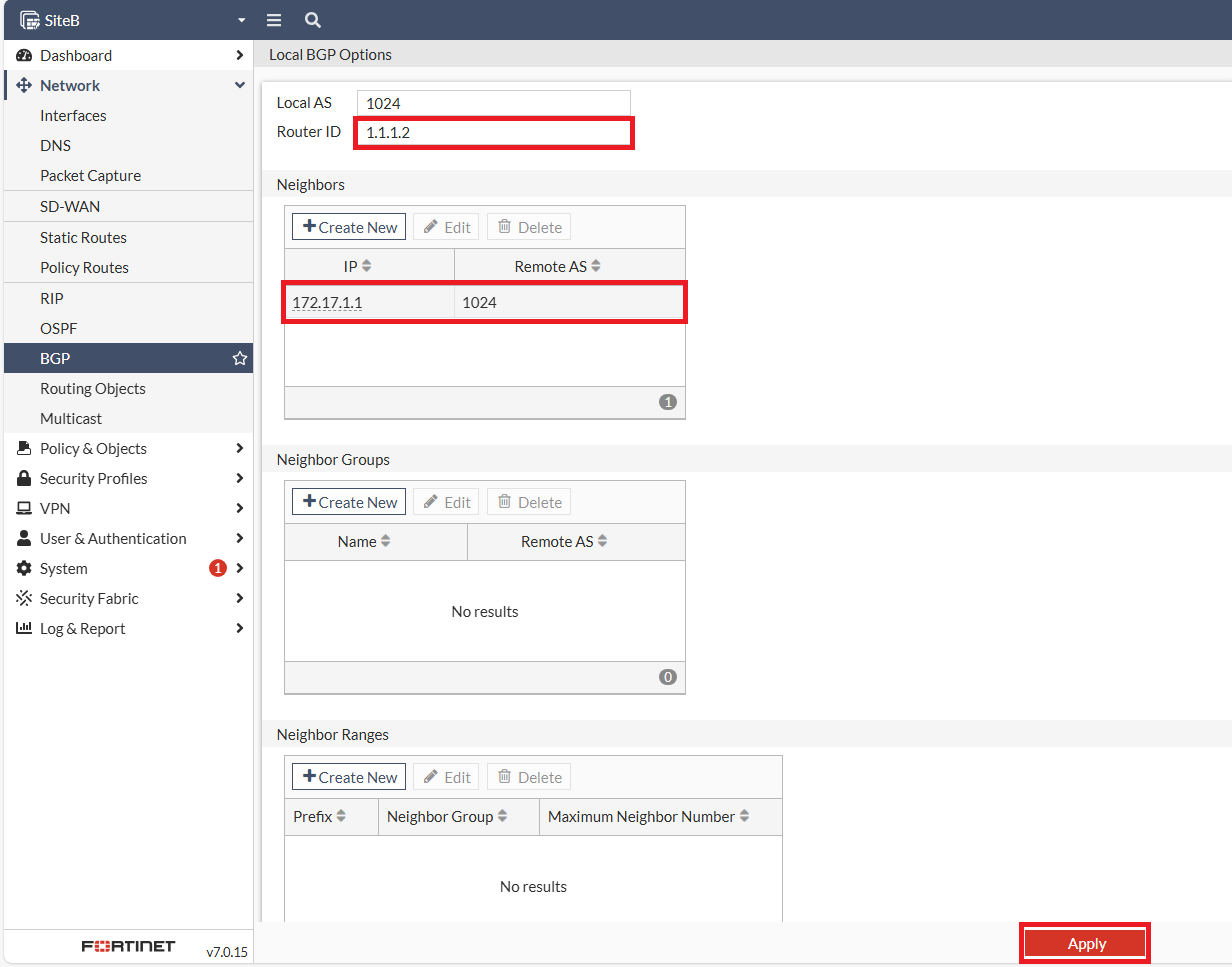
其實這個時候IPSEC應該已經起來了
[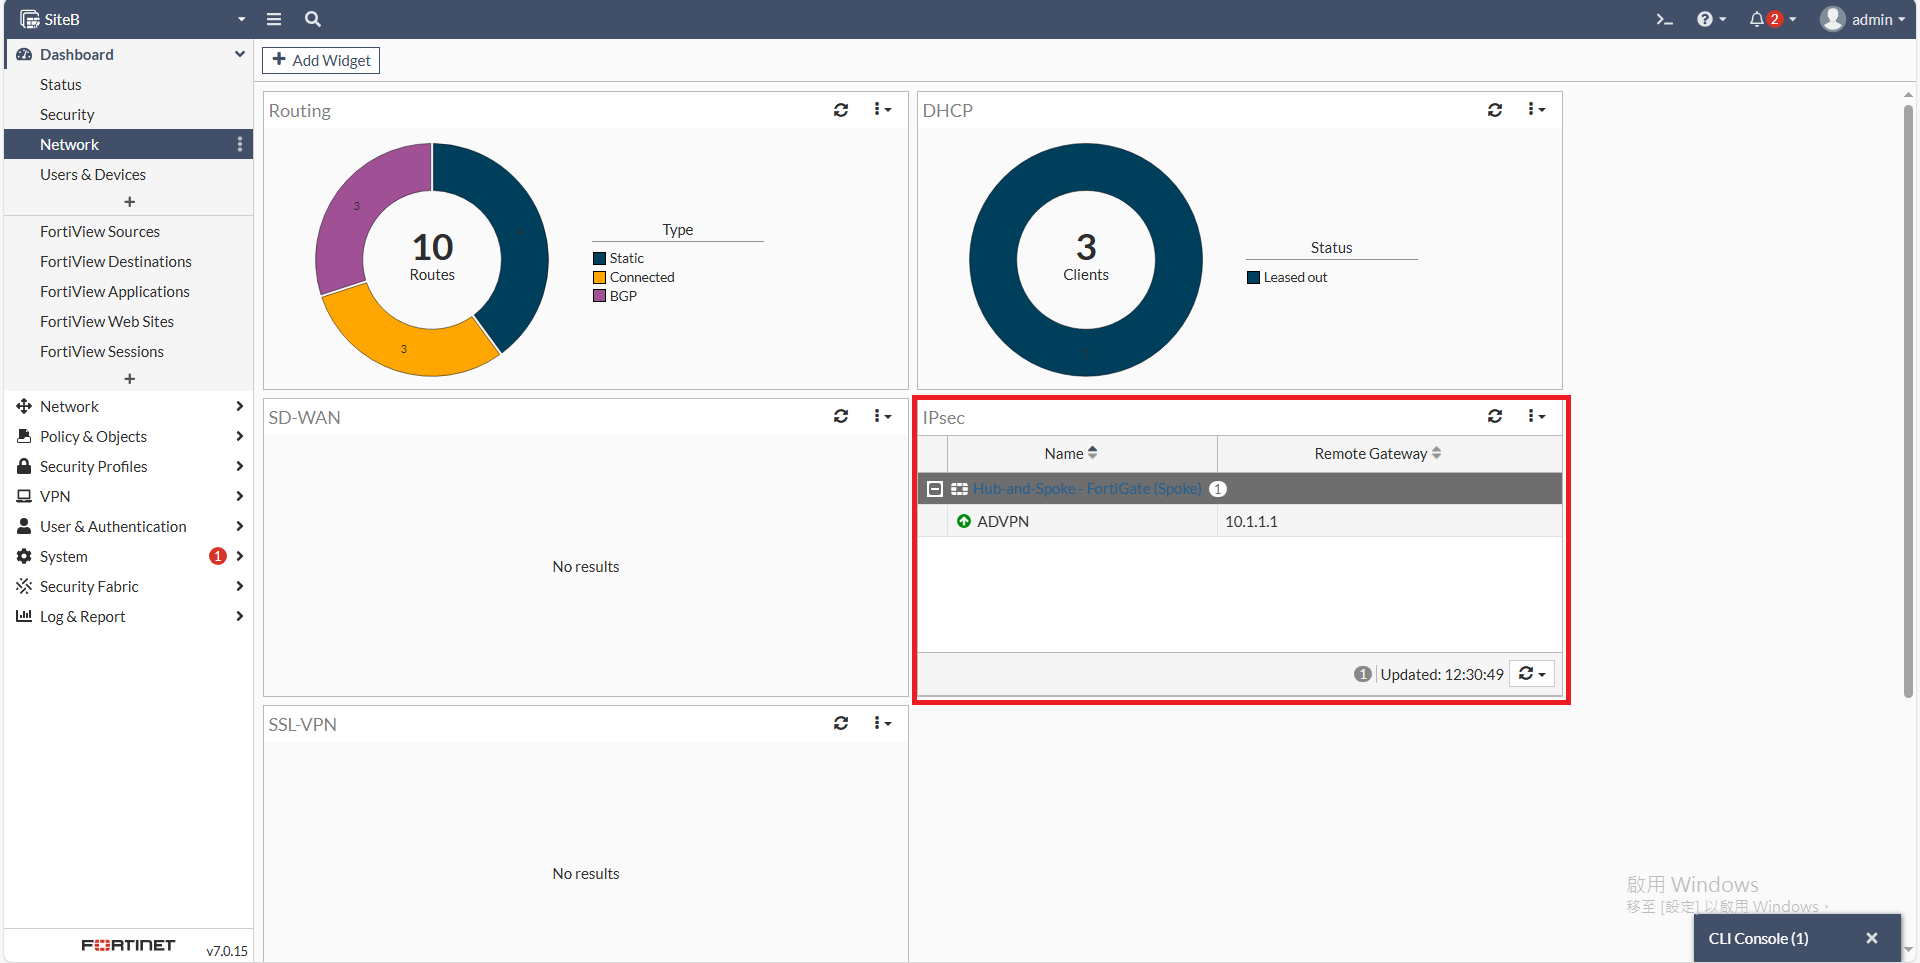](https://mdfk.goddamn.idv.tw/uploads/images/gallery/2024-08/b0Crfs8FGW.png)
確認BGP狀態良好,**SiteA**的路由有同步過來
```
get router info bgp summary
get router info bgp network
```

#### 確認Firewall Policy
Wizzard都幫我們建好了,這樣足矣
[](https://mdfk.goddamn.idv.tw/uploads/images/gallery/2024-08/ZFGngrZBv1.png)
#### 設定Static Route
所以大功告成了 **(?)**
不不不,**路由在這裡才是整篇的關鍵**,我們看一下下圖
Default Route 0.0.0.0/0 是往WAN1 Gateway設,但其實我們並沒有設定任何的路由,這個路由是由 PPPOE / DHCP自動派發的
```
get router info routing-table all
```
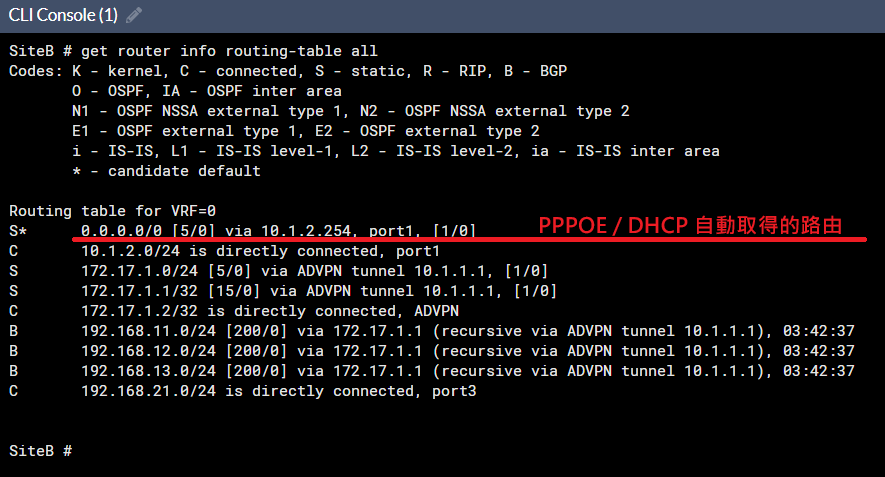
如果依照這種設定,Internet流量會走WAN1出去而不是回到**SiteA**走SD-WAN,所以在這邊我們要變更一下路由設定
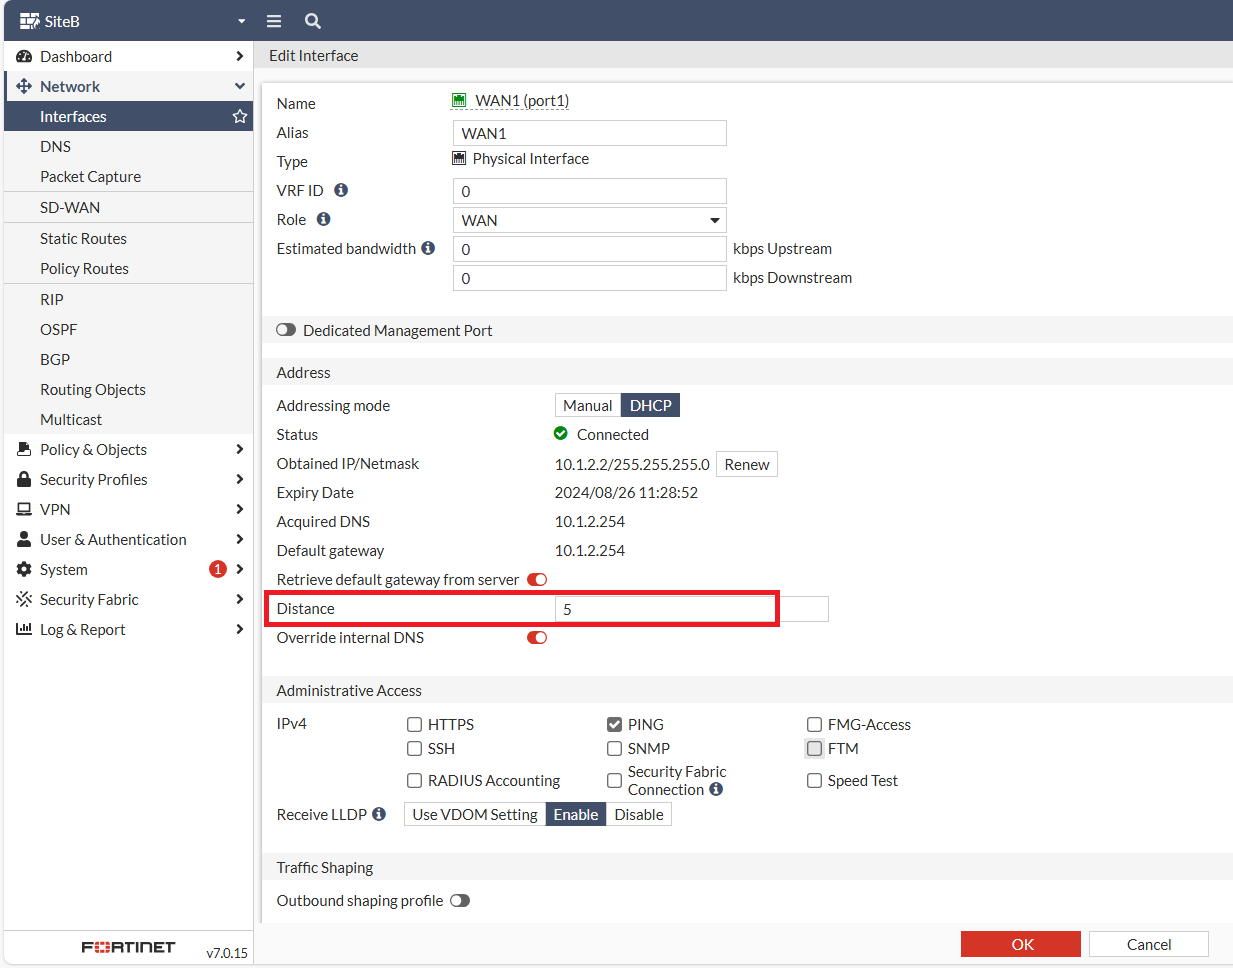
從 WAN Interface 可知,PPPOE / DHCP 預設的 Distance 是 5
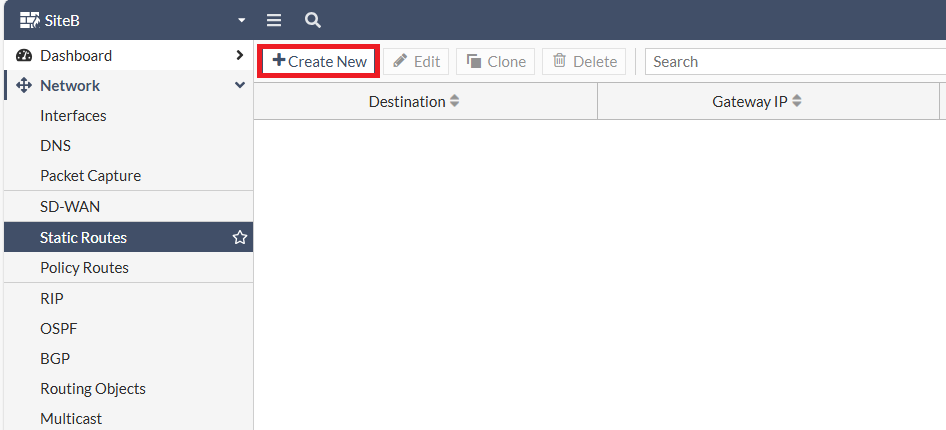
所以在這邊我們要新增兩筆路由
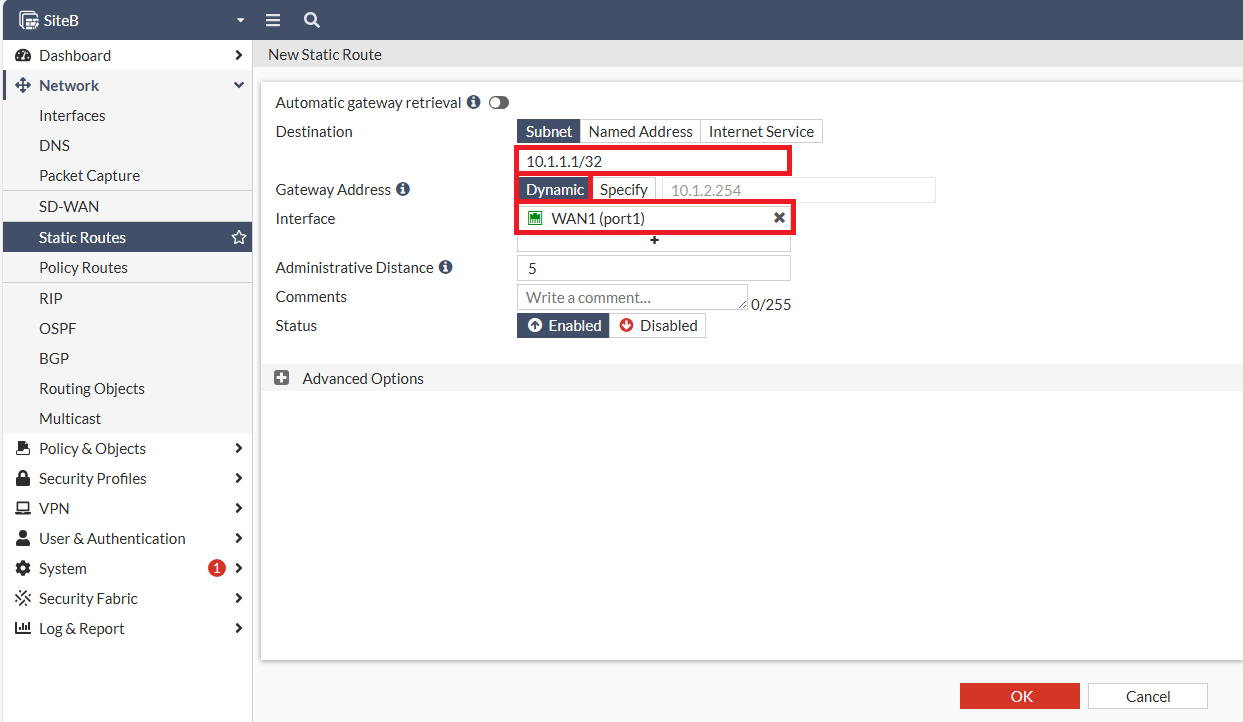
1\. 往 **SiteA** WAN IP 走 WAN1 的 Dynamic Gateway,Distance 一樣設為 5
[](https://mdfk.goddamn.idv.tw/uploads/images/gallery/2024-08/RDn9G6A40D.png)
2\. Default Route 0.0.0.0/0改走 ADVPN,Distance 必須設定比 PPPOE / DHCP 小才會優先走,在此我們設為 1。
[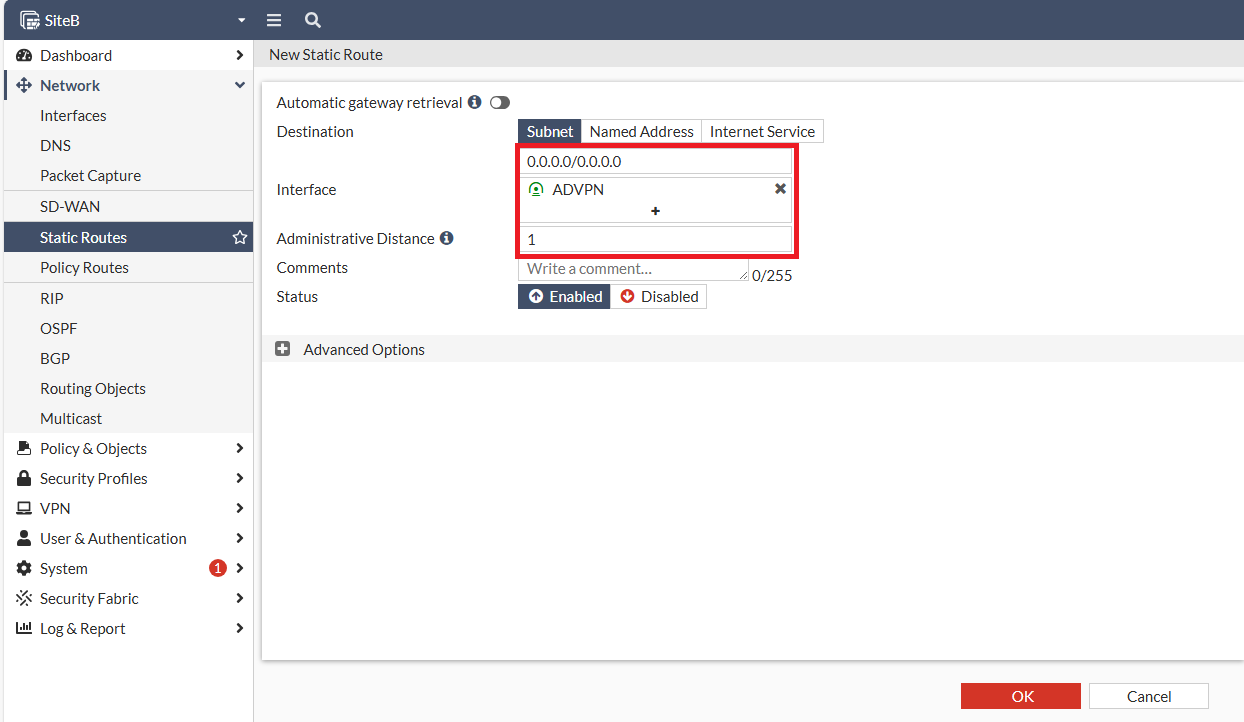](https://mdfk.goddamn.idv.tw/uploads/images/gallery/2024-08/QA4HZZK8Du.png)
[](https://mdfk.goddamn.idv.tw/uploads/images/gallery/2024-08/VzmHfyBu9R.png)
設定完再看一次路由
[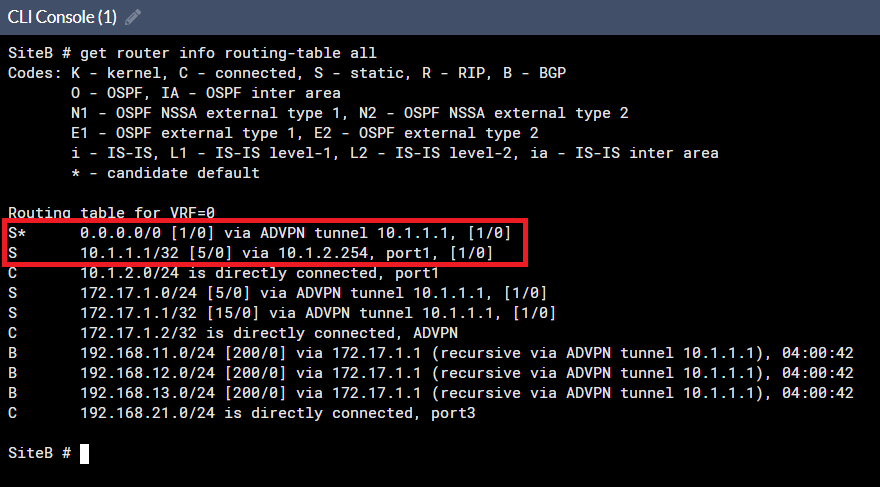](https://mdfk.goddamn.idv.tw/uploads/images/gallery/2024-08/JNLcbJejN5.png)
**SiteB**到此設定就大功告成了
#### 建立 **SiteC** IPSEC ADVPN Spoke
比照**SiteB**步驟建立,不贅述
### 狀態確認
#### IPSEC狀態
回到**SiteA**,確認ADVPN都有自動連上來了
[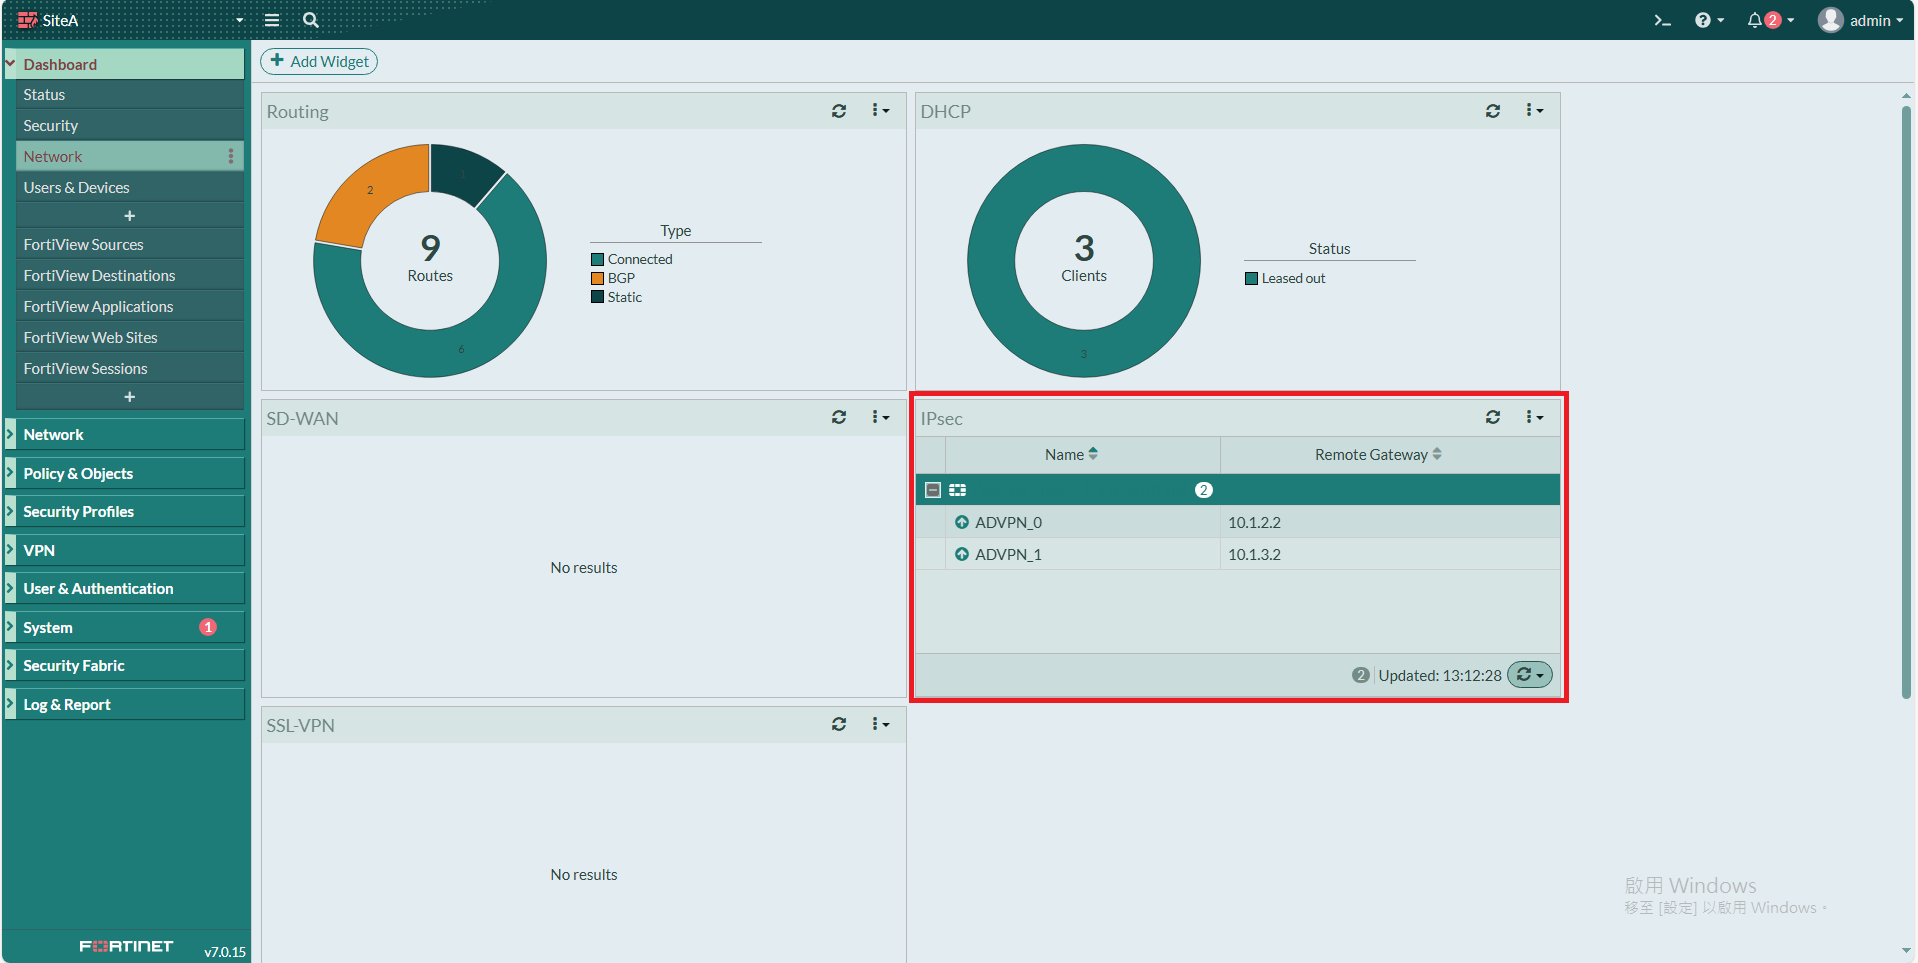](https://mdfk.goddamn.idv.tw/uploads/images/gallery/2024-08/8HEBXkmZhm.png)
[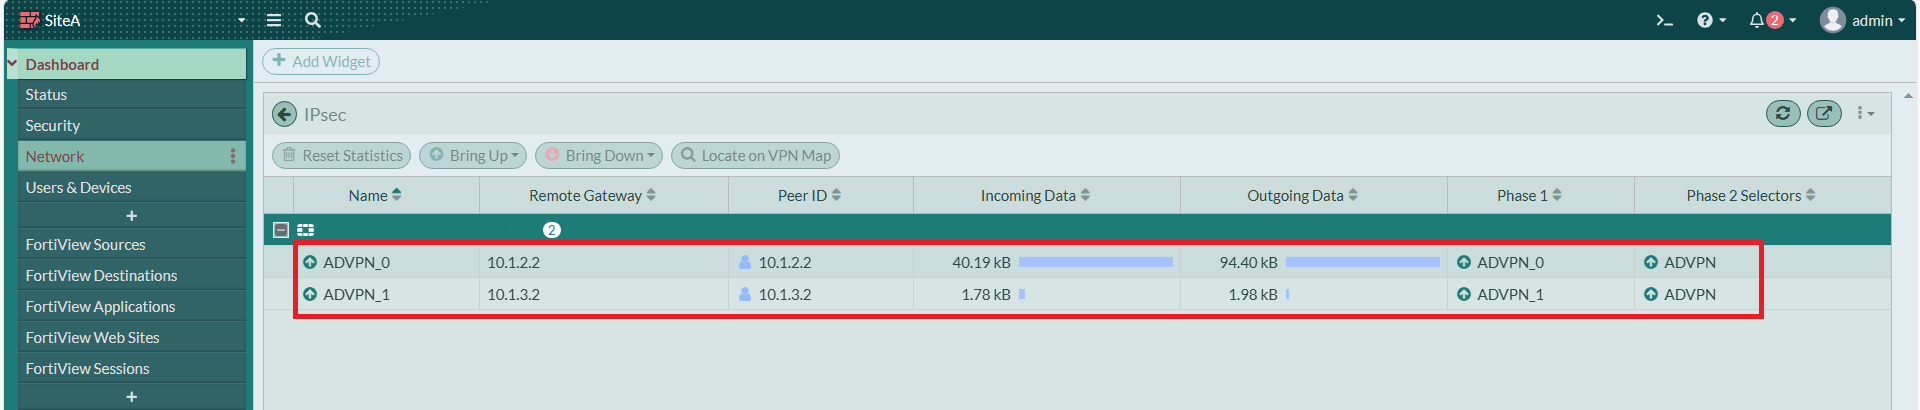](https://mdfk.goddamn.idv.tw/uploads/images/gallery/2024-08/QD3Pz4oZEO.png)
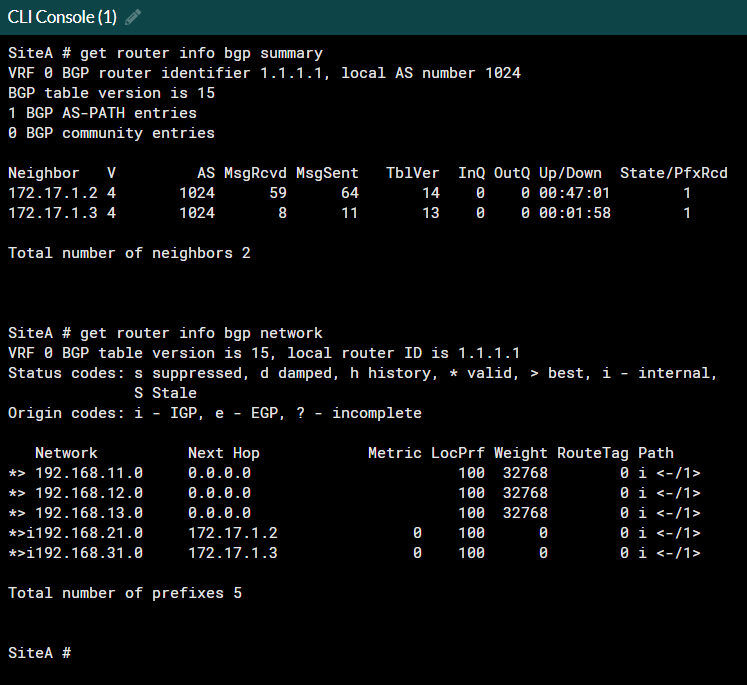
#### BGP 狀態
```
get router info bgp summary
get router info bgp network
```
**SiteA**
**SiteB**
[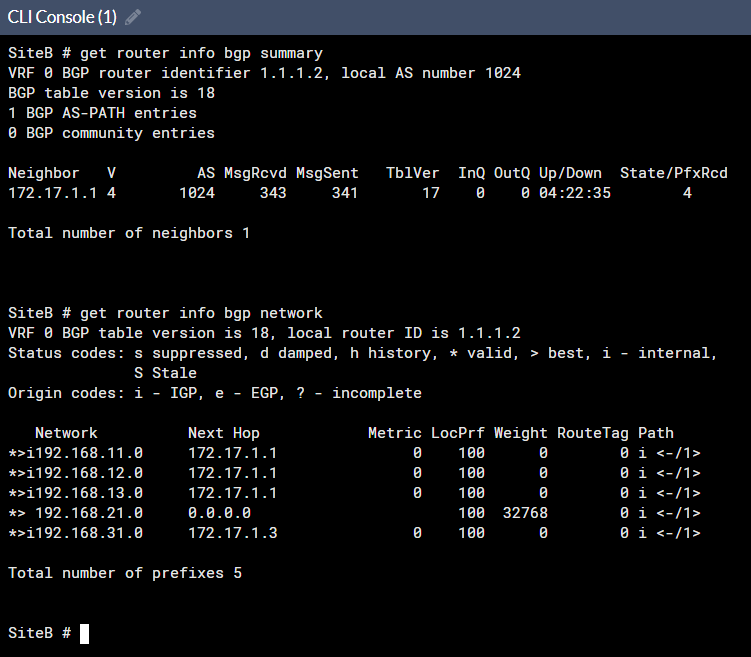](https://mdfk.goddamn.idv.tw/uploads/images/gallery/2024-08/EAYJO2Dy57.png)
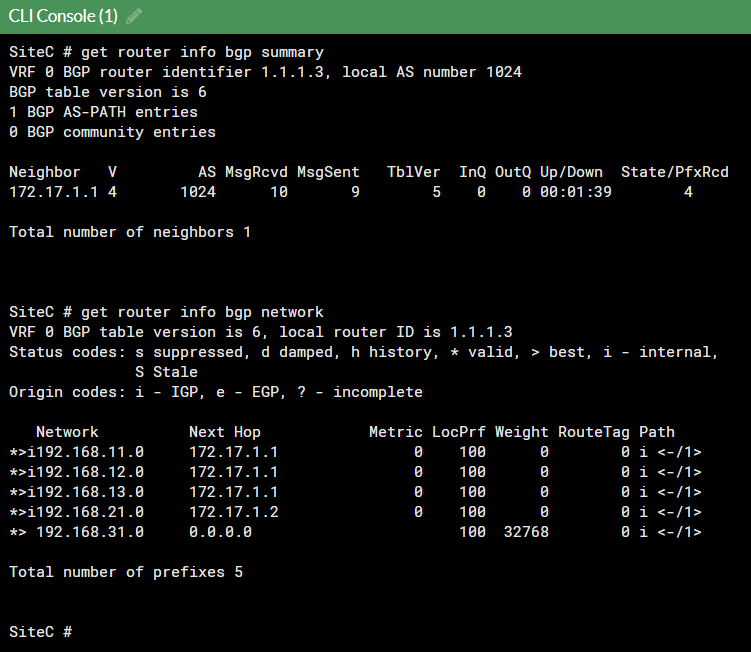
**SiteC**
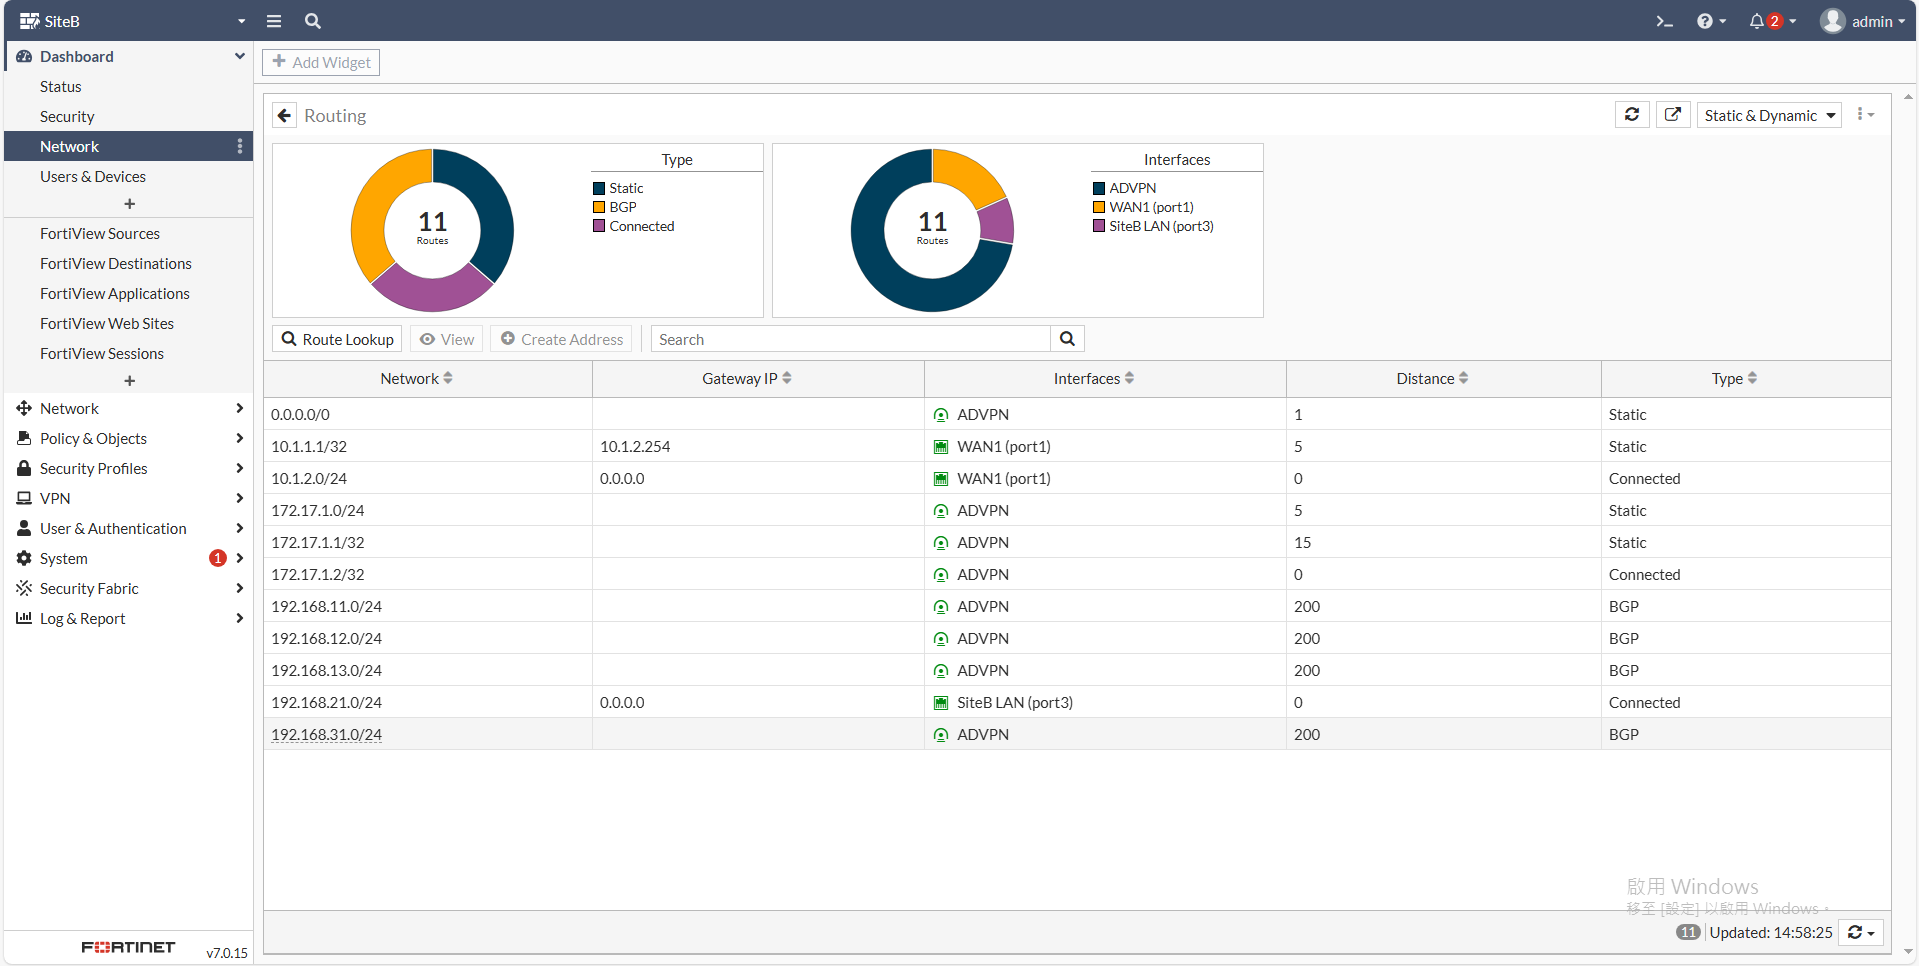
#### 路由狀態
**SiteA**
[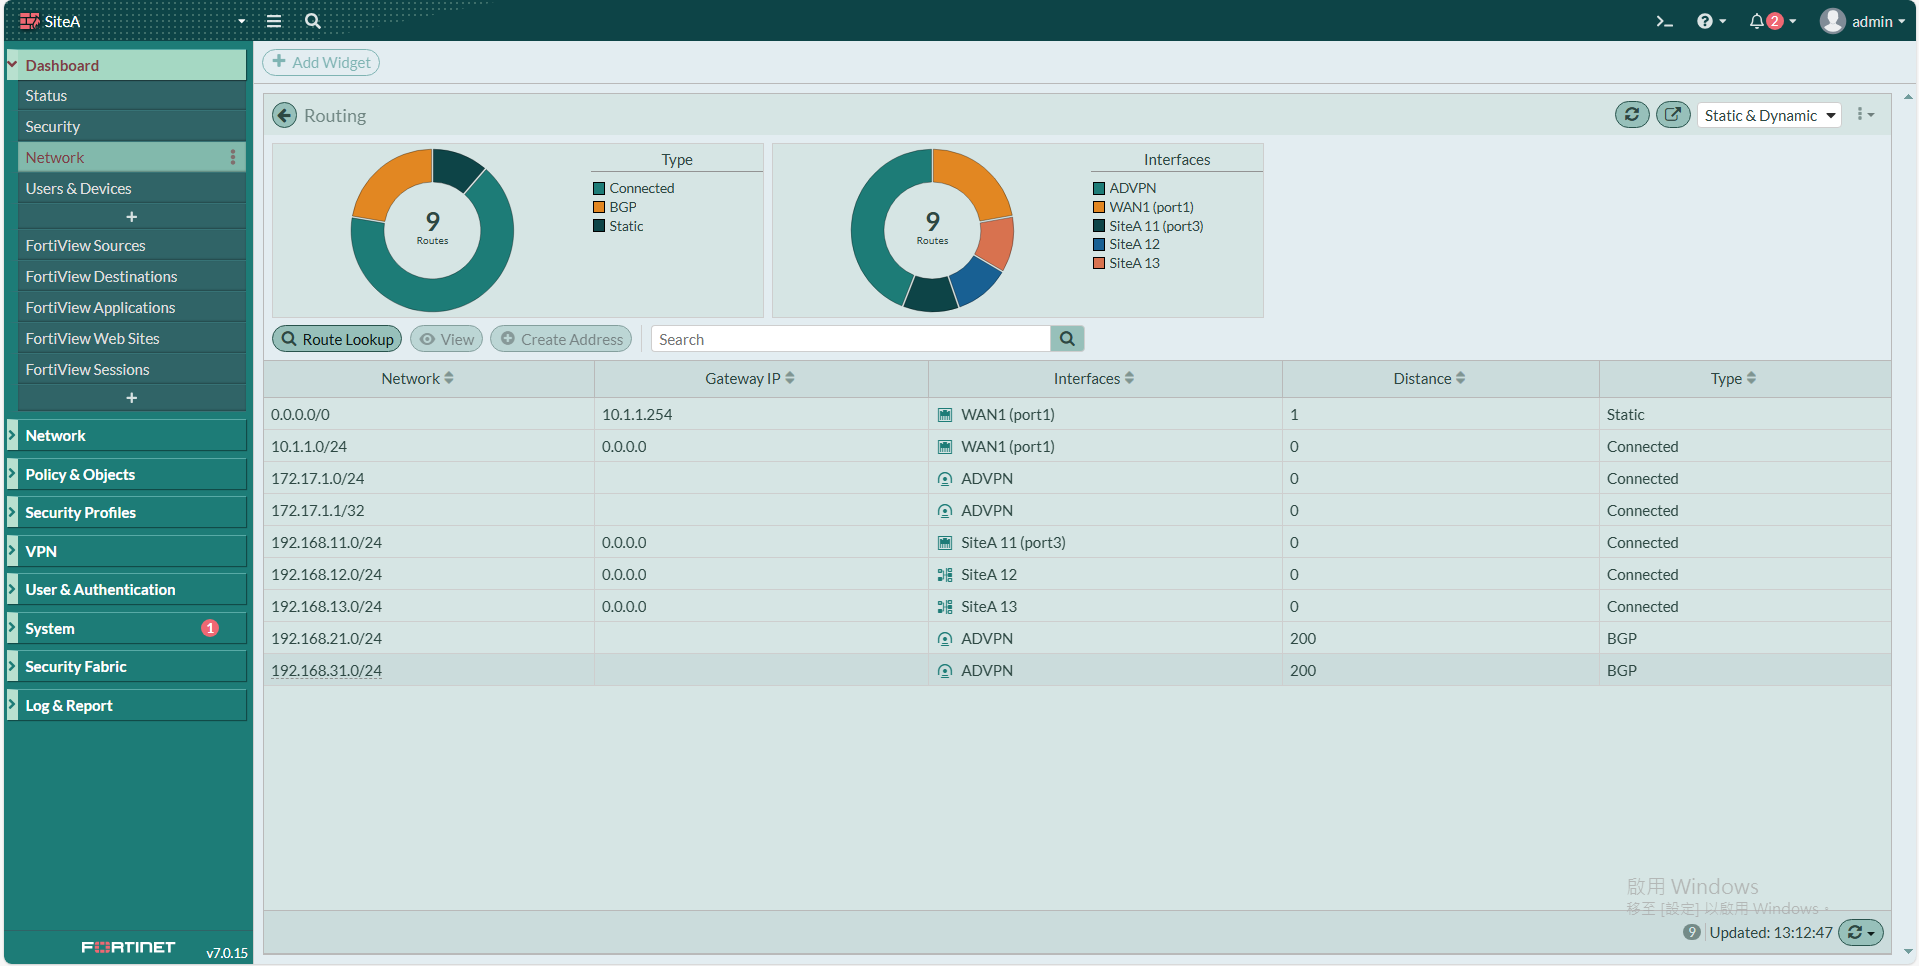](https://mdfk.goddamn.idv.tw/uploads/images/gallery/2024-08/GCYM5HRcI9.png)
**SiteB**
[](https://mdfk.goddamn.idv.tw/uploads/images/gallery/2024-08/9ejXgtTZHN.png)
**SiteC**
[](https://mdfk.goddamn.idv.tw/uploads/images/gallery/2024-08/ELixXre2lW.png)
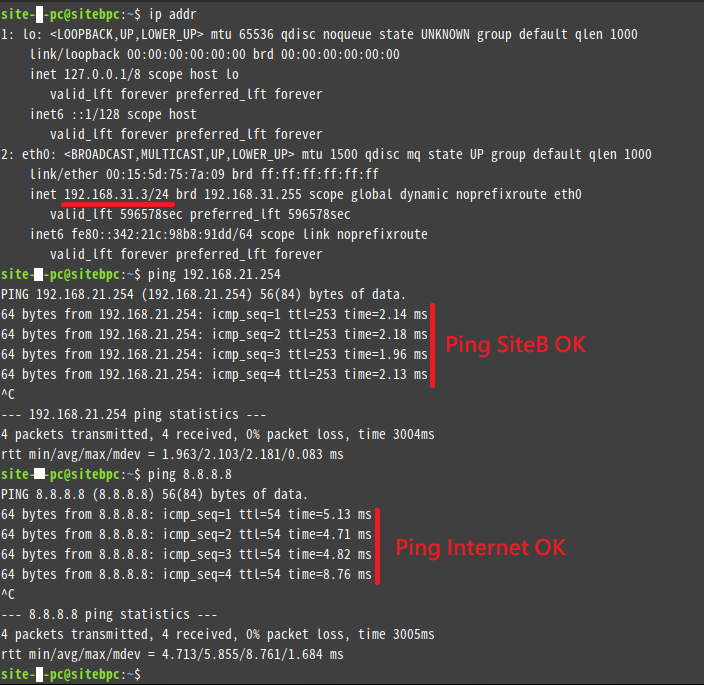
### 連線測試
我在 **SiteC** 放了一台PC,Ping **SiteB** LAN Interface OK、Ping Internet OK
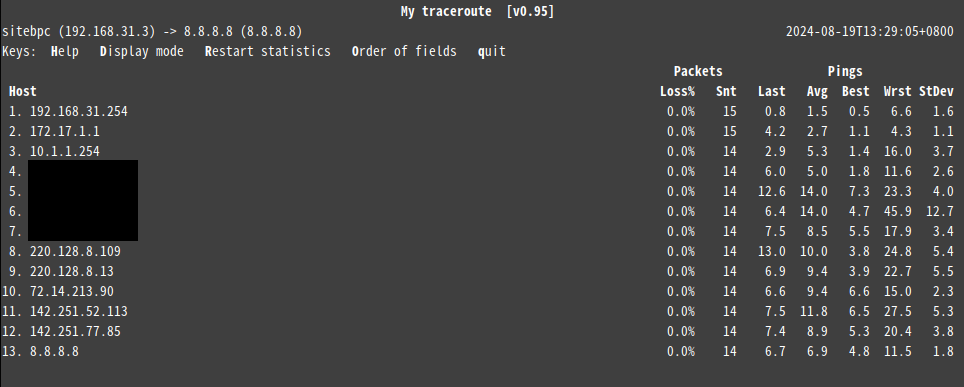
Traceroute **SiteB** Interface,透過**SiteA**過去 OK

Traceroute Internet,透過**SiteA**過去 OK
### 結語
由於中華電信的PPPOE在未申請固定IP的狀況下每72小時更換一次IP,在IP可能不斷變動的狀況下,各分點透過 PPPOE 網路與 HQ IPSEC ADVPN 介接,透過iBGP自動交換路由,並統一由HQ出Internet以利於政策與資安控管,透過這種架構大幅降低了設定的複雜度,同時減少了企業建置VPN的線路成本,是很實用的一種應用提供給大家參考。