Rocky Linux 9.5 LibreNMS 安裝教學
安裝環境

參考資料
LibreNMS官網 https://docs.librenms.org/Installation/Install-LibreNMS/
安裝過程
以下作業如果未特別說明皆是以 root 執行 (因為我懶得打 sudo ... =_=a )
前置作業
首先到DNS主機建立一筆 LibreNMS 的 A Rec
然後回到Linux進行作業系統更新、安裝EPEL Release。
dnf update -y
dnf install epel-release -y
安裝一些常用的工具,安裝完之後重新開機。
dnf install btop htop glances fastfetch iotop iftop -y
systemctl reboot
開始安裝
鍵人我選擇用Apache
dnf -y install dnf-utils http://rpms.remirepo.net/enterprise/remi-release-9.rpm
dnf module reset php
dnf module enable php:8.2
dnf install bash-completion cronie fping gcc git httpd ImageMagick mariadb-server mtr net-snmp net-snmp-utils nmap php-fpm php-cli php-common php-curl php-gd php-gmp php-json php-mbstring php-process php-snmp php-xml php-zip php-mysqlnd python3 python3-devel python3-PyMySQL python3-redis python3-memcached python3-pip python3-systemd rrdtool unzip
新增LibreNMS User
useradd librenms -d /opt/librenms -M -r -s "$(which bash)"下載 LibreNMS
cd /opt
git clone https://github.com/librenms/librenms.git
設定權限
chown -R librenms:librenms /opt/librenms
chmod 771 /opt/librenms
setfacl -d -m g::rwx /opt/librenms/rrd /opt/librenms/logs /opt/librenms/bootstrap/cache/ /opt/librenms/storage/
setfacl -R -m g::rwx /opt/librenms/rrd /opt/librenms/logs /opt/librenms/bootstrap/cache/ /opt/librenms/storage/
安裝PHP相依性套件
先切換為使用者 librenms
su - librenms
執行批次檔
./scripts/composer_wrapper.php install --no-dev
exit

設定PHP時區
編輯 /etc/php.ini
vim /etc/php.ini
#找到 ;date.timezone =
#改寫為 date.timezone = "Asia/Taipei"
ESC => :wq 存檔離開
順便確認一下系統時區
timedatectl
如果時區不對可以透過下面指令變更時區
timedatectl set-timezone "Asia/Taipei"設定MariaDB
編輯 mariadb-server.cnf
vim /etc/my.cnf.d/mariadb-server.cnf在 [mysqld] 下面加入下面的設定後存檔離開
innodb_file_per_table=1
lower_case_table_names=0
重新啟動 MariaDB Service 並設定為開機自動啟動
systemctl enable mariadb
systemctl restart mariadb
systemctl status mariadb
執行下面指令新增mysql使用者及密碼
mysql -u root
CREATE DATABASE librenms CHARACTER SET utf8mb4 COLLATE utf8mb4_unicode_ci;
CREATE USER 'librenms'@'localhost' IDENTIFIED BY '改你要設定的密碼';
GRANT ALL PRIVILEGES ON librenms.* TO 'librenms'@'localhost';
exit
設定PHP-FPM
cp /etc/php-fpm.d/www.conf /etc/php-fpm.d/librenms.conf
vim /etc/php-fpm.d/librenms.conf
變更下面設定如圖片所示後存檔離開
[librenms]
user = librenms
group = librenms
listen = /run/php-fpm-librenms.sock
設定Apache
建立librenms.conf
vim /etc/httpd/conf.d/librenms.conf貼上下面設定值,修改LibreNMS主機FQDN,並存檔離開
<VirtualHost *:80>
  DocumentRoot /opt/librenms/html/
  ServerName  LibreNMS主機FQDN

  AllowEncodedSlashes NoDecode
  <Directory "/opt/librenms/html/">
    Require all granted
    AllowOverride All
    Options FollowSymLinks MultiViews
  </Directory>

  # Enable http authorization headers
  <IfModule setenvif_module>
    SetEnvIfNoCase ^Authorization$ "(.+)" HTTP_AUTHORIZATION=$1
  </IfModule>

  <FilesMatch ".+\.php$">
    SetHandler "proxy:unix:/run/php-fpm-librenms.sock|fcgi://localhost"
  </FilesMatch>
</VirtualHost>
設定開機啟動 httpd、php-fpm
systemctl enable --now httpd
systemctl enable --now php-fpm
執行下面指令
chcon -t httpd_sys_rw_content_t /opt/librenms/.env關閉 SELinux
編輯SELinux設定檔
vim /etc/selinux/config將SELINUX設定改為disabled,存檔之後重新開機
SELINUX=disabled
systemctl reboot允許fping
其實關閉了SELinux應該不用做這一段,但反正官方文件有就加減做
在root建立temp資料匣
cd /
mkdir temp
chmod 777 temp
cd /temp
建立http_fping.tt檔案
touch http_fping.tt
vim http_fping.tt
將下面內容貼入 http_fping.tt 後存檔離開
module http_fping 1.0;

require {
type httpd_t;
class capability net_raw;
class rawip_socket { getopt create setopt write read };
}

#============= httpd_t ==============
allow httpd_t self:capability net_raw;
allow httpd_t self:rawip_socket { getopt create setopt write read };
執行下面指令
checkmodule -M -m -o http_fping.mod http_fping.tt
semodule_package -o http_fping.pp -m http_fping.mod
semodule -i http_fping.pp
設定Firewall
先確認Firewall狀態
firewall-cmd --list-all
允許 http、https、syslog、snmp 服務
syslog服務後面會用到,snmp是當建置DR另一台LibreNMS反向偵測時會用到
firewall-cmd --permanent --add-service http --add-service https --add-service syslog --add-service snmpReload設定,再次確認 firewall狀態
firewall-cmd --reload
firewall-cmd --list-all
設定lnms指令連結
ln -s /opt/librenms/lnms /usr/bin/lnms
cp /opt/librenms/misc/lnms-completion.bash /etc/bash_completion.d/
設定 snmpd
cp /opt/librenms/snmpd.conf.example /etc/snmp/snmpd.conf
vim /etc/snmp/snmpd.conf
將下面community置換為你所設定的值,其他資訊自己改一改後存檔離開

安裝LibreNMS Linux Distro
直接執行BJ4,設定啟動並執行SNMP Service
curl -o /usr/bin/distro https://raw.githubusercontent.com/librenms/librenms-agent/master/snmp/distro
chmod +x /usr/bin/distro
systemctl enable snmpd
systemctl restart snmpd
systemctl status snmpd
複製Cron Job
cp /opt/librenms/dist/librenms.cron /etc/cron.d/librenms啟動排程Timer
cp /opt/librenms/dist/librenms-scheduler.service /opt/librenms/dist/librenms-scheduler.timer /etc/systemd/system/
systemctl enable librenms-scheduler.timer
systemctl start librenms-scheduler.timer
複製循環Log設定值
cp /opt/librenms/misc/librenms.logrotate /etc/logrotate.d/librenms初始設定LibreNMS
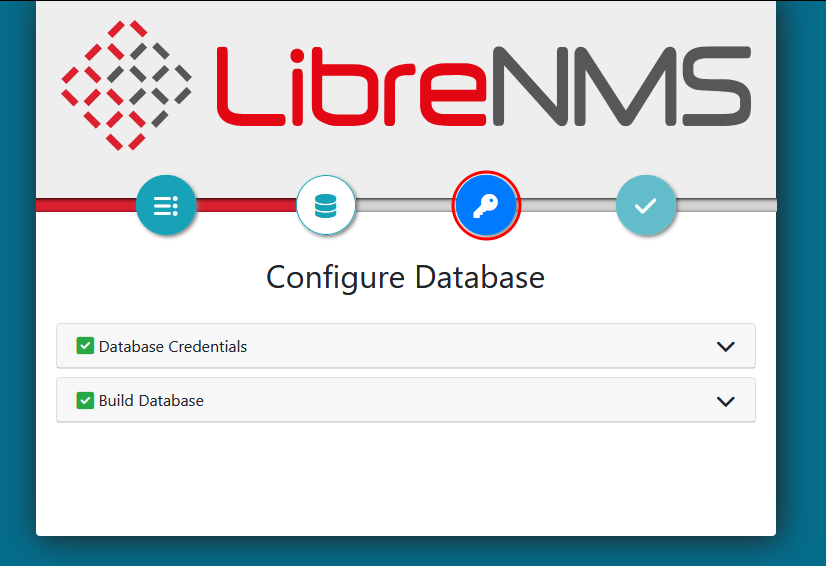
Browser 開啟 http://LibreNMS.主機.FQDN/install,點擊資料庫

進行DB設定

建立DB

DB建立完成,繼續設定admin帳號密碼
鍵入自己喜歡的使用者 Add User

完成設定


驗證安裝


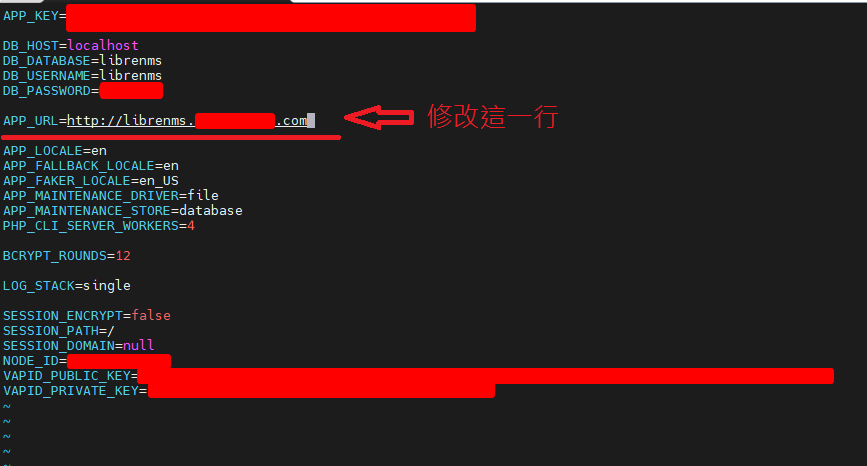
出現這個問題不用驚慌,修改 .env 即可
cd /opt/librenms
vim .env
或者也可以透過CLI執行下面指令驗證
cd /opt/librenms/
su librenms
./validate.php
到此LibreNMS基本安裝完成,優化校調、Plugins安裝 下回分解。